

In the previous article of this series, we learned how to implement client-side state management in our application. We also added a watchlist to it.
This article will show you how to deploy our MovieApp application to the IIS and Azure app services.
Publish Blazor server app in IIS
Configure the Windows machine for deployment
For this tutorial, I am using a Windows 11 system.
Enable IIS on Windows
Open the control panel on your Windows machine. Click Programs and Features. A new window will open. Click Turn Windows feature on or off under the menu on the left side. A new window called Windows feature will open.
Search for Internet Information Services (IIS). Expand the IIS option by clicking on the plus icon. You will find a list of sub-options under it. Select all the options under Web Management Tools & World Wide Web Services. Refer to the next image.

Click OK to install IIS.

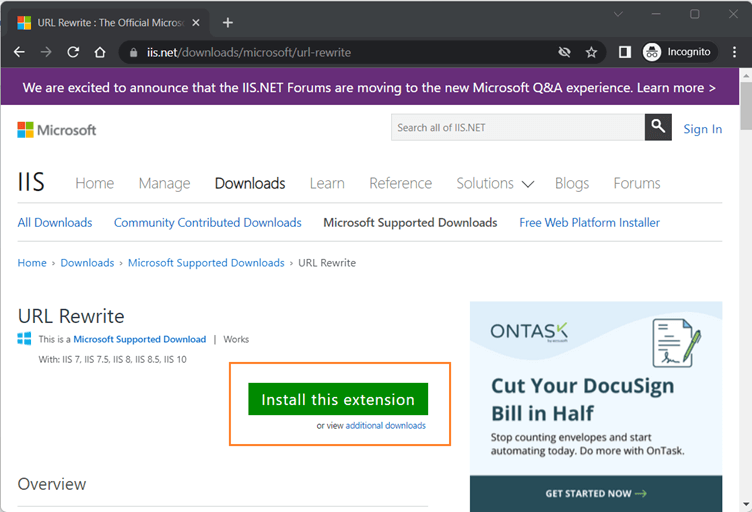
Install URL rewrite module
The URL rewrite module enables the site administrator to create customized rules to implement URLs that are easier for users to remember and are SEO-friendly, as well.
To learn more, please refer to the Microsoft documentation.
Navigate to URL Rewrite. Click Install this extension to download the URL rewrite module to your machine.
Refer to the following image.
 Install the downloaded package on your machine.
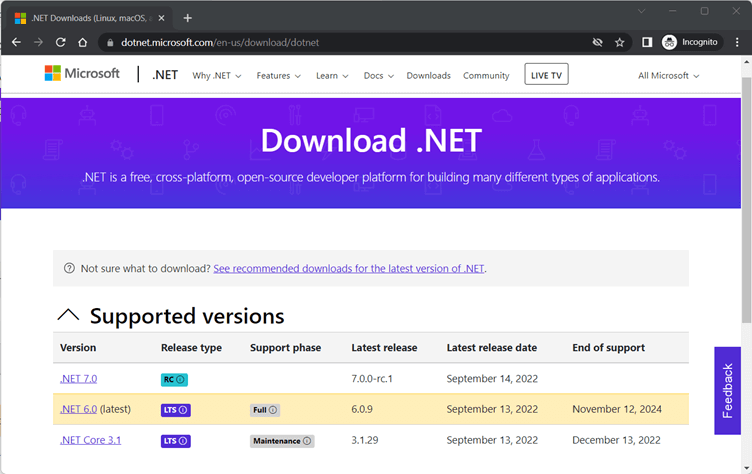
Install .NET Core hosting bundle
Navigate to .NET official site. Click on the latest stable version of .NET. We are using .NET 6.0 in our app, so we will click on that option.
Refer to the following image.
A new window will appear. In the Run apps – Runtime section, observe that the link to download the hosting bundle is provided corresponding to the Windows option. Refer to the following image.
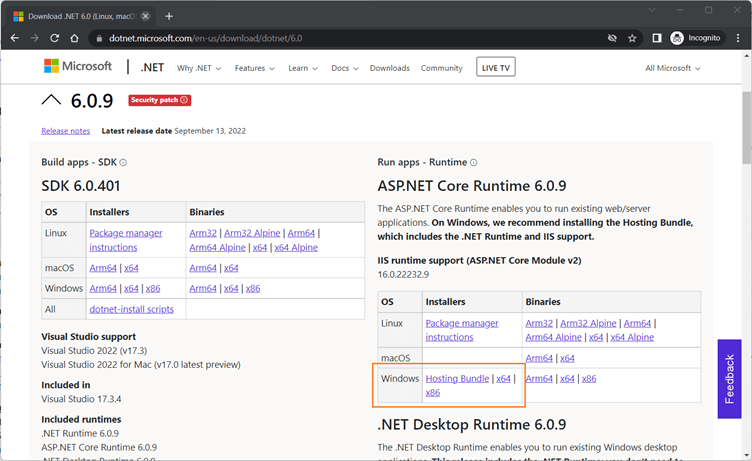 Download and install the .NET Core hosting bundle for Windows.
Important Notes
- Install the .NET Core hosting bundle after installing IIS.
- Restart your machine after installing the .NET Core hosting bundle.
Publish the Blazor application
Once the configuration of the Windows machine is complete, let’s focus on publishing our Blazor application:
- Right-click the MovieApp.Server project and then click Publish.
- In the Publish window that appears, click the Folder link and then click Next.
- In the next window, provide the path of the folder where you want your application to be published and then click Finish.
- Finally, click Publish at the top. The process of building and publishing will start.
Refer to the following image to see all the steps in action.
If there are no errors, then the app will be published successfully in the folder path you have provided.
Next, let’s focus on configuring the IIS.
Configuring IIS
To open the IIS manager:
- Open the Control Panel from the start menu.
- In the category view of the Control Panel, open System and Security and select Administrative Tools.
- Here, you’ll find the Internet Information Service (IIS) Manager. Double-click on it to open it.
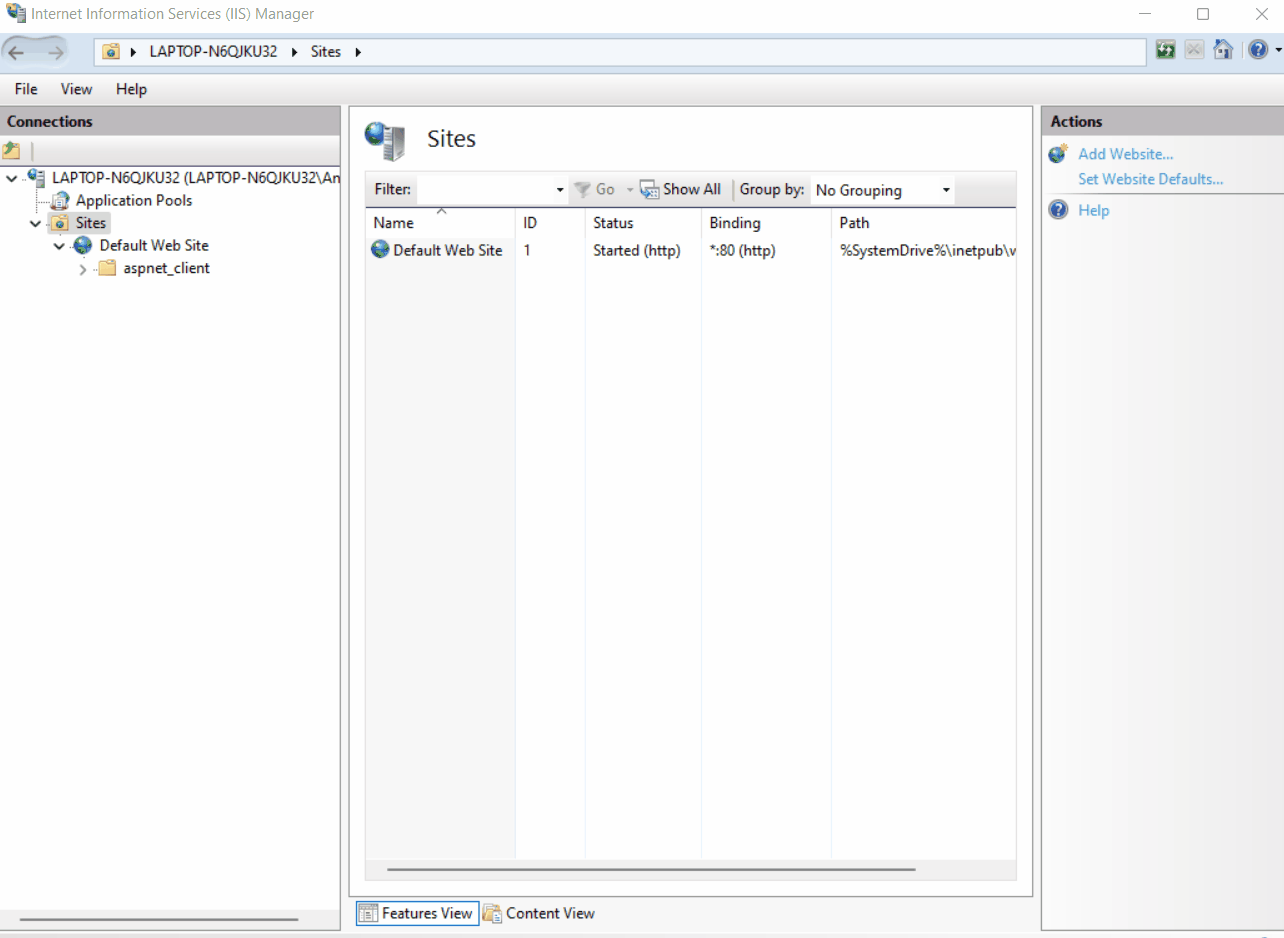
Right-click on Sites in the left pane and then select Add Website. An Add Website window will appear. Fill out the details:
- Site name: Enter the site’s name as per your choice. We will use the name MovieApp for this demo.
- Physical path: Provide the path of the folder where you have published the Blazor application.
- Host name: Provide the URL to be used to access the application in the browser. We will use movieapp.com for this demo.
Click OK to create the website.
The next step is to configure the application pool. An application pool corresponding to our website is created automatically once we add a new website. The name of the application pool is the same as the site name we provided while creating the website.
Select the Application Pools link and double-click on the pool movieapp. A new edit application pool window will appear. Select No Managed Code from the .NET CLR version dropdown and then click OK.
Refer to the next image to see all the steps in action.
Configure the DNS host
The final step is to configure the DNS host file of the machine.
Navigate to the C:\Windows\System32\drivers\etc folder on your machine. Open the hosts file using a text editor of your choice.
Add an entry for the website URL in this file corresponding to the localhost IP address. Refer to the following image.
 This configuration is required to ensure that we can access our deployed website on the local machine.
Execution and troubleshooting
Open a browser and navigate to Movie App page. You can see a page similar to the one in the following screenshot.
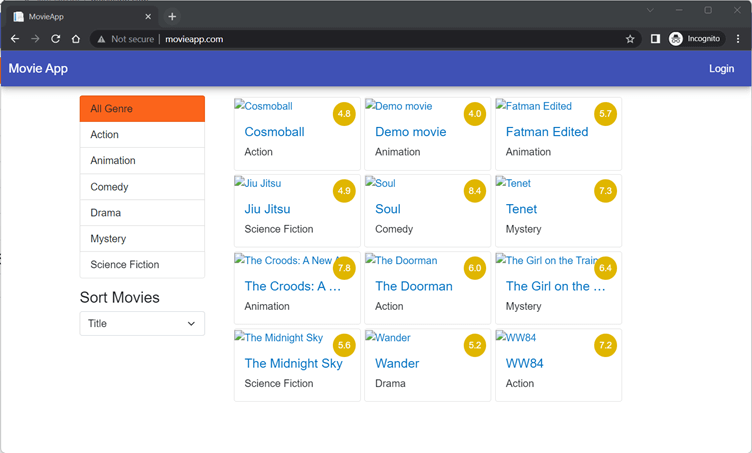 You can see that the movie posters are not being displayed. Let’s understand why this is happening and how we can fix it.
In our app, we have used the same database for the deployed environment and development environment. While running the app after deployment, it will try to fetch the posterPath from the Movie table of the database and try to locate the posters in the Poster folder of the server. But the posters are not available where we have published our app. So, we need to add the images to the Poster folder to resolve the issue.
Open the Poster folder in MovieApp.Server project and copy all the images. Navigate to the folder where you have published the app. You can see that a Poster folder is already created. Paste the copied images here.
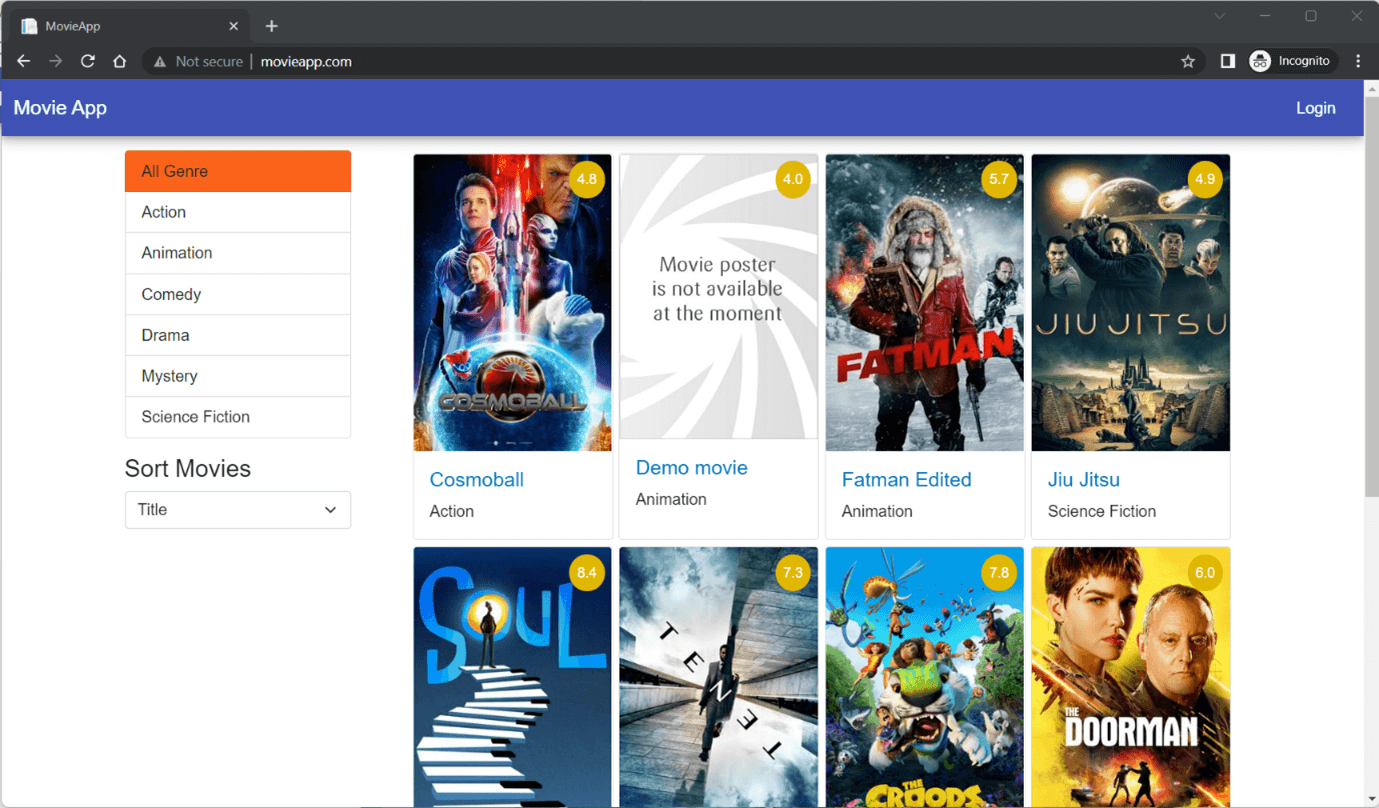
If you refresh the website, you will see the posters, as shown in the following image.
 We have successfully deployed the app to IIS. Let’s learn how to deploy it to Azure App Service.
Publish Blazor server app in MS Azure
Please create an Azure subscription account.
Create a SQL Server resource on the Azure portal
Now, create a SQL Server on Azure to handle our database operations. Open the Microsoft Azure portal.
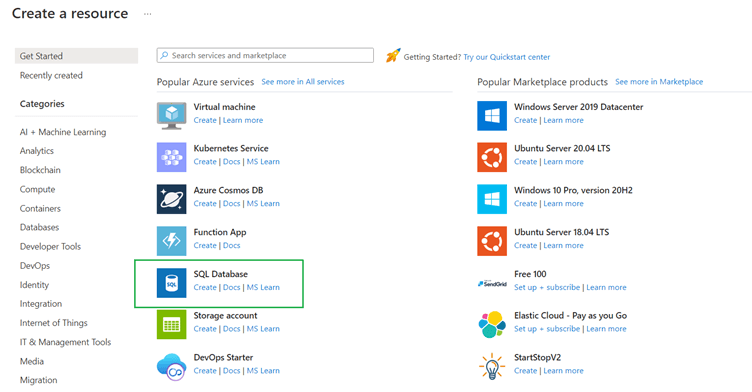
Click Create a resource. On the next page, locate the SQL Database resource and click Create. Refer to the next image.
A new page with the title “Create SQL Database” will appear. On this page, you will be asked to furnish the details for your SQL database.
You can provide the details in the Basics tab:
- Subscription: Select the subscription type for your Azure account from the drop-down.
- Resource group: You can either select an existing resource group name from the dropdown or create a new resource group by clicking Create new.
- Database name: Provide a unique name for the database. This database name must satisfy the following validation criteria.


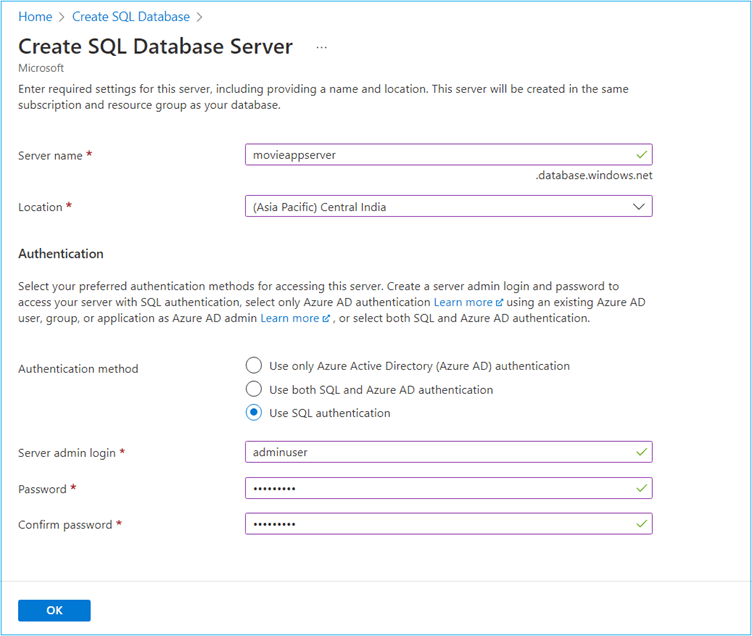
- Server: Click Create new to create a new server for the database. A new window will appear. Provide the details:
- Server name: Provide a unique server name.
- Location: Provide a location.
- Authentication Method: Select an authentication method as per your requirement. For this app, we will use SQL authentication. Configure the Server admin login and password.
Refer to the following image to understand the server configuration.

- Compute + storage: Click Configure database. In the next window, select the option you need from the service tier dropdown.
Click Next at the bottom until you reach the Review + create tab. Click Create at the bottom of this tab to create the SQL database.
Refer to the following image.

Update the connection string in the application
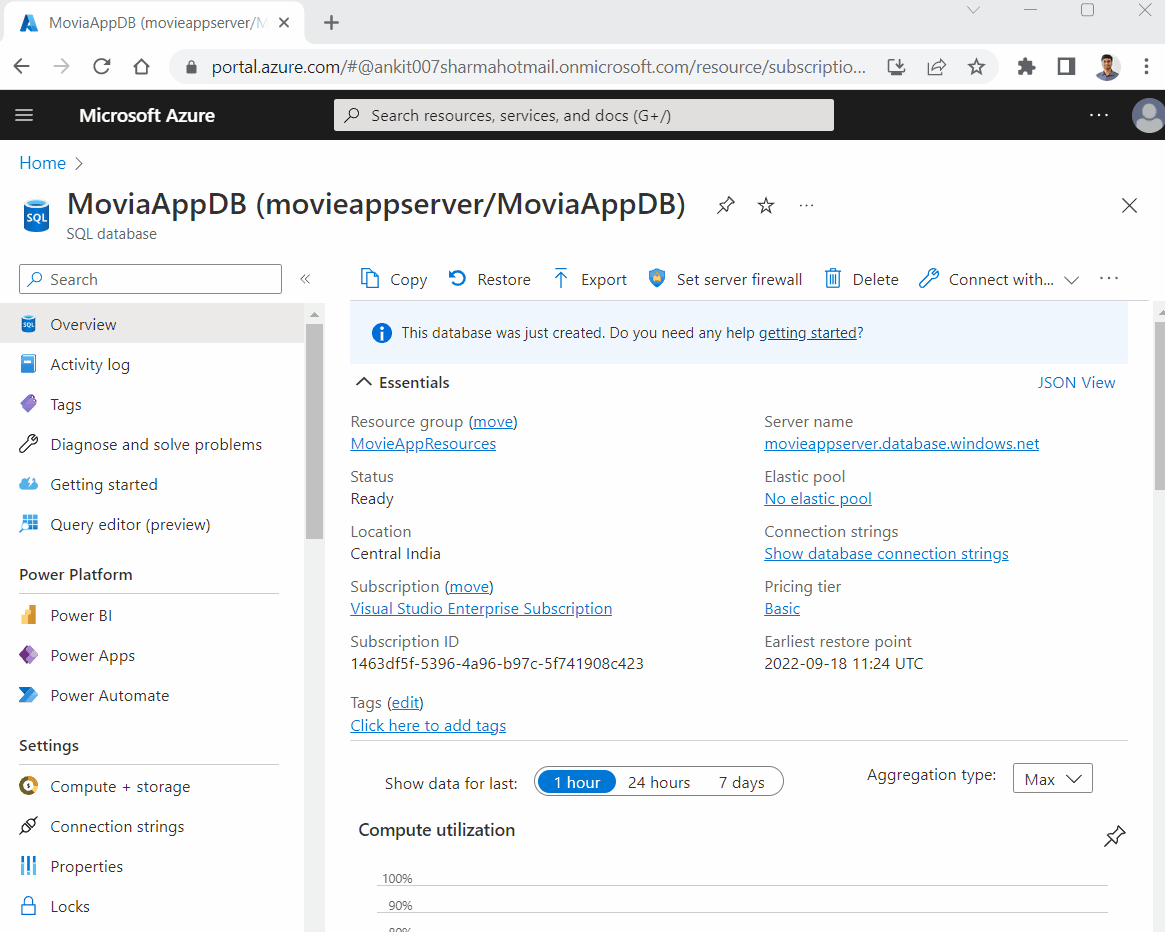
Once the database is created, navigate to the database resource page. We must allow access to this resource through the internet using a public IP address. This will allow us to connect to this database from our local machine.
Click Set Server Firewall at the top. Under the Public access tab, click Selected networks. Click Save at the bottom.
We also need other Azure resources, such as the Azure App Service, to access our database. Therefore, select Allow Azure services and resources to access this server at the bottom of the page in the Exceptions section. Once again, click Save at the bottom.
The next step is to fetch the connection string.
Click Connection strings in the Settings menu on the left side of the page. Select the ADO.NET tab and copy the connection string.
Refer to the following image.
Open the appsettings.json file in your project and replace the existing connection string of the local database with the connection string of Azure SQL Server.
Refer to the following code.
"ConnectionStrings": {
    "DefaultConnection": "Server=tcp:moviedbserver.database.windows.net,1433;
        Initial Catalog=MovieDB;Persist Security Info=False;
        User ID={YourUserID};Password={YourPassword};MultipleActiveResultsSets=False;Encrypt=True;
        TrustServerCertificate=Falst;Connnection Timeout=30;"
}Creating database objects
The Azure SQL database does not contain the tables that we are using in our app. We will create them using SSMS from our machine.
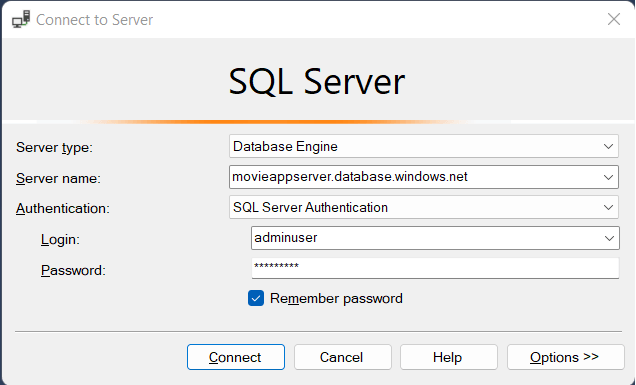
Open SSMS and connect to the Azure SQL Server by furnishing the following information:
- Server name: Provide the server name as given in the connection string.
- Authentication: Select SQL Server Authentication.
- Login: Provide the user ID for the server.
- Password: Provide the password for the server.
Refer to the following image.
Click Connect.
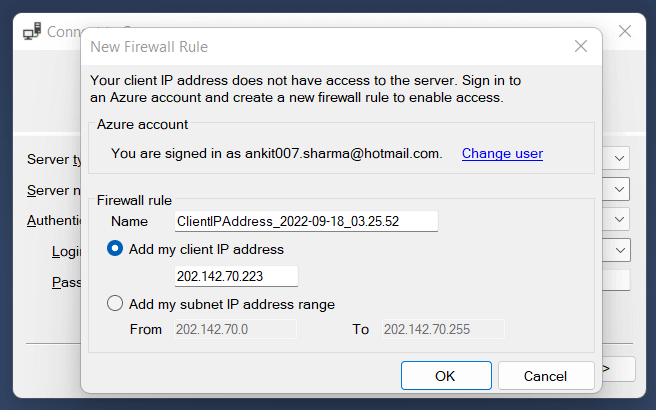
When you are trying to connect to the Azure SQL Server from your local machine, it will ask you to set up a firewall rule. Log in with the credentials of your Azure account. Select Add my client IP address and click OK.
Refer to the following image.
Once the connection is made, create all the required tables in the database. You can get the SQL scripts for creating the tables from the Set up the database section of Part 1 of this series. Run these scripts to generate the tables.
Now, run the application from Visual Studio. You will be able to see the following screen.
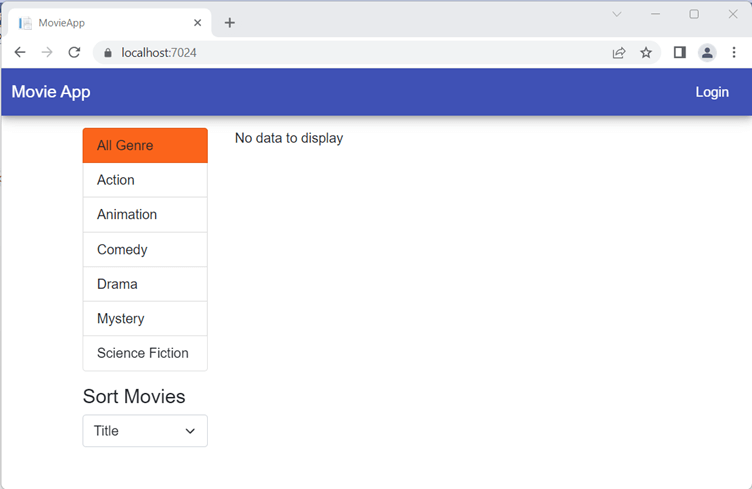
Since the tables are empty, there is no movie data to display. However, you can see the genre data.
Publish the Blazor application to Azure
Right-click the MovieApp.Server project and click Publish. A Publish window will open asking you to select a target to publish. Select Azure and click Next.
You will be asked to connect to the Azure account from Visual Studio. Once the login is successful, it will ask you to select the Azure service to host the application. Select Azure App Service (Windows) and click Next.
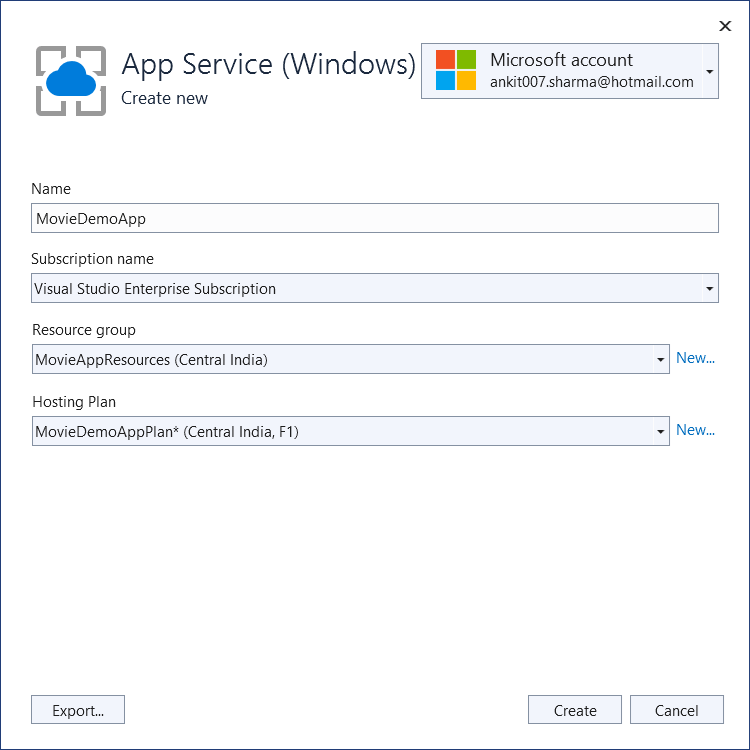
The next window will list all the app services you have in your account. We will create a new app service instance for this app. Click Create New.
A new window will appear requesting you to provide the app service details. Provide a unique name for your app service. The name of the app service must be universally unique and should not be used by anybody else. Select the subscription name and resource group as per your account configuration. You can select an existing hosting plan or create a new one.
Refer to the following image.
Click Create to create the Azure App Service instance. Select the newly created app service name and click Finish.
On the next page, you can verify all the information you have provided and then click Publish at the top. The process of building and publishing will start. After the publication is successful, the URL will launch in your machine’s default browser.
The website URL will be <app service name>.azurewebsites.net. You can see the webpage looks like the following image.
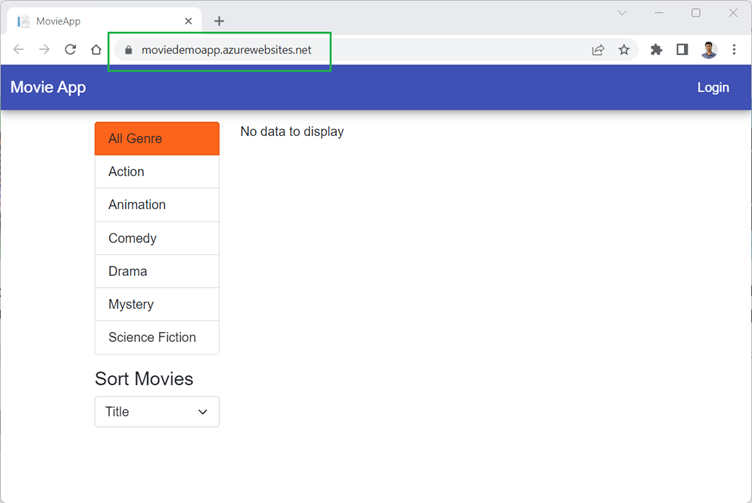
Currently, there is no data displayed since the DB tables are empty. Log in as the admin user and add some movie data. You can validate that the application is working as expected.
The application we have created in this series of articles is available at here.
Upload the default poster image to the Azure App Service
We need to add the default poster image to the Azure App Service. This will ensure that the default poster image is displayed if the user fails to upload a poster for a movie.
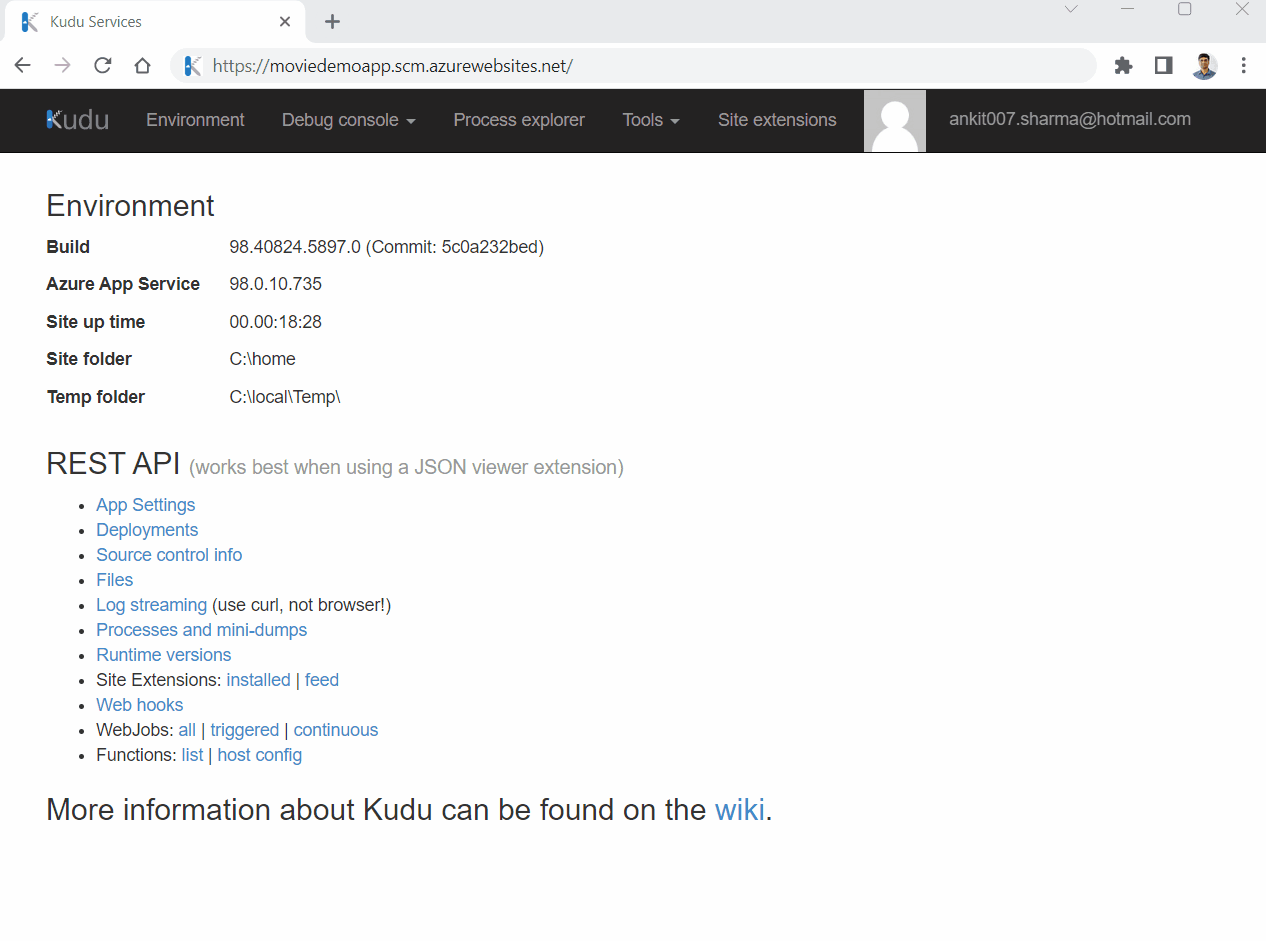
We will upload the required file via the Kudu console.
Note: To learn more about the Kudu console, please refer to the Microsoft documentation
. Open the URL https://<app service name>. scm.azurewebsites.net to open the Kudu console corresponding to your app service.
Select Debug console -> PowerShell from the menu bar at the top. It will list the file system of our app service. Navigate to Site -> wwwroot -> Poster folder. Drag the default poster image to this path. The file is uploaded and will be available for the app service to consume.
Refer to the following image.
GitHub reference
The complete source code of this application is available on GitHub.
Summary
Thanks for reading! In this article, we learned to configure IIS on a Windows machine and deploy our Blazor application on it. We learned about deploying and publishing a Blazor application on Azure. We created a SQL Server database on Azure and configured it to use as the database provider for our application. We finally deployed the Blazor application on the Azure App Service.
This article concludes the series on Blazor and GraphQL.
Syncfusion’s Blazor component suite offers over 70 UI components. They work with both server-side and client-side (WebAssembly) hosting models seamlessly. Use them to build marvelous apps!
If you have any questions or comments, you can contact us through our support forums, support portal, or feedback portal. We are always happy to assist you!
Related blogs
- A Full-Stack Web App Using Blazor WebAssembly and GraphQL: Part 1
- A Full-Stack Web App Using Blazor WebAssembly and GraphQL: Part 2
- A Full-Stack Web App Using Blazor WebAssembly and GraphQL: Part 3
- A Full-Stack Web App Using Blazor WebAssembly and GraphQL: Part 4
- A Full-Stack Web App Using Blazor WebAssembly and GraphQL: Part 5
- A Full-Stack Web App Using Blazor WebAssembly and GraphQL: Part 6

