In the previous article of this series, we learned how to implement policy-based authorization to restrict access to application resources based on the policies defined for the user.
In this article, we will learn how to configure client-side state management in our app. We will also add a watchlist feature to the app. It will allow the user to add or remove a movie from the watchlist.
Let’s start with creating the interface.
Create the IWatchlist interface
Add a new file, IWatchlist.cs, to the MovieApp.Server\Interfaces folder. Add the following method declarations inside it.
public interface IWatchlist
{
    Task ToggleWatchlistItem(int userId, int movieId);

    Task<string> GetWatchlistId(int userId);
}
Create watchlist data access layer
Add a class named WatchlistDataAccessLayer.cs inside the MovieApp.Server\DataAccess folder. Add the following code inside it.
public class WatchlistDataAccessLayer : IWatchlist
{
    readonly MovieDBContext _dbContext;

    public WatchlistDataAccessLayer(IDbContextFactory<MovieDBContext> dbContext)
    {
        _dbContext = dbContext.CreateDbContext();
    }

    string CreateWatchlist(int userId)
    {
        try
        {
            Watchlist watchlist = new()
            {
                WatchlistId = Guid.NewGuid().ToString(),
                UserId = userId,
                DateCreated = DateTime.Now.Date
            };

            _dbContext.Watchlists.Add(watchlist);
            _dbContext.SaveChanges();

            return watchlist.WatchlistId;
        }
        catch
        {
            throw;
        }
    }
}
Now, we have implemented the IWatchlist interface and added the private method CreateWatchlist. This method accepts userId as a parameter. Then, it creates an object of type Watchlist and adds it to the Watchlist table. Finally, this method returns the Watchlist ID.

Explore the best and most comprehensive Blazor UI components library in the market.
Now, add the definition for the methods defined in the IWatchlist interface as shown in the following.
public async Task<string> GetWatchlistId(int userId)
{
    try
    {
        Watchlist? watchlist = await _dbContext.Watchlists
            .FirstOrDefaultAsync(x => x.UserId == userId);

        if (watchlist is not null)
        {
            return watchlist.WatchlistId;
        }
        else
        {
            return CreateWatchlist(userId);
        }

    }
    catch
    {
        throw;
    }
}

public async Task ToggleWatchlistItem(int userId, int movieId)
{
    string watchlistId = await GetWatchlistId(userId);

    WatchlistItem? existingWatchlistItem =
        await _dbContext.WatchlistItems
        .FirstOrDefaultAsync(x =>
            x.MovieId == movieId
            && x.WatchlistId == watchlistId
         );

    if (existingWatchlistItem is not null)
    {
        _dbContext.WatchlistItems.Remove(existingWatchlistItem);
    }
    else
    {
        WatchlistItem watchlistItem = new()
        {
            WatchlistId = watchlistId,
            MovieId = movieId,
        };

        _dbContext.WatchlistItems.Add(watchlistItem);
    }
    await _dbContext.SaveChangesAsync();
}
In the database, we have two tables— watchlist and WatchlistItems. The table watchlist is used to store the watchlist for each logged-in user. The watchlist table will be created for the first time when a user logs in to the app. The table WatchlistItems is used to store the ID of all the movies added to each watchlist.
The GetWatchlistId method will accept userId as a parameter. It will check if a watchlist exists for the user. If a record is found in the watchlist table corresponding to the userId passed to it, then the method will return the watchlist ID. Otherwise, it will invoke the CreateWatchlist method.
The ToggleWatchlistItem method is used to add or remove a movie from the WatchlistItems table. It will accept the userId and the movieId as parameters. It will fetch the WatchlistId corresponding to the userId passed to the method. It will then find the movie in the WatchlistItems table. If the movie exists, then it will remove the movie from the table. Otherwise, it will create a new object of the type WatchlistItem and add it to the WatchlistItems table.
Update the IMovie interface
Update the IMovie.cs file by adding the method declaration as shown.
public interface IMovie
{
    // other methods

    Task<List<Movie>> GetMoviesAvailableInWatchlist(string watchlistID);
}
Update the MovieDataAccessLayer class
Update the MovieDataAccessLayer class by implementing the GetMoviesAvailableInWatchlist method as shown.
async Task<Movie> GetMovieData(int movieId)
{
    try
    {
        Movie? movie = new();

        movie = await _dbContext.Movies.FindAsync(movieId);

        if (movie is not null)
        {
            _dbContext.Entry(movie).State = EntityState.Detached;
        }

        return movie;
    }
    catch
    {
        throw;
    }
}

public async Task<List<Movie>> GetMoviesAvailableInWatchlist(string watchlistID)
{
    try
    {
        List<Movie> userWatchlist = new();
        List<WatchlistItem> watchlistItems =
            _dbContext.WatchlistItems
            .Where(x => x.WatchlistId == watchlistID).ToList();

        foreach (WatchlistItem item in watchlistItems)
        {
            Movie movie = await GetMovieData(item.MovieId);
            if (movie?.MovieId > 0)
            {
                userWatchlist.Add(movie);
            }
        }
        return userWatchlist;
    }
    catch
    {
        throw;
    }
}
The GetMovieData method accepts movieId as the parameter and returns the movie data based on it.
We implement the GetMoviesAvailableInWatchlist method to accept the watchlistID as the parameter. Then, this method fetches the data from the watchlistItems table based on the watchlistID. Finally, it returns the list of movies available in the watchlist of the user.

Syncfusion’s Blazor components suite is the expert’s choice for building modern web apps.
Add a GraphQL mutation resolver
Add a class named WatchlistMutationResolver.cs inside the MovieApp.Server/GraphQL folder. Add the following code inside it.
[ExtendObjectType(typeof(MovieMutationResolver))]
public class WatchlistMutationResolver
{
    readonly IWatchlist _watchlistService;
    readonly IMovie _movieService;
    readonly IUser _userService;

    public WatchlistMutationResolver(IWatchlist watchlistService, IMovie movieService, IUser userService)
    {
        _watchlistService = watchlistService;
        _movieService = movieService;
        _userService = userService;
    }

    [Authorize]
    [GraphQLDescription("Get the user Watchlist.")]
    public async Task<List<Movie>> GetWatchlist(int userId)
    {
        return await GetUserWatchlist(userId);
    }

    [Authorize]
    [GraphQLDescription("Toggle Watchlist item.")]
    public async Task<List<Movie>> ToggleWatchlist(int userId, int movieId)
    {
        await _watchlistService.ToggleWatchlistItem(userId, movieId);
        return await GetUserWatchlist(userId);
    }

    async Task<List<Movie>> GetUserWatchlist(int userId)
    {
        bool user = await _userService.IsUserExists(userId);

        if (user)
        {
            string watchlistid = await _watchlistService.GetWatchlistId(userId);
            return await _movieService.GetMoviesAvailableInWatchlist(watchlistid);
        }
        else
        {
            return new List<Movie>();
        }
    }
}
The GetUserWatchlist method accepts the userId as a parameter. Then, it invokes the IsUserExists method of the userService to validate the existence of the user.
If the user exists, it fetches the watchlistid and returns the list of movies available in the watchlist based on the watchlistid.
If the user does not exist, the method will return an empty list.
The ToggleWatchlist method invokes the ToggleWatchlistItem method of the watchlist service to add or remove the item from the user’s watchlist.
The GetWatchlist method then calls the GetUserWatchlist method to get the movies available in the user watchlist.
Register the mutation resolver
Since we have added a new mutation resolver, we need to register it in our middleware.
Update the Program.cs file as shown.
builder.Services.AddGraphQLServer()
    .AddDefaultTransactionScopeHandler()
    .AddAuthorization()
    .AddQueryType<MovieQueryResolver>()
    .AddMutationType<MovieMutationResolver>()
    .AddTypeExtension<AuthMutationResolver>()
    .AddTypeExtension<WatchlistMutationResolver>()
    .AddFiltering()
    .AddSorting();
We used the AddTypeExtension method to register the new mutation resolver, which is of the type WatchlistMutationResolver.
Next, register the scoped lifetime of the IWatchlist service using the following code.
builder.Services.AddScoped<IWatchlist, WatchlistDataAccessLayer>();
We are done with the server configuration. Let’s move to the client side of the app.

Everything a developer needs to know to use Blazor components in the Blazor app is completely documented.
Add GraphQL client queries
Since we have added a new mutation to the server, we need to regenerate the GraphQL client using the process discussed in part 2 of this series.
Add a file named ToggleWatchList.graphql inside MovieApp.Client\GraphQLAPIClient folder. Add the GraphQL mutation to toggle the movies in the watchlist of the user.
mutation ToggleWatchList($userId:Int!, $movieId: Int!){
toggleWatchlist(userId:$userId, movieId:$movieId){
    movieId,
    title,
    posterPath,
    genre,
    rating,
    language,
    duration
  }
}
Add a new file named FetchWatchList.graphql inside the MovieApp.Client\GraphQLAPIClient folder. Add the GraphQL mutation to fetch the list of movies in the watchlist of the user.
mutation FetchWatchList($userId:Int!){
watchlist(userId:$userId){
    movieId,
    title,
    posterPath,
    genre,
    rating,
    language,
    duration
  }
}
Use the Visual Studio shortcut Ctrl+Shift+B to build the project. It will regenerate the Strawberry Shake, client class.
Create the AppStateContainer class
We are going to implement client-side state management in our app. The state created in a Blazor WebAssembly app is held in the browser’s memory. When a user closes and re-opens their browser or reloads the page, the user state held in the browser’s memory is lost.
Create a class file named AppStateContainer.cs inside the MovieApp.Client\Shared folder.
Add the following code to it.
public class AppStateContainer
{
    private readonly MovieClient _movieClient;

    public AppStateContainer(MovieClient movieClient)
    {
        _movieClient = movieClient;
    }

    public List<Movie> userWatchlist = new();

    public List<Genre> AvailableGenre = new();

    public event Action OnAppStateChange = default!;

    public async Task GetAvailableGenre()
    {
        var results = await _movieClient.FetchGenreList.ExecuteAsync();

        if (results.Data is not null)
        {
            AvailableGenre = results.Data.GenreList.Select(x => new Genre
            {
                GenreId = x.GenreId,
                GenreName = x.GenreName,
            }).ToList();
        }
    }

    public async Task GetUserWatchlist(int userId)
    {
        List<Movie> currentUserWatchlist = new();

        if (userId > 0)
        {
            var response = await _movieClient.FetchWatchList.ExecuteAsync(userId);

            if (response.Data is not null)
            {
                currentUserWatchlist = response.Data.Watchlist.Select(x => new Movie
                {
                    MovieId = x.MovieId,
                    Title = x.Title,
                    Duration = x.Duration,
                    Genre = x.Genre,
                    Language = x.Language,
                    PosterPath = x.PosterPath,
                    Rating = x.Rating,
                }).ToList();
            }
        }

        SetUserWatchlist(currentUserWatchlist);
    }

    public void SetUserWatchlist(List<Movie> lstMovie)
    {
        userWatchlist = lstMovie;
        NotifyAppStateChanged();
    }

    private void NotifyAppStateChanged() => OnAppStateChange?.Invoke();
}
We have injected MovieClient into the class.
The GetAvailableGenre method fetches the list of genres by invoking the FetchGenreList method of the MovieClient.
The GetUserWatchlist method accepts the userId as a parameter. Then, it fetches the watchlist of the user by invoking the FetchWatchList method of MovieClient.
The SetUserWatchlist method assigns the list of movies to the local variable userWatchlist.
The NotifyAppStateChanged method invokes the OnAppStateChange action, which notifies the components in different parts of the app about the state changes.
Add the following line to the MovieApp.Client\Program.cs file.
builder.Services.AddScoped<AppStateContainer>();
This allows us to use the AppStateContainer as a scoped service across our client project.

Every property of the Syncfusion Blazor components is completely documented for easy use.
Create the AddToWatchlist component
Create a new component named AddToWatchlist.razor in the pages folder.
Add the class definition inside the AddToWatchlist.razor.cs file, as shown.
public class AddToWatchlistBase : ComponentBase
{
    [Inject]
    AppStateContainer AppStateContainer { get; set; } = default!;

    public static SfToast ToastObj;

    [Inject]
    MovieClient MovieClient { get; set; } = default!;

    [Parameter]
    public int MovieID { get; set; }

    [Parameter]
    public EventCallback WatchListClick { get; set; }

    [CascadingParameter]
    Task<AuthenticationState> AuthenticationState { get; set; } = default!;

    List<Movie> userWatchlist = new();
    protected bool toggle;
    protected string buttonText = string.Empty;
    int UserId { get; set; }
}
We have injected all the required services into the class. This component accepts an integer parameter MovieID. We have defined an EventCallback parameter named WatchListClick. We have added the AuthenticationState as a CascadingParameter.
Add the following methods to the class.
protected override async Task OnInitializedAsync()
{
    AppStateContainer.OnAppStateChange += StateHasChanged;

    var authState = await AuthenticationState;

    if (authState.User.Identity is not null
        && authState.User.Identity.IsAuthenticated)
    {
        UserId = Convert.ToInt32(authState.User.FindFirst("userId").Value);
    }
}

protected override void OnParametersSet()
{
    userWatchlist = AppStateContainer.userWatchlist;
    SetWatchlistStatus();
}
Here, we attached the OnAppStateChange action to our component inside the OnInitializedAsync lifecycle method. Then, we fetch the authentication state of the user. If the user is authenticated, we fetch the userId from the authentication state.
In the OnParametersSet lifecycle method, we fetch the user watchlist from the app state container.
Add the following methods to the class.
void SetWatchlistStatus()
{
    var favouriteMovie = userWatchlist.Find(m => m.MovieId == MovieID);

    if (favouriteMovie != null)
    {
        toggle = true;
    }
    else
    {
        toggle = false;
    }

    SetButtonText();
}
void SetButtonText()
{
    if (toggle)
    {
        buttonText = "Remove from Watchlist";
    }
    else
    {
        buttonText = "Add to Watchlist";
    }
}
In the SetWatchlistStatus method, we search for the movie in the user watchlist based on the movieId passed as the component parameter. If the movie is found, we then set the Boolean variable toggle to true, and otherwise, we set it to false.
The SetButtonText method is used to set the display text of the button based on the toggle status.
Finally, add the following methods to the class.
public static List<ToastModel> Toast = new List<ToastModel>
{
    new ToastModel{  Title = "SUCCESS", Content="Movie added to your Watchlist", CssClass="e-toast-success", Timeout=3000, ShowCloseButton=true},
    new ToastModel{ Title = "INFO", Content="Movie removed from your Watchlist", CssClass="e-toast-info", Timeout=3000, ShowCloseButton=true},
    new ToastModel{  Title = "SUCCESS", Content="Movie data is deleted successfully", CssClass="e-toast-success", Timeout=3000, ShowCloseButton=true}
};

protected async Task ToggleWatchList()
{
    if (UserId > 0)
    {
        List<Movie> watchlist = new();
        toggle = !toggle;
        SetButtonText();

        var response = await MovieClient.ToggleWatchList.ExecuteAsync(UserId, MovieID);

        if (response.Data is not null)
        {
            watchlist = response.Data.ToggleWatchlist.Select(x => new Movie
            {
                MovieId = x.MovieId,
                Title = x.Title,
                Duration = x.Duration,
                Genre = x.Genre,
                Language = x.Language,
                PosterPath = x.PosterPath,
                Rating = x.Rating,
            }).ToList();
        }

        AppStateContainer.SetUserWatchlist(watchlist);

        if (toggle)
        {
            ToastObj.Show(Toast[0]);
        }
        else
        {
            ToastObj.Show(Toast[1]);
        }

        await WatchListClick.InvokeAsync();
    }
}

public void Dispose()
{
    AppStateContainer.OnAppStateChange -= StateHasChanged;
}
Here, we have created a static variable to define the various ToastModels that will be displayed in our app.
In the ToggleWatchList method, we check whether the user has been authenticated successfully, i.e., whether userId is greater than zero.
If the user is authenticated, we invoke the ToggleWatchList method of MovieClient. Then, we invoke the SetUserWatchlist method of AppStateContainer to set the updated state of the watchlist on the client side.
We want to display a toast message based on the toggle status. This is done by invoking the WatchListClick EventCallback parameter by calling the InvokeAsync method on it.
Inside the Dispose method, we detach the OnAppStateChange action from the component.
Add the following code in the AddToWatchlist.razor file.
@inherits AddToWatchlistBase

<button class="btn @(toggle ? "btn-danger" : "btn-success" )"
    @onclick="ToggleWatchList">
    <i class="fa @(toggle ? "fa-minus-circle" : "fa-plus-circle" )"></i>
    @buttonText
</button>
We have added a button. The button will have CSS classes added dynamically based on the value of the toggle property. This is used to display Font Awesome icons inside the button, based on the value of the toggle property. Then, we invoke the ToggleWatchList method with the click of a button.

Explore the different application UIs developed using Syncfusion Blazor components.
Create the Watchlist component
Create a new component named Watchlist.razor in the pages folder. Add the base class and stylesheet for this component. This component is used to display all the movies present in the user’s watchlist.
Add the following code to the Watchlist.razor.cs file.
public class WatchlistBase : ComponentBase
{
    [Inject]
    AppStateContainer AppStateContainer { get; set; } = default!;

    [Inject]
    NavigationManager NavigationManager { get; set; } = default!;

    [CascadingParameter]
    Task<AuthenticationState> AuthenticationState { get; set; } = default!;

    protected List<Movie> watchlist = new();

    protected override async Task OnInitializedAsync()
    {
        AppStateContainer.OnAppStateChange += StateHasChanged;

        var authState = await AuthenticationState;

        if (authState.User.Identity is not null && authState.User.Identity.IsAuthenticated)
        {
            GetUserWatchlist();
        }
        else
        {
            NavigationManager.NavigateTo($"login?returnUrl={Uri.EscapeDataString(NavigationManager.Uri)}");
        }
    }
    protected void WatchlistClickHandler()
    {
        GetUserWatchlist();
    }

    void GetUserWatchlist()
    {
        watchlist = AppStateContainer.userWatchlist;
    }

    public void Dispose()
    {
        AppStateContainer.OnAppStateChange -= StateHasChanged;
    }
}
Inside the OnInitializedAsync lifecycle method, we have attached the OnAppStateChange action to our component. Then, we fetch the authentication state of the user. If the user is authenticated, we invoke the GetUserWatchlist method. Otherwise, navigate the user back to the login page and set a returnUrl.
The GetUserWatchlist method fetches the user watchlist from the app state container.
Inside the Dispose method, we detach the OnAppStateChange action from the component.
Add the following code in the Watchlist.razor file.
@page "/watchlist"
@inherits WatchlistBase

<h1 class="display-4">My Watchlist</h1>
<hr />

@if (watchlist.Count == 0)
{
<p><em>No Data to show...</em></p>
}
else

{
<div class="card mb-3">
    <div class="card-body">
        <table class="table">
            <thead>
                <tr class="row card-body p-1 text-center">
                    <th class="col-md-2">Image</th>
                    <th class="col-md-2">Title</th>
                    <th class="col-md-2">Genre</th>
                    <th class="col-md-2">Language</th>
                    <th class="col">Action</th>
                </tr>
            </thead>
        </table>

        <table class="table align-middle table-borderless">
            <tbody>
                @foreach (var movie in watchlist)
                {
                    <tr class="row card-body watchlist-row p-1 mb-2 align-items-center text-center">
                        <td class="col-md-2">
                            <img data-toggle="tooltip" title="@movie.Title" alt="@movie.Title" src="/Poster/@movie.PosterPath">
                        </td>
                        <td class="col-md-2">
                            <a class="nav-link" href='/movies/details/@movie.MovieId'>@movie.Title</a>
                        </td>
                        <td class="col-md-2">@movie.Genre</td>
                        <td class="col-md-2">@movie.Language</td>
                        <td class="col">
                            <AddToWatchlist MovieID="@movie.MovieId" WatchListClick="WatchlistClickHandler"></AddToWatchlist>
                        </td>
                    </tr>
                }
            </tbody>
        </table>
    </div>
</div>
}
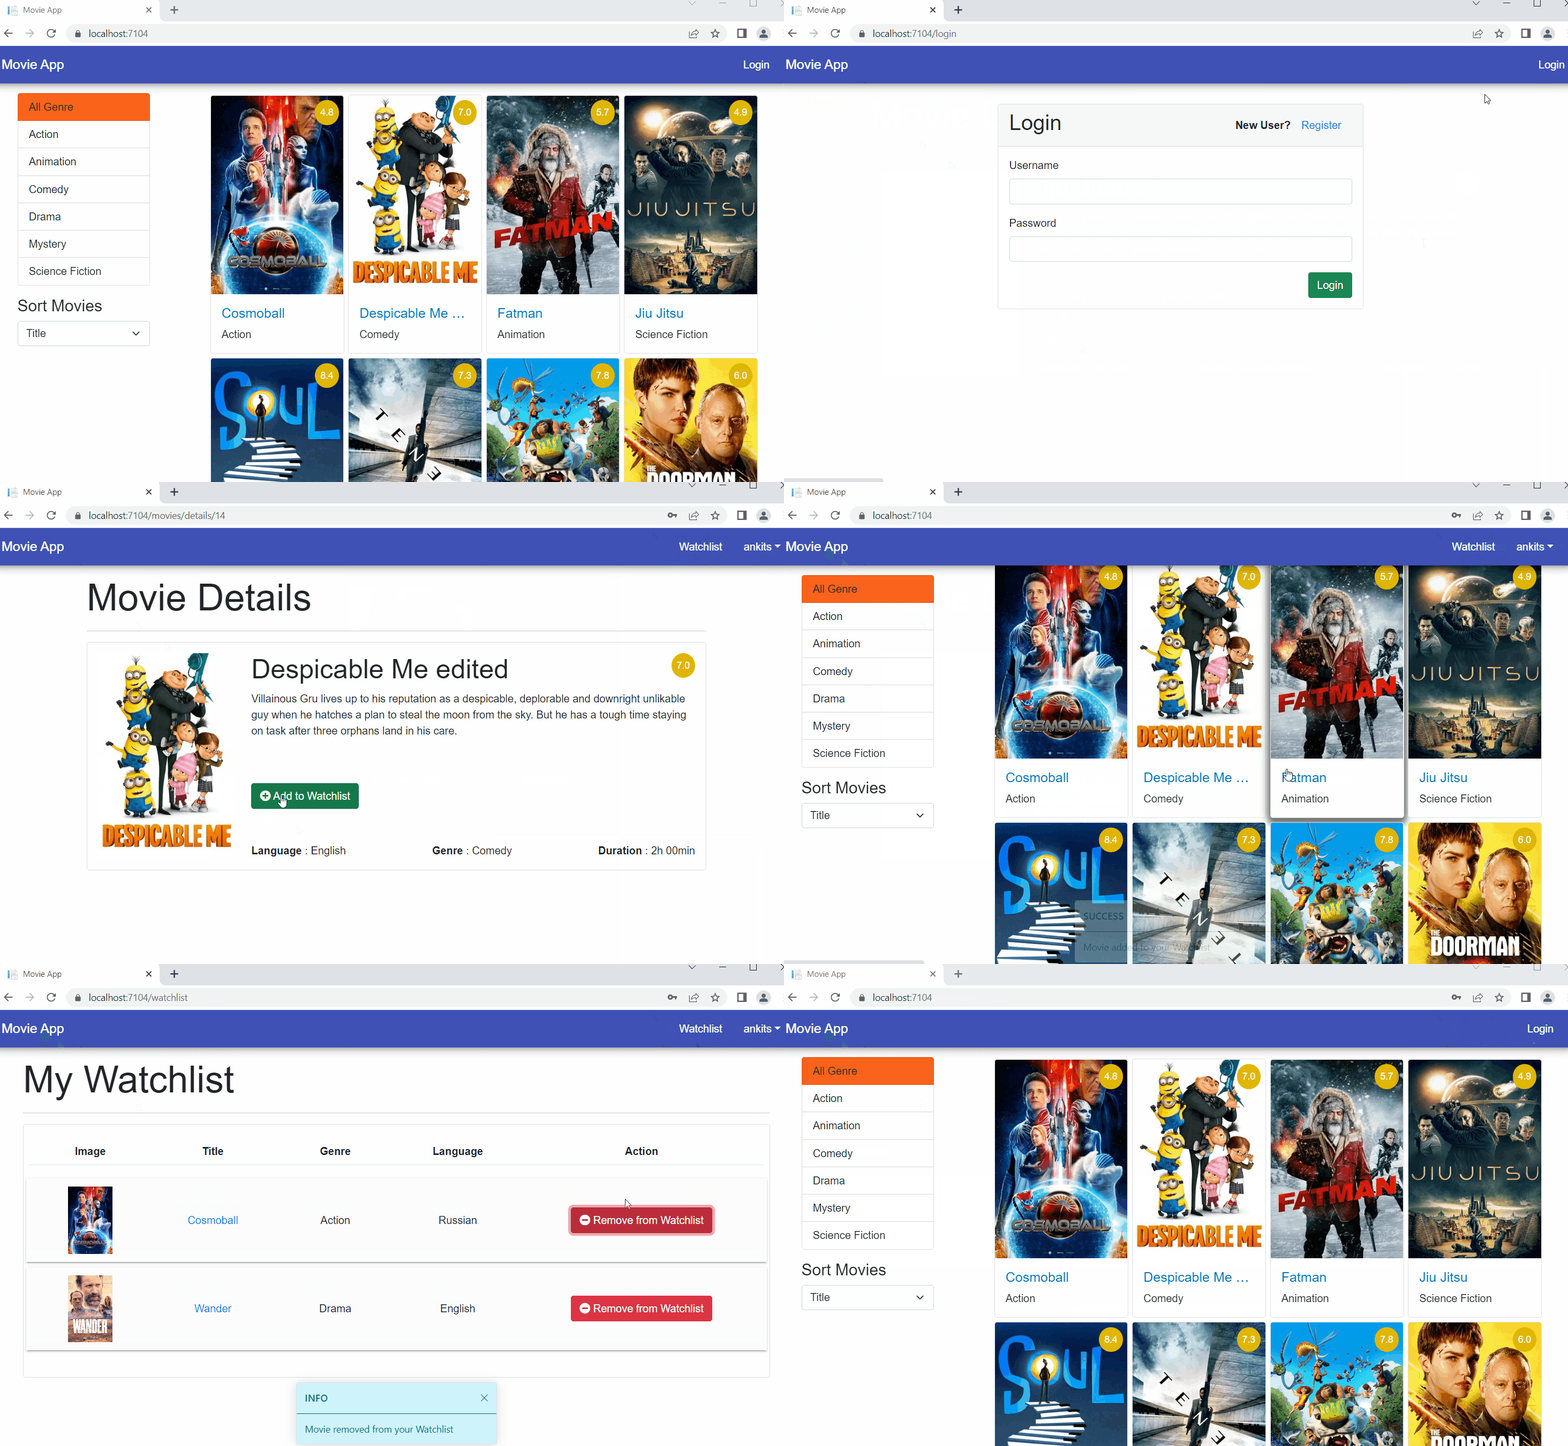
We have set the route of the page to watchlist and inherited the base class. We use a table to display the movies available on the watchlist. Then, we display the poster image, title, genre, and language of each movie.
We added the AddToWatchlist component for each row of the table and passed the movieId as a parameter. The event callback WatchListClick invokes the WatchlistClickHandler of the component.
Add the following style definition to the Watchlist.razor.css file.
img {
    width: 40%;
    overflow: hidden;
    position: relative;
}

.watchlist-row {
    background: #fcfcfc;
    box-shadow: 0 3px 1px -2px rgba(0,0,0,.2), 0 2px 2px 0 rgba(0,0,0,.14), 0 1px 5px 0 rgba(0,0,0,.12);
}
Update the MovieDetails component
Open the MovieDetails.razor file. Add the following code snippet just above the <div> tag showing the language, genre, and duration information of the movie.
<!-- Existing code -->

<div>
    <AuthorizeView>
        <Authorized>
            <AddToWatchlist MovieID="@movie.MovieId"></AddToWatchlist>
        </Authorized>
    </AuthorizeView>
</div>

<!-- Existing code -->
We have added the AddToWatchlist component inside the MovieDetails component. It’s inside the AuthorizeView tag so only an authorized user can access it. This will allow us to add the movie to the watchlist directly from the movie details page.
Update the MovieGenre component
Currently, the MovieGenre component invokes the GraphQL endpoints to fetch the list of available genres. However, we already have the genre list available to us as a part of the app state. So, we will fetch the list of genres from the app state instead of invoking the GraphQL endpoints.
Then, we will update the MovieGenre component using the following steps:
Step 1: First, inject the AppStateContainer class into the MovieGenreBase class.
Step 2: Then, remove the OnInitializedAsync lifecycle method implementation.
Step 3: Add the OnInitialized lifecycle method and fetch the list of genres from the app state.
Refer to the code snippet shown.
public class MovieGenreBase : ComponentBase
{
    // existing code

    [Inject]
    AppStateContainer AppStateContainer { get; set; } = default!;

    protected override void OnInitialized()
    {
        lstGenre = AppStateContainer.AvailableGenre;
    }

    // existing code
}
Update the AddEditMovie component
Similar to the MovieGenre component, update the AddEditMovie component to fetch the list of genres from the app state:
Step 1: Inject the AppStateContainer class into the AddEditMovieBase class.
Step 2: Now, remove the OnInitializedAsync and GetAvailableGenre method implementations.
Step 3: Then, add the OnInitialized lifecycle method and fetch the list of genres from the app state.
Refer to the code snippet shown.
public class AddEditMovieBase : ComponentBase
{

    // existing code

    [Inject]
    MovieClient MovieClient { get; set; } = default!;

    protected override void OnInitialized()
    {
        lstGenre = AppStateContainer.AvailableGenre; ;
    }

    // existing code
}
See how Syncfusion Blazor components can be transformed into beautiful and efficient applications.
Update the CustomAuthStateProvider class
Inject the AppStateContainer into the CustomAuthStateProvider class. Refer to the code snippet shown.
public class CustomAuthStateProvider : AuthenticationStateProvider
{
    // existing code
    private readonly AppStateContainer _appStateContainer;

    public CustomAuthStateProvider(ILocalStorageService localStorage, AppStateContainer appStateContainer)
    {
        // existing code
        _appStateContainer = appStateContainer;
    }
}
Update the GetAuthenticationStateAsync method as shown in the following.
public override async Task<AuthenticationState> GetAuthenticationStateAsync()
{
    await _appStateContainer.GetAvailableGenre();
    AuthToken.TokenValue = await _localStorage.GetItemAsync<string>(AuthToken.TokenIdentifier);

    if (string.IsNullOrWhiteSpace(AuthToken.TokenValue))
    {
        return _anonymousUser;
    }

    List<Claim>? userClaims = ParseClaimsFromJwt(AuthToken.TokenValue).ToList();
    int UserId = Convert.ToInt32(userClaims.Find(claim => claim.Type == "userId")!.Value);

    if (UserId > 0)
    {
        await _appStateContainer.GetUserWatchlist(UserId);
    }
    return new AuthenticationState(new ClaimsPrincipal(new ClaimsIdentity(userClaims, "BlazorClientAuth")));
}
Here, we fetch the user watchlist and the list of available genres as soon as the user authentication is successful.
Inside the GetAuthenticationStateAsync method, we invoke the GetAvailableGenre method of the AppStateContainer class.
Then, fetch the userId from the user claims. If the userId exists, this means the user has already logged in, and so, we invoke the GetUserWatchlist method of the AppStateContainer class.
Update the NavMenu component
Open the NavMenu.razor.cs file and add the link to the watchlist component. Add the navigation link just above the dropdown menu inside the Authorized tag.
Refer to this code snippet.
<!-- Existing code -->

<AuthorizeView>
    <Authorized>
        <a class="nav-link" href="watchlist">Watchlist</a>
        <!-- Existing code -->
    </Authorized>
</AuthorizeView>
Execution demo
Launch the app and you can see the features of the watchlist.

Resource
The complete source code of this application is available on GitHub.
Summary
Thanks for reading! In this article, we have configured the client-side state management for our application. We have added a watchlist feature to the app. This will allow the user to add or remove a movie from the watchlist.
In the next and final article of this series, we will learn how to deploy this application to the IIS and Azure App Service.
Syncfusion’s Blazor component suite offers over 70 UI components. They work with both server-side and client-side (WebAssembly) hosting models seamlessly. Use them to build marvelous apps!
If you have any questions or comments, you can contact us through our support forums, support portal, or feedback portal. We are always happy to assist you!


Comments (1)
You have taught this educational topic very well.
Thank you very much.