

In the previous article of this series, we learned how to configure a Blazor WebAssembly application to create a GraphQL server using Hot Chocolate. We created a GraphQL query and used the Banana Cake Pop IDE to execute it.
In this article, we will cover how to create a GraphQL mutation to add new movie data. We will configure the Strawberry Shake tools which will help us create a GraphQL client to consume the server endpoints.
Update the Movie class
We will use a form to accept the movie data from the user. To add validations to the form, we need to update the movie class as shown below:
public partial class Movie
{
    public int MovieId { get; set; }

    [Required]
    public string Title { get; set; }

    [Required]
    public string Overview { get; set; }

    [Required]
    public string Genre { get; set; }

    [Required]
    public string Language { get; set; }

    [Required]
    [Range(1, int.MaxValue, ErrorMessage = " This field accepts only positive numbers.")]
    public int Duration { get; set; }

    [Required]
    [Range(0, 10.0, ErrorMessage = "The value should be less than or equal to 10.")]
    public decimal Rating { get; set; }

    public string? PosterPath { get; set; }

    public Movie()
    {
        Title = string.Empty;
        Overview = string.Empty;
        Genre = string.Empty;
        Language = string.Empty;
    }
}
We have added the [Required] attribute properties in our class. The Duration property accepts only positive values. The Rating property accepts decimal values ranging between 0 and 10. The PosterPath is an optional property, which means the user has an option to add the poster for the movie or skip it.
Note: To learn about Blazor forms and validations, please refer to the blog Blazor Forms and Form Validation (Built-in & Custom): A Beginner’s Guide.
Configure the app to handle the uploaded poster image
The user can upload a poster image of a movie while adding the movie data. We will store the images on the MovieApp.Server project inside a folder named Poster. To do this, add the following code to the Program.cs file.
var FileProviderPath = app.Environment.ContentRootPath + "/Poster";

if (!Directory.Exists(FileProviderPath))
{
    Directory.CreateDirectory(FileProviderPath);
}

app.UseFileServer(new FileServerOptions
{
    FileProvider = new PhysicalFileProvider(FileProviderPath),
    RequestPath = "/Poster",
    EnableDirectoryBrowsing = true
});
We will check if the folder with the name Poster exists on the root level of our project. If the folder does not exist, which will be the case when the app is launched for the first time, then we will create the Poster folder.
The UseFileServer method will allow us to navigate through the Poster folder and read the contents from it. This will be helpful while fetching the image to display it on the UI.
If the user does not upload a poster for the movie, then we will show a default image. Then, we add the name of the default image in the appsettings.json file as shown below.
"DefaultPoster": "DefaultPoster.jpg",
Note: The default image is not added to the application at this point. Currently, we have added the name in the appsettings.json file for consistency. The default poster image will be added once the Poster folder is created when the app is executed for the first time. This will be done in the later part of this article.
Update the IMovie interface
Update the IMovie.cs file by adding the method declaration as shown below:
public interface IMovie
{
    // other methods.

    Task AddMovie(Movie movie);
}
Implement the Add movie functionality in the data access layer
Since we have added a new method in the IMovie interface, we need to update the MovieDataAccessLayer class by implementing the method as shown below:
public async Task AddMovie(Movie movie)
{
    try
    {
        await _dbContext.Movies.AddAsync(movie);
        await _dbContext.SaveChangesAsync();
    }
    catch
    {
        throw;
    }
}
This method will accept a movie object as the parameter and add it to the Movies DB set. We will then update the database by invoking the SaveChangesAsync method.
Add a GraphQL mutation resolver
A GraphQL mutation is used to mutate or change the data on the server. Add a class and name it MovieMutationResolver.cs inside the MovieApp.Server/GraphQL folder. Add the following code inside it.
using MovieApp.Server.Interfaces;
using MovieApp.Server.Models;

namespace MovieApp.Server.GraphQL
{
    public class MovieMutationResolver
    {
        public record AddMoviePayload(Movie movie);

        readonly IWebHostEnvironment _hostingEnvironment;
        readonly IMovie _movieService;
        readonly IConfiguration _config;
        readonly string posterFolderPath = string.Empty;

        public MovieMutationResolver(IConfiguration config, IMovie movieService, IWebHostEnvironment hostingEnvironment)
        {
            _config = config;
            _movieService = movieService;
            _hostingEnvironment = hostingEnvironment;
            posterFolderPath = System.IO.Path.Combine(_hostingEnvironment.ContentRootPath, "Poster");
        }

        [GraphQLDescription("Add new movie data.")]
        public AddMoviePayload AddMovie(Movie movie)
        {
            if (!string.IsNullOrEmpty(movie.PosterPath))
            {
                string fileName = Guid.NewGuid() + ".jpg";
                string fullPath = System.IO.Path.Combine(posterFolderPath, fileName);

                byte[] imageBytes = Convert.FromBase64String(movie.PosterPath);
                File.WriteAllBytes(fullPath, imageBytes);

                movie.PosterPath = fileName;
            }
            else
            {
                movie.PosterPath = _config["DefaultPoster"];
            }

            _movieService.AddMovie(movie);

            return new AddMoviePayload(movie);
        }
    }
}
The image uploaded by the user will be converted to a base64 string array on the client-side and then passed to the server.
The method AddMovie will accept an object of type Movie as a parameter. If the user has uploaded a poster while adding the movie data, then we will create a poster name using a GUID. We will convert the poster data to a byte array and then save it as a file to the Poster folder on the server. If the user has not uploaded any image, then we will use the default poster path.
Register mutation resolver
Update the Program.cs file as shown below:
builder.Services.AddGraphQLServer()
    .AddQueryType<MovieQueryResolver>()
    .AddMutationType<MovieMutationResolver>();
At this point, you can run the app and add new movie data via the Banana Cake Pop IDE. However, I am skipping this step for simplicity. We will add the movie data from the UI via a form.
We are done with the server configuration. Let us move to the client side of the application.
Configure the Strawberry Shake CLI tools
We will configure the Strawberry Shake tool which will help us create a GraphQL client. Navigate to the MovieApp\Client directory in your machine, open a command prompt, and run the following command:
dotnet new tool-manifest |
Upon successful execution, it will add a .config folder in the MovieApp\Client directory. This folder will contain a dotnet-tools.json file.
Run the following command in the command prompt to install the Strawberry Shake tools.
dotnet tool install StrawberryShake.Tools –local |
Add the required NuGet packages
We will install all the necessary NuGet packages to our client project. Navigate to Tools > NuGet Package Manager > Package Manager Console. Select MovieApp.Client from the Default project dropdown. Run the following command.
Install-Package StrawberryShake.Transport.Http -Version 12.5.0 |
Refer to the following image.
 Similarly, install the NuGet package for code generation.
Install-Package StrawberryShake.CodeGeneration.CSharp.Analyzers -Version 12.5.0 |
Run the following command to install the DI package.
Install-Package Microsoft.Extensions.DependencyInjection -Version 6.0.0 |
Run the following command to install the HTTP package.
Install-Package Microsoft.Extensions.Http -Version 6.0.0 |
Generate the GraphQL client using the server schema
We will generate a GraphQL client based on the server schema. Follow these steps:
Step 1: Run the application. Get the path of the GraphQL server. In my case it is https://localhost:7024/graphql/. The port number might change on your machine.
Step 2: Navigate to the MovieApp\Client directory in your machine, open the command prompt, and run the following command:
dotnet graphql init https://localhost:7024/graphql/ -n MovieClient -p ./GraphQLAPIClient |
MovieClient is the name of the client we will use to invoke the GraphQL endpoints. GraphQLAPIClient is the name of the folder that will contain all the client schema and related files. Both of these are user-specific names, and you can use any name of your choice.
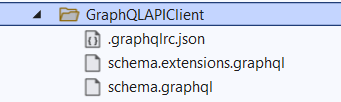
Upon successful execution, this command will create a folder with the name GraphQLAPIClient inside the MovieApp\Client project. The folder structure will look like the following image.
 Step 3: Add the following namespace definition to the .graphqlrc.json file. This namespace will be used by the client class which will be generated when we build the project.
"namespace": "MovieApp.Client.GraphQLAPIClient",
Refer to the following image to see where we add the namespace definition.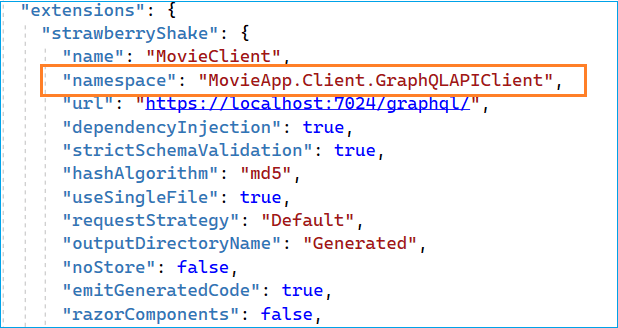
The GraphQL schema is generated inside the schema.graphql file. You can refer to it to understand the structure of GraphQL types and inputs.
Note: Whenever there is an update on the GraphQL server, we need to generate the client by following these steps.
Add the first GrapqhQL query
Add a file named AddMovieData.graphql inside the MovieApp.Client\GraphQLAPIClient folder. Add the GraphQL query to add movie data as shown below:
mutation AddMovieData($movieData:MovieInput!){
  addMovie(movie:$movieData){
  movie{
      title
    }
  }
}
Similarly, add a file named FetchGenreList.graphql and add the following GraphQL query to fetch the genre list:
query FetchGenreList{
  genreList{
    genreId,
    genreName
  }
}
Build the project. Upon successful build, a folder named Generated will be created inside the MovieApp.Client\GraphQLAPIClient folder. It will contain a file called MovieClient.StrawberryShake.cs. This class file will contain GraphQL query and type definitions as C# objects.
Note: Do not edit the generated client class.
Add dependency injection to the Program.cs file
Add the following code to the MovieApp.Client\Program.cs file:
string graphQLServerPath = builder.HostEnvironment.BaseAddress + "graphql";

builder.Services.AddMovieClient()
   .ConfigureHttpClient(client =>
   {
       client.BaseAddress = new Uri(graphQLServerPath);
   }
);
We have registered the MovieClient via dependency injection and created the GraphQL server path by appending graphql to the base address of the application. This will make sure that we do not need to maintain separate URLs for different environments.
Create the component for adding movies
Right-click the MovieApp.Client\Pages folder. Select Add > Razor Component. Add a new component with the name AddEditMovie.razor. Next, right-click the MovieApp.Client\Pages folder and select Add > Class. Add a base class for the component called AddEditMovie.razor.cs.
Note: We will use this component for both adding and editing movie data; therefore, we have named it AddEditMovie. In this blog post, we are going to cover the add functionality. We will discuss the edit functionality in the next blog post in this series.
Add the class definition inside the AddEditMovie.razor.cs file as shown below:
public class AddEditMovieBase : ComponentBase
{
    [Inject]
    public NavigationManager NavigationManager { get; set; } = default!;

    [Inject]
    MovieClient MovieClient { get; set; } = default!;

    [Parameter]
    public int MovieID { get; set; }

    protected string Title = "Add";
    public Movie movie = new();
    protected List<Genre>? lstGenre = new();
    protected string? imagePreview;
    const int MaxFileSize = 10 * 1024 * 1024; // 10 MB
    const string DefaultStatus = "Maximum size allowed for the image is 10 MB";
    protected string status = DefaultStatus;
}
We have injected the NavigationManager and MovieClient into the component. The component will accept the parameter MovieID of type integer. We have also defined the maximum file size for poster images that the user can upload.
If the parameter is provided, then it means that the movie data already exists, and the component is invoked for editing the movie data. If the parameter is null, we can assume that the component is invoked for adding new movie data.
Add the following method to fetch the genre list.
protected override async void OnInitialized()
{
    await GetAvailableGenre();
}

public async Task GetAvailableGenre()
{
    var results = await MovieClient.FetchGenreList.ExecuteAsync();

    if (results.Data is not null)
    {
        lstGenre = results.Data.GenreList.Select(x => new Genre
        {
            GenreId = x.GenreId,
            GenreName = x.GenreName,
        }).ToList();
    }
}
We will invoke the FetchGenreList method of the MovieClient to get the list of available genres. This GetAvailableGenre method will be called on the OnInitialized life-cycle method to ensure that the genre list is available as soon as the component loads.
Add the following method to save the movie data.
protected async Task SaveMovie()
{
    MovieInput movieData = new()
    {
        MovieId = movie.MovieId,
        Title = movie.Title,
        Overview = movie.Overview,
        Duration = movie.Duration,
        Rating = movie.Rating,
        Genre = movie.Genre,
        Language = movie.Language,
        PosterPath = movie.PosterPath,
    };

    await MovieClient.AddMovieData.ExecuteAsync(movieData);

    NavigateToAdminPanel();
}

protected void NavigateToAdminPanel()
{
    NavigationManager?.NavigateTo("/");
}
Then, map the movie data to an object of type MovieInput and invoke the AddMovieData method of the MovieClient to save the movie. The NavigateToAdminPanel method will navigate the user back to the home page.
In the next article in this series, we will create an admin panel that will allow the admin users to manage all the movie data. We will then update the navigation link of this method to allow the user to navigate to the admin panel after saving the movie data.
Finally, add the following method to this class.
protected async Task ViewImage(InputFileChangeEventArgs e)
{
    if (e.File.Size > MaxFileSize)
    {
        status = $"The file size is {e.File.Size} bytes, this is more than the allowed limit of {MaxFileSize} bytes.";
        return;
    }
    else if (!e.File.ContentType.Contains("image"))
    {
        status = "Please upload a valid image file";
        return;
    }
    else
    {
        using var reader = new StreamReader(e.File.OpenReadStream(MaxFileSize));

        var format = "image/jpeg";
        var imageFile = await e.File.RequestImageFileAsync(format, 640, 480);

        using var fileStream = imageFile.OpenReadStream(MaxFileSize);
        using var memoryStream = new MemoryStream();
        await fileStream.CopyToAsync(memoryStream);

        imagePreview = $"data:{format};base64,{Convert.ToBase64String(memoryStream.ToArray())}";
        movie.PosterPath = Convert.ToBase64String(memoryStream.ToArray());

        status = DefaultStatus;
    }
}
The ViewImage method will be invoked when a user uploads an image for the movie poster. We will perform the checks to validate if the uploaded file is a valid image and its size is within the allowed limit.
If all the checks pass, we will create a StreamReader of size MaxFileSize. We will then set the image format, height, and width using the RequestImageFileAsync method. We will read the uploaded image file using a read stream and then copy the data to a MemoryStream.
The imagePreview variable is used to show the preview of the uploaded image on the UI. We will then set the PosterPath property of the movie object to a string of type base64.
Add the following code in the AddEditMovie.razor file:
@page "/admin/movies/new"
@page "/admin/movies/edit/{MovieID:int}"
@inherits AddEditMovieBase

<div class="row justify-content-center">
    <div class="col my-3">

        <h1 class="display-3">@Title Movie</h1>
        <hr />

        <EditForm Model="@movie" OnValidSubmit="SaveMovie">
            <DataAnnotationsValidator />

            <div class="row justify-content-between">
                <div class="col-md-8">
                    <div class="mb-3">
                        <label for="Title" class="form-label">Title</label>
                        <div class="col-md-6">
                            <InputText class="form-control" @bind-Value="movie.Title" />
                        </div>
                        <ValidationMessage For="@(() => movie.Title)" />
                    </div>

                    <div class="mb-3">
                        <label for="Genre" class="form-label">Genre</label>
                        <div class="col-md-6">
                            <InputSelect class="form-control" @bind-Value="movie.Genre">
                                <option value="-- Select Genre --">-- Select Genre --</option>
                                @if (lstGenre is not null)
                                {
                                    @foreach (var genre in lstGenre)
                                    {
                                        <option value="@genre.GenreName">@genre.GenreName</option>
                                    }
                                }
                            </InputSelect>
                        </div>
                        <ValidationMessage For="@(() => movie.Genre)" />
                    </div>


                    <div class="mb-3">
                        <label for="Language" class="form-label">Language</label>
                        <div class="col-md-6">
                            <InputText class="form-control" @bind-Value="movie.Language" />
                        </div>
                        <ValidationMessage For="@(() => movie.Language)" />
                    </div>

                    <div class="mb-3">
                        <label for="Duration" class="form-label">Duration</label>
                        <div class="col-md-6">
                            <InputNumber class="form-control" @bind-Value="movie.Duration" />
                        </div>
                        <ValidationMessage For="@(() => movie.Duration)" />
                    </div>


                    <div class="mb-3">
                        <label for="Rating" class="form-label">Rating</label>
                        <div class="col-md-6">
                            <InputNumber class="form-control" @bind-Value="movie.Rating" />
                        </div>
                        <ValidationMessage For="@(() => movie.Rating)" />
                    </div>

                    <div class="mb-3">
                        <label for="Overview" class="form-label">Overview</label>
                        <div class="col-md-6">
                            <InputTextArea class="form-control" @bind-Value="movie.Overview" />
                        </div>
                        <ValidationMessage For="@(() => movie.Overview)" />
                    </div>
                </div>
                <div class="col">
                    <div class="mb-3">
                        <div class="image-container">
                            <img class="preview-image" src=@imagePreview>
                        </div>
                        <InputFile OnChange="ViewImage"></InputFile>
                        <p>@status</p>
                    </div>
                </div>
            </div>

            <div class="form-group">
                <button type="submit" class="btn btn-success">Save</button>
                <button class="btn btn-secondary" @onclick="NavigateToAdminPanel">Cancel</button>
            </div>
        </EditForm>
    </div>
</div>
We have defined two routes for this component:
- /admin/movies/new: This route will be used while adding new movie data.
- /admin/movies/edit/{MovieID:int}: We will pass the parameter in this route, and it will be used for editing movie data.
We have used the EditForm component to create the form that will allow the user to add or edit the movie data. The DataAnnotationsValidator component is used to implement all the validators defined for the model. The dropdown to display the genre will be created dynamically by iterating the lstGenre variable.
Upon clicking the Save button, the form validations will be checked. If all the client-side validation passes, then the SaveMovie method will be invoked.
Configure the navigation bar
Here, we will change the style of the navigation menu and add the link to the AddEditMovie component.
Right-click the MovieApp.Client\Shared folder and select Add > Class. Add a base class for the navigation menu component called NavMenu.razor.cs.
Add the following code inside this class:
using Microsoft.AspNetCore.Components;

namespace MovieApp.Client.Shared
{
    public class NavMenuBase : ComponentBase
    {

    }
}
We have defined just the base class for now. We will add the method definition in future articles in this series.
Add the following code inside the NavMenu.razor file.
@inherits NavMenuBase

<nav class="navbar fixed-top navbar-expand-lg navbar-dark">
    <div class="container-fluid">
        <a class="navbar-brand" href="/">Movie App</a>
        <span class="spacer"></span>
        <a class="nav-link" href="/admin/movies/new">Add Movie</a>
    </div>
</nav>
We have created a Bootstrap navigation menu and added a link to the AddEditMovie component.
Open the NavMenu.razor.css file and replace the existing code with the code shown below:
nav {
    background-color: #3f51b5;
    box-shadow: 0 3px 5px -1px rgba(0,0,0,.2), 0 6px 10px 0 rgba(0,0,0,.14), 0 1px 18px 0 rgba(0,0,0,.12);
}

.spacer {
    flex: 1 1 auto;
}

.nav-link {
    color: #ffffff;
}
Update the application layout
We will use a custom layout for our application. Navigate to the Shared/MainLayout.razor file and replace the existing code with our custom layout code as shown below:
@inherits LayoutComponentBase

<div class="page">
    <div class="main">
        <NavMenu />
        <div class="container">
            @Body
        </div>
    </div>
</div>
To learn more about layouts in Blazor, refer to the article ASP.NET Core Blazor layouts in Microsoft’s ASP.NET documentation.
Update the MainLayout.razor.css file by replacing the existing code with the following style definitions.
.container {
    margin-top: 70px;
}

.page {
    position: relative;
    display: flex;
    flex-direction: column;
}

.main {
    flex: 1;
}
How do we get the data for the demo?
You can get dummy data to test the app from any source of your choice. However, for consistency, we will use The Movie Database as the data source. You can get all the required details for the app such as movie title, rating, genre, posters, and more from this website.
Running the demo
Launch the application and perform the add movie operation as shown below.
After the movie has been added successfully, you can verify the data inside the Movie table in the database.
Once the application is executed for the first time, the Poster folder will be created in the MovieApp.Server project. Add a default image of your choice in this folder with the name DefaultPoster.jpg. This image will act as the default poster image if the user does not upload an image. Remember, we already configured the logic to use the default poster earlier in this article.
Source code
The complete source code of this Blazor WebAssembly and GraphQL application is available at GitHub.
Summary
Thanks for reading! In this article, we learned how to create and configure mutation in a GraphQL server. We used Strawberry Shake to create a GraphQL client to consume the server endpoints, and we implemented the functionality to add new movie data to our Blazor WebAssembly application.
In our next article in this series, we will add the edit and delete capabilities to the movie data and configure the home page to display the list of movies. We will provide the sort and filter movies options to the user.
Syncfusion’s Blazor component suite offers over 70 UI components that work with both server-side and client-side (WebAssembly) hosting models seamlessly. Use them to build marvelous applications!
If you have any questions or comments, you can contact us through our support forums, support portal, or feedback portal. We are always happy to assist you!


 No spam, just valuable updates.
Comments (5)
SyncFusion,
I’ve been following this demo to learn and familiarize myself a bit with GraphQL.
I have however run into an issue, not sure if it affects the end-result yet though.
When ending the section “Add the first GrapqhQL query”
There is the mention that a folder “Generated” should be auto-generated and be placed under the “GraphQLAPIClient” folder, this hower does not happen and I get the following warning:
“The type of schema applied to the document is not supported”
I’ve checked all the code again (four times) and can not find any deviations the the code that I currently have.
Best regards,
Matthias E.
Hi Matthias,
The folder named Generated will be created once you build the application. I assume you have missed this part.
Please use the Visual Studio shortcut ctrl+Shift+B to build the project. After the successful build, you can see the folder and the generated client class inside it.
Thank you.
Hi!
I have the same problem … no folder “Generated” is created even after building the project.
Could the “Schema”-URL (above the code in VS2022) be the problem? What should there be shown?
Okay – ich got it …
I had to create simple text-files in the GraphQLAPIClient-folder …
Before that i tried to add a codefile with with “add new element” …
I had to follow this https://bartwullems.blogspot.com/2021/10/graphqlstrawberry-shake-graphql-client.html. There’s that part about changing the Build Action for the .graphql file to GraphQL compiler