
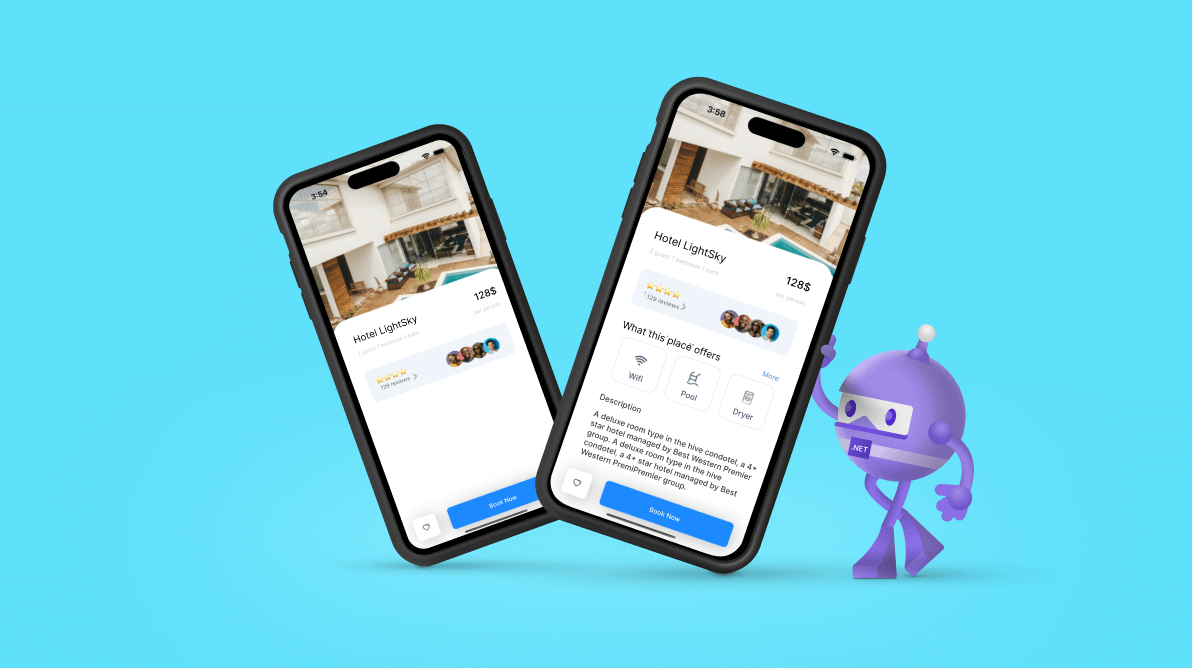
The user interface (UI) is the primary way we connect with our users. We should develop it to be as enjoyable as possible and maintain good performance so that our users will be satisfied. In this article, you will learn how to reinforce your XAML skills by developing a hotel booking UI based on this Dribbble design.
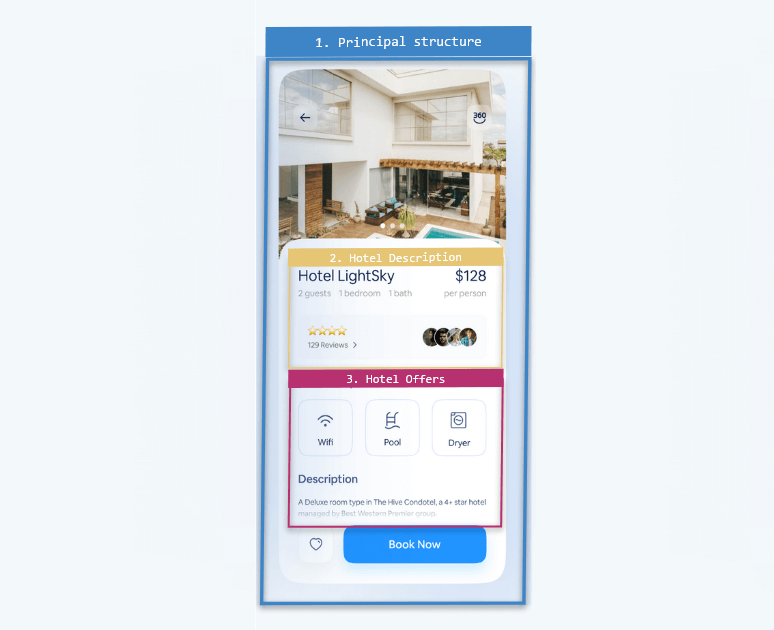
We’ll break down the creation of the UI into three steps, as illustrated by the following screenshot.
In this article, we will learn to use:
- Syncfusion .NET MAUI ListView control: To display a list of data in horizontal orientation.
- Syncfusion .NET MAUI Avatar View control: To provide a graphical representation of users.
Let’s start!
Main layout
To design the main layout, create a folder called Views and add a file named DetailPage.xaml inside it.
In this case, we are going to use a DataGrid to design the main layout because it provides good performance and will also help creating the floating buttons (we’ll create them later).
<!-- Main layout -->
<Grid RowDefinitions="*"
      ColumnDefinitions="Auto,*"
      Margin="0,-120,0,50”>

   <!-- Start step 1:  Add the content of this step, which will contain steps
     2 and 3-->

     <!-- Step 2: Add all the elements contained  in this step -->
     <!-- Step 3:  Add all the elements contained  in this step -->

   <!-- End step 1 -->
</Grid>
Step 1: Principal structure
Now that we have configured the initial setup, let’s get started with the UI design!
This block contains the following elements:
- Main image
- White box with rounded edges
- Floating buttons
In addition to containing these elements, it is responsible for generating the structure containing all the elements to be developed in steps 2 and 3.
This structure can be later slid without affecting the position of the Like and Book Now buttons. Thus, it generates a feeling of floating buttons. Although this floating aspect has yet to be apparent, it is important to lay the foundation now.
Preparing the structure to scroll
To prepare the main layout to scroll, we should add the following code in the previously mentioned step where it says “<!– Start Step 1: Add the content of this step, which will contain steps 2 and 3–>.”
<!-- Step 1:  Rounded border & Floating Buttons-->

<ScrollView Grid.Row="0" Grid.Column="0" Grid.ColumnSpan="2" VerticalScrollBarVisibility="Never">
  <Grid RowDefinitions="Auto,*">

   <!-- Add the main picture here -->
   <!-- Add the White box here -->

  </Grid>
</ScrollView>

<!-- Add the floating buttons here -->
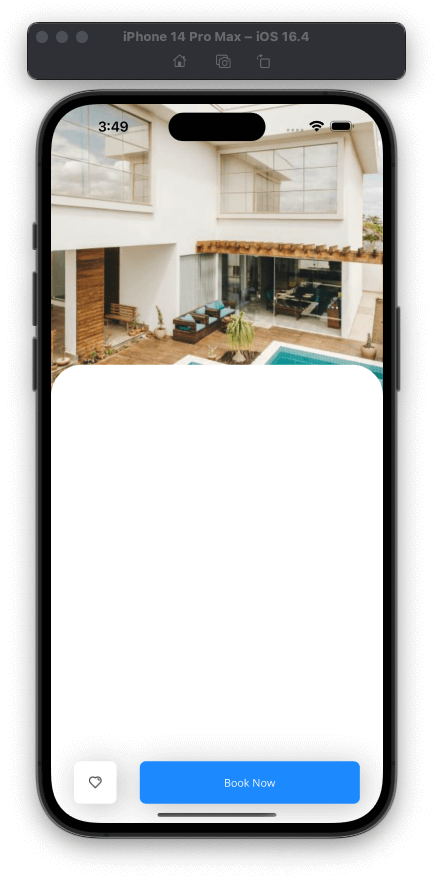
Main picture
Let’s add the main picture! You previously saw a comment that said, “<!—Add the main picture here ->”. Right there, add the image with the following code.
<!-- Main Image-->
<Image Grid.Row="0" Source="hotelmodel.jpeg" Aspect="AspectFill"  VerticalOptions="Start" HeightRequest="380"/>
White box with rounded edges
Here, we’ll work with a Frame (you can also use a border) to design the white box with rounded edges. This code block is the one that will officially contain the elements of steps 2 and 3.
<!-- White box with rounded edges-->

<Frame Grid.Row="1" CornerRadius="40" HasShadow="False" Margin="0,-40,0,0" BorderColor="Transparent">
  <Grid RowDefinitions="Auto,Auto,Auto,Auto,Auto,Auto,Auto"
           ColumnDefinitions="*,Auto" Padding="20,20,20,60">

    <!-- Add the elements of steps 2 and 3 here -- >

  </Grid>
</Frame>
Creating the floating buttons
Finally, add the following code in the comment line that says “<!– Add the floating buttons here –>.”
<!-- Floating Buttons -->

<Button Grid.Row="1" Grid.Column="0"
                     HeightRequest="55"
                     WidthRequest="55"
                     ImageSource="heart"
                     VerticalOptions="End"
                     BackgroundColor="White"
                     Margin="30,0">
  <Button.Shadow>
   <Shadow Brush="Silver"
           Offset="5,5"
           Radius="20"
           Opacity="0.9"/>
  </Button.Shadow>
</Button>
<Button Grid.Row="1" Grid.Column="1"
                    Margin="0,0,30,0"
                    Text="Book Now"
                    HeightRequest="55"
                    VerticalOptions="End"
                    BackgroundColor="#2094ff">
 <Button.Shadow>
  <Shadow Brush="Silver"
          Offset="5,5"
          Radius="20"
          Opacity="0.9"/>
 </Button.Shadow>
</Button>
Note: If you want to know more about the floating effect of the buttons, I invite you to look at the article Simple way to create a floating button.
Step 2: Hotel description

We are going to replicate the hotel description with the following elements:
- Name, price, and hotel description.
- Reviews with frame and its main layout.
Name, price, and hotel description
Refer to the following code example to display the hotel name, price, and description.
<!-- Step 2: Hotel Description-->

<!--Hotel name-->
<Label Grid.Row="0" Grid.Column="0" Grid.ColumnSpan="2" Text="Hotel LightSky" FontSize="22"/>

<!--Price-->
<Label Grid.Row="0" Grid.Column="1" Text="128$" HorizontalTextAlignment="End" FontSize="22"/>

<!--Price description-->
<Label Grid.Row="1" Grid.Column="1" Text="per person" Margin="0,10,0,0" TextColor="Silver"/>

<!--Hotel description-->
<Label Grid.Row="1" Grid.Column="0" Text="2 guest 1 bedroom 1 bath" Margin="0,10,0,0" TextColor="Silver"/>

<!-- Add here all the code explained in the following code block -->
Reviews
The Reviews section includes star icons, a description, an arrow icon, and a list of profile images of the reviewers.
Add a frame and its main layout
To design the review section, add a frame and a layout to organize the information it will contain. Refer to the following code example.
<!--Reviews-->
<Frame Grid.Row="2" Grid.Column="0" Grid.ColumnSpan="2" BorderColor="Transparent" CornerRadius="10" HasShadow="False" BackgroundColor="#f2f6fc" HeightRequest="80" Margin="0,35">
 <Grid RowDefinitions="*,*" ColumnDefinitions="Auto,*,Auto">

      <!-- Add the star icon and description here -->
      <!-- Add the list of reviewers here -->

 </Grid>
</Frame>

<!-- Add here all the code explained in the following code block -->
Adding the star icon and description
Replace the comment line that says “<!– Add the star icon and description here –>” with the following code.
<!-- Start icons-->
<Label Grid.Row="0" Grid.Column="0" Text="⭐⭐⭐⭐"/>

<!-- Start description-->
<Label Grid.Row="1" Grid.Column="0" Text="129 reviews" VerticalTextAlignment="Center" TextColor="#70747a"/>


<!-- Arrow icon-->
<Image Grid.Row="1" Grid.Column="1" Source="arrow" HorizontalOptions="Start"/>
Reviews list
To display a list with the profile pictures of the reviewers, we will use the Syncfusion .NET MAUI ListView and Avatar View controls. To implement them in your project:
- Add the Syncfusion.Maui.ListView and Syncfusion.Maui.Core NuGet packages.


- Now, register the handler for the Syncfusion .NET MAUI ListView and Avatar View controls in the MauiProgram.cs file. To do so, go to the CreateMauiApp method, then add the following code, next to the .UseMauiApp<App>() method.
.ConfigureSyncfusionCore();
Add the following namespaces for the .NET MAUI ListView and Avatar View controls in your XAML file.
ListView
xmlns:syncListView="clr-namespace:Syncfusion.Maui.ListView;assembly=Syncfusion.Maui.ListView"
Avatar View
xmlns:syncAvatar="clr-namespace:Syncfusion.Maui.Core;assembly=Syncfusion.Maui.Core"
- Finally, add the following code right in the comment where it says ” <!– Add the list of reviewers here –>.”
<!--Avatar collections-->

<syncListView:SfListView Grid.Row="0" Grid.RowSpan="2" Grid.Column="2" ItemsSource="{Binding Reviews}" SelectionBackground="Transparent" ItemSpacing="-9" WidthRequest="140" ScrollBarVisibility="Never" Orientation="Horizontal">
 <syncListView:SfListView.ItemTemplate>
  <DataTemplate>
   <Grid Margin="5,0,0,0">
    <syncAvatar:SfAvatarView ContentType="Default" Padding="5" ImageSource="{Binding Picture}" Stroke="Transparent" WidthRequest="50" HeightRequest="50" CornerRadius="25"/>
   </Grid>
  </DataTemplate>
 </syncListView:SfListView.ItemTemplate>
</syncListView:SfListView>

Step 3: Hotel offers
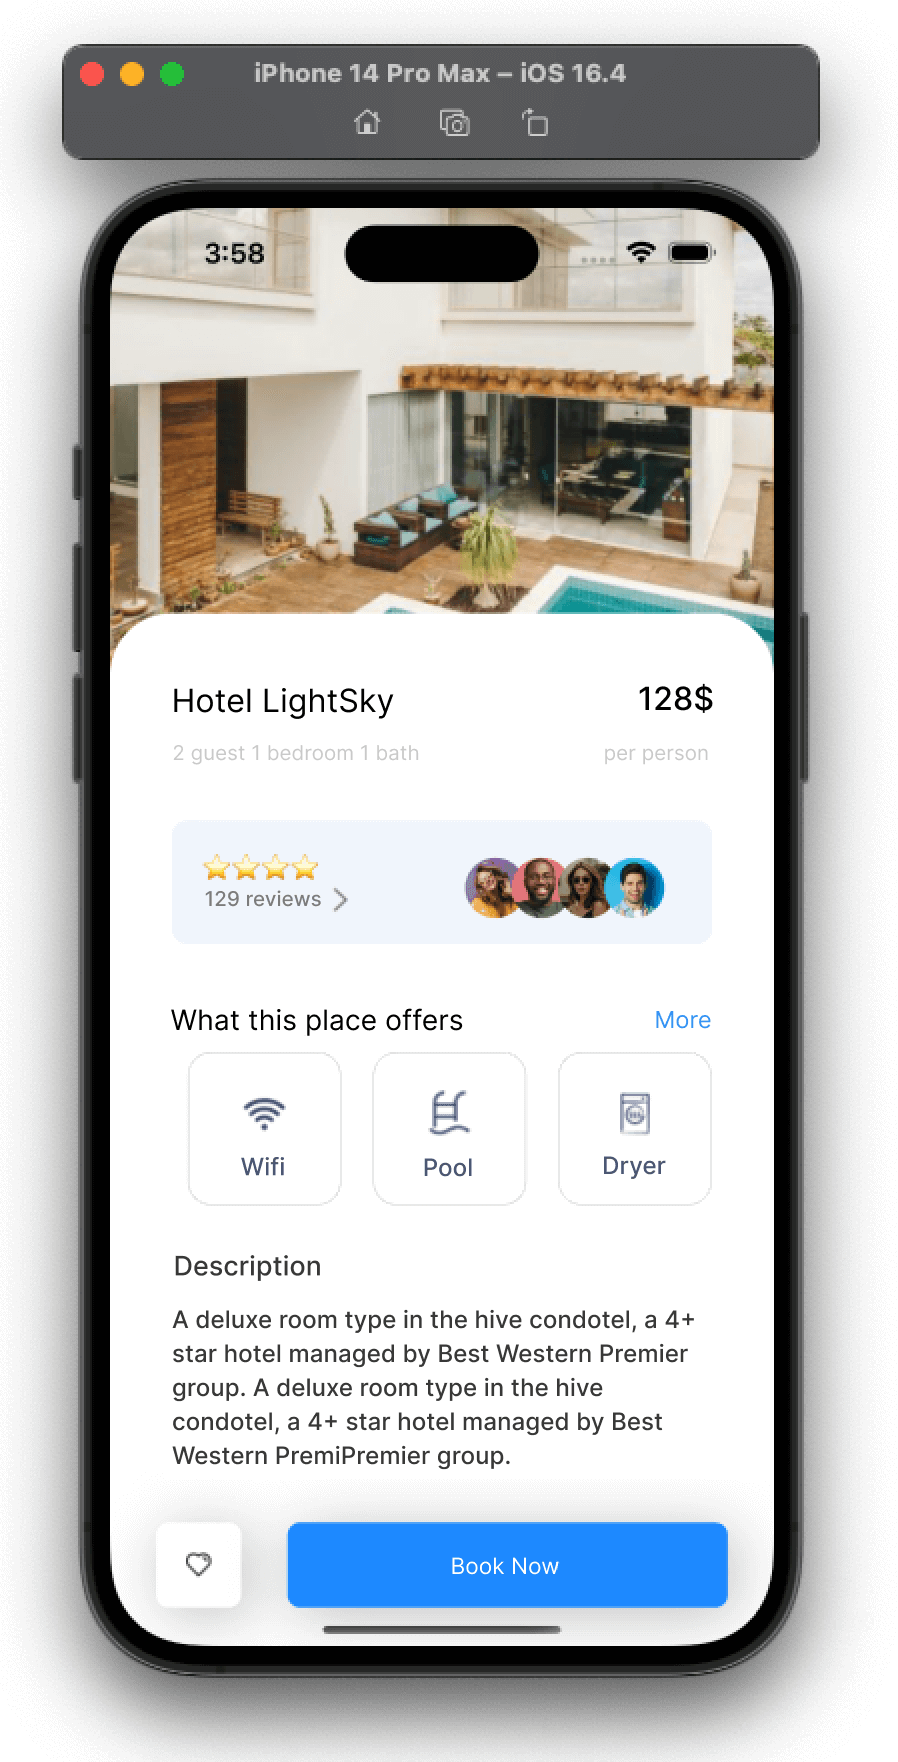
We’ve come to the last step to complete our UI. We need the following elements:
- Title and More button.
- A list of services offered.
- Description title and text.
Title and More button
Refer to the following code example to design the title, “What this place offers,” and More button.
<!-- Step 3: Hotel Offers>

<!-- Offers: Title -->
<Label Grid.Row="3" Grid.Column="0" Grid.ColumnSpan="2" Text="What this place offers" FontAttributes="Bold" FontSize="18"/>

<!-- Offers: More -->
<Label Grid.Row="3" Grid.Column="1" Text="More" FontAttributes="Bold" HorizontalTextAlignment="End" VerticalTextAlignment="Center" TextColor="#3394ee"/>

<!-- Add the service offers list here -->
Services offers list
We will use the Syncfusion .NET MAUI ListView control to display the offers list.
<!-- Offer collection-->

<syncListView:SfListView Grid.Row="4" Grid.Column="0" Grid.ColumnSpan="2" Padding="0,15,0,0" ItemsSource="{Binding Services}" ItemSize="100" ItemSpacing="10" SelectionBackground="Transparent" ScrollBarVisibility="Never" HeightRequest="120" HorizontalOptions="Start" Orientation="Horizontal">
 <syncListView:SfListView.ItemTemplate>
  <DataTemplate>
   <Border WidthRequest="100" StrokeShape="RoundRectangle 15,15,15,15">
    <VerticalStackLayout VerticalOptions="Center" HorizontalOptions="Center">
     <Image Source="{Binding Picture}" HeightRequest="45"/>
     <Label Text="{Binding Title}" TextColor="#4a587d"/>
    </VerticalStackLayout>
   </Border>
  </DataTemplate>
 </syncListView:SfListView.ItemTemplate>
</syncListView:SfListView>

<!-- Add the description header and text here -->
Description header and text
Refer to the following code example to display the Description header and text details.
<!--Description header-->
<Label Grid.Row="5" Grid.Column="0" Text="Description" Padding="0,15" FontAttributes="Bold" FontSize="18"/>

<!--Description-->
<Label Grid.Row="6" Grid.Column="0" Grid.ColumnSpan="2" Text="A deluxe room type in the hive Condotel, a 4-star hotel managed by the Best Western Premier group. A deluxe room type in the hive condotel, a 4-star hotel managed by the Best Western Premier group." Padding="0,0,0,30" FontAttributes="Bold" FontSize="16"/>
And our UI is done!
GitHub reference
To see the complete code structure of this project, go to our demo on GitHub.
Conclusion
Thanks for reading! In this blog, we saw how to replicate a hotel booking UI using Syncfusion .NET MAUI controls. Try out the steps in this blog post and leave your feedback in the comments section below!
Syncfusion .NET MAUI controls were built from scratch using .NET MAUI, so they feel like framework controls. They are fine-tuned to work with a huge volume of data. Use them to build your cross-platform mobile and desktop apps!
For current customers, the new Essential Studio® version is available for download from the License and Downloads page. If you are not a Syncfusion customer, you can always download our free evaluation to see all our controls.
You can also contact us via our support forum, support portal, or feedback portal. We’re always ready to assist you!


