
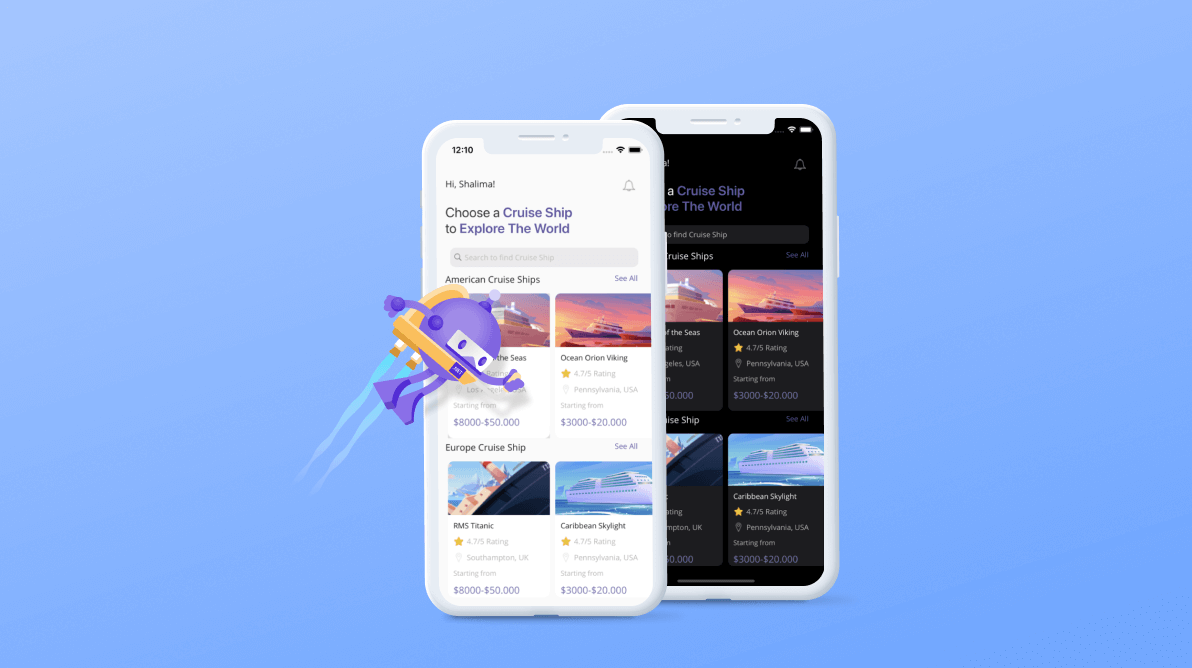
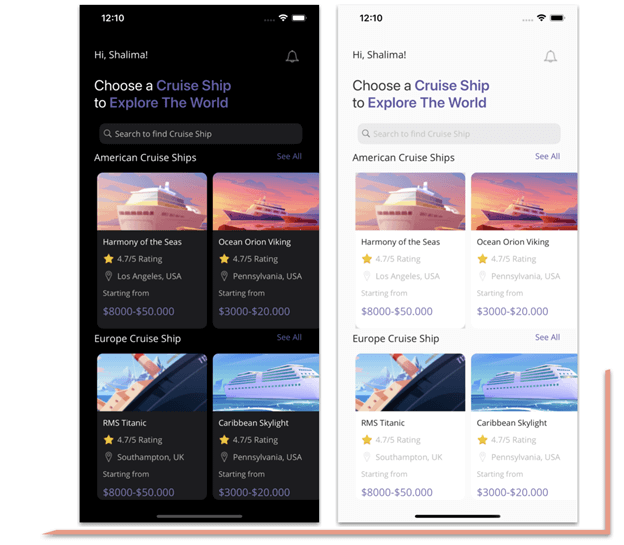
Howdy! In this blog, we’ll replicate a cruise travel application UI in .NET MAUI. It is a design created by Ilham Maulana that they shared on Dribbble.
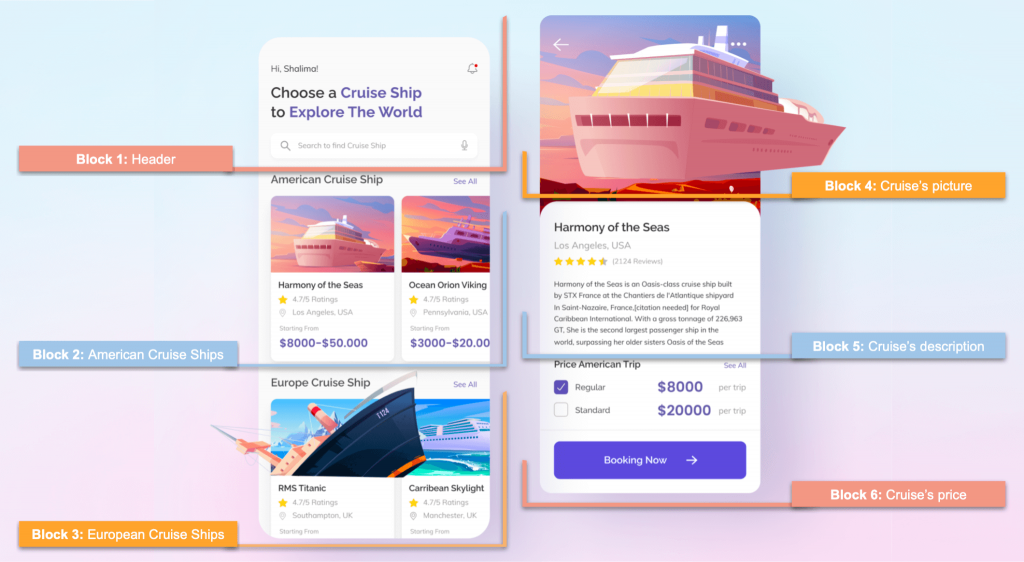
Let’s start designing the UI by dividing it into the following block structure.
Skills that you’ll develop
In addition to strengthening your XAML skills, you will learn to implement the following .NET MAUI features in this article:

- Appearance modes: Manage the appearance of visual elements based on your UI design for both light and dark modes.
- Labels:
- Handle different styles on the same label.
- Add line breaks in the Text property.
- Overlapping visual elements:
- Implement the overlay effect on visual elements based on your UI design.
- Exploration controls: Use the Syncfusion .NET MAUI ListView control to present lists of data vertically or horizontally with different layouts.
General settings for the project
Page creation
Here, we are going to design two different pages. So, I recommend creating a Views folder and, inside it creating the following pages:
- CruisePage.xaml: We will add the list of all the ships available in the app to this page.
- CruiseDetailsPage.xaml: We will add the details about a specific cruise to this page.
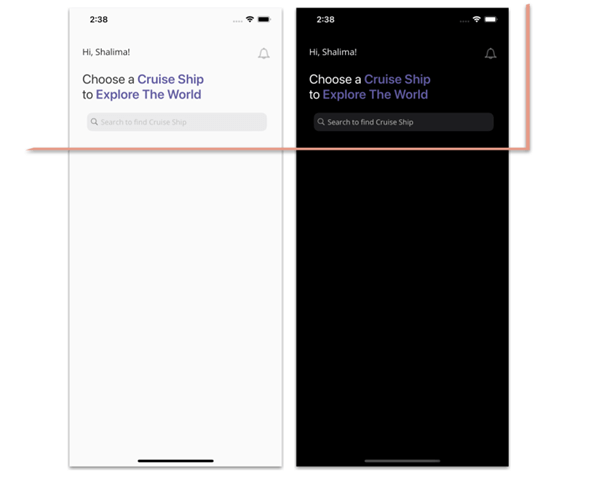
Appearance mode
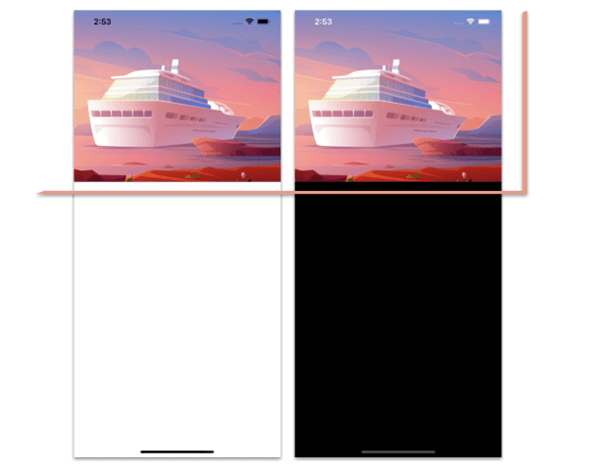
Before you begin, note the following point about the behavior of the appearance modes: It’s not mandatory to add colors to your UI to adapt to the different appearance modes if a visual element does not have a specific value assigned in a property that receives a color. The visual element will take the default values for the appearance mode in which the device is configured (i.e. light or dark).
Let’s understand this better with a use case!
Consider that if you don’t add the BackgroundColor property to your page and your device is set to dark mode, then your page’s background color will be black.
If your device is in light mode, your app will take the white background color. If you want to use a different color, then you should add the BackgroundColor property with the desired value.
Keeping this information in mind, since the CruisePage will have a different BackgroundColor for light mode, we have to add the following line of code in the ContentPage tags:
BackgroundColor="{AppThemeBinding Light=#efefef,Dark=Black}"Step 1: Header
Main layout
Let’s start building the CruisePage.xaml page. First, add the main layout that will contain all the content from blocks one through three.
Refer to the following code example.
<ScrollView Margin="0,0,0,-30" VerticalScrollBarVisibility="Never">
  <Grid ColumnDefinitions="*,Auto" RowDefinitions="Auto,Auto,Auto,Auto,Auto,Auto,Auto" Padding="25,30,0,0">
   <!-- Add all the information corresponding to block 1 -- >
   <!-- Add all the information corresponding to block 2 -- >
   <!-- Add all the information corresponding to block 3 -- >
  </Grid>
</ScrollView>
We have added everything inside a ScrollView to make the page content scrollable. Additionally, we added a Grid with two columns and seven rows to organize all the page elements.
Header elements
The header is composed of the following four elements:
- Greetings
- Bell icon
- Main title
- Search bar
Let’s design them!
Greetings and a bell icon
Refer to the following code example to render the greetings and bell icon.
<!-- Greetings and bell icon-->
   <Label Grid.Column="0" Grid.Row="0" Text="Hi, Shalima!" FontSize="17"/>
   <Image Grid.Column="1" Grid.Row="0" Source="bell" HeightRequest="30" WidthRequest="30" Margin="0,0,20,0"/>
<!-- Add here all the information explained in the next code block -- >
Main title
Here, we are going to use the FormattedString, that allows us to add different styles to the same Label. You can see our UI title (Choose a Cruise Ship to Explore the World) has purple text in bold and also black text without bold formatting.
We will also add line breaks using the string that you can see in some text properties.
The AppThemeBinding markup extension helps us adapt to the visual characteristics for both light and dark modes. In this case, we will use it to change the text color depending on the configured appearance mode.
Note: For more details, refer to the respond to system theme changes documentation page.
<!-- Main title-->
<Label Grid.Column="0" Grid.Row="1" Grid.ColumnSpan="2" FontSize="25" Margin="0,20">
<Label.FormattedText>
<FormattedString>
<Span Text="Choose a " TextColor="{ AppThemeBinding Light=#383838, Dark=White}"/>
<Span Text="Cruise Ship " TextColor="#625ba5" FontAttributes="Bold" />
<Span Text="to " TextColor="{ AppThemeBinding Light=#383838, Dark=White}"/>
<Span Text="Explore The World" TextColor="#625ba5" FontAttributes="Bold" />
</FormattedString>
</Label.FormattedText>
</Label>
<!-- Add here all the information explained in the next code block -- >Search bar
The search bar has small gray borders by default which we don’t need for this UI. So, let’s define the borders and negative padding as shown in the following code example to remove them.
<!—Search bar-->
<Border Grid.Column="0" Grid.Row="2" Grid.ColumnSpan="2" Stroke="Transparent" Padding="0,-20,0,0">
    <SearchBar Placeholder="Search to find a cruise ship" BackgroundColor="{ AppThemeBinding Light=#fafafa, Dark=Transparent}" PlaceholderColor="Silver" Margin="0,10,20,0"/>
</Border>
<!-- Add here all the information explained in the next code block -- >
Step 2: American ships
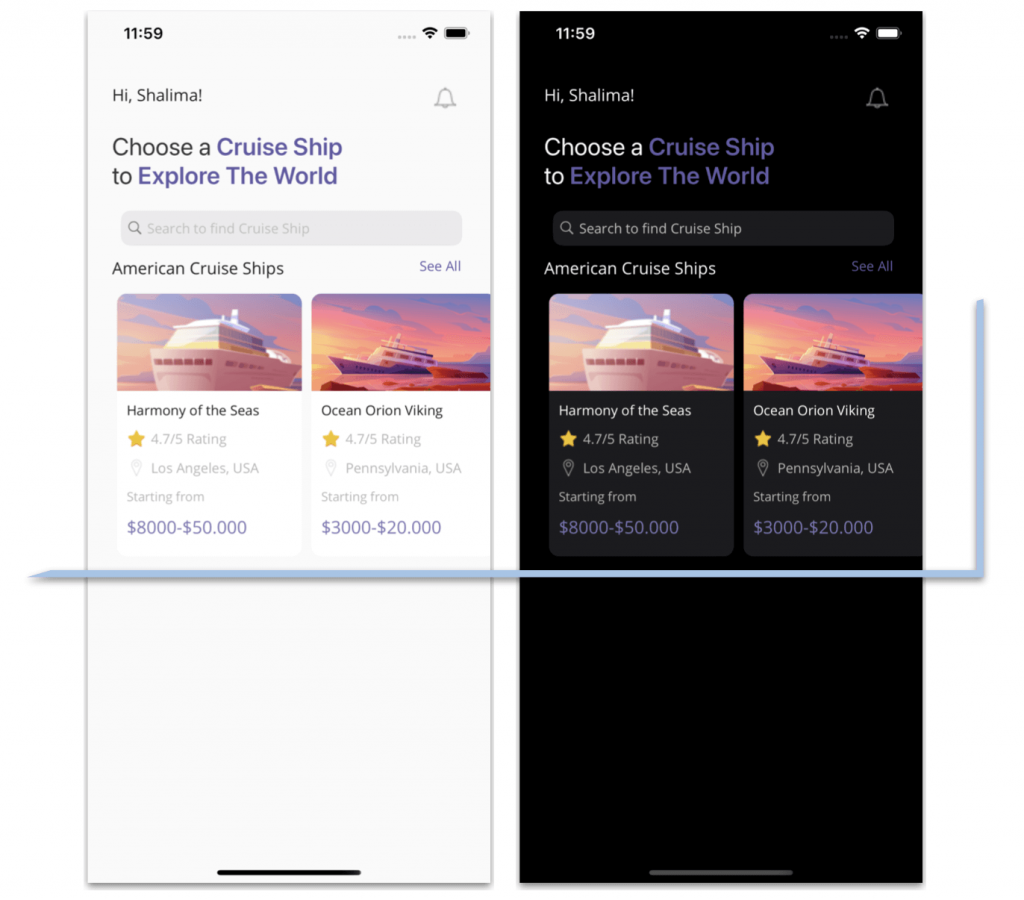
To design the list of American Cruise Ships, first, add the labels that contain the ship descriptions. Then, to render the list, let’s use the Syncfusion .NET MAUI ListView control by following these steps:
Note: Before starting, please refer to the .NET MAUI ListView getting started guide.
- Add the Syncfusion.Maui.ListView NuGet package.

- Go to the MauiProgram.cs file and register the handler for the Syncfusion .NET MAUI ListView. To do this, navigate to the CreateMauiApp method and then just before the line return builder.Build();, add the builder.ConfigureSyncfusionListView(); method.
- Then, add the Syncfusion.Maui.ListView namespace in your XAML file.
xmlns:syncfusion="clr-namespace:Syncfusion.Maui.ListView;assembly=Syncfusion.Maui.ListView"
- Now, add the following code to your XAML page.
<!-- American Cruise Ship Descriptions-->
<Label Grid.Column="0" Grid.Row="3" Text="American Cruise Ships" FontSize="17" />
<Label Grid.Column="1" Grid.Row="3" Text="See All" Padding="0,0,30,0" TextColor="#625ba5" HorizontalTextAlignment="End"/>
<!--American Cruise Ship List-->
<syncfusion:SfListView Grid.Column="0" Grid.Row="4" Grid.ColumnSpan="2" Margin="0,10,0,0"
                           ItemsSource="{Binding Cruise}"
                           ItemSize="190" ItemSpacing="5"
                           ScrollBarVisibility="Never"
                           HeightRequest="280"
                           HorizontalOptions="Start"
                           Orientation="Horizontal">
     <syncfusion:SfListView.ItemTemplate>
      <DataTemplate>
       <Frame CornerRadius="10" BorderColor="Transparent" Padding="10,0,0,0" IsClippedToBounds="True" HorizontalOptions="Start" BackgroundColor="{ AppThemeBinding Light=White, Dark=#1c1c1f}">
        <Grid RowDefinitions="Auto,Auto,Auto,Auto,Auto,Auto" Grid.ColumnDefinitions="Auto,*" RowSpacing="10">
         <!-- Main picture-->
          <Image Grid.Column="0" Margin="-10,0" Grid.Row="0" Grid.ColumnSpan="2" Source="{Binding Picture}" WidthRequest="200" Aspect="AspectFill" HeightRequest="100"/>
         <!-- Cruise's name-->
          <Label Grid.Column="0" Grid.Row="1" Grid.ColumnSpan="2" Text="{Binding Name}" FontAttributes="Bold"/>
         <!-- Rating-->
          <Image Grid.Column="0" Grid.Row="2" Source="star" HeightRequest="20" WidthRequest="20" />
          <Label Grid.Column="1" Grid.Row="2" Text="{Binding Rate}" Padding="5,0,0,0" TextColor="#B9B9B4"/>
         <!-- Location-->
          <Image Grid.Column="0" Grid.Row="3" Source="location" HeightRequest="20" WidthRequest="20" Aspect="AspectFill"/>
          <Label Grid.Column="1" Grid.Row="3" Text="{Binding Location}" Padding="5,0,0,0" TextColor="#B9B9B4"/>
         <!-- Starting From -->
          <Label Grid.Column="0" Grid.Row="4" Grid.ColumnSpan="2" Text="Starting from" FontSize="13" TextColor="#B9B9B4"/>
          <Label Grid.Column="0" Grid.Row="5" Grid.ColumnSpan="2" Text="{Binding StartingFrom}" FontSize="18" FontAttributes="Bold" TextColor="#7c77b4"/>
        </Grid>
       </Frame>
     </DataTemplate>
  </syncfusion:SfListView.ItemTemplate>
</syncfusion:SfListView>
<!-- Add here all the information explained in the next code block -- >
Step 3: European Ships
To design the list of European cruise ships, we are going to use the same visual elements and steps used in the previous block.
Refer to the following code example.
<!-- European Cruise Ship Descriptions-->
 <Label Grid.Column="0" Grid.Row="5" Text="Europe Cruise Ship" FontSize="17"/>
 <Label Grid.Column="1" Grid.Row="5" Text="See All" Padding="0,0,30,0" TextColor="#625ba5" HorizontalTextAlignment="End"/>

<!--European Cruise Ship List-->
<syncfusion:SfListView Grid.Column="0" Grid.Row="6" Grid.ColumnSpan="2" Margin="0,10,0,0"
                        ItemsSource="{Binding EuropeCruise}"
                        ItemSize="190" ItemSpacing="5"
                        ScrollBarVisibility="Never"
                        HeightRequest="280"
                        HorizontalOptions="Start"
                        Orientation="Horizontal">
  <syncfusion:SfListView.ItemTemplate>
   <DataTemplate>
    <Frame CornerRadius="10" BorderColor="Transparent" Padding="10,0,0,0" IsClippedToBounds="True" HorizontalOptions="Start" BackgroundColor="{ AppThemeBinding Light=White, Dark=#1c1c1f}">
     <Grid RowDefinitions="Auto,Auto,Auto,Auto,Auto,Auto" Grid.ColumnDefinitions="Auto,*" RowSpacing="10">
      <!-- Main picture-->
       <Image Grid.Column="0" Margin="-10,0" Grid.Row="0" Grid.ColumnSpan="2" Source="{Binding Picture}" Aspect="AspectFill" HeightRequest="100" WidthRequest="200"/>
      <!-- Cruise's name-->
       <Label Grid.Column="0" Grid.Row="1" Grid.ColumnSpan="2" Text="{Binding Name}" FontAttributes="Bold"/>
      <!-- Rating-->
       <Image Grid.Column="0" Grid.Row="2" Source="star" HeightRequest="20" WidthRequest="20" />
       <Label Grid.Column="1" Grid.Row="2" Text="{Binding Rate}" Padding="5,0,0,0" TextColor="#B9B9B4"/>
      <!-- Location-->
       <Image Grid.Column="0" Grid.Row="3" Source="location" HeightRequest="20" WidthRequest="20" Aspect="AspectFill"/>
       <Label Grid.Column="1" Grid.Row="3" Text="{Binding Location}" Padding="5,0,0,0" TextColor="#B9B9B4"/>
      <!-- Starting From -->
       <Label Grid.Column="0" Grid.Row="4" Grid.ColumnSpan="2" Text="Starting from" FontSize="13" TextColor="#B9B9B4"/>
       <Label Grid.Column="0" Grid.Row="5" Grid.ColumnSpan="2" Text="{Binding StartingFrom}" FontSize="18" FontAttributes="Bold" TextColor="#7c77b4"/>

     </Grid>
    </Frame>
   </DataTemplate>
  </syncfusion:SfListView.ItemTemplate>
</syncfusion:SfListView>
Step 4: Cruise’s picture
In this block, we will design the second page, the CruiseDetailsPage.xaml page, to display the details of a specific ship.
As in the first block, before starting with the code to add the image, let’s define the main layout.
Main layout
Here, we are going to define a Grid with two rows, one for the main image, and the other for the frame which contains all the remaining information of the page.
<Grid RowDefinitions="Auto,*">
 <!-- Add all the information corresponding to block 4 -- >
 <!-- Add all the information corresponding to blocks 5 and 6 -- >
</Grid>
Cruise picture
Now, add the main picture and place it in row number 0.
<Image Grid.Row="0" Source="cruise" Aspect="AspectFill" HeightRequest="350" Margin="0,-50,0,0"/>
<!-- Add here all the information explained in the next code block -- >
Step 5: Cruise’s description
We are going to design the cruise’s description and price blocks inside a Frame.
First, let’s see how to render the cruise’s description.
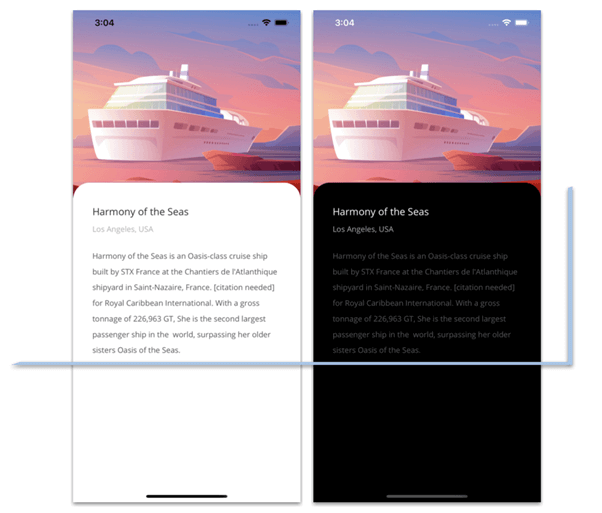
Frame and overlapping
Add a Frame and place it in row number 1. Then, add a negative margin to design the rounded edges of the Frame and overlap it on the top of the image of the previous block.
In addition, inside the Frame, add a Grid to organize the additional information. Refer to the following code example.
<Frame Grid.Row="1" CornerRadius="30" Margin="0,-30,0,0" VerticalOptions="FillAndExpand" BorderColor="Transparent">
 <Grid ColumnDefinitions="*,Auto" RowDefinitions="Auto,Auto,*,Auto,Auto,Auto,Auto" Margin="0,20" RowSpacing="10" Padding="15,0">
   <!-- Add all the information corresponding to blocks 5 and 6 -- >
 </Grid>
</Frame>
Cruise description
We are going to modify this block a bit from the original design by rendering the following components:
- Name
- Location
- Description
Refer to the following code example.
<!--Name-->
<Label Grid.Column="0" Grid.Row="0" Text="Harmony of the Seas" FontAttributes="Bold" FontSize="18" TextColor="{AppThemeBinding Light=#303030, Dark=White}"/>
<!-- Location-->
<Label Grid.Column="0" Grid.Row="1" Text="Los Angeles, USA" TextColor="#aeaeb2"/>
<!-- Description-->
<Label Grid.Column="0" Grid.Row="2" Grid.ColumnSpan="2" TextColor="#565659" LineHeight="1.5" Padding="0,0,0,20" Text="Harmony of the Seas is an Oasis-class cruise ship built by STX France at the Chantiers de l'Atlanthique shipyard in Saint-Nazaire, France. [citation needed] for Royal Caribbean International. With a gross tonnage of 226,963 GT, She is the second largest passenger ship in the world, surpassing her older sisters Oasis of the Seas."/>
<!-- Add here all the information explained in the next code block -- >
Step 6: Cruise’s price
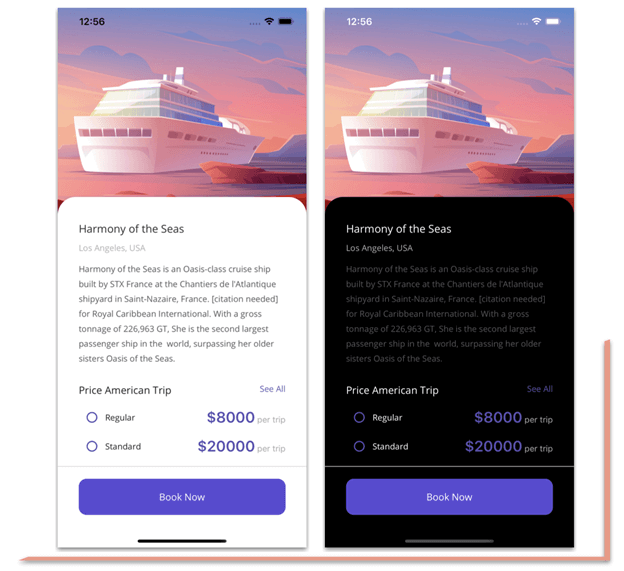
Finally, let’s develop the price block with the following elements:
- Price list
- Separator
- Book Now button
Price list
Refer to the following code example to design the title and description of the Cruise Ship, Price American Trip, and See All labels.
<!-- Price American Trip Description-->
<Label Grid.Column="0" Grid.Row="3" Text="Price American Trip" FontSize="17"/>
<Label Grid.Column="1" Grid.Row="3" Text="See All" TextColor="#625ba5" HorizontalTextAlignment="End"/>
<!-- Add here all the information explained in the next code block -- >
Now, let’s design the following components:
- Checkboxes for the options to select.
- Checkbox descriptions.
- The price and a label of other text descriptions with different formats. To design this, we’ll use FormattedText.
All of this is wrapped in the Syncfusion .NET MAUI ListView control.
<syncfusion:SfListView Grid.Column="0" Grid.Row="4" Grid.ColumnSpan="2"
                         ItemsSource="{Binding Plan}"
                         ScrollBarVisibility="Never"
                         HeightRequest="85"
                         HorizontalOptions="Start">
  <syncfusion:SfListView.ItemTemplate>
   <DataTemplate>
    <Grid ColumnDefinitions="Auto,Auto,*">
      <CheckBox Grid.Column="0" Color="#5b50b2"  HeightRequest="20" WidthRequest="20" HorizontalOptions="Start"/>
      <Label Grid.Column="1" Text="{Binding Name}" VerticalTextAlignment="Center" />
      <Label Grid.Column="2" HorizontalTextAlignment="End" VerticalTextAlignment="Center">
      <Label.FormattedText>
       <FormattedString>
        <Span Text="{Binding Price}" TextColor="#5b50b2" FontAttributes="Bold" FontSize="25"/>
        <Span Text=" per trip" TextColor="#a9a9a9"/>
       </FormattedString>
      </Label.FormattedText>
     </Label>
    </Grid>
   </DataTemplate>
  </syncfusion:SfListView.ItemTemplate>
</syncfusion:SfListView>
<!-- Add here all the information explained in the next code block -- >
Separator and button
To design the separator line, we will use a BoxView, and for the booking option, we are going to add a button.
Refer to the following code example.
<!--Separator and Button-->
<BoxView Grid.Column="0" Grid.Row="5" Grid.ColumnSpan="2" HorizontalOptions="FillAndExpand" HeightRequest="1" Color="#d8d5d5" Margin="-35,10"/>
<Button Grid.Column="0" Grid.Row="6" Grid.ColumnSpan="2" BackgroundColor="#594ad5" TextColor="White" Text="Book Now" FontAttributes="Bold" HeightRequest="60" FontSize="16" CornerRadius="13"/>
That’s all! We have now finished developing our cruise travel app UI!
GitHub reference
To see the complete code structure, refer to our Cruise Travel App UI in .NET MAUI demo on GitHub.
Conclusion
Thanks for reading! In this blog, we saw how to replicate a cruise travel app UI using the Syncfusion .NET MAUI controls. Try out the steps in this blog post and leave your feedback in the comments section below!
Syncfusion .NET MAUI controls were built from scratch using .NET MAUI, so they feel like framework controls. They are fine-tuned to work with a huge volume of data. Use them to build elite cross-platform mobile and desktop apps!
Also, if you have any questions, you can contact us through our support forum, support portal, or feedback portal. We are always happy to assist you!
See you next time!


 No spam, just valuable updates.