We are excited to announce the availability of Syncfusion WPF Template Studio for Visual Studio as part of our Essential Studio® 2023 Volume 3 release.
The WPF Template Studio is a tool Syncfusion provides specifically for building apps using its WPF components. This tool streamlines the development process by including essential Syncfusion components, managing necessary NuGet references, providing predefined namespaces, and generating component-rendering code. It acts as a template wizard, making it easier for developers to create WPF apps using Syncfusion components.
Let’s see how to install Syncfusion WPF extensions and effectively utilize their functionalities and capabilities using the new Syncfusion WPF Template Studio for Visual Studio.
Prerequisites
Getting started
To utilize the WPF Template Studio, install the Syncfusion WPF extensions. This can be done either in Visual Studio or through the Visual Studio Marketplace.
Follow these steps to directly install the WPF extensions in Visual Studio:
- Open Visual Studio.
- Navigate to Extensions -> Manage Extensions -> Online and search for Syncfusion WPF option.
- Locate the WPF Extensions –> Syncfusion item.
- Click the Download or Install option next to the extension.
Note: Close all Visual Studio instances before clicking Modify in the VSIX installer to install the extension. For more details, refer to the Syncfusion VS Extensions Now on the Visual Studio Marketplace blog.
There are two options for creating WPF projects using the installed extension. Let’s check them out.
Option 1: Create WPF projects using the Syncfusion menu in Visual Studio
To create a WPF projects using the Syncfusion menu, click Extensions –> Syncfusion and choose Essential Studio® for WPF -> Create New Syncfusion Project in Visual Studio.
Refer to the following image.
Note: In Visual Studio 2017, the Syncfusion menu is located in the Visual Studio menu.
Option 2: Create WPF projects using the installed extension
To create a Syncfusion WPF project using the installed extension, follow these steps:
- Open Visual Studio and select File -> New -> Project. This will launch the Create a new project dialog.
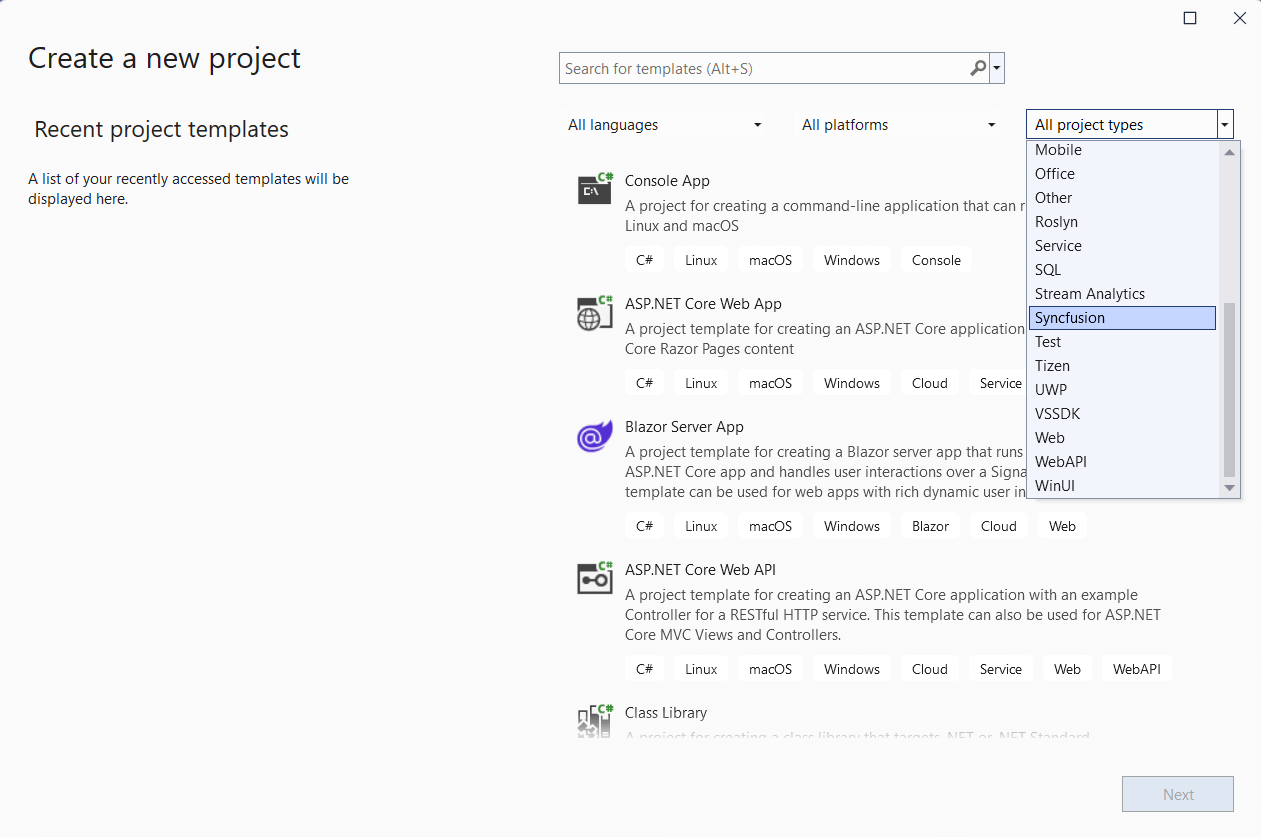
- To find the templates Syncfusion offers for WPF, filter the project type by selecting Syncfusion in the project type dropdown.
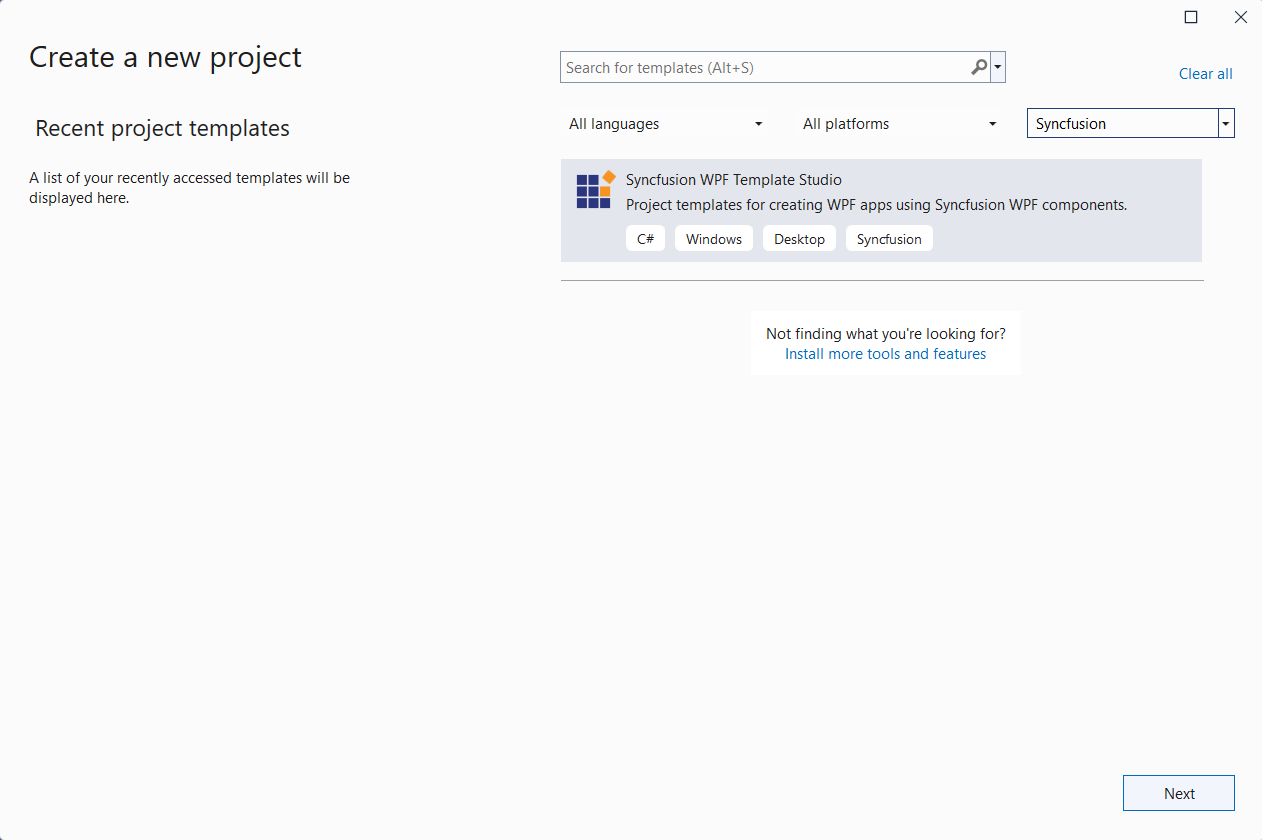
- Select Syncfusion WPF Template Studio and click Next.
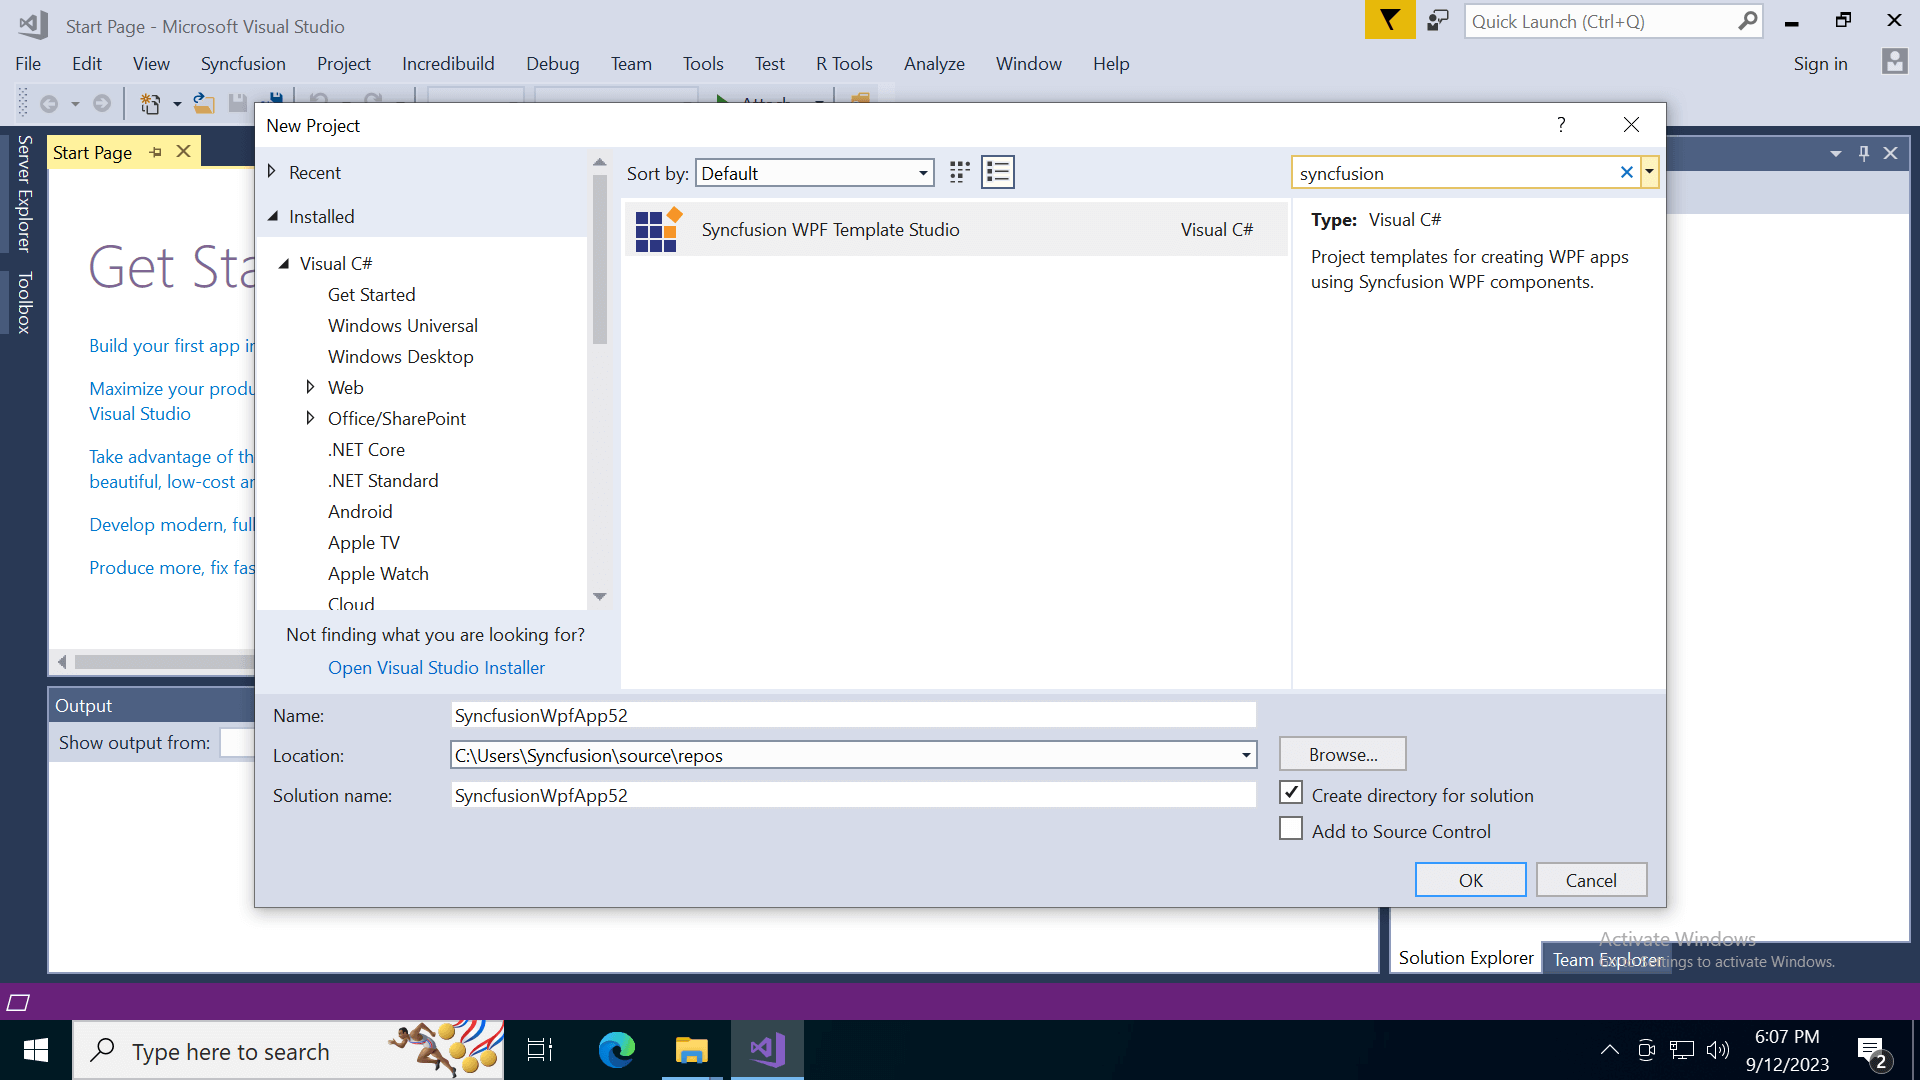
If you’re using Visual Studio 2017, select File -> New -> Project and then navigate to Syncfusion -> Windows -> Syncfusion WPF Template Studio.
Name the project, specify the project location, and then click OK. This will open the project configuration wizard.
- In the Configuration tab, select a language (C# or Visual Basic) and then select the required framework version (.NET 7.0 or .NET6.0 or .NET Framework) and select the required assembly location such as NuGet, GAC Location, or Essential Studio® installed location, from where the assembly is added to the project.
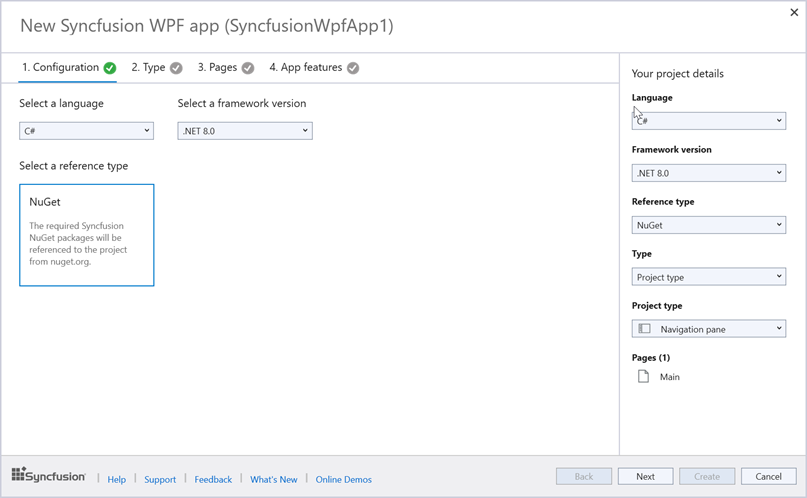
Note: The installed location and GAC options will be available only after the Syncfusion Essential WPF setup has been installed. You can use the NuGet option instead of installing the Syncfusion Essential WPF setup. Also, the GAC option will not be available if you choose .NET 6.0 or .NET 7.0 as the framework version in Visual Studio.
In the Type tab, you can create applications by choosing one of the following types using the Select a type option
Note: The pages, control features, and app features tabs are enabled only when a project type is selected. If we choose a predefined template, these tabs will be disabled.
Type 1: Project type
To create a project type application, follow these steps:
- Choose the required project type from the displayed options.
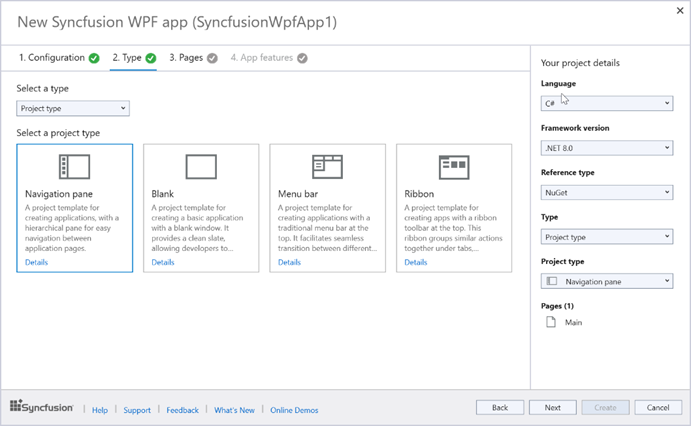
- In the Pages tab, select the Syncfusion WPF controls you want to include in your app by clicking on them.
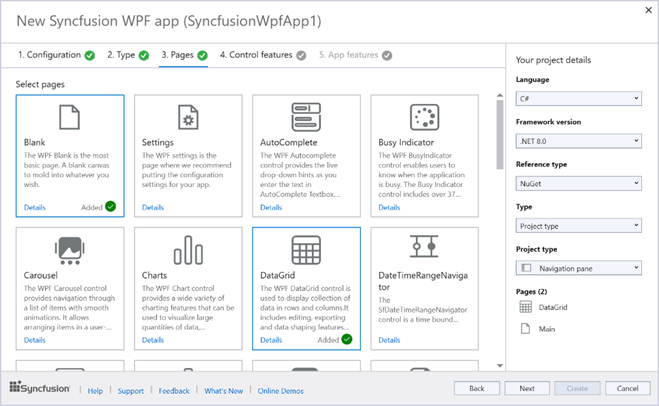
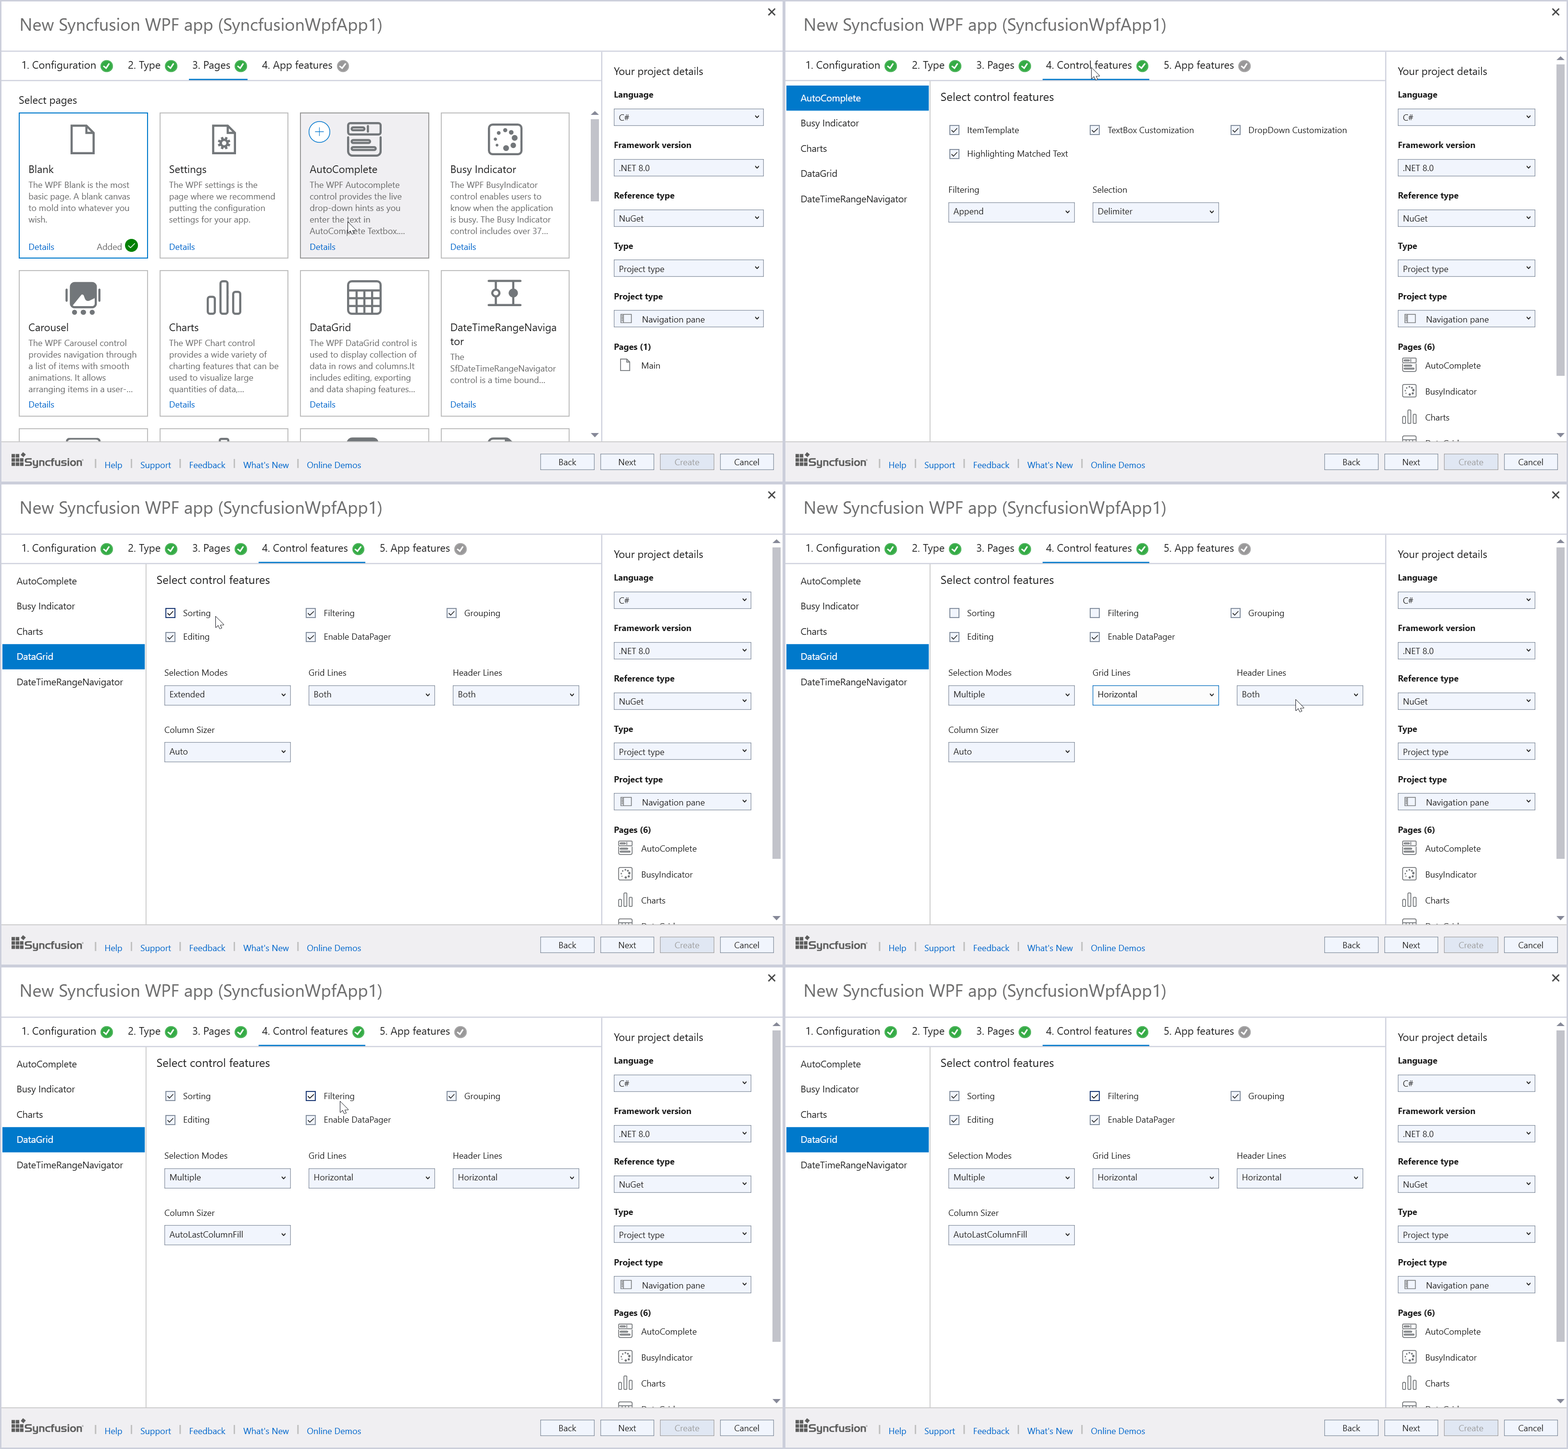
- Then, click Next or go to the Control Features tab to view and select the features of the chosen controls.
- In the App Features tab, choose the required app features.
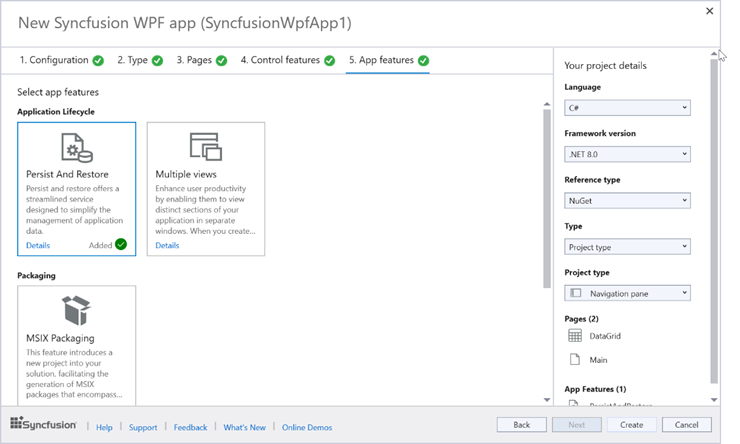
In the project details pane, you can change the project type, framework version, reference type, remove selected controls or app features.
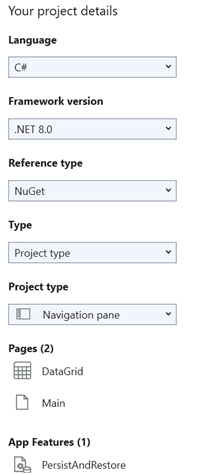
- After configuring all the previous options in the project configuration wizard, click Create button. The Syncfusion WPF project will be created with the necessary XAML files and required Syncfusion WPF assemblies or NuGet packages.
Refer to the following images.
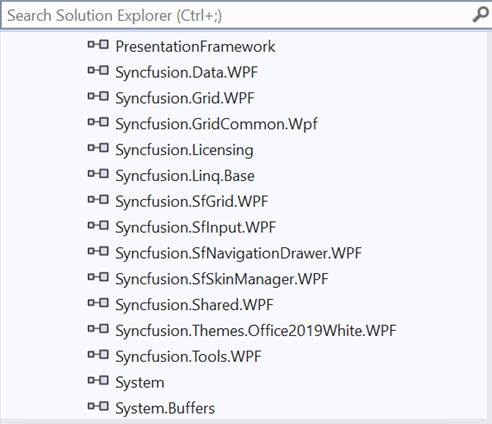
Syncfusion WPF Project Created with Syncfusion WPF assemblies or NuGet packages 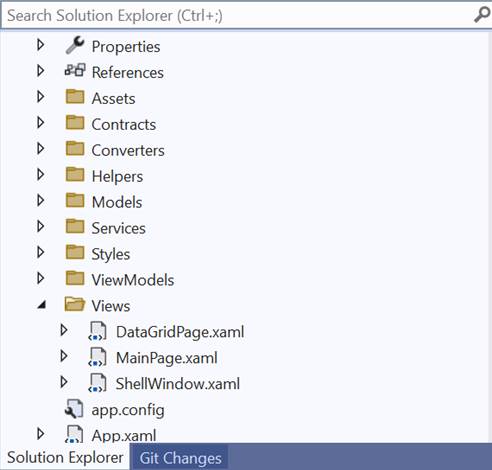
Syncfusion WPF Project Created with XAML files 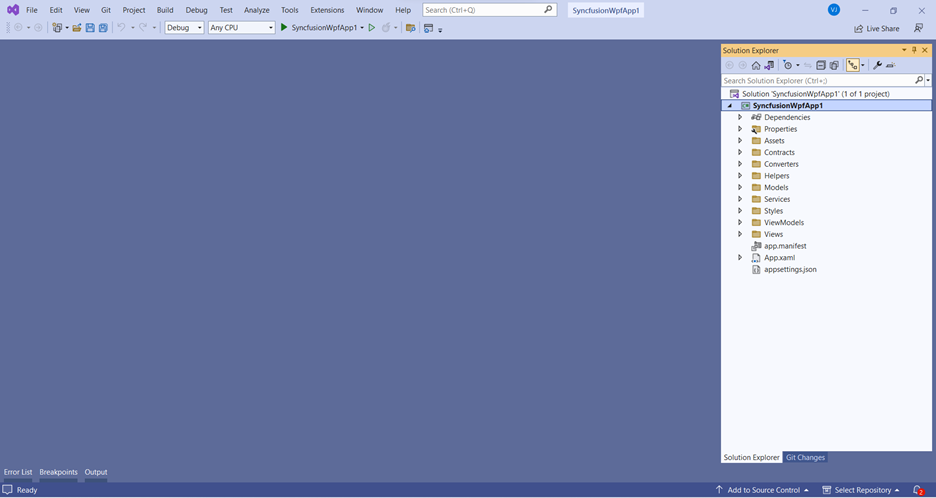
Syncfusion WPF Project Created Using Syncfusion WPF Template Studio for Visual Studio
Type 2: Predefined template
To create a predefined template application, follow these steps:
- Choose the required predefined template from the displayed options.
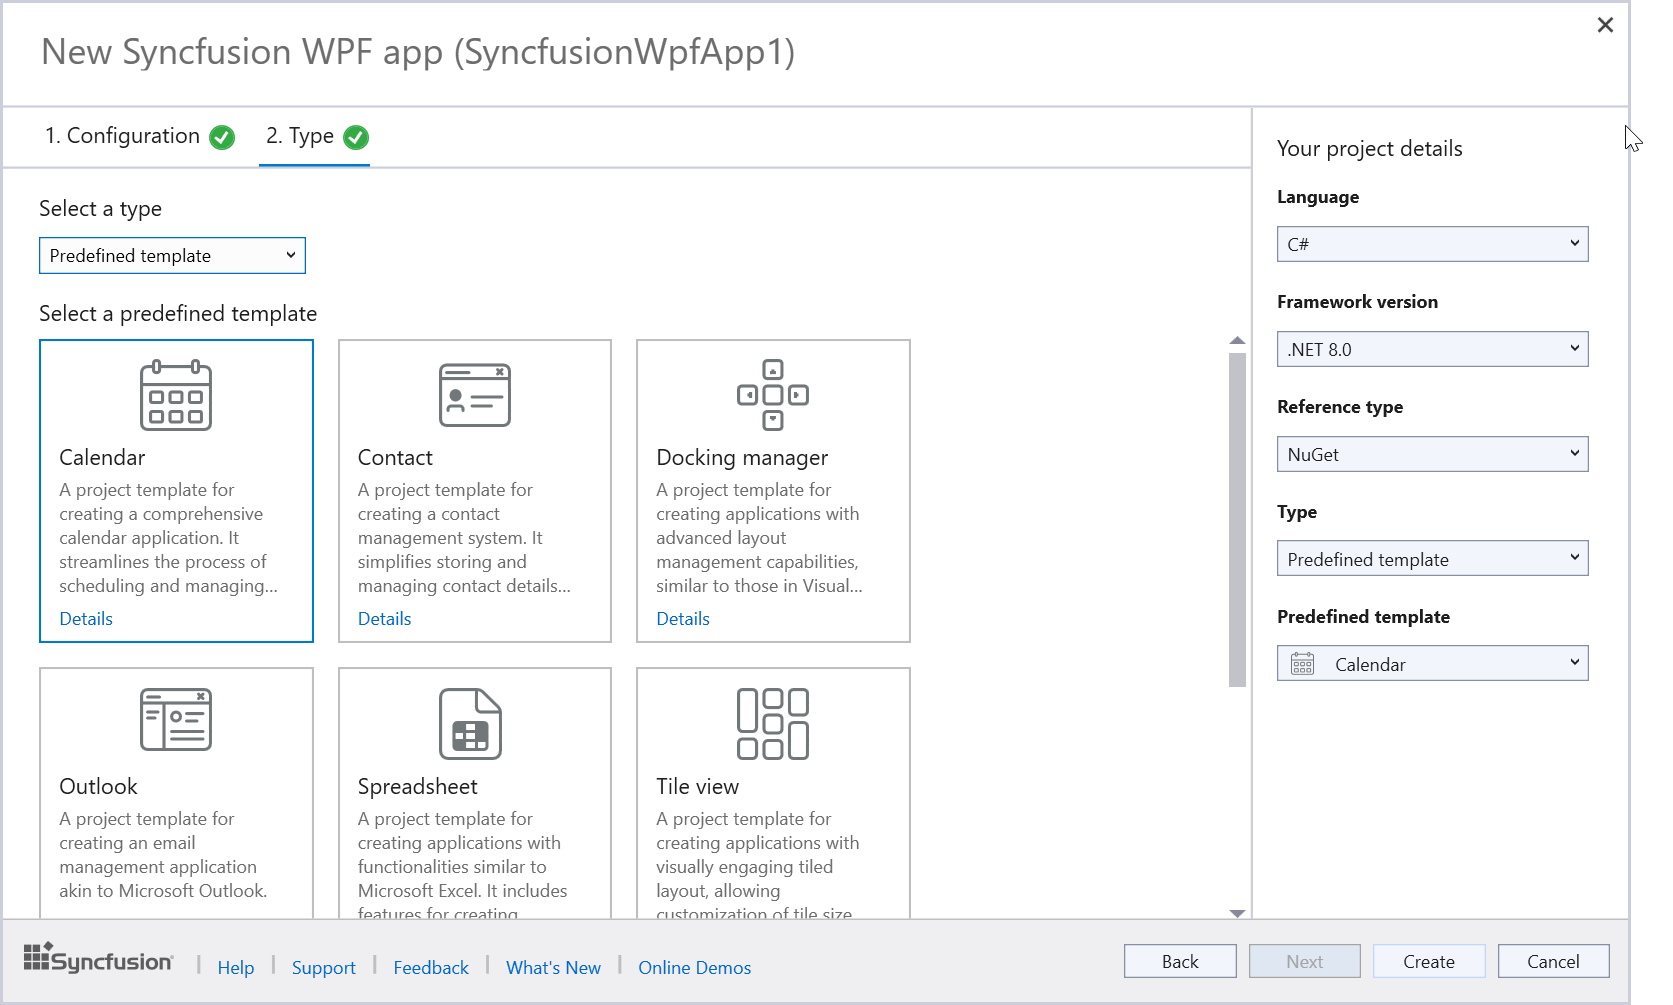
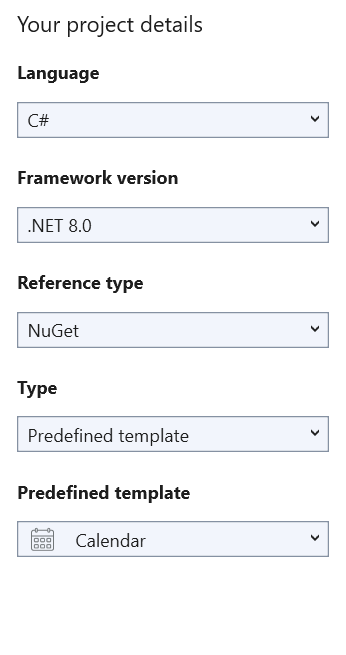
In the project details pane, you can change the selected language, framework version, reference type, and predefined template.
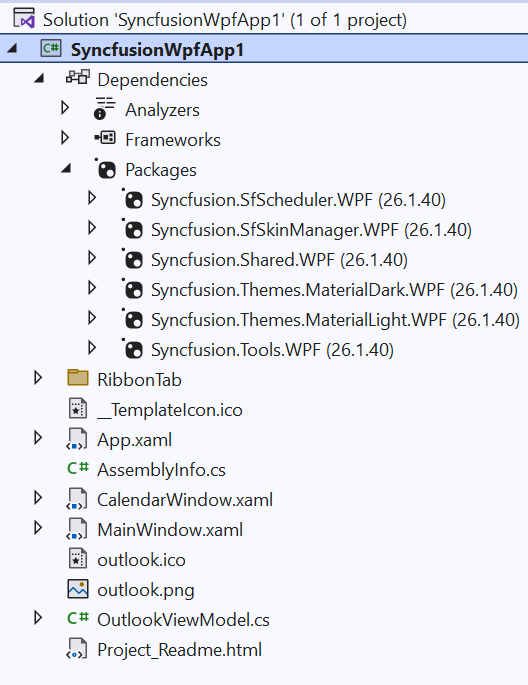
- Click the Create button. The Syncfusion WPF project will be created with the necessary files, Syncfusion WPF assemblies, and NuGet packages.
Conclusion
Thanks for reading! In this blog, we’ve explored the new Syncfusion WPF Template Studio for Visual Studio, available in the 2023 Volume 3 release. It provides a user-friendly project wizard that simplifies the integration of Syncfusion components into your apps, generating code and references for your app so you don’t have to do it manually. Try out this marvelous tool and share your feedback in the comment section of this blog.
Current customers can download the new version of Essential Studio® from the License and Downloads page. If you are not yet a Syncfusion customer, you can try our 30-day free trial to check out our incredible features.
You can also reach us through our support forums, support portal, or feedback portal. We’re always happy to assist you!
Related blogs
- Syncfusion Essential Studio® 2023 Volume 3 Is Here!
- Chart of the Week: Creating A Trend Line Using WPF Charts to Visualize Rapid Heating in North American Oceans
- Chart of the Week: Creating a WPF Doughnut Chart for the Top Rice-Exporting Countries
- Chart of the Week: Creating a WPF Range Column Chart to Visualize ChatGPT’s Performance in Competitive Exams


Comments (1)
Looks amazing!
What about WinForms? Any plans for a similar template/extension?
Yes, some of us are still heavily using WinForms these days!