

Our previous blog showed us how to easily create a Blazor server application with authentication. This blog will show how to configure the Blazor File Manager component with role-based authorization.
- Authentication is done before authorization. It is the process of validating that users are whom they claim to be. It determines whether the person is a registered user or not.
- Authorization is done after authentication. It is the process of permitting a user to access a resource.
The Syncfusion Blazor File Manager is a graphical user interface component for managing the file system. It allows users to perform common file operations like accessing, editing, and sorting files and folders. This component also provides easy navigation of folders for selection of a file or folder from the file system.
Let’s get started!
Add a full-featured file explorer to your Blazor apps with Syncfusion Blazor File Manager. Handle file uploads, downloads, search, sorting, previews, and other file operations through an intuitive, responsive interface.
Add Blazor File ManagerCreate a Blazor server app with authentication and authorization
First, refer to the Getting Started with authentication and authorization in a Blazor server app documentation.
Getting started with the Syncfusion Blazor File Manager component
After creating a Blazor server app, refer to the Getting Started with the Blazor File Manager component documentation.
Configure the Blazor File Manager’s supported operations
We can control the Blazor File Manager’s supported operations through user roles. We will define the following roles and their corresponding file operations.
Role | Subject | File operations |
Admin | Admin can perform all the supported operations of the File Manager. |
|
Employee | Employees can perform file and folder management operations. |
|
Guest | Guest users can view and download the files and folders. |
|
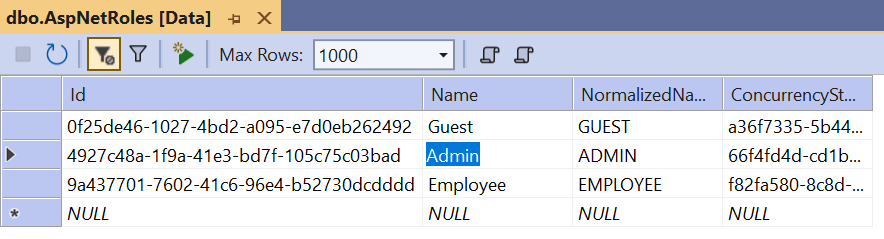
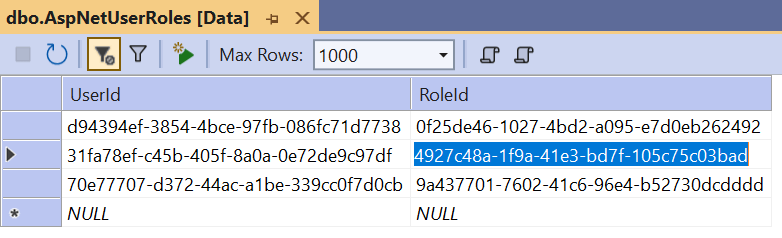
Refer to the following images. They depict the details of the users that we’ll use in this blog to enable role-based authorization.
Usernames

User roles
User Role ID
Configure the Blazor File Manager toolbar
Let’s configure the file operations in the File Manager component’s toolbar based on the roles of the users in the Index.razor file:
- First, access the currently logged-in user’s identity using the AuthenticationState class.
- Then, validate the authenticated user using the Identity.IsAuthenticated property.
- Define the toolbar items in the Blazor File Manager with file operations based on the user role by checking the condition using the IsInRole method.
Refer to the following code example.
@code {
 [CascadingParameter]
 private Task<AuthenticationState> authenticationStateTask { get; set; }
 string[] toolbarItems = { };
 protected async override Task OnInitializedAsync()
 {
     var authState = await authenticationStateTask;
     var user = authState.User;

     if (user.Identity.IsAuthenticated)
     {
         if (user.IsInRole(“Admin”))
         {
            toolbarItems = new string[] { “NewFolder”, “Upload”, “Cut”, “Copy”, “Paste”, “Delete”, “Download”, “Rename”, “SortBy”, “Refresh”, “Selection”, “View”, “Details” };
         }
         else if (user.IsInRole(“Employee”))
         {
             toolbarItems = new string[] { “Cut”, “Copy”, “Paste”, “Download”, “Rename”, “SortBy”, “Refresh”, “Selection”, “View”, “Details” };
        }
        else
        {
            toolbarItems = new string[] { “Download”, “SortBy”, “Refresh”, “Selection”, “View”, “Details” };
        }
     }

  }
}
Configure the File Manager to handle users
To handle the authorized and not authorized users, define the <Authorized> and <NotAuthorized> components within the <AuthorizeView> component in the Index.razor file:
- Access the authenticated user’s identity using the @context object within the <Authorized> component.
- Then, validate the user role using the IsInRole method.
- Define the Url, DownloadUrl, GetImageUrl, and UploadUrl properties using the FileManagerAjaxSettings based on the roles.
- Pass the corresponding role as a query parameter to the File Manager service to handle the file operations based on the user roles.
Refer to the following code example.
<AuthorizeView>
  <Authorized>
    <h1>Hello, @context.User.Identity.Name!</h1>

    @if (context.User.IsInRole(“Admin”))
    {
      <SfFileManager Tvalue=”FileManagerDirectoryContent”>
          <FileManagerAjaxSettings Url=”/api/FileManager/FileOperations?Role=Admin”
                                     DownloadUrl=”/api/FileManager/Download”
                                     GetImageUrl=”/api/FileManager/GetImage”
                                     UploadUrl=”/api/FileManager/Upload”>
          </FileManagerAjaxSettings>
          <FileManagerToolbarSettings Items=”@toolbarItems”></FileManagerToolbarSettings>
      </SfFileManager>
   }
   else if (context.User.IsInRole(“Employee”))
   {
      <SfFileManager Tvalue=”FileManagerDirectoryContent”>
          <FileManagerAjaxSettings Url=”/api/FileManager/FileOperations?Role=Employee”
                                     DownloadUrl=”/api/FileManager/Download”
                                     GetImageUrl=”/api/FileManager/GetImage”
                                     UploadUrl=”/api/FileManager/Upload”>
          </FileManagerAjaxSettings>
          <FileManagerToolbarSettings Items=”@toolbarItems”></FileManagerToolbarSettings>
     </SfFileManager>
   }
   else
   {
      <SfFileManager Tvalue=”FileManagerDirectoryContent”>
          <FileManagerAjaxSettings Url=”/api/FileManager/FileOperations?User=AuthorizedUser”
                                     DownloadUrl=”/api/FileManager/Download”
                                     GetImageUrl=”/api/FileManager/GetImage”>
         </FileManagerAjaxSettings>
         <FileManagerToolbarSettings Items=”@toolbarItems”></FileManagerToolbarSettings>
     </SfFileManager>
   }
   </Authorized>
   <NotAuthorized>
     <h1>Authentication Failure!</h1>
     <p>You’re not signed in.</p>
   </NotAuthorized>
</AuthorizeView>
Configure the Blazor File Manager service
Finally, configure the File Manager service:
- Receive the file operation details and corresponding roles as parameters through the FileManagerDirectoryContent and Role parameter.
- Then, define the file operations based on the user roles.
The main action code follows, but you can also find all its dependent classes and methods by checking out this GitHub repository.
[Route(“api/[controller]”)]
public class FileManagerController : Controller
{
public PhysicalFileProvider operation;
public string basePath;
string root = “wwwroot\\Files”;
public FileManagerController(Microsoft.AspNetCore.Hosting.IwebHostEnvironment hostingEnvironment)
{
this.basePath = hostingEnvironment.ContentRootPath;
this.operation = new PhysicalFileProvider();
this.operation.RootFolder(this.basePath + this.root); // It denotes in which files and folders are available.
}
// Processing the File Manager operations.
[Route(“FileOperations”)]
public object? FileOperations([FromBody] FileManagerDirectoryContent args, string Role)
{
if (Role == “Admin”)
{
if (args.Action == “create”)
// Path – Current path where the folder is to be created; Name – Name of the new folder.
return this.operation.ToCamelCase(this.operation.Create(args.Path, args.Name));
else if (args.Action == “delete”)
// Path – Current path where the folder is to be deleted; Names – Name of the files to be deleted.
return this.operation.ToCamelCase(this.operation.Delete(args.Path, args.Names));
}
if (Role == “Admin” || Role == “Employee”)
{
if (args.Action == “copy”)
// Path – Path from where the file was copied; TargetPath – Path where the file/folder is to be copied; RenameFiles – Files with same name in the copied location that are confirmed for renaming; TargetData – Data of the copied file.
return this.operation.ToCamelCase(this.operation.Copy(args.Path, args.TargetPath, args.Names, args.RenameFiles, args.TargetData));
else if (args.Action == “move”)
// Path – Path from where the file was cut; TargetPath – Path where the file/folder is to be moved; RenameFiles – Files with same name in the moved location that is are confirmed for renaming; TargetData – Data of the moved file.
return this.operation.ToCamelCase(this.operation.Move(args.Path, args.TargetPath, args.Names, args.RenameFiles, args.TargetData));
else if (args.Action == “rename”)
// Path – Current path of the renamed file; Name – Old file name; NewName – New file name.
return this.operation.ToCamelCase(this.operation.Rename(args.Path, args.Name, args.NewName));
}
if (args.Action == “read”)
// Path – Current path; ShowHiddenItems – Boolean value to show/hide hidden items.
Return this.operation.ToCamelCase(this.operation.GetFiles(args.Path, args.ShowHiddenItems));
else if (args.Action == “search”)
// Path – Current path where the search is performed; SearchString – String typed in the searchbox; CaseSensitive – Boolean value which specifies whether the search must be case sensitive.
return this.operation.ToCamelCase(this.operation.Search(args.Path, args.SearchString, args.ShowHiddenItems, args.CaseSensitive));
else if (args.Action == “details”)
// Path – Current path where details of file/folder is are requested; Name – Names of the requested folders.
return this.operation.ToCamelCase(this.operation.Details(args.Path, args.Names));
return null;
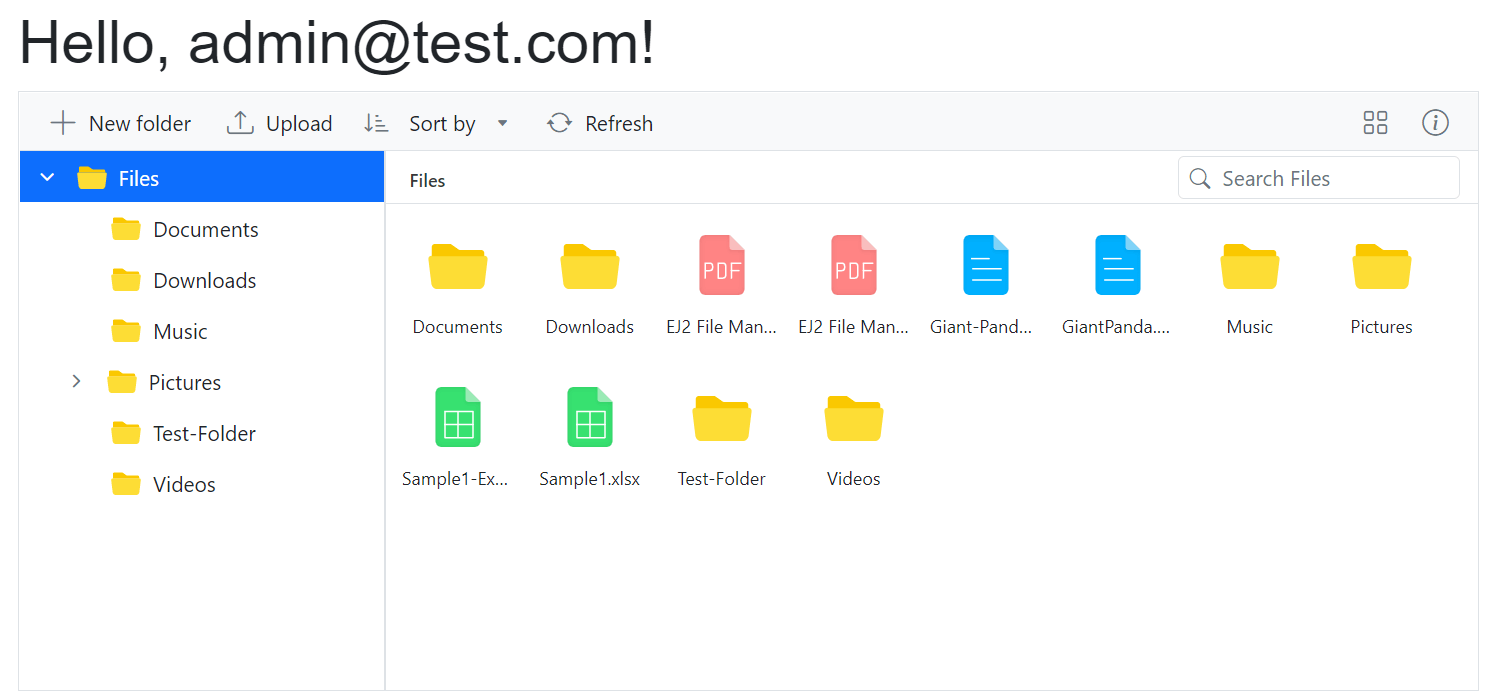
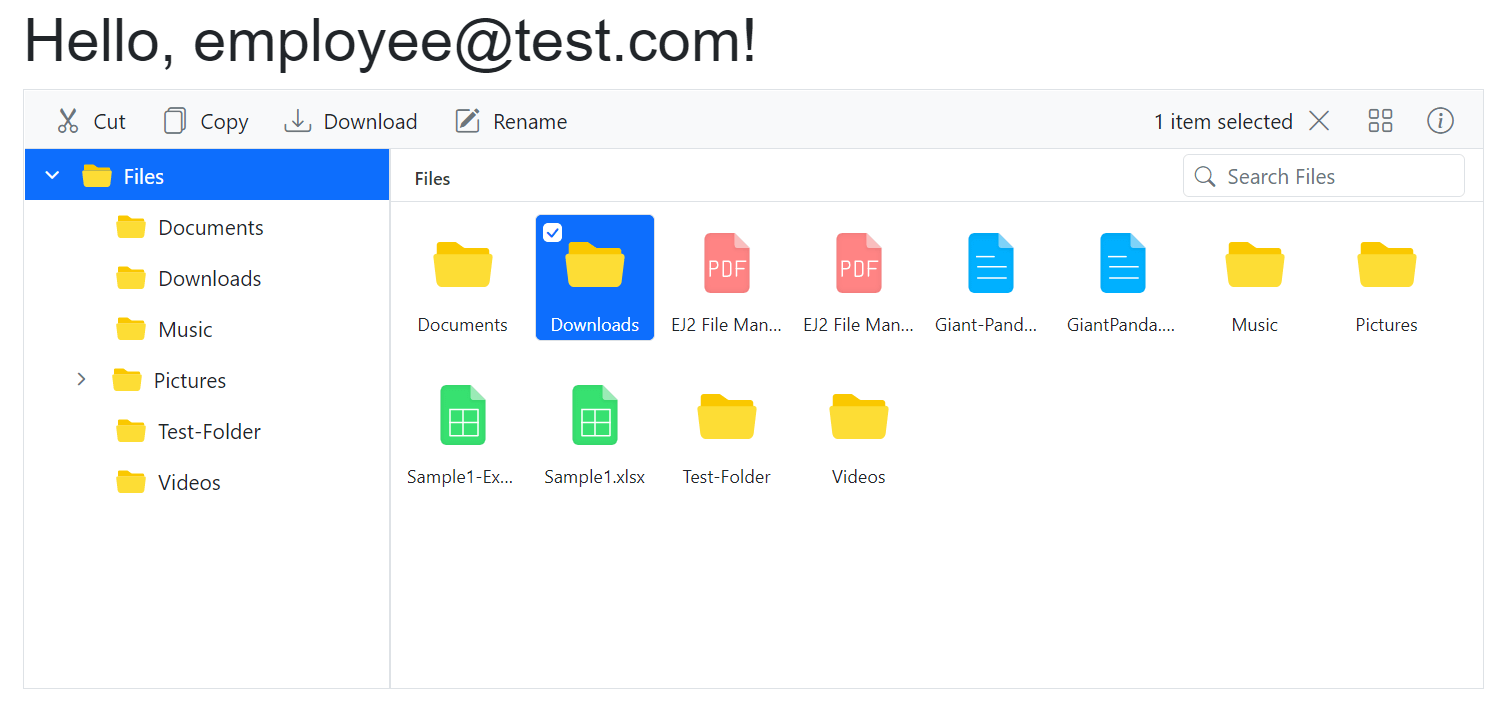
}After executing these code examples, users can perform the file management operations added as items in the toolbar based on their roles in the Blazor File Manager component. Refer to the following output images.
Admin
Employee
Guest

GitHub reference
Check out the code example for Role-based authorization in Blazor File Manager on GitHub.
Conclusion
Thanks for reading! This blog showed you how to enable role-based authorization in the Syncfusion Blazor File Manager component. This will help you prevent users from performing certain file management operations based on their roles in Blazor applications. Try out the steps in this blog and leave your feedback in the comments section below!
For current Syncfusion customers, the newest version of Essential Studio® is available from the license and downloads page. If you’re a new customer, then try our Blazor components by downloading a free 30-day trial.
For questions, you can contact us through our feedback portal, support forums, or support portal. We are always happy to assist you!


 No spam, just valuable updates.
Comments (1)
Hi
How can I authorize FileManagerController for Administrator role?
If I put [Auhtorize] for controller I get an error.