
Cloud storage is the present and future form of data storage, in which data is stored on remote servers. It eliminates the need for physical storage devices, allowing users to access their files from any location easily. This blog provides an overview of how to to download Azure files and set the Azure Blob container dynamically using the Blazor File Manager component.
A blob container is a cloud storage data structure used to save unstructured data in the form of binary large objects (BLOBs). These objects are categorized as unstructured data, as they do not share any particular format, unlike structured data formats, such as CSV or JSON.
The Syncfusion Blazor File Manager component is a graphical user interface for managing the file system. It allows users to perform the most common file operations like accessing, editing, and sorting files or folders. This component also provides easy navigation for browsing folders to select files and folders from the file system.
Prerequisites
- Visual Studio 2019
- .NET Core 3.0 or above
- Syncfusion.Blazor NuGet package
- Syncfusion.EJ2.AspNet.Core NuGet package
- WindowsAzure.Storage NuGet package
Create a Blazor server-side application
- First, create a Blazor server-side app.
- Then, configure the Syncfusion Blazor services in it.
Add Syncfusion.Blazor and Syncfusion.EJ2.AspNet.Core libraries
To import the Syncfusion.Blazor namespace, install the Syncfusion.Blazor NuGet package in your app using the following command.
dotnet add package Syncfusion.Blazor --version 19.3.0.44
To import the Syncfusion.EJ2.AspNet.Core namespace, install the Syncfusion.EJ2.AspNet.Core NuGet package in your app using the following command.
dotnet add package Syncfusion.EJ2.AspNet.Core ---version 19.3.0.44
To import the WindowAzure.Storage namespace, install the WindowAzure.Storage NuGet package in your app.
dotnet add package WindowsAzure.Storage --version 9.3.3
Register Syncfusion Blazor Service
For a .NET 6 app, open the ~/Program.cs file and register the Syncfusion Blazor Service.
For a .NET 5 or .NET 3.X app, open the ~/Startup.cs file and register the Syncfusion Blazor Service.
public void ConfigureServices(IServiceCollection services)
{
   services.AddSyncfusionBlazor();
}
Add style sheet and script reference
For a .NET 6 app, add the Syncfusion bootstrap5 theme in the <head> of the ~/Pages/_Layout.cshtml file.
For a .NET 5 or .NET 3.X app, add the Syncfusion bootstrap5 theme in the <head> of the ~/Pages/_Host.cshtml file.
<head>
    <link href="_content/Syncfusion.Blazor/styles/bootstrap5css" rel="stylesheet" />
    <script src=" _content/Syncfusion.Blazor/scripts/syncfusion-blazor.min.js" />
</head>
Add Blazor FileManager component
Now, add the Syncfusion FileManager component in the Razor file. Here, the FileManager component was added in the ~/Pages/Index.razor file under the ~/Pages folder.
Import the @using Syncfusion.Blazor.
<SfFileManager TValue="FileManagerDirectoryContent">
    <FileManagerAjaxSettings>
    </FileManagerAjaxSettings>

</SfFileManager>
Initialize the service in the controller
To initialize a local service, create a new folder named Controllers inside the server part of the project. Then, create a new file named DefaultController.cs inside the Controllers folder. Next, import the Syncfusion File Manager’s Base and AzureFileProvider in the DefaultController.
using System;
using System.Threading.Tasks;
using Microsoft.AspNetCore.Mvc;
using Microsoft.AspNetCore.Hosting;
using Microsoft.AspNetCore.Http;
using Microsoft.AspNetCore.Http.Features;
using Newtonsoft.Json;
using Newtonsoft.Json.Serialization;
using Syncfusion.EJ2.FileManager.Base;
using Syncfusion.EJ2.FileManager.AzureFileProvider;
using Microsoft.Extensions.Configuration;

namespace BlazorApp1.Controllers
{
    [Route("api/[controller]")]
    public class DefaultController : Controller
    {
        public AzureFileProvider operation;

        [Obsolete]
        public DefaultController(IHostingEnvironment hostingEnvironment, IConfiguration configuration)
        {

        }


        public IActionResult Index()
        {
            return View();
        }
    }
}
Note: For more information, refer to the Example of Azure Blob Storage in the Blazor File Manager Component.
Initialize Azure Blob container
According to Microsoft, “a container organizes a set of blobs, similar to a directory in a file system. A storage account can include an unlimited number of containers, and a container can store an unlimited number of blobs.”
In the file constructor method of the Azure controller, register your Azure Blob and initialize the container:
- First, include the Azure credentials like blob name and domain in the appsettings.json file. Then, use these values in the Azure controller to initialize the blob.
//These are dummy values. Use your actual Azure Blob credentials, Blob name. "AzureBlobs": { "Domain": "https://testteslayt.blob.core.windows.net/", "BlobName": "testblobs", "ParentFolder": "Files", "AzureKey": "TUyG------------------------------------------B==", "DevName": "tesladev" } - Then, register the Azure Blob and set the blob container in the controller constructor method.
public DefaultController(IHostingEnvironment hostingEnvironment, IConfiguration configuration)
{
    domain = configuration.GetSection("AzureBlobs").GetSection("Domain").Value;
    blobName = configuration.GetSection("AzureBlobs").GetSection("BlobName").Value;
    parentFolder = configuration.GetSection("AzureBlobs").GetSection("ParentFolder").Value;
    azureKey = configuration.GetSection("AzureBlobs").GetSection("AzureKey").Value;
    devName = configuration.GetSection("AzureBlobs").GetSection("DevName").Value;

    this.operation = new AzureFileProvider();
    this.operation.RegisterAzure(devName, azureKey, blobName);
    this.operation.SetBlobContainer(domain + blobName + "/", domain + blobName + "/" + parentFolder);
}
Thus, we have initialized the Azure Blob container and set its path. Now, let’s focus on how to integrate a dynamic Azure Blob container with Blazor File Manager.
Configuring a dynamic Azure Blob container
Once the blob container path is set, we can perform all operations, like file upload and folder creation, in that container.
Let’s see how to restrict the whole container and provide permission to access a specific folder based on the user login.
Changes in the Razor file
In the Razor file, declare the BeforeImageLoad, BeforeDownload, and OnSend events to pass the parent container name to set the dynamic blob container.
Our Blazor File Manager calls the OnSend event for each CRUD operation. The BeforeImageLoad event will be triggered while previewing the image file. The BeforeDownload event will be triggered before downloading a file.
Refer to the following code. Here, Test is the folder name set to the parent folder for the user and the user can only access this folder.
<SfFileManager TValue="FileManagerDirectoryContent">
    <FileManagerAjaxSettings Url="/api/Default/AzureFileoperations"
                             UploadUrl="/api/Default/AzureUpload"
                             DownloadUrl="/api/Default/AzureDownload"
                             GetImageUrl="/api/Default/AzureGetImage">
    </FileManagerAjaxSettings>
    <FileManagerEvents TValue="FileManagerDirectoryContent" BeforeImageLoad="BeforeImageLoadEvent" BeforeDownload="BeforeDownloadEvent" OnSend="SendEvent"></FileManagerEvents>
</SfFileManager>

@code{
    /// <summary>
    /// The SendEvent is used to pass the container name to create, upload, copy and delete events.
    /// </summary>
    /// <param name="args"></param>
    public void SendEvent(Syncfusion.Blazor.FileManager.BeforeSendEventArgs args)
    {
        args.HttpClientInstance.DefaultRequestHeaders.Remove("Container_Name");
        args.HttpClientInstance.DefaultRequestHeaders.Add("Container_Name", "Test"));
    }

    /// <summary>
    /// The BeforeImageLoadEvent is used to pass the container name to the get image event.
    /// </summary>
    /// <param name="args"></param>
    public void BeforeImageLoadEvent(Syncfusion.Blazor.FileManager.BeforeImageLoadEventArgs<FileManagerDirectoryContent> args)
    {
        args.ImageUrl = args.ImageUrl + "&Name=" + "Test";
    }

    /// <summary>
    /// The BeforeDownloadEvent is used to pass the container name to the download event.
    /// </summary>
    /// <param name="args"></param>
    public void BeforeDownloadEvent(BeforeDownloadEventArgs<FileManagerDirectoryContent> args)
    {
        //At the NewName field, pass the container name.
        args.Data.DownloadFileDetails[0].NewName = "Test";
    }
}
Changes at the controller end
Azure file operation
Once Azure registration is completed, it will trigger the AzureFileOperations method in the defaultcontroller.cs to execute the read operation.
Now, add the following code to set the blob container based on the additional parameter from the client side. The blob read operation fetches the files from the new, dynamically registered path.
Based on the parameters, we can perform the CRUD AzureFileOperations like upload and delete using the Blazor File Manager. Before executing a CRUD operation, set the blob container again to achieve the dynamic blob container using the Client_Name passed from the client-side.
public object AzureFileOperations([FromBody] FileManagerDirectoryContent args)
{
    string ContainerName = this.HttpContext.Request.Headers["Container_Name"].ToString();

    if (args.Path != "")
    {
       //Set the dynamic blob container based on ContainerName.
       this.operation.SetBlobContainer(domain + blobName + "/", domain + blobName + "/" + parentFolder + "/" + ContainerName);

       string startPath = domain + "/" + blobName + "/";
       string originalPath = (domain + "/" + blobName + "/" + parentFolder + "/" + ContainerName).Replace(startPath, "");

       args.Path = (originalPath + "/" + args.Path).Replace("//", "/");
       args.TargetPath = (originalPath + args.TargetPath).Replace("//", "/");
    }
    switch (args.Action)
    {
       case "read":
             return Json(this.ToCamelCase(this.operation.GetFiles(args.Path, args.ShowHiddenItems, args.Data)));
       case "delete":
             return this.ToCamelCase(this.operation.Delete(args.Path, args.Names, args.Data));
       case "details":
             return this.ToCamelCase(this.operation.Details(args.Path, args.Names, args.Data));
       case "create":
             return this.ToCamelCase(this.operation.Create(args.Path, args.Name, args.Data));
       case "rename":
             return this.ToCamelCase(this.operation.Rename(args.Path, args.Name, args.NewName, false, args.Data));
       case "copy":
             return this.ToCamelCase(this.operation.Copy(args.Path, args.TargetPath, args.Names, args.RenameFiles, args.TargetData, args.Data));

    }
    return null;
}
Azure file upload
In the AzureUpload method, add the following code to set the blob container based on the parameter from the client side. This code should be executed first in this method.
public ActionResult AzureUpload(FileManagerDirectoryContent args)
{
   string ContainerName = this.HttpContext.Request.Headers["Container_Name"].ToString();

   if (args.Path != "")
   {
       //Set the dynamic blob container based on ContainerName.
       this.operation.SetBlobContainer(domain + blobName + "/", domain + blobName + "/" + parentFolder + "/" + ContainerName);
       string startPath = domain + "/" + blobName + "/";
       string originalPath = (domain + "/" + blobName + "/" + parentFolder + "/" + ContainerName).Replace(startPath, "");
       args.Path = (originalPath + args.Path).Replace("//", "/");
   }
   FileManagerResponse uploadResponse = operation.Upload(args.Path, args.UploadFiles, args.Action, args.Data);
   if (uploadResponse.Error != null)
   {
       Response.Clear();
       Response.ContentType = "application/json; charset=utf-8";
       Response.StatusCode = Convert.ToInt32(uploadResponse.Error.Code);
       Response.HttpContext.Features.Get<IHttpResponseFeature>().ReasonPhrase = uploadResponse.Error.Message;
   }
   return Json("");
}
Azure file download
In the AzureDownload method, add the following code to set the blob container based on the parameter from the client side. We have to execute this code first in this method.
public object AzureDownload(string downloadInput)
{
    FileManagerDirectoryContent args = JsonConvert.DeserializeObject<FileManagerDirectoryContent>(downloadInput);
    string ContainerName = args.Data[0].NewName;
    //Set the dynamic blob container based on selected client name.
    this.operation.SetBlobContainer(domain + blobName + "/", domain + blobName + "/" + parentFolder + "/" + ContainerName);

    return operation.Download(args.Path, args.Names, args.Data);
}
AzureGetImage
In the AzureGetImage method, add the following code to set the blob container based on the parameter from the client side. We have to execute this code first in this method.
public async Task<IActionResult> AzureGetImage(FileManagerDirectoryContent args)
{
//Set the dynamic blob container based on selected client name.
this.operation.SetBlobContainer(domain + blobName + "/", domain + blobName + "/" + parentFolder + "/" + args.Name);
return await this.operation.GetImageAsync(args.Path, args.Id, true, null, args.Data);
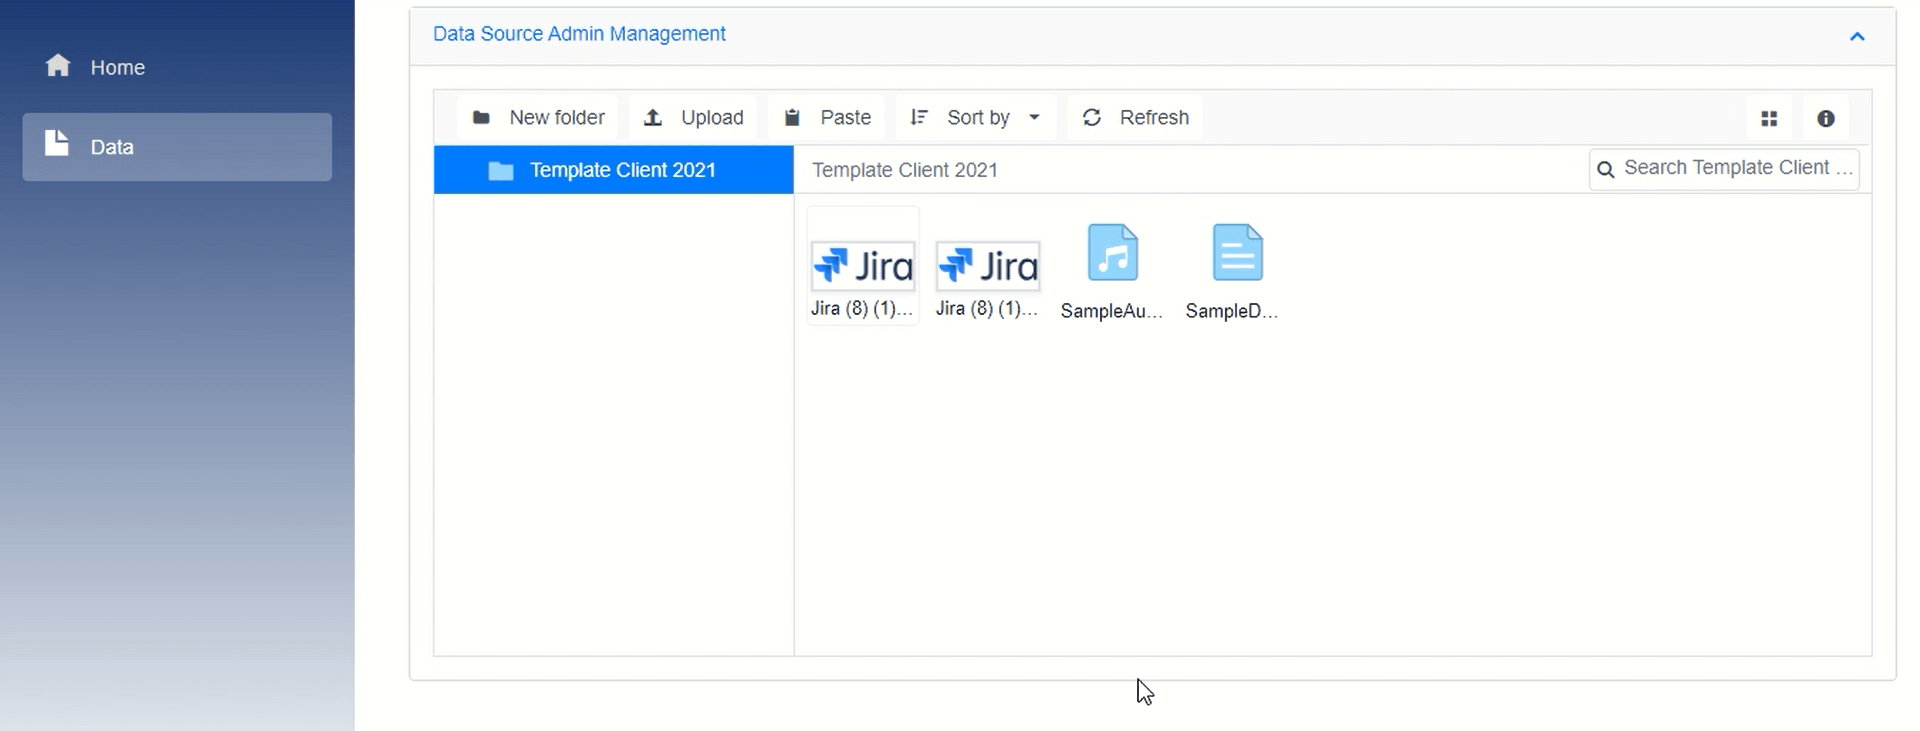
}Refer to the following image.
GitHub reference
For more details, refer to the example Downloading Azure Files Using Blazor File Manager and Implementing Dynamic Blob Container.

Conclusion
Thanks for reading! I hope you now have a clear idea of how to use a dynamic blob container and download files in Azure Blob using the Syncfusion Blazor File Manager. Try out the steps provided here and leave your feedback in the comments section below!
If you aren’t a Syncfusion customer yet, you can start a 30-day free trial to check out our features. Also, we encourage you to try our examples on GitHub.
If you would like to submit any questions, please feel free to contact us through our support forums, feedback portal, or support portal. We are always happy to assist you!


 No spam, just valuable updates.
Comments (3)
I am seeing that are used the Blazor and ASP.NET Syncfusion libraries.
Do I have to purchase a developer license to implement the solution displayed in this blog?
or I can implement this with just the Blazor Syncfusion Individual license.
Hi Andres,
Syncfusion Blazor individual license is enough to develop and deploy this application.
Thanks,
Suresh
Awesome. thank you for the prompt reply