

In part 1 of this series, we created an e-commerce web application in React to sell digital products. We created an architectural diagram to get an idea about the user navigation and wireframes and set up the boilerplate with the public and private routes.
In this part, we will handle the authentication and authorization of the web app. We’ll create the signup and login pages and integrate them with a database to persist the data.
Let’s get started!
Using SupaBase as the database
In this demo, we’ll use SupaBase, which is an alternative to Firebase and provides an easy-to-use and integrated database (DB).
First, we sign into SupaBase, create a new project, and then get our project URL and API keys to create an instance of the DB.
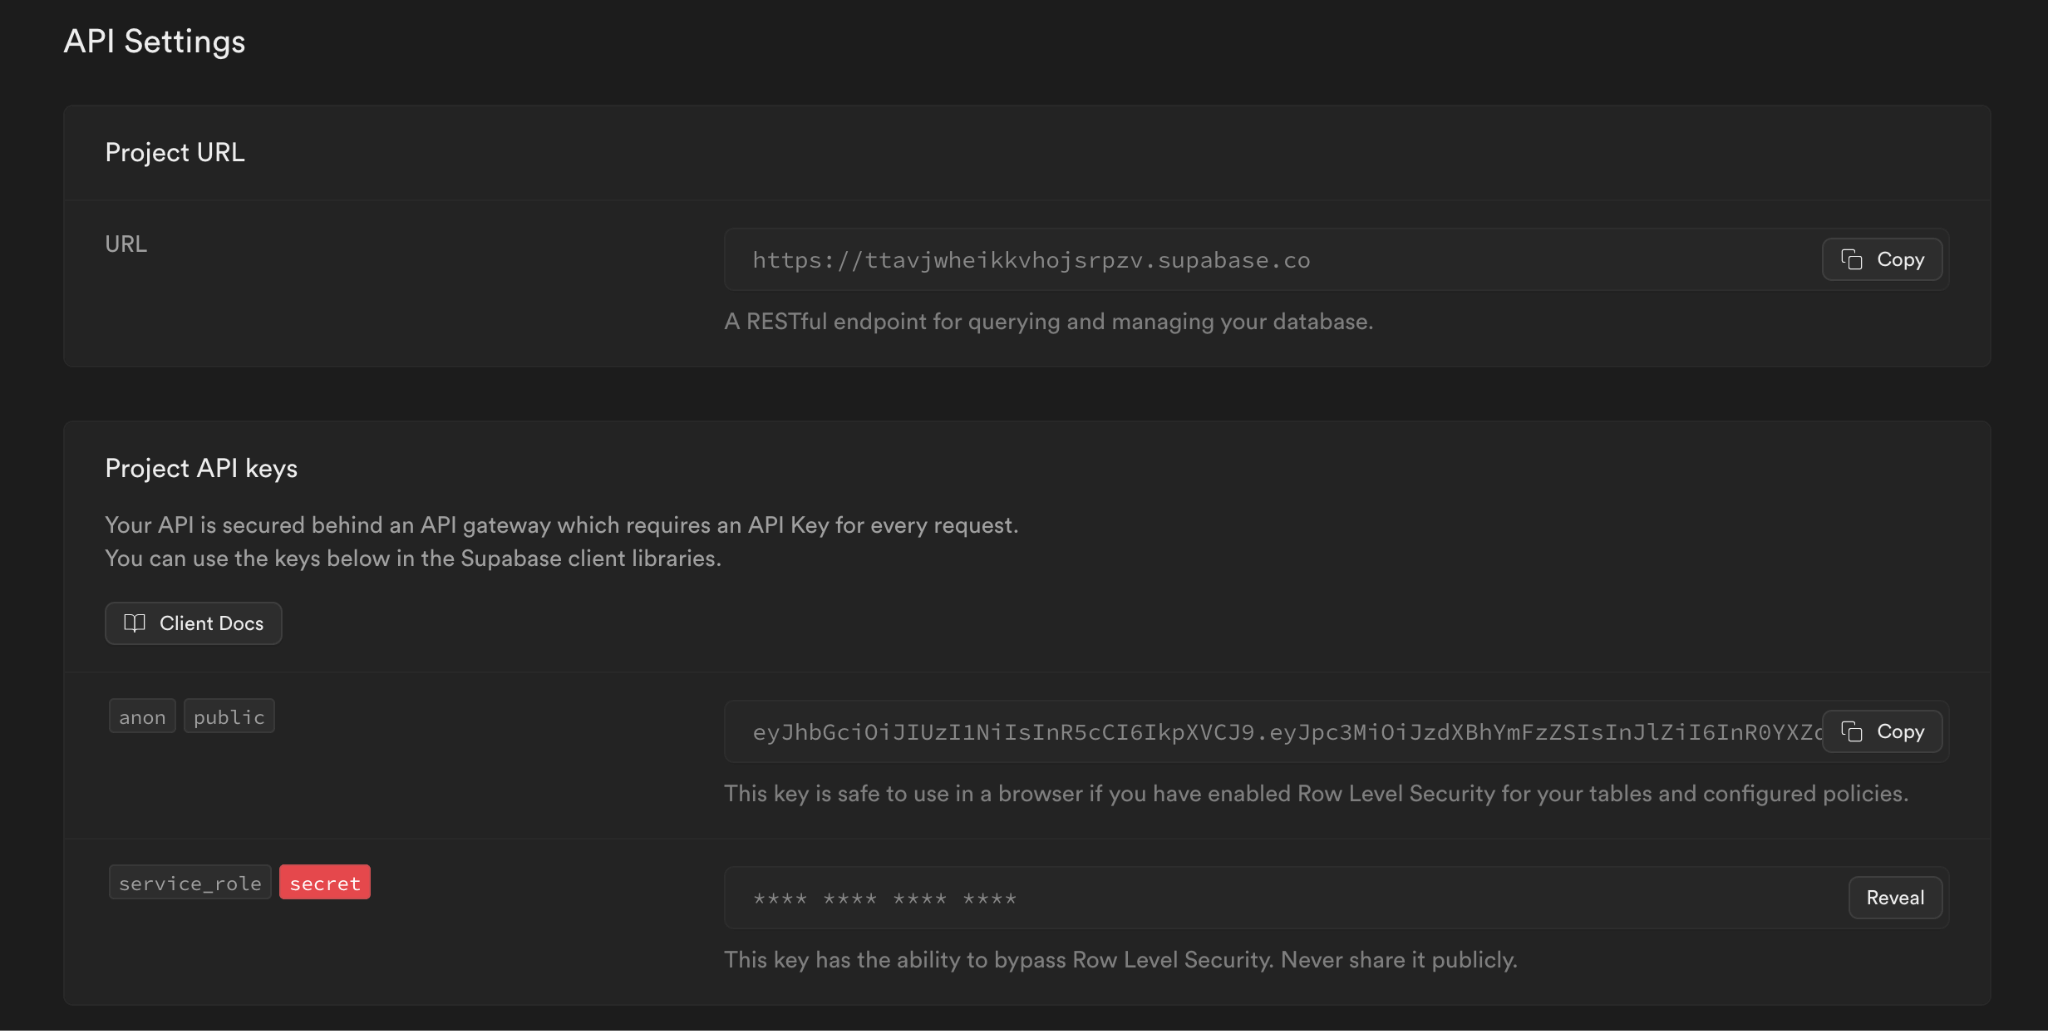
Let’s use its JavaScript SDK to use the database directly from the React code.
npm install @supabase/supabase-js
To use the SupaBase, we have to create an instance of it so that we can invoke different methods of it. What I did was create a hook for the SupaBase to instantiate and then use it in all other hooks.
// hooks/supabase.js
import { createClient } from "@supabase/supabase-js";

const useSupbase = () => {
  const supabase = createClient(
    "your-project-url",
    "your-anon-public-key"
  );

  return supabase;
};

export default useSupbase;
Creating the useAuth() hook for authentication
The first important hook we are going to create is an authentication hook called useAuth() that lets users sign up and log into the app. SupaBase already provides methods for seamless signup and login actions, so we are going to make use of them.
For signup, we’ll store the email address, password, first name, and last name details. You can store as many additional details as you want.
For the login, we’ll accept the email address and password and verify if the credential is valid or not.
Refer to the following code example.
// hooks/auth.js
import useSupbase from "“./supbase"”;
import useStore from "“../store/user"”;
import { useState } from "“react"”;

const useAuth = () => {
 const [signupData, setSignupData] = useState(null);
 const [loginData, setLoginData] = useState(null);
 const [error, setError] = useState(null);

 const supabase = useSupbase();
 const setUserState = useStore((state) => state.setUserState);

 const signup = async (email, password, firstName, lastName) => {
   try {
     const { data, error } = await supabase.auth.signUp({
       email: email,
       password: password,
       options: {
         data: {
           firstName,
           lastName,
         },
       },
     });
     if (!error) {
       setSignupData(data);
     } else {
       setError(error);
     }
   } catch € {
     console.error("Error while creating an user please try agaiin!");
     setError€(e);
   }
 };

 const login = async (email, password) => {
   try {
     const { data, error } = await supabase.auth.signInWithPassword({
       email,
       password,
     });

     if (!error) {
       const { session, user } = data;
       setLoginData(data);
       setUserState({
         isLoggedIn: true,
         email: user.email,
         firstName: user.user_metadata.firstName,
         lastName: user.user_metadata.lastName,
         accessToken: session.access_token,
       });
     } else {
       setError(error);
     }
   } catch (error) {
     console.error("Invalid credenntials", error);
     setError(error);
   }
 };

 return { login, loginData, signup, signupData, error };
};

export default useAuth;
The useAuth() hook provides the methods for signup and login and their respective data and errors, which helps us to abstract similar logic to a single stage.
Once the user has successfully logged in, we’ll store the user details like first name and last name in the Zustand along with the bearer access token. We’ll use them for further authorization to get the user-specific data from the database.
For this, the user state has to be updated in the Zustand to accommodate additional details.
import { create } from "zustand";
import { persist } from "zustand/middleware";

let store = (set) => ({
 isLoggedIn: false,
 email: "",
 firstName: "",
 lastName: "",
 accessToken: "",
 setUserState: ({ isLoggedIn, email, firstName, lastName, accessToken }) =>
   set(() => ({ isLoggedIn, email, firstName, lastName, accessToken })),
});

//persist the state with key "randomKey"
store = persist(store, { name: "user-store" });

//create the store
let useStore = create(store);

export default useStore;
On successful login, we’ll also change the state isLoggedIn to true. That will change the router to show on the dashboard page that the user is logged in.
Creating the signup and login pages
By default, the user will be moved to the login page, and there will be a link at the bottom for the user to sign up if they haven’t already.
Let’s start by creating the signup page. Add it to the router and then create the page.
import { BrowserRouter, Routes, Route } from "react-router-dom";
import Login from "./pages/login";
import Signup from "./pages/signup";
import PrivateRoutes from "./routes/private";
import PublicRoutes from "./routes/public";
import NotFound from "./pages/404";
const App = () => {
return (
<BrowserRouter>
<Routes>
<Route path="/" element={<PublicRoutes />}>
<Route index element={<h1>Browse</h1>} />
<Route path="product-list" element={<h1>Product List</h1>}></Route>
<Route path="login" element={<Login />}></Route>
<Route path="signup" element={<Signup />}></Route>
</Route>
<Route path="/" element={<PrivateRoutes />}>
<Route path="dashboard" element={<h1>Dashboard</h1>}></Route>
<Route path="product-add" element={<h1>Product Add</h1>}></Route>
<Route path="checkout" element={<h1>checkout</h1>}></Route>
<Route path="thank-you" element={<h1>Thank You</h1>}></Route>
</Route>
<Route path="*" element={<NotFound />} />
</Routes>
</BrowserRouter>
);
};
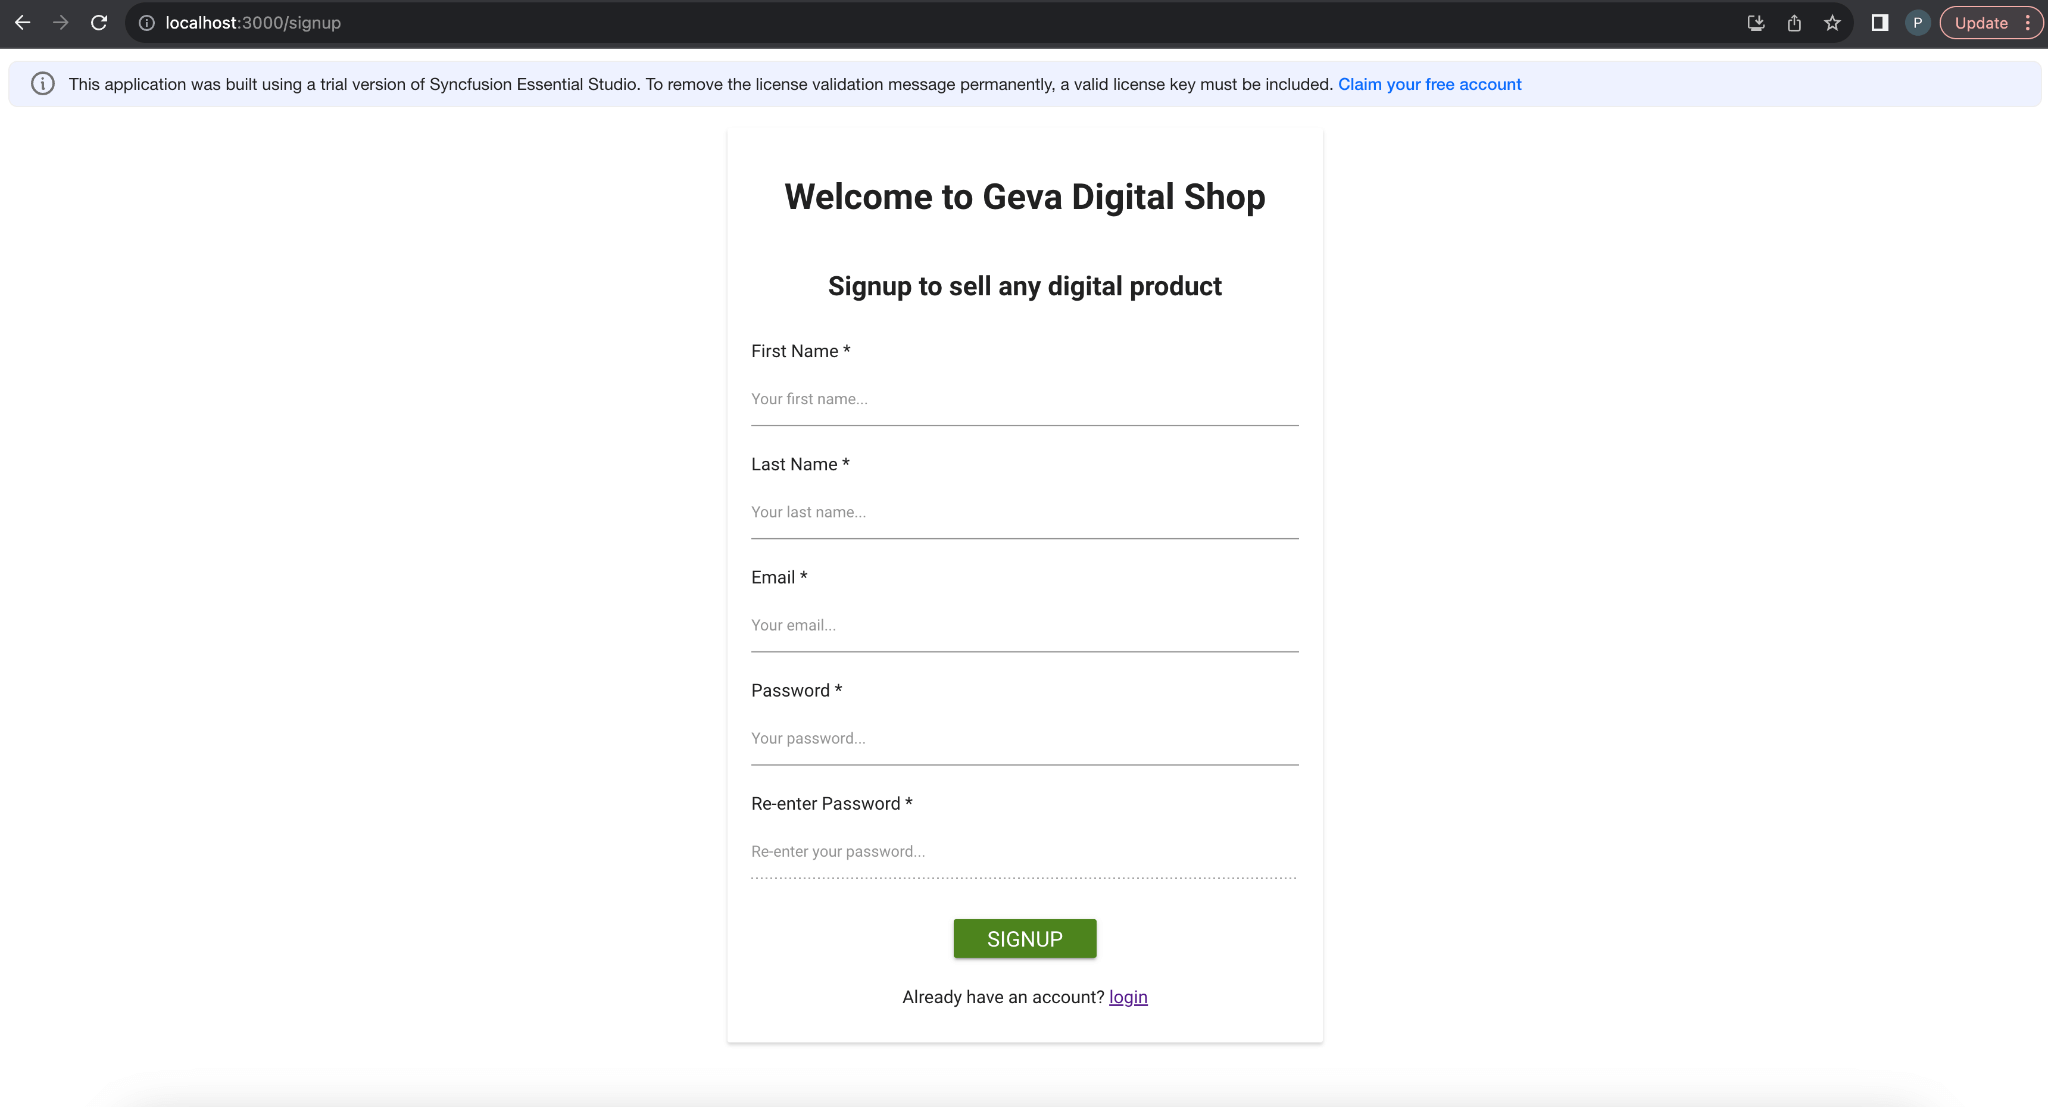
export default App;Signup page
The signup page is part of the public routes, as users can access it without being logged in. To sign up, users must provide their first name, last name, email address, and password, and then re-enter the password to verify.
To create the layout, we’ll use the Syncfusion React inputs, buttons, and card controls.
import "@syncfusion/ej2-layouts/styles/material.css";
import "@syncfusion/ej2-react-inputs/styles/material.css";
import "@syncfusion/ej2-react-buttons/styles/material.css";
import "./login.css";
import { ButtonComponent } from "@syncfusion/ej2-react-buttons";
import { useState, useCallback, useEffect } from "react";
import { debounce } from "lodash";
import Toast from "../components/Toast";
import { Link, useNavigate } from "react-router-dom";
import useAuth from "../hooks/auth";

const Signup = () => {
 const navigate = useNavigate();
 const [email, setEmail] = useState("");
 const [password, setPassword] = useState("");
 const [repassword, setRepassword] = useState("");
 const [firstName, setFirstName] = useState("");
 const [lastName, setLastName] = useState("");
 const [invalidEmail, setInvalidEmail] = useState(false);
 const [passwordMatching, setPasswordMatching] = useState(true);
 const [toast, setToast] = useState({
   show: false,
   message: "",
   type: "error",
 });
 const { signup, signupData } = useAuth();

 // helper function that checks email using regex
 const isValidEmail = (email) => {
   return /\S+@\S+\.\S+/.test(email);
 };

 // function to validate email
 const validateEmail = (text) => {
   if (!!text && !isValidEmail(text)) {
     setInvalidEmail(true);
   } else {
     setInvalidEmail(false);
   }
 };

 // debounce the function to initiate test
 // when user stops writing for certain time
 const debouncedValidateEmail = useCallback(debounce(validateEmail, 1000), []);

 const handleEmailChange = (e) => {
   setEmail(e.target.value);
   debouncedValidateEmail(e.target.value);
 };

 // monitor change of re-entered password
 useEffect(() => {
   // if both the passwords mismatch, update the state to show error
   if (password && repassword && password !== repassword) {
     setPasswordMatching(false);
   } else {
     setPasswordMatching(true);
   }
 }, [repassword]);

 // on signup
 const handleSubmit = () => {
   // if the required fields are empty
   if (!firstName || !lastName || !email || !password) {
     // show toast message
     setToast({
       message: "Required fields are missing",
       show: true,
       type: "error",
     });
   } else {
     // initiate signup
     signup(email, password, firstName, lastName);
   }
 };

 // monitor the change in data after signup
 useEffect(() => {
   // if user is successfully authenticated
   if (signupData?.user?.role === "authenticated") {
     // show toast message
     setToast({
       message: "Successfully signed up",
       show: true,
       type: "success",
     });

     // and redirect to the login page
     setTimeout(() => {
       navigate("/login");
     }, 2000);
   }
 }, [signupData]);

 return (
   <div className="e-card login-container">
     <h1 className="text-center">Welcome to Geva Digital Shop</h1>
     <h2 className="text-center">Signup to sell any digital product</h2>
     <div className="field-area">
       <label htmlFor="first-name">First Name *</label>
       <input
         className="e-input"
         type="text"
         placeholder="Your first name..."
         name="first-name"
         id="first-name"
         onChange={(e) => setFirstName(e.target.value)}
         value={firstName}
         required
       />
     </div>
     <div className="field-area">
       <label htmlFor="last-name">Last Name *</label>
       <input
         className="e-input"
         type="text"
         placeholder="Your last name..."
         name="last-name"
         id="last-name"
         onChange={(e) => setLastName(e.target.value)}
         value={lastName}
         required
       />
     </div>
     <div className="field-area">
       <label htmlFor="email">Email *</label>
       <input
         className="e-input"
         type="email"
         placeholder="Your email..."
         name="email"
         id="email"
         onChange={handleEmailChange}
         value={email}
         required
       />
       {invalidEmail && (
         <p className="error">Please enter a valid email address</p>
       )}
     </div>
     <div className="field-area">
       <label htmlFor="password">Password *</label>
       <input
         className="e-input"
         type="password"
         placeholder="Your password..."
         name="password"
         id="password"
         onChange={(e) => setPassword(e.target.value)}
         value={password}
         required
       />
     </div>
     <div className="field-area">
       <label htmlFor="re-password">Re-enter Password *</label>
       <input
         className="e-input"
         type="password"
         placeholder="Re-enter your password..."
         name="re-password"
         id="re-password"
         onChange={(e) => setRepassword(e.target.value)}
         value={repassword}
         required
         disabled={!password}
       />
     </div>
     {repassword && !passwordMatching && (
       <span className="text-center" style={{ color: "red" }}>
         Entered passwords does not match
       </span>
     )}
     <div
       style={{
         width: "120px",
         margin: "20px auto 0 auto",
       }}
     >
       <ButtonComponent
         cssClass="e-success e-block"
         type="submit"
         onClick={handleSubmit}
         style={{ fontSize: "1.2em" }}
       >
         Signup
       </ButtonComponent>
     </div>
     {toast.show && (
       <Toast
         errorMessage={toast.message}
         type={toast.type}
         onClose={() => {
           setToast({
             show: false,
             message: "",
             type: "error",
           });
         }}
       />
     )}
     <span className="text-center" style={{ marginTop: "1em" }}>
       Already have an account? <Link to="/login">login</Link>
     </span>
   </div>
 );
};

export default Signup;
Now, we’ve created the controlled components and maintained the state for each input.
On the email change, we’ll validate that the entered email address is in the correct format using Regex and debouncing the input using the lodash.debounce.
Also, on submission, we are validating whether all the inputs are filled or not. If not, we’ll show an error with the help of Synfusion’s React Toast component.
Import { ToastComponent } from “@syncfusion/ej2-react-notifications”;
import “@syncfusion/ej2-base/styles/material.css”;
import “@syncfusion/ej2-react-buttons/styles/material.css”;
import “@syncfusion/ej2-react-popups/styles/material.css”;
import “@syncfusion/ej2-react-notifications/styles/material.css”;
const TOAST_TYPES = {
 warning: “e-toast-warning”,
 success: “e-toast-success”,
 error: “e-toast-danger”,
 info: “e-toast-infor”,
};

const Toast = ({ errorMessage, type, onClose }) => {
 let toastInstance;

 let position = { X: “Center” };

 function toastCreated() {
   toastInstance.show();
 }

 function toastDestroyed€ {
   e.clickToClose = true;
   onClose && onClose();
 }

 return (
   <div>
     <ToastComponent
       ref={(toast) => (toastInstance = toast)}
       title={type.toUpperCase()}
       content={errorMessage}
       position={position}
       created={toastCreated.bind(this)}
       click={toastDestroyed.bind(this)}
       showCloseButton
       cssClass={TOAST_TYPES[type] || TOAST_TYPES["info"]}
     />
   </div>
 );
};
export default Toast;
If every input is filled, we sign up the user using the signup method from the useAuth() hook and show a success toast. Then, we navigate the user to the login page.
Login page
To log in, we accept the email address and password and pass them to Supabase’s signinwithpassword method with our useAuth() hook.
Refer to the following image.

Refer to the following code example.
import "@syncfusion/ej2-layouts/styles/material.css";
import "@syncfusion/ej2-react-inputs/styles/material.css";
import "@syncfusion/ej2-react-buttons/styles/material.css";
import "./login.css";
import { ButtonComponent } from "@syncfusion/ej2-react-buttons";
import { useState, useCallback, useEffect } from "react";
import { debounce } from "lodash";
import Toast from "../components/Toast";
import { Link } from "react-router-dom";
import useAuth from "../hooks/auth";

const Login = () => {
 const { login, loginData } = useAuth();
 const [email, setEmail] = useState("");
 const [password, setPassword] = useState("");
 const [invalidEmail, setInvalidEmail] = useState(false);
 const [showToast, setShowToast] = useState(false);

 // helper function that checks email using regex
 const isValidEmail = (email) => {
   return /\S+@\S+\.\S+/.test(email);
 };

 // function to validate email
 const validateEmail = (text) => {
   if (!!text && !isValidEmail(text)) {
     setInvalidEmail(true);
   } else {
     setInvalidEmail(false);
   }
 };

 // debounce the function to initiate test
 // when user stops writing for certain time
 const debouncedValidateEmail = useCallback(debounce(validateEmail, 1000), []);

 const handleEmailChange = (e) => {
   setEmail(e.target.value);
   debouncedValidateEmail(e.target.value);
 };

 const handleSubmit = () => {
   if (!email || !password) {
     setShowToast(true);
   } else {
     login(email, password);
   }
 };

 return (
   <div className="e-card login-container">
     <h1 className="text-center">Welcome to Geva Digital Shop</h1>
     <h2 className="text-center">Login to continue</h2>
     <div className="field-area">
       <label htmlFor="email">Email *</label>
       <input
         className="e-input"
         type="email"
         placeholder="Your email..."
         name="email"
         id="email"
         onChange={handleEmailChange}
         value={email}
         required
       />
       {invalidEmail && (
         <p className="error">Please enter a valid email address</p>
       )}
     </div>
     <div className="field-area">
       <label htmlFor="password">Password *</label>
       <input
         className="e-input"
         type="password"
         placeholder="Your password..."
         name="password"
         id="password"
         onChange={(e) => setPassword(e.target.value)}
         value={password}
         required
       />
     </div>
     <div
       style={{
         width: "120px",
         margin: "20px auto 0 auto",
       }}
     >
       <ButtonComponent
         cssClass="e-success e-block"
         type="submit"
         onClick={handleSubmit}
         style={{ fontSize: "1.2em" }}
       >
         Login
       </ButtonComponent>
     </div>
     {showToast && (
       <Toast
         errorMessage={"Please enter valid credentials"}
         type={"error"}
         onClose={() => {
           setShowToast(false);
         }}
       />
     )}
     <span className="text-center" style={{ marginTop: "1em" }}>
       Don't have an account? <Link to="/signup">signUp</Link>
     </span>
   </div>
 );
};

export default Login;
Here, too, we validate the email address and password. We show an appropriate error if the authentication fails using the Toast component.
If the user is successfully logged in, we’ll update the state in the Zustand in useAuth()’s login method. This will update the router and render the Dashboard page as the user is logged in.

Now, the user can sign up and log into our e-commerce app!

Conclusion
Thanks for reading! In this blog, we’ve seen how to design the Signup and Login pages for the React e-commerce app for digital products. We encourage you to put this knowledge into practice and share your experiences in the comments section below!
In the next part, we’ll design the home page with some dummy products to show and then the dashboard page, where the new products can be added.
Syncfusion’s Essential Studio for React is a one-stop solution offering over 80 high-performance, lightweight, modular, and responsive UI components. It’s the perfect suite to build any web app.
For our existing Syncfusion users, the latest version of Essential Studio is readily available for download on the License and Downloads page. If you’re new to Syncfusion, we invite you to explore our products’ features and capabilities with our 30-day free trial.
For questions, you can contact us through our support forum, support portal, or feedback portal. We are always here to assist you!


 No spam, just valuable updates.
Comments (2)
Enjoying the collaborative journey with Prashant Yadav in building a React E-Commerce App for Digital Products using Syncfusion’s Essential Studio responsive UI components. Eagerly anticipating Part-3. I would share my knowledge and experiences gained after comprehensive understanding once the project takes full shape.
Simply amazing