
TLDR: Explore implementing user authentication with JWT, role-based authorization, GraphQL mutations, client-side login forms, and database role configuration, crucial for secure web application development.
Welcome to our exciting journey of building a full-stack web application using Angular and GraphQL.
In the previous article of this series, we learned how to add the user registration functionality to our app. In this article, we will cover how to implement the login and role-based authorization functionalities in our app.
Using JWT for authentication
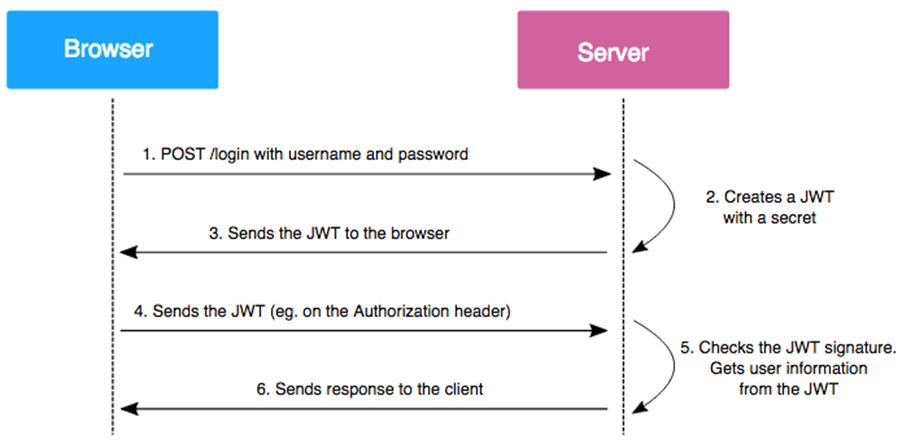
We will use the JSON Web Token (JWT) for authentication in our app. We will render the app in a way that will allow users to login via a login form on the client side. Upon submission, the client will send the user credentials to the server via a POST request for validation. If the authentication is successful on the server, we will create a JWT with user claims and return it to the client. This JWT will be securely stored in the browser’s local storage and sent back to the server as a Bearer token in the header of each subsequent API request.
Additionally, we’ll enhance security by implementing policy-based authorization to control access to application resources based on predefined policy.
Note: To learn more about JWT, refer to the documentation.
Add the DTO classes
Create a new folder named Dto within the MovieApp project. Inside the Dto folder, add a class file named UserLogin.cs, and then add the following code.
public class UserLogin
{
    [Required]
    public string Username { get; set; } = string.Empty;
    [Required]
    public string Password { get; set; } = string.Empty;
}
This class will contain the properties required by a user to log into the app.
Next, create another class file named AuthResponse.cs in the Dto folder and add the following code inside it.
public class AuthResponse
{
   public string ErrorMessage { get; set; } = string.Empty;
   public string? Token { get; set; } = string.Empty;
}
This class is used to return the authentication response to the client.
Now, add a new class file named AuthenticatedUser.cs in the Dto folder and add the following code inside it.
public class AuthenticatedUser
{
    public int UserId { get; set; }
    public string Username { get; set; } = string.Empty;
    public string UserTypeName { get; set; } = string.Empty;
}
This class is used to represent a user who has been authenticated on the server.
Update the IUser interface
Update the Iuser.cs file by adding the following method declarations.
public interface IUser
{
    // Existing methods.

    AuthenticatedUser AuthenticateUser(UserLogin loginCredentials);
}
Update the UserDataAccessLayer class
Update the UserDataAccessLayer class by implementing the AuthenticateUser method, as shown in the following code example.
public AuthenticatedUser AuthenticateUser(UserLogin loginCredentials)
{
    AuthenticatedUser authenticatedUser = new();
    var userDetails = _dbContext.UserMasters
        .FirstOrDefault(u =>
        u.Username == loginCredentials.Username &&
        u.Password == loginCredentials.Password);
    if (userDetails != null)
    {
        authenticatedUser = new AuthenticatedUser
        {
            Username = userDetails.Username,
            UserId = userDetails.UserId,
            UserTypeName = userDetails.UserTypeName
        };
    }
    return authenticatedUser;
}
The AuthenticateUser method is used to authenticate a user based on their login credentials. Upon receiving the user credentials, the method verifies whether there exists a corresponding user record in the database. If a match is found, the user will be considered authenticated.
Configure the JWT secrets
Let’s add the secret key, issuer, and audience details for the JSON web token (JWT) in the appsettings.json file, as shown in the following code example.
"Jwt": {
    "SecretKey": "7V6WGdWPCO141kPD",
    "Issuer": "https://localhost:7214/",
    "Audience": "https://localhost:7214/"
  },
For JWT encryption, we will use HmacSha256 as our preferred encryption algorithm, which accepts a key size of 128 bits. Ensure that the secret key adheres to this requirement to avoid any potential runtime errors.
To implement user authentication via GraphQL, we’ll start by integrating a GraphQL Server Mutation. Let’s see how to do so.
Add a GraphQL server mutation to authenticate the user
First, we will add the dependency for the IConfiguration service to the AuthMutationResolver class via dependency injection through its constructor. Refer to the code example.
public class AuthMutationResolver
{
    readonly IUser _userService;
    readonly IConfiguration _config;
    public AuthMutationResolver(IConfiguration config, IUser userService)
    {
        _config = config;
        _userService = userService;
    }

    // Existing code
}
The config object is used to access application configuration settings.
Next, we’ll add the following code in the AuthMutationResolver class.
[GraphQLDescription("Authenticate the user.")]
public AuthResponse? UserLogin(UserLogin userDetails)
{
    AuthenticatedUser authenticatedUser = _userService.AuthenticateUser(userDetails);
    if (!string.IsNullOrEmpty(authenticatedUser.Username))
    {
        string tokenString = GenerateJSONWebToken(authenticatedUser);
        return new AuthResponse { Token = tokenString };
    }
    else
    {
        return null;
    }
}
string GenerateJSONWebToken(AuthenticatedUser userInfo)
{
    var securityKey = new SymmetricSecurityKey(Encoding.UTF8.GetBytes(_config["Jwt:SecretKey"]));
    var credentials = new SigningCredentials(securityKey, SecurityAlgorithms.HmacSha256);
    List<Claim> userClaims = new()
    {
        new Claim(JwtRegisteredClaimNames.Name, userInfo.Username),
        new Claim(JwtRegisteredClaimNames.Sub, userInfo.UserTypeName),
        new Claim(JwtRegisteredClaimNames.Jti, Guid.NewGuid().ToString()),
        new Claim(ClaimTypes.Role,userInfo.UserTypeName),
        new Claim("userId", userInfo.UserId.ToString()),
    };
    var token = new JwtSecurityToken(
        issuer: _config["Jwt:Issuer"],
        audience: _config["Jwt:Audience"],
        claims: userClaims,
        expires: DateTime.Now.AddHours(24),
        signingCredentials: credentials
    );
    return new JwtSecurityTokenHandler().WriteToken(token);
}
}
The UserLogin method is pivotal for user authentication and JWT generation upon successful authentication. Let’s break down its functionality for clarity:
- Authentication process: It invokes the AuthenticateUser method of the _userService object, providing userDetails as parameters. This method returns an AuthenticatedUser object upon successful authentication.
- Verification: The method checks that the Username property of the authenticatedUser object is not null or empty, indicating successful authentication.
- JWT generation: If authentication is successful, the method calls the GenerateJSONWebToken method, passing the authenticatedUser The GenerateJSONWebToken method is responsible for JWT creation based on the provided AuthenticatedUser instance.
- Key generation: This constructs a SymmetricSecurityKey from the secret key specified in the application’s configuration (_config[“Jwt:SecretKey”]). This key ensures the JWT’s integrity.
- Credentials setup: The method establishes SigningCredentials using the security key and the HMAC-SHA256 algorithm, ensuring the token’s validity.
- Claim definition: This defines a list of Claim objects representing the JWT’s claims, including username, user type, JWT identifier (Jti), user role, and user ID.
- Token creation: Utilizing the issuer, audience, claims, expiration time, and signing credentials, the method generates a JwtSecurityToken.
By adhering to these steps, the UserLogin method facilitates user authentication and subsequent JWT creation, while the GenerateJSONWebToken method ensures the integrity and security of the generated token.
Define the user policies
Now, add the Policies.cs class file inside the MovieApp\Models folder.
Refer to the following code example.
public static class Policies
{
    public static AuthorizationPolicy AdminPolicy()
    {
        return new AuthorizationPolicyBuilder().RequireAuthenticatedUser()
                                               .RequireRole(UserRoles.Admin)
                                               .Build();
    }
    public static AuthorizationPolicy UserPolicy()
    {
        return new AuthorizationPolicyBuilder().RequireAuthenticatedUser()
                                               .RequireRole(UserRoles.User)
                                               .Build();
    }
}
The Policies class is a static class that contains two methods:
- AdminPolicy
- UserPolicy
Both methods return an instance of AuthorizationPolicy, which is built using the AuthorizationPolicyBuilder class. In both methods, RequireAuthenticatedUser is a requirement that the user must be authenticated, and RequireRole is a requirement that the user must be in a specific role.
Configure the Program.cs file
Now, register and configure the authentication services for the .NET middleware. Add the following code to the Program.cs file.
builder.Services.AddAuthentication(JwtBearerDefaults.AuthenticationScheme)
 .AddJwtBearer(options =>
 {
     options.RequireHttpsMetadata = false;
     options.SaveToken = true;
     options.TokenValidationParameters = new TokenValidationParameters
     {
         ValidateIssuer = true,
         ValidateAudience = true,
         ValidateLifetime = true,
         ValidateIssuerSigningKey = true,
         ValidIssuer = builder.Configuration["Jwt:Issuer"],
         ValidAudience = builder.Configuration["Jwt:Audience"],
         IssuerSigningKey = new SymmetricSecurityKey(Encoding.UTF8.GetBytes(builder.Configuration["Jwt:SecretKey"])),
     };
 });
We will add the authentication services to the application’s dependency injection container and set the default scheme to JWT Bearer.
Inside the options lambda function, several properties are being set:
- options.RequireHttpsMetadata = false: Disables the HTTPS requirement for the metadata address or authority.
- options.SaveToken = true: Indicates that the token should be stored.
- options.TokenValidationParameters = new TokenValidationParameters {…}: Sets the parameters for validating the token.
Inside the TokenValidationParameters object, several properties are being set:
- ValidateIssuer = true: This line indicates that the issuer of the token should be validated.
- ValidateAudience = true: This line indicates that the audience of the token should be validated.
- ValidateLifetime = true: This line indicates that the lifetime of the token should be validated.
- ValidateIssuerSigningKey = true: This line indicates that the issuer’s signing key should be validated.
- ValidIssuer = builder.Configuration[“Jwt:Issuer”]: This line sets the valid issuer of the token. The issuer is being retrieved from the application’s configuration.
- ValidAudience = builder.Configuration[“Jwt:Audience”]: This line sets the valid audience of the token. The audience is retrieved from the application’s configuration.
- IssuerSigningKey = new SymmetricSecurityKey(Encoding.UTF8.GetBytes(builder.Configuration[“Jwt:SecretKey”])): This line sets the symmetric key that will be used to validate the signature of the token. The key is being retrieved from the application’s configuration and is being encoded as a UTF8 byte array.
Next, configure the authorization policy for the application. Refer to the following code example.
builder.Services.AddAuthorization(config =>
{
    config.AddPolicy(UserRoles.Admin, Policies.AdminPolicy());
    config.AddPolicy(UserRoles.User, Policies.UserPolicy());
});
Refer to the following code example to add the authorization support to the GraphQL server.
builder.Services.AddGraphQLServer()
    .AddAuthorization()
    .AddQueryType<MovieQueryResolver>()
    .AddMutationType<MovieMutationResolver>()
    .AddTypeExtension<AuthMutationResolver>()
    .AddFiltering()
    .AddErrorFilter(error =>
    {
        return error;
    });
The AddAuthorization extension method adds authorization support to the GraphQL server. This allows us to protect certain fields or types in the GraphQL schema based on the user’s roles or claims.
Finally, add the following code to the program.cs file.
app.UseAuthentication();
app.UseAuthorization();
These two lines of code are middleware components in the ASP.NET Core pipeline. Middleware is the software assembled into an app pipeline to handle requests and responses. Each component decides whether to pass the request to the next component in the pipeline. They can perform certain actions before and after invoking the next component.
Here’s a breakdown of what each line does:
- app.UseAuthentication();: Adds the authentication middleware to the pipeline. This middleware inspects the request for an authentication token (like a JWT token) and attempts to authenticate the user if one is found. Upon successful authentication, the user’s identity is stored in the HttpContext. The user property can be accessed in subsequent middleware and action methods.
- app.UseAuthorization();: Adds the authorization middleware to the pipeline. This middleware checks the user’s authorization to access certain resources based on their identity and any configured authorization policies in the application. If the user is not authorized to access a resource, the middleware returns an HTTP 403 Forbidden status code.
These two lines should be placed after the app.UseRouting() method before the app.UseEndpoints() method. This order is crucial because middleware in the pipeline matters. The routing middleware needs to come first so that it can match the request to a route, while the endpoints middleware must come last so that it can execute the matched route. By placing the authentication and authorization middleware in between, they can effectively use the route information to perform authentication and authorization.
Securing the GraphQL resolver
We will use the [Authorize] attribute to secure our GraphQL server endpoint.
Note: The [Authorize] attribute is available on Microsoft.AspNetCore.Authorization and HotChocolate.AspNetCore.Authorization packages. The packages are different from each other. We will use the attribute provided by the HotChocolate.AspNetCore.Authorization package.
Open the MovieMutationResolver.cs file and add the following import statement at the top.
using HotChocolate.Authorization;
Our application allows only an authenticated user with the Admin role to perform actions such as adding, editing, and deleting the movie data. Therefore, we will annotate the corresponding methods with the [Authorize] attribute and policy, as shown in the following code example.
[Authorize(Policy = UserRoles.Admin)]
[GraphQLDescription("Add new movie data.")]
public AddMoviePayload AddMovie(Movie movie)
{
    // Existing method definition.
}
[Authorize(Policy = UserRoles.Admin)]
[GraphQLDescription("Edit existing movie data.")]
public async Task<AddMoviePayload> EditMovie(Movie movie)
{
    // Existing method definition.
}
[Authorize(Policy = UserRoles.Admin)]
[GraphQLDescription("Delete movie data.")]
public async Task<int> DeleteMovie(int movieId)
{
    // Existing method definition.
}
With the server configuration complete, let’s transition to the application’s client-side implementation.
Add the GraphQL mutation
To enable user login functionality, add the following GraphQL mutation to the src\app\GraphQL\mutation.ts file.
export const LOGIN = gql`
  mutation login($loginData: UserLoginInput!) {
    userLogin(userDetails: $loginData) {
      errorMessage
      token
    }
  }
`;
Create the client-side model
Create a new file named userLogin.ts in the src\app\models folder and include the following code.
Export interface UserLogin {
  username: string;
  password: string;
}
export interface AuthResponse {
  token: string;
  errorMessage: string;
}
export type LoginType = {
  userLogin: AuthResponse;
};
In the previous code example:
- The UserLogin interface represents the data structure for a user login. It has two properties, username, and password, both of type string.
- The AuthResponse interface represents the data structure for an authentication response. It has two properties, token and errorMessage, both of which are type strings. The token is the authentication token returned upon successful login, and errorMessage is a message describing any errors that occurred during the login process.
- LoginType is a type alias that represents a structure with a single property, userLogin, of type AuthResponse. This could be used to wrap the AuthResponse in another layer for the application’s data handling.
Next, create a new file named user.ts within the models folder and add the following code to it.
export class User {
  userId: number;
  firstName: string;
  lastName: string;
  username: string;
  userTypeName: string;
  isLoggedIn: boolean;
  constructor() {
    this.userId = 0;
    this.firstName = '';
    this.lastName = '';
    this.username = '';
    this.userTypeName = '';
    this.isLoggedIn = false;
  }
}
The User class is used to represent a user, containing properties related to the user, all of which are initialized in the constructor.
Create another file named userType.ts in the models folder and add the following code to it.
export enum UserType {
  Anonymous = 'Unk',
  Admin = 'Admin',
  User = 'User',
}
In this, the UserType enum defines three constants:
- Anonymous: Indicates users who are not logged in and are assigned the string value Unk.
- Admin: Represents administrative users, assigned the string value Admin.
- User: Denotes regular users. They’re assigned the string value User.
Finally, create a new file named loginForm.ts in the models folder and add the following code to it.
import { FormControl } from '@angular/forms';
export interface LoginForm {
  username: FormControl<string>;
  password: FormControl<string>;
}
This interface is used to create a strongly typed reactive form to capture user login details.
Create the GraphQL service
Navigate to the ClientApp folder and run the following command to generate a service file.
ng g s services\login
Now, add the following code to the login.service.ts file.
import { Injectable } from '@angular/core';
import { LoginType } from '../models/userLogin';
import { Mutation } from 'apollo-angular';
import { LOGIN } from '../GraphQL/mutation';
@Injectable({
  providedIn: 'root',
})
export class LoginService extends Mutation<LoginType> {
  document = LOGIN;
}
This service is used to perform a GraphQL mutation for user login.
Create the authentication service
Run the following command to generate a new service file.
ng g s services\subscription
Add the following code to the authentication.service.ts file.
import { Injectable } from '@angular/core';
import { BehaviorSubject } from 'rxjs';
import { User } from '../models/user';
@Injectable({
  providedIn: 'root',
})
export class SubscriptionService {
  userData$ = new BehaviorSubject<User>(new User());
}
This class contains a single property, userData$, which is an instance of BehaviorSubject initialized with a new User object. This property is used to store and update user data. Other parts of the application can subscribe to userData$ to get the current user data and receive notifications of changes.
Run the following command to generate a new service file.
ng g s services\authentication
Next, add the following code to the AuthenticationService class inside the authentication.service.ts file.
export class AuthenticationService {
  constructor(
    private readonly apollo: Apollo,
    private readonly subscriptionService: SubscriptionService,
    private readonly loginService: LoginService
  ) {}
  login(userLoginData: UserLogin) {
    return this.loginService.mutate({ loginData: userLoginData }).pipe(
      map((response) => {
        if (response.data) {
          const authToken = response.data.userLogin.token;
          localStorage.setItem('authToken', authToken);
          this.setUserDetails(authToken);
        }
        return response;
      })
    );
  }
  setUserDetails(authToken: string) {
    if (authToken != null) {
      const userDetails = new User();
      const decodeUserDetails = JSON.parse(
        window.atob(authToken.split('.')[1])
      );
      userDetails.userId = decodeUserDetails.userId;
      userDetails.username = decodeUserDetails.name;
      userDetails.userTypeName = decodeUserDetails.sub;
      userDetails.isLoggedIn = true;
      this.subscriptionService.userData$.next(userDetails);
    }
  }
  logout() {
    localStorage.clear();
    this.resetSubscription();
    this.apollo.client.resetStore();
  }
  private resetSubscription() {
    this.subscriptionService.userData$.next(new User());
  }
}
In the previous code example:
- The AuthenticationService class has three dependencies: Apollo, SubscriptionService, and LoginService, which are injected through the constructor.
- The login method takes a UserLogin object as a parameter, which contains the user’s login credentials. It calls the mutate method on the LoginService with these credentials, which then sends a GraphQL mutation to the server for user authentication. If the server responds with a token, it is stored in local storage, and the user’s details are set using the setUserDetails.
- The setUserDetails method takes an authentication token as a parameter, decodes it, and creates a new User object with the decoded details. This user object is then pushed to an RxJS Subject in the SubscriptionService, which allows other parts of the application to respond to the user logging in.
- The logout method clears local storage, resets the subscriptions in the SubscriptionService, and resets the Apollo client’s store. This logs the user out and clears any user-specific data from the application.
- The resetSubscription method is a private helper method that resets the user data in the SubscriptionService to its initial state. This function is invoked when the user logs out to ensure no user-specific data is left in the application.
Create the login component
Run the following command to create the login component.
ng g c components\login
Update the LoginComponent class in the src\app\components\login\login.component.ts file as follows.
export class LoginComponent implements OnDestroy {
  protected loginForm!: FormGroup;
  private destroyed$ = new ReplaySubject(1);
  constructor(
    private readonly formBuilder: NonNullableFormBuilder,
    private readonly activatedRoute: ActivatedRoute,
    private readonly router: Router,
    private readonly authenticationService: AuthenticationService
  ) {
    this.initializeForm();
  }
  private initializeForm(): void {
    this.loginForm = this.formBuilder.group({
      username: this.formBuilder.control('', Validators.required),
      password: this.formBuilder.control('', Validators.required),
    });
  }
  protected get loginFormControl() {
    return this.loginForm.controls;
  }
  login() {
    if (this.loginForm.valid) {
      this.authenticationService
        .login(this.loginForm.value as UserLogin)
        .pipe(
          switchMap(() => {
            return this.activatedRoute.queryParams;
          }),
          takeUntil(this.destroyed$)
        )
        .subscribe({
          next: (params) => {
            const returnUrl = params['returnUrl'] || '/';
            this.router.navigate([returnUrl]);
          },
          error: (error) => {
            this.loginForm.reset();
            this.loginForm.setErrors({
              invalidLogin: true,
            });
            console.error('Error occurred while login : ', error);
          },
        });
    }
  }
  ngOnDestroy(): void {
    this.destroyed$.next();
    this.destroyed$.complete();
  }
}
This component is responsible for handling user login:
- The initializeForm method initializes the loginForm property with a new FormGroup instance. The FormGroup contains two form controls: username and password, both of which are required.
- The loginFormControl getter returns the loginForm controls. This can be used in the template to access the form controls and their properties.
- The login method is called when the user submits the form. If the form is valid, it calls the login method on the AuthenticationService with the form values. It then subscribes to the Observable returned by the login function. Upon successful login, it directs the user to the designated return URL specified in the route parameters or defaults to the root route if no URL is specified. Conversely, if the login attempt fails, it resets the form and sets an invalidLogin error on the form.
<div class="row justify-content-center">
  <div class="col-md-6 col-lg-6 col-sm-12">
    <div class="title-container p-2 d-flex align-items-center justify-content-between">
      <h2 class="m-0">Login</h2>
      <div>
        <span class="mat-h4">New User? </span>
        <button
          type="submit"
          ejs-button
          cssClass="e-primary"
          [routerLink]="['/register']"
        >
          Register
        </button>
      </div>
    </div>
    <div class="e-card">
      <div class="e-card-header" *ngIf="loginForm.errors">
        <div class="e-card-header-caption">
          <ejs-message
            content="Username or Password is incorrect"
            severity="Error"
          ></ejs-message>
        </div>
      </div>
      <div class="e-card-content row g-0">
        <form [formGroup]="loginForm" (ngSubmit)="login()" novalidate>
          <div class="e-input-section">
            <ejs-textbox
              placeholder="Username"
              cssClass="e-outline"
              floatLabelType="Auto"
              formControlName="username"
            ></ejs-textbox>
          </div>
          <div
            *ngIf="loginFormControl.username.touched &&
                  loginFormControl.username.errors?.['required']"
            class="e-error"
          >
            Username is required.
          </div>
          <div class="e-input-section">
            <ejs-textbox
              type="password"
              placeholder="Password"
              cssClass="e-outline"
              floatLabelType="Auto"
              formControlName="password"
            ></ejs-textbox>
          </div>
          <div
            *ngIf="loginFormControl.password.touched &&
                  loginFormControl.password.errors?.['required']"
            class="e-error"
          >
            Password is required.
          </div>
          <div class="e-card-actions d-flex justify-content-end">
            <button type="submit" ejs-button cssClass="e-success">Login</button>
          </div>
        </form>
      </div>
    </div>
  </div>
</div>
This template code is responsible for displaying a user login form:
- The form uses the formGroup directive to bind it to the loginForm property in the component class.
- The ngSubmit event is associated with the login method in the component class and is triggered upon form submission. The form contains two input fields for the username and password. These fields use the Syncfusion ejs-textbox component and the formControlName directive to bind them to the username and password form controls in the loginForm FormGroup. If either the username or password field is touched and has a required error, an error message is displayed.
- The ejs-button directive, coupled with the routerLink attribute, is used to navigate to the /register route, where a new user can register.
Update the navigation bar
Update the NavBarComponent class under src\app\components\nav-bar\nav-bar.component.ts as in the following code example.
export class NavBarComponent implements OnInit, OnDestroy {
  readonly userType = UserType;
  authenticatedUser = new User();
  private destroyed$ = new ReplaySubject<void>(1);
  public items: ItemModel[] = [
    {
      text: 'Logout',
    },
  ];
  constructor(
    private readonly router: Router,
    private readonly subscriptionService: SubscriptionService,
    private readonly authService: AuthenticationService
  ) {}
  ngOnInit(): void {
    this.subscriptionService.userData$
      .pipe(takeUntil(this.destroyed$))
      .subscribe({
        next: (user: User) => {
          this.authenticatedUser = user;
        },
        error: (error) => {
          console.error('An error occurred : ', error);
        },
      });
  }
  clickActionItem(args: MenuEventArgs) {
    if (args.item.text === 'Logout') {
      this.logout();
    }
  }
  private logout() {
    this.authService.logout();
    this.router.navigate(['/login']);
  }
  ngOnDestroy(): void {
    this.destroyed$.next();
    this.destroyed$.complete();
  }
}
In the previous code example:
- The NavBarComponent class has three dependencies: Router, SubscriptionService, and AuthenticationService. These are injected through the constructor.
- The items property is an array of ItemModel objects used to configure a Syncfusion SplitButton. The array includes a single item with the text Logout.
- The ngOnInit method subscribes to the userData$ observable of the SubscriptionService. When a new User object is emitted, it sets the authenticatedUser If an error occurs, it logs the error.
- The clickActionItem method is called when an item in the Syncfusion Split Button component is clicked. If the clicked item’s text is Logout, it calls the logout method.
- The logout method calls the logout method of the AuthenticationService and navigates to the /login route.
Now, let’s proceed with updating the HTML file by updating the src\app\components\nav-bar\nav-bar.component.html file as follows.
<ejs-appbar colorMode="Primary">
  <button
    ejs-button
    iconCss="e-icons e-video e-medium"
    cssClass="e-inherit"
    [routerLink]="['/']"
  >
    Movie App
  </button>
  <div class="e-appbar-spacer"></div>
  <button
    *ngIf="!authenticatedUser.isLoggedIn"
    ejs-button
    cssClass="e-inherit"
    [routerLink]="['/login']"
    [isToggle]="true"
  >
    Login
  </button>
  <button
    *ngIf="authenticatedUser.userTypeName == userType.Admin"
    ejs-button
    cssClass="e-inherit"
    [routerLink]="['/admin/movies']"
    [isToggle]="true"
  >
    Admin Panel
  </button>
  <ng-container *ngIf="authenticatedUser.isLoggedIn">
    <button
      ejs-dropdownbutton
      cssClass="e-inherit"
      iconCss="e-icons e-people"
      [items]="items"
      content="{{ authenticatedUser.username }}"
      (select)="clickActionItem($event)"
    ></button>
  </ng-container>
</ejs-appbar>
In the previous code example:
- We have added a Login button with the routerLink attribute set to /login. The button is only displayed if the user is not logged in.
- The Admin panel button will be displayed only if the authenticated user has an admin role.
- Finally, an ng-container with the *ngIf directive is used to render a button conditionally with the ejs-dropdownbutton directive, visible only when the user is logged in. This button displays the username and a dropdown menu with the items defined in the items When an item in the dropdown menu is selected, the clickActionItem method is triggered.
Update the app component
Update the AppComponent class located in the src\app\app.component.ts file. We’ve incorporated logic to maintain the user authentication state.
export class AppComponent {
  constructor(private readonly authService: AuthenticationService) {
    const authToken = localStorage.getItem('authToken');
    if (authToken) {
      this.authService.setUserDetails(authToken);
    }
  }
}
This adjustment ensures that if a user has previously logged in and their token is saved in local storage, the application will automatically authenticate the user upon loading.
Create route guards
We will create route guards to restrict unauthorized access to the application routes. There are two types of guards implemented.
Authentication guard
Run the following command to create the authentication guard.
ng g g guards\auth
This command will ask, “Which type of guard you would like to create?”. Select the CanActivate option when prompted, then press Enter to create the guard.
Upon successful execution, this command will create a folder named guards and create an auth.guard.ts file under it. Add the following code to this file.
import { CanActivateFn } from '@angular/router';
import { inject } from '@angular/core';
import { Router } from '@angular/router';
import { SubscriptionService } from '../services/subscription.service';
import { map } from 'rxjs';
export const authGuard: CanActivateFn = (route, state) => {
  const subscriptionService = inject(SubscriptionService);
  const router = inject(Router);
  if (localStorage.getItem('authToken')) {
    return true;
  }
  return subscriptionService.userData$.pipe(
    map((user) => {
      if (user.isLoggedIn) {
        return true;
      }
      router.navigate(['/login'], {
        queryParams: { returnUrl: state.url },
      });
      return false;
    })
  );
};
In the previous code example:
- The authGuard function implements the CanActivate interface from Angular’s router. This function is used as a guard to determine whether a route can be activated based on the user’s authentication status.
- Dependencies like subscriptionService and router are injected using Angular’s core inject function. The function initially checks for the presence of an authToken in the local storage. If found, it returns true, enabling route activation. However, if no authToken exists, it subscribes to the userData$ Observable from SubscriptionService. Then, it utilizes the map operator from RxJS to process user data. If the user is logged in, route activation is permitted.
- If the user is not logged in, it navigates to the /login route and returns false, preventing the route from being activated. The current URL is passed as the query parameter returnUrl. This is used to redirect the user back to the original page after they log in.
Admin authentication guard
Run the following command to create the admin-auth guard.
ng g g guards\admin-auth
When prompted with which type of guard you would like to create, select CanActivate, which is similar to the admin guard, and press Enter to create the guard.
Refer to the following code in the src\app\guards\admin-auth.guard.ts file.
import { CanActivateFn } from '@angular/router';
import { inject } from '@angular/core';
import { Router } from '@angular/router';
import { SubscriptionService } from '../services/subscription.service';
import { map } from 'rxjs';
import { UserType } from '../models/userType';
export const adminAuthGuard: CanActivateFn = (route, state) => {
  const subscriptionService = inject(SubscriptionService);
  const router = inject(Router);
  return subscriptionService.userData$.pipe(
    map((user) => {
      if (user.isLoggedIn && user.userTypeName === UserType.Admin) {
        return true;
      }
      router.navigate(['/login'], {
        queryParams: { returnUrl: state.url },
      });
      return false;
    })
  );
};
In the previous code example:
- The adminAuthGuard function is used as a guard to determine whether a route can be activated based on the user’s authentication status and role.
- It subscribes to the userData$ Observable from the SubscriptionService. It then uses the map operator from RxJS to transform the user data. If the user is logged in and their userTypeName is Admin, it returns true, allowing the route to be activated.
- If the user is not logged in or their userTypeName is not Admin, it navigates to the /login route and returns false, preventing route activation. The current URL is passed as the query parameter returnUrl.
- We will use this function to prevent non-admin users from accessing admin-only pages.
Configure app routing
Open the src\app\app-routing.module.ts file and update the appRoutes array as follows.
const appRoutes: Routes = [
  { path: '', component: HomeComponent, pathMatch: 'full' },
  { path: 'filter', component: HomeComponent },
  { path: 'login', component: LoginComponent },
  { path: 'register', component: UserRegistrationComponent },
  { path: 'movies/details/:movieId', component: MovieDetailsComponent },
  {
    path: 'admin/movies',
    loadChildren: () =>
      import('./admin/admin.module').then((module) => module.AdminModule),
    canActivate: [adminAuthGuard],
  },
];
We have configured the routing path for the login component. The last route configuration uses the loadChildren function to lazily load the AdminModule when the admin/movies path is matched. The canActivate option with the adminAuthGuard means that this route is protected by the adminAuthGuard, which checks that the user is an admin before allowing access to the route.
Update the UserRegistration component
Currently, the user is being redirected to the home page upon successful registration. However, to provide a better user experience, we will redirect the user to the login page once the registration is successful.
Update the routing URL under the subscribe block of the registerUser function in the UserRegistrationComponent class, as follows.
registerUser(): void {
  // Existing code
    if (this.userRegistrationForm.valid) {
      this.registrationService
        .mutate({
          registrationData: userRegistrationData,
        })
        .pipe(takeUntil(this.destroyed$))
        .subscribe({
          next: (response) => {
            // Existing code
              this.router.navigate(['/login']); // Update this line
            } else {
             // Existing code
            }
          },
        });
    }
  }
Update the database
If a user registers using the UI, they will be registered with the User role. If we want to add a user with the Admin role, we should add them directly via the database. Open SSMS and run the following SQL query in the MovieDB database.
INSERT INTO UserMaster
VALUES('Ankit','Sharma','admin','Admin@123','Male','Admin');
This SQL query inserts a user with the Admin role into the UserMaster table in the MovieDB database.
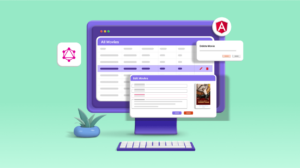
Execution demo
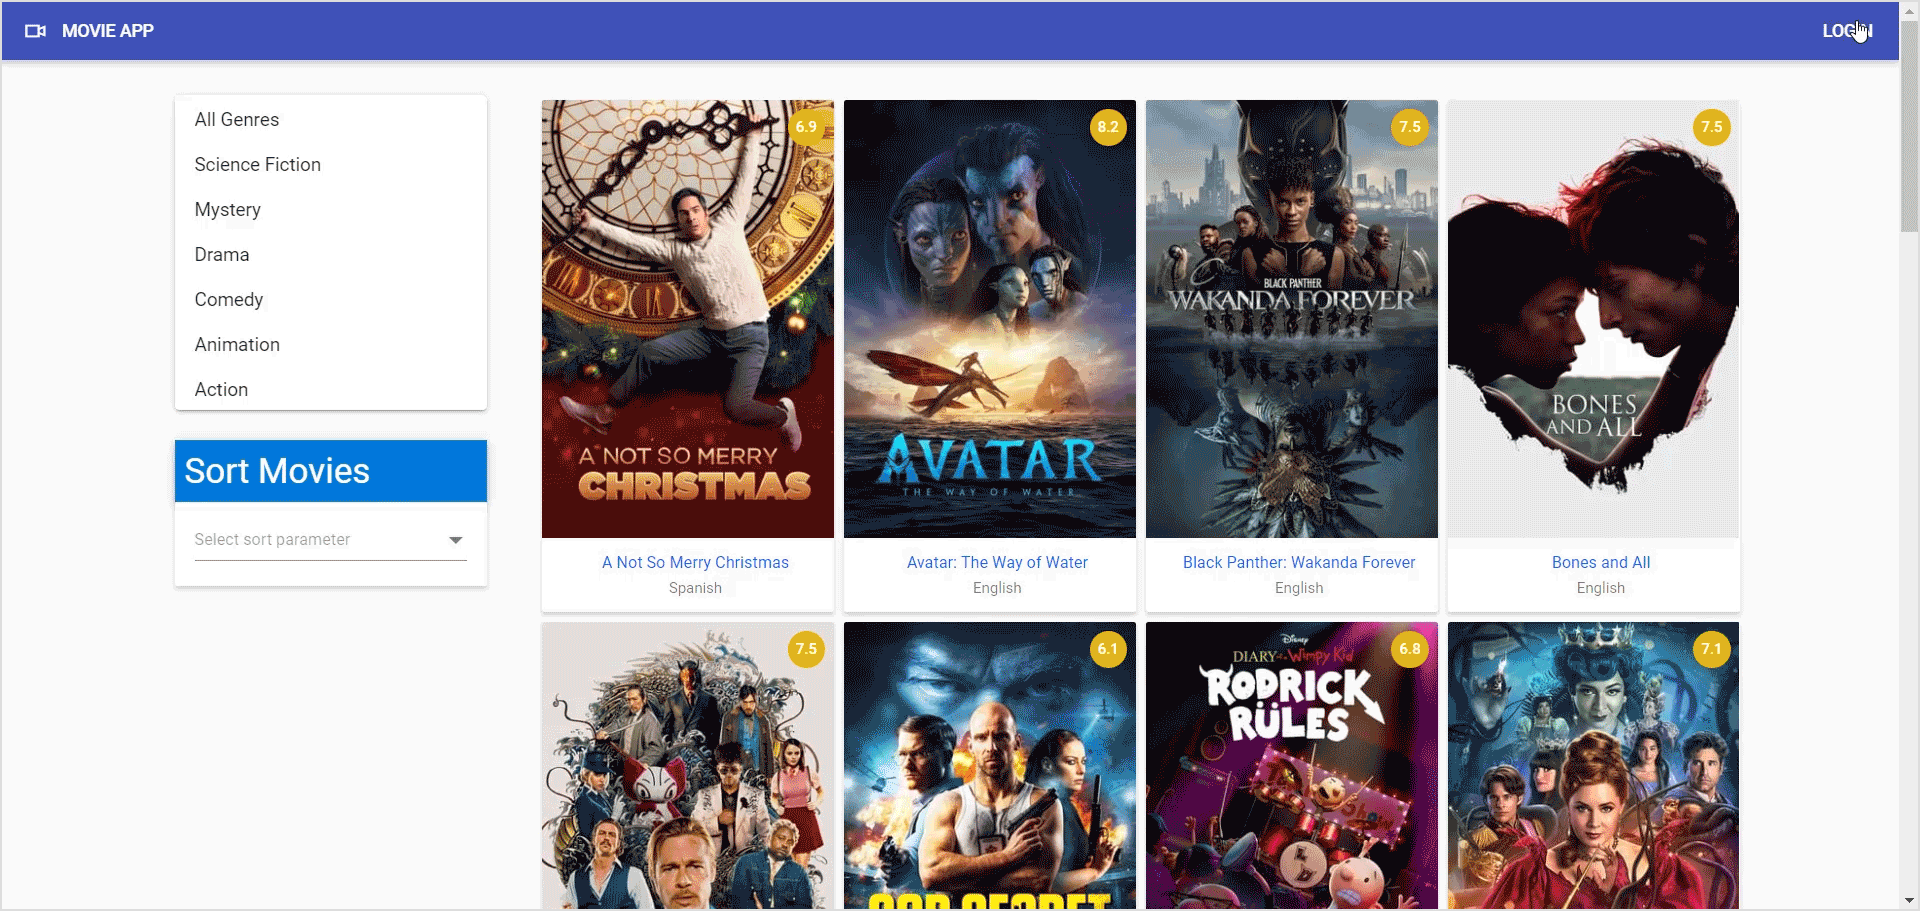
After executing the previous code examples, we will get the output like in the following image.
GitHub resource
For more details, refer to the complete source code for the full-stack web app with Angular and GraphQL on GitHub.

Summary
Thanks for reading this article. In it, we learned how to implement the Login functionality and add the role-based authorization feature to our application. We also added route guards to prevent unauthorized access to parts of our application.
In the next article of this series, we will learn how to implement the watchlist feature. It will allow the users to add and remove movies from a watchlist. This will be similar to the Wishlist feature of an e-commerce app.
Whether you’re already a valued Syncfusion user or new to our platform, we extend an invitation to explore our Angular components with the convenience of a free trial. This trial allows you to experience the full potential of our components to enhance your app’s user interface and functionality.
Our dedicated support system is readily available if you need guidance or have any inquiries. Contact us through our support forum, support portal, or feedback portal. Your success is our priority, and we’re always delighted to assist you on your development journey!
Related blogs
- A Full-Stack Web App Using Angular and GraphQL: Part 1
- A Full-Stack Web App Using Angular and GraphQL: Data Fetching and Manipulation (Part 2)
- A Full-Stack Web App Using Angular and GraphQL: Perform Edit, Delete, and Advanced Filtering (Part 3)
- A Full-Stack Web App Using Angular and GraphQL: Adding User Registration Functionality (Part 4)


 No spam, just valuable updates.