
This is the first of a series of articles that will walk you through the process of creating a full-stack web application using Angular, .NET, and GraphQL with the SQL server as a database.
We will create a MovieApp project. The app will display a list of movies and their details, such as rating, genre, description, poster image, and language. It will allow us to filter the movies based on the genre.
The app will have support for authentication and authorization. It will support two roles—admin and user. An admin can add, update, and delete movie data in the application. A user has only read access but can add a movie to a watchlist.
We will then learn to deploy the app to IIS and Azure app services.

Tech stack
- Angular
- .NET
- SQL Server
- Entity Framework Core
- Hot Chocolate
- Banana Cake Pop
- Apollo Angular
- Syncfusion Angular UI components library
What is GraphQL?
GraphQL is an open-source query language for APIs. It allows the client to ask for the specific data they need. This makes sure that the client controls the data, not the server. GraphQL is not tied to any specific database or storage engine.
What is Hot Chocolate?
Hot Chocolate is an open-source GraphQL server for the .NET platform that allows users to create GraphQL endpoints. It is easy to set up and allows users to deliver apps quickly by removing the need to build a fully-fledged GraphQL server.
What is Banana Cake Pop?
Banana Cake Pop is a GraphQL IDE that allows us to test the GraphQL server implementations. We can use it with Hot Chocolate or other GraphQL servers. We can also use the online IDE.
What is Apollo Angular?
Apollo Angular is a lightweight, open-source GraphQL client for Angular. It is universally compatible and can work with any GraphQL server setup or schema.
Prerequisites
Please install the following set of tools before we begin our project:
- Install the latest version of Visual Studio 2022. While installing, make sure you have selected the ASP.NET and web development workloads.
- Install the latest version of Visual Studio Code.
- Download and install the latest version of SQL Server and SQL Server Management Studio (SSMS).
- Download and install the latest LTS version of Node.js.
- Install Angular CLI. It will help us to scaffold and maintain the Angular app using the command line.
Configure the database
The first step toward creating a project is to create and configure our database. Open SSMS and create a database named MovieDB. Create a table called Genre. This table will have two fields, GenreID and GenreName. GenreID will be the primary key for this table.
Add six genres to this table. Run the command as shown.
CREATE TABLE Genre (
    GenreID int IDENTITY(1,1) PRIMARY KEY,
    GenreName varchar(20) NOT NULL,
)

GO

INSERT INTO Genre VALUES('Action')
INSERT INTO Genre VALUES('Animation')
INSERT INTO Genre VALUES('Comedy')
INSERT INTO Genre VALUES('Drama')
INSERT INTO Genre VALUES('Mystery')
INSERT INTO Genre VALUES('Science Fiction')
Next, we will create the UserType table. This table will have two fields, UserTypeID and UserTypeName.
We will insert the data for two user types supported by our app: admin and user.
Run the command as shown.
CREATE TABLE UserType (
   UserTypeID int IDENTITY(1,1) PRIMARY KEY,
   UserTypeName varchar(20) NOT NULL
)

GO

INSERT INTO UserType VALUES('Admin')
INSERT INTO UserType VALUES('User')
We will create a UserMaster table to store the details of the user for our app. The table will have columns for UserID, FirstName, LastName, Username, Password, Gender, and UserTypeName. The UserID will be the primary key for this table.
Run the command as shown.
CREATE TABLE UserMaster (
    UserID int IDENTITY(1,1) PRIMARY KEY,
    FirstName varchar(20) NOT NULL,
    LastName varchar(20) NOT NULL,
    Username varchar(20) NOT NULL,
    Password varchar(40) NOT NULL,
    Gender varchar(6) NOT NULL,
    UserTypeName varchar(20) NOT NULL,
)

GO
The Movie table is used to store the details of the movies. The table will have columns for MovieID, Title, Overview, Genre, Language, Duration, Rating, and the PosterPath of the movie. The MovieID will be the primary key for this table.
Run the command as shown.
CREATE TABLE Movie (
     MovieID int IDENTITY(1,1) PRIMARY KEY,
     Title varchar(100) NOT NULL,
     Overview varchar(1024) NOT NULL,
     Genre varchar(20) NOT NULL,
     Language varchar(20) NOT NULL,
     Duration int NOT NULL,
     Rating decimal(2, 1) NULL,
     PosterPath varchar(100) NULL,
)

GO
Next, we will create the Watchlist table. This table will have three fields: WatchlistId, UserID, and DateCreated. This table is used to store the watchlists of all the users.
Run the command as shown.
CREATE TABLE Watchlist (
    WatchlistId varchar(36) PRIMARY KEY,
    UserID int NOT NULL,
    DateCreated datetime NOT NULL,
)

GO
Finally, we will create the table WatchlistItems. This table is used to store the list of movies added by a user to their watchlist.
Run the command as shown.
CREATE TABLE WatchlistItems (
    WatchlistItemId int IDENTITY(1,1) PRIMARY KEY,
    WatchlistId varchar(36) NOT NULL,
    MovieId int NOT NULL,
)

GOCreate the ASP.NET Core hosted Angular application
We will create an Angular app with an integrated ASP.NET Core backend. Please follow these steps:
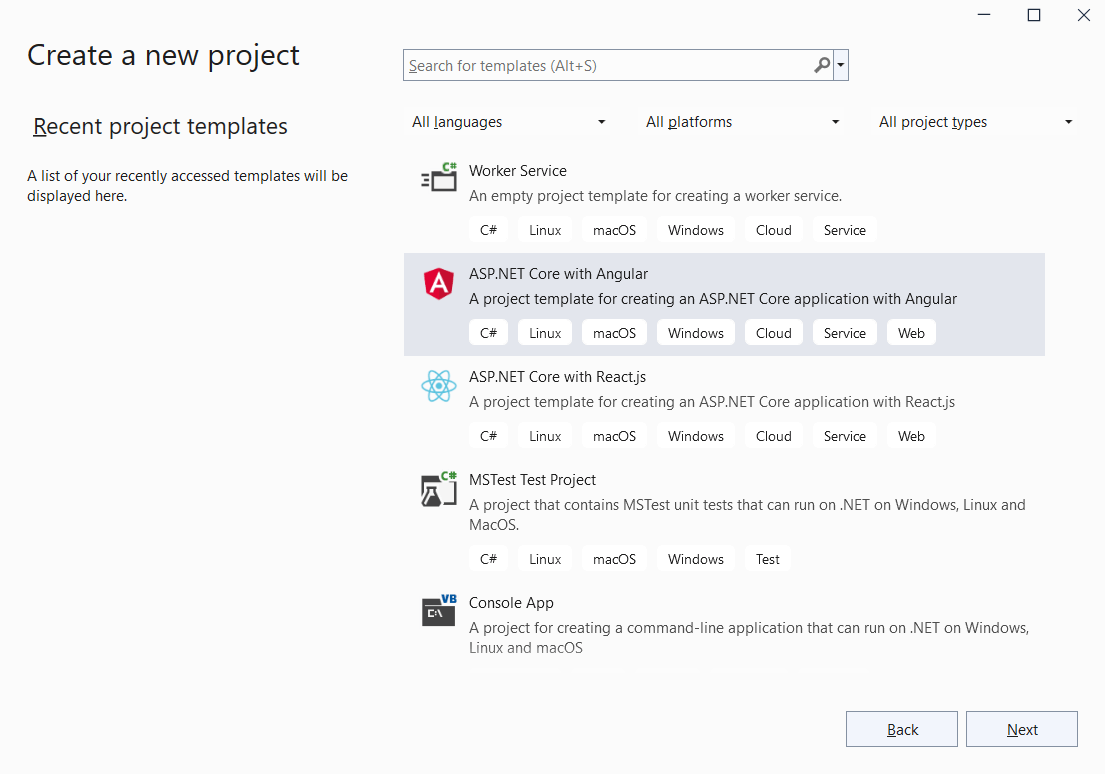
- Open Visual Studio 2022 and click Create a new Project.
- In the Create a new project dialog that opens, search for Angular and select ASP.NET Core with Angular from the search results. Then, click Next. Refer to the following image.
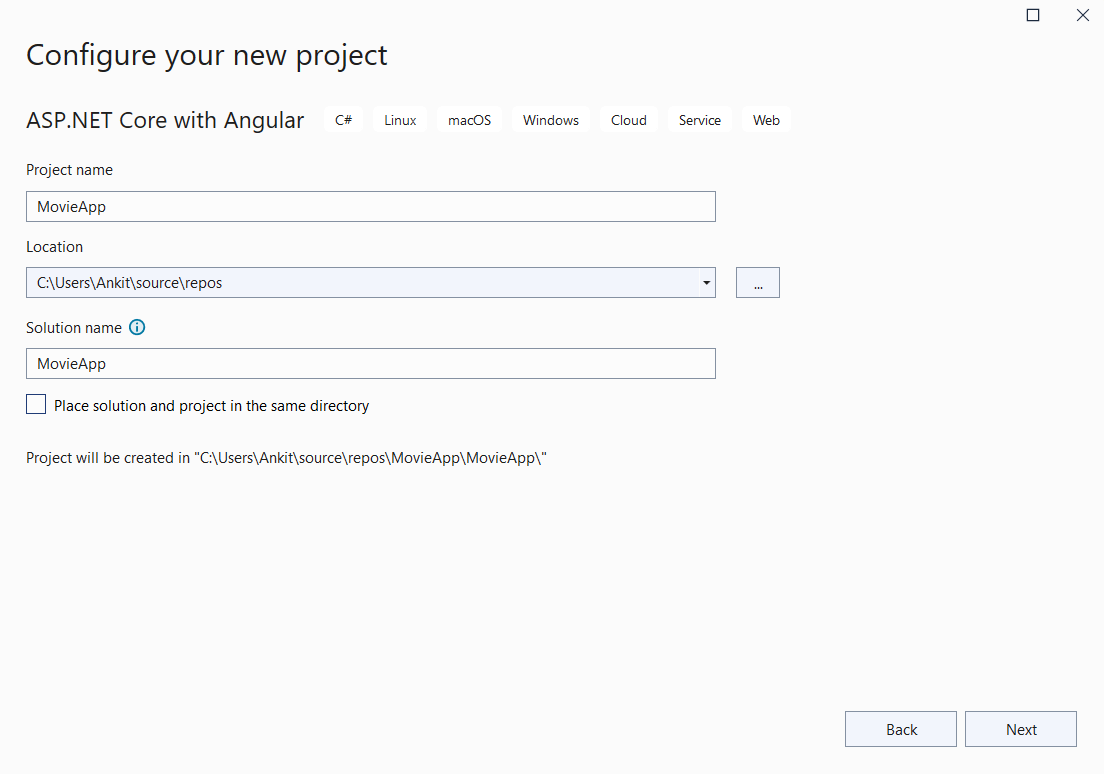
- Now, we are in the Configure your new project dialog. Provide the name of your app. Here, we are naming our app as MovieApp. Then, click Next. Refer to the following image.
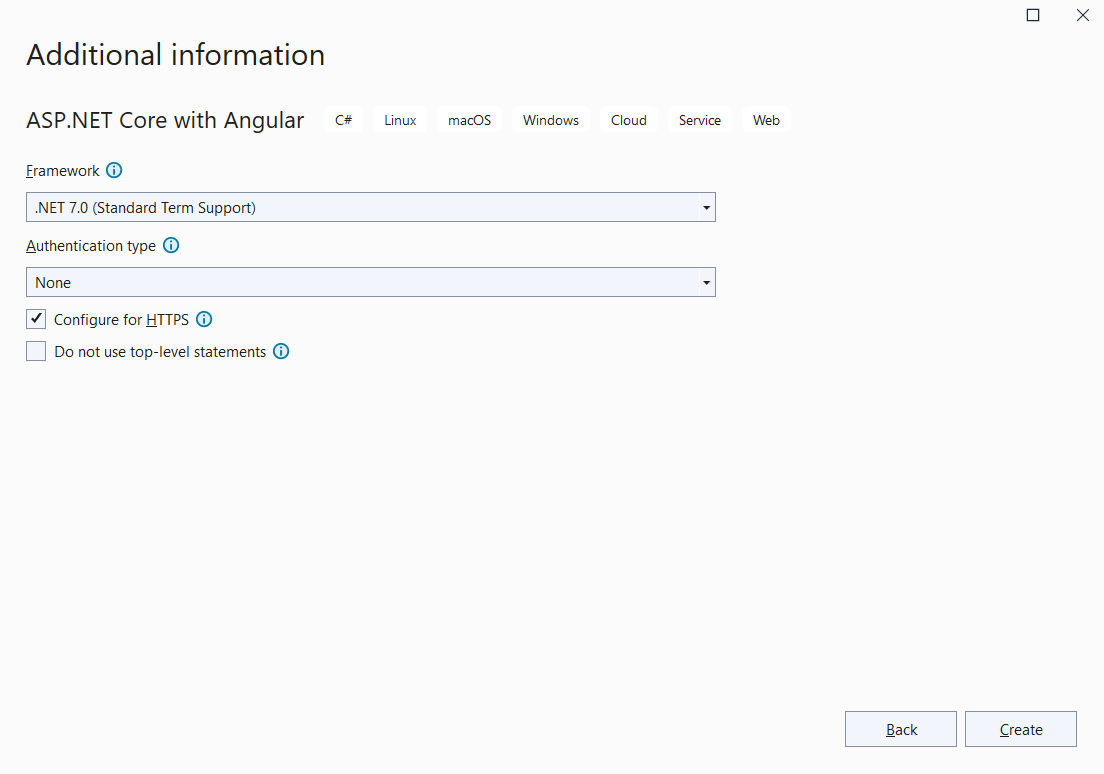
- On the Additional information page, select the target framework as .NET 7.0 (Standard-term support) and set the authentication type to None. Check the Configure for HTTPS box and then click Create. Refer to the following image.
We have successfully created the project. The project has a ClientApp folder, which contains the client-side Angular app.
In the next section, we will configure our project by installing the required NuGet packages.
Configure the ASP.NET project
Navigate to Tools >> NuGet Package Manager >> Package Manager Console. The NuGet package manager console will open, as shown in the following image.
We are using the Entity Framework Core database first approach to create our models. First, we need to install the package for the database provider we are targeting, which is SQL Server in this case. So, run the following command.
NuGet\Install-Package Microsoft.EntityFrameworkCore.SqlServer -Version 7.0.9
We want to create models from an existing database using Entity Framework Tools. Therefore, we need to install the required tools package. Run the following command.
NuGet\Install-Package Microsoft.EntityFrameworkCore.Tools -Version 7.0.9
We will use JWT to implement the authentication mechanism in our app. We will install the required package by running the following command.
NuGet\Install-Package Microsoft.AspNetCore.Authentication.JwtBearer -Version 7.0.9
Run the following command to install the GraphQL ASP.NET Core middleware for Hot Chocolate. This package includes the Banana Cake Pop middleware, which provides us with the GraphQL IDE middleware.
NuGet\Install-Package HotChocolate.AspNetCore -Version 13.4.0
To allow the seamless integration of Entity Framework Core into Hot Chocolate, install the following package.
NuGet\Install-Package HotChocolate.Data.EntityFramework -Version 13.4.0
To enable the ASP.NET Core authorization integrations for Hot Chocolate, install the following package.
NuGet\Install-Package HotChocolate.AspNetCore.Authorization -Version 13.4.0
Scaffolding the model to the application
Add the connection string in the MovieApp\appsettings.json file, as shown in the following code. Replace the value with the connection string for your database.
"ConnectionStrings": {
    "DefaultConnection": "Data Source=LAPTOP-N6QJKU32;Initial Catalog=MovieDB;User Id=test;Password=sa;TrustServerCertificate=True;"
  }
Run the following command in the package manager console to scaffold the models from the database tables.
Scaffold-DbContext Name=ConnectionStrings:DefaultConnection Microsoft.EntityFrameworkCore.SqlServer -OutputDir Models -Tables Movie, Genre, UserType, UserMaster, Watchlist, WatchlistItems
Once this command is executed successfully, a Models folder will be created inside the MovieApp project. This folder contains the DB context class, which will have the name of the database followed by the word Context. Our database name is MovieDB, so the name of the DB context class is MovieDBContext.
Important: The MovieDBContext contains a default empty constructor, as shown in the following code example. Delete this constructor. Otherwise, it will throw a runtime error.
public MovieDBContext()
{
}
Add the interface
We will use the repository pattern in our app. Add a folder called Interfaces inside the MovieApp project. Add an interface class, IMovie.cs. Then, add the following code to it.
using MovieApp.Models;

namespace MovieApp.Interfaces
{
    public interface IMovie
    {
        Task<List<Genre>> GetGenre();
    }
}
Currently, we have added only one method to this interface. We will add more methods as we progress with the app creation.
Creating a movie data access layer for the application
Add a folder called DataAccess inside the MovieApp project. Add a class called MovieDataAccessLayer.cs inside this folder. Put the following code inside it.
using Microsoft.EntityFrameworkCore;
using MovieApp.Models;
using MovieApp.Interfaces;

namespace MovieApp.DataAccess
{
    public class MovieDataAccessLayer : IMovie
    {
        readonly MovieDbContext _dbContext;
        public MovieDataAccessLayer(IDbContextFactory<MovieDbContext> dbContext)
        {
            _dbContext = dbContext.CreateDbContext();
        }
        {
            _dbContext = dbContext.CreateDbContext();
        }
        public async Task<list<Genre>> GetGenre()
        {
            return await _dbContext.Genres.AsNoTracking().ToListAsync();
        }
    }
}
We have implemented the IMovie interface and defined the GetGenre() function.
We have created a DbContext instance on a per-operation basis using an IDbContextFactory. This will ensure that we do not face any concurrency issues with EF Core.
Add a GraphQL query resolver
A GraphQL query is used to fetch values from a server. It is a read-only operation.
Add a folder called GraphQL inside the MovieApp project. Add a class called MovieQueryResolver.cs and put the following code inside it.
using MovieApp.Interfaces;
using MovieApp.Models;

namespace MovieApp.GraphQL
{
    public class MovieQueryResolver
    {
        readonly IMovie _movieService;
        public MovieQueryResolver(IMovie movieService)
        {
            _movieService = movieService;
        }
        [GraphQLDescription("Gets the list of genres.")]
        public async Task<list<Genre>> GetGenreList()
        {
            return await _movieService.GetGenre();
        }
    }
}
We injected the IMovie service dependency in this class. The GetGenreList method will invoke the GetGenre method of the movie service to fetch the list of genres. The GraphQLDescription attribute is used to describe the function. This description will be available to the client consuming this function.
Configure the program.cs file
We will use the program.cs file to configure the middleware for our app. Add the following lines to it.
builder.Services
    .AddDbContextFactory<MovieDbContext>(options =>
    options.UseSqlServer(builder.Configuration.GetConnectionString("DefaultConnection")
    ));

builder.Services.AddTransient<IMovie, MovieDataAccessLayer>();

builder.Services.AddGraphQLServer()
    .AddQueryType<MovieQueryResolver>();
We are registering our DBContext using the AddDbContextFactory extension method and providing the connection string path from the appsettings.json file. The IMovie service is created for the transient lifetime. We also register the MovieQueryResolver class with the GraphQL server using the AddQueryType extension method.
Now, add the following code at the end of the file just before calling the Run() function. This will add the GraphQL endpoint to the endpoint configurations.
app.MapGraphQL();
Configure the proxy server
Our app has a proxy server configured, which is used to access the API endpoints. The configuration can be found in the ClientApp\proxy.conf.js file.
The GraphQL API endpoint is accessible via the path “<BaseURL>/graphql”, where <baseURL> is the base URL of the app. Therefore, we need to add the endpoint path to the proxy server.
Update the PROXY_CONFIG constant in the proxy.conf.js file, as shown in the following code example.
const PROXY_CONFIG = [
  {
    context: [
      "/graphql",
   ],
    proxyTimeout: 10000,
    target: target,
    secure: false,
    headers: {
      Connection: 'Keep-Alive'
    }
  }
]
Execution demo
Finally, launch the app and append /graphql to the base URL. It will open the Banana Cake Pop IDE in your browser. You can perform a fetch operation to get the list of genres.
The name of our query method is GetGenreList, as defined in the MovieQueryResolver class. However, when the GraphQL schema is generated, the word Get is removed, and the method name is generated in the Pascal case. Therefore, we use genreList for invoking the query from the Banana Cake Pop IDE.
Resource
The complete source code of this full-stack web app with Angular and GraphQL is available in the GitHub repository.
Summary
Thanks for reading! In this article, we learned how to set up a .NET app to create a GraphQL server with the help of Hot Chocolate. We created a query and used the Banana Cake Pop IDE to execute it.
In the next article of this series, we will create more complex queries and configure the Angular client to consume our GraphQL API endpoints using Apollo Angular.
You can download our free trial to try our Syncfusion Angular components if you don’t have a license.
You can also contact us through our support forum, support portal, or feedback portal. We are always happy to assist you!
 No spam, just valuable updates.
Comments (2)
Your code have errors that are fixed on your github repository.
public MovieDataAccessLayer(IDbContextFactory dbContext) — *WRONG*
public MovieDataAccessLayer(IDbContextFactory dbContext) — * OK *
public async Task GetGenreList() — *WRONG*
public async Task<List> GetGenre() — * OK *
please update the code here in the page!
Thanks
Hi Marcos,
We have updated the code example and you can find the updated runnable sample in the GitHub repository.
Regards,
Gayathri R