

Syncfusion is happy to announce that our 2019 Volume 3 beta release has been rolled out. With every release, Syncfusion gives more value to our customers by adding new controls, features, and enhancements. The Syncfusion file-format libraries provide .NET libraries to create, read, write, and convert PDF, Excel, Word, and PowerPoint files in .NET Framework, .NET Core, UWP, and Xamarin applications without Microsoft Office or Adobe dependencies. In this blog, we will explore details about the new features and enhancements in our file-format libraries.
PDF Library
PDF digital signatures with CAdES
As per PDF specification 2.0, Syncfusion PDF Library now supports digital signatures based on CAdES (CMS Advanced Electronics Signature). The CAdES-based digital signature can remain valid for long periods, even if underlying cryptographic algorithms are broken.
You can change the standard between CMS and CAdES using the CryptographicStandard property in the PdfSignatureSettings class. In addition, you can now set different message digest algorithms to sign PDF documents using the DigestAlgorithm property in the PdfSignatureSettings class.
We now have support for these message digest algorithms:
- SHA1
- SHA256
- SHA384
- SHA512
- RIPEMD160
Please refer to the following code example of signing a PDF document with CAdES standard.
public void SignPDFDocument()
{
    //Load the existing PDF document.
    PdfLoadedDocument document = new PdfLoadedDocument("Input.pdf");

    //Get the existing PDF page.
    PdfLoadedPage page = document.Pages[0] as PdfLoadedPage;

    //Create a new PDF certificate from PFX file with private key.
    PdfCertificate pdfCert = new PdfCertificate(@"PDF.pfx", "syncfusion");

    //Create a digital signature.
    PdfSignature signature = new PdfSignature(document, page, pdfCert, "Signature");

    //Set signature settings to customize a cryptographic standard specified.
    signature.Settings.CryptographicStandard = CryptographicStandard.CADES;

    //Specify the digest algorithm (hash).
    signature.Settings.DigestAlgorithm = DigestAlgorithm.SHA256;

    //Set signature information.
    signature.Bounds = new RectangleF(new PointF(0, 0), new SizeF(100, 50));
    signature.ContactInfo = "[email protected]";
    signature.LocationInfo = "Honolulu, Hawaii";
    signature.Reason = "I am author of this document.";

    //Save and close the document.
    document.Save("Output.pdf");
    document.Close(true);
}
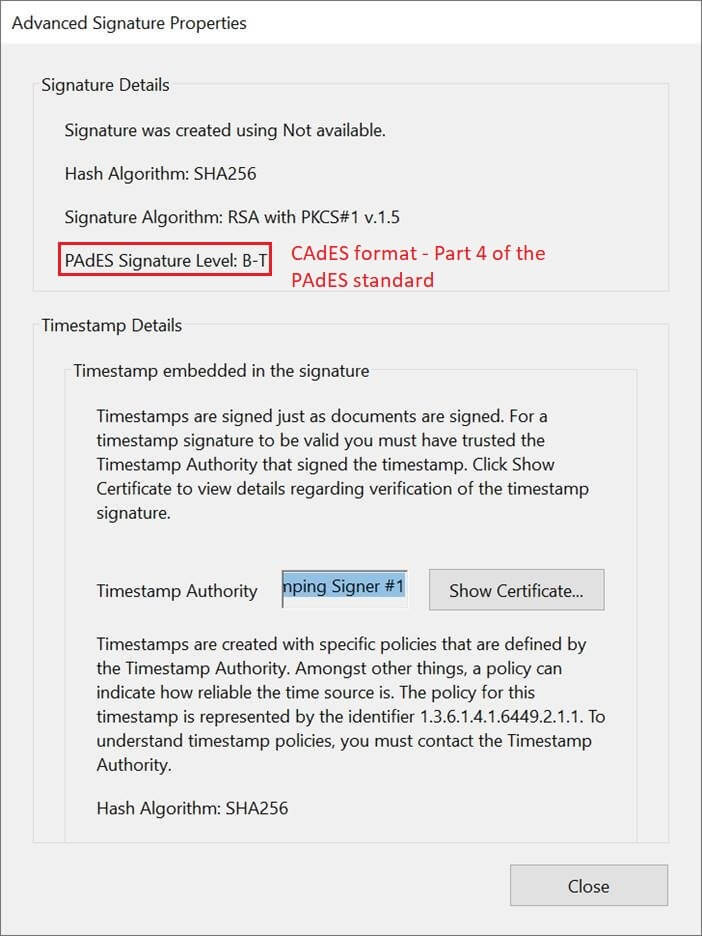
Property of CAdES format signature in PDF
To learn more about PDF digital signature creation, refer to the documentation.
Validating PDF digital signatures
Now, you can validate digital signatures in an existing PDF document.
Digital signature validation covers the following steps to ensure the validity of the signatures:
- Validate the document modification.
- Validate the certificate chain.
- Ensure the signature with timestamp time.
- Check the revocation status of the certificate with OCSP and CRL.
- Ensure the multiple digital signatures.
You can use the ValidateSignature method of the class PdfLoadedSignatureField to validate the digital signature. You can get the validation result from the IsSignatureValid property of the PdfSignatureValidationResult class.
The following code example shows how to validate the existing signed PDF document.
public void ValidateDigitalSignature()
{
    //Load an existing signed PDF document.
    PdfLoadedDocument loadedDocument = new PdfLoadedDocument("Input.pdf");

    //Get signature field.
    PdfLoadedSignatureField signatureField = loadedDocument.Form.Fields[0] as PdfLoadedSignatureField;

    //X509Certificate2Collection to check the signer's identity using root certificates.
    X509CertificateCollection collection = new X509CertificateCollection();
    //Create new X509Certificate2 with the root certificate.
    X509Certificate2 certificate = new X509Certificate2("PDF.pfx", "syncfusion");
    //Add the certificate to the collection.
    collection.Add(certificate);

    //Validate signature and get the validation result.
    PdfSignatureValidationResult result = signatureField.ValidateSignature(collection);

    //Check overall status.
    bool isValidSignature = result.IsSignatureValid;

    //Checks the signature status.
    SignatureStatus status = result.SignatureStatus;
    //Checks whether the document is modified or not.
    bool isModified = result.IsDocumentModified;
    //Checks whether the LTV is enabled or not.
    bool isLTVEnabled = result.IsLTVEnabled;
    //Checks the signature validity based on the timestamp, signing, or current time.
    bool isValidAtTimestampTime = result.IsValidAtTimeStampTime;
    bool isValidAtSignedTime = result.IsValidAtSignedTime;
    bool isValidAtCurrentTime = result.IsValidAtCurrentTime;

    //Get the signature algorithm.
    string signatureAlgorithm = result.SignatureAlgorithm;
    //Get the Hash algorithm.
    DigestAlgorithm digestAlgorithm = result.DigestAlgorithm;
    //Revocation validation details.
    RevocationResult revocationDetails = result.RevocationResult;
    //Get the OCSP revocation status.
    RevocationStatus revocationStatus = revocationDetails.OcspRevocationStatus;
    //Checks whether it contains revoked CRL.
    bool isRevokedCRL = revocationDetails.IsRevokedCRL;
    //Close the document.
    loadedDocument.Close(true);
}

Validating the PDF digital signature and showing the result
To learn more about validating a PDF digital signature, refer to the documentation.
Encrypt only file attachments
Now, encrypt PDF documents with following options in the PDF Library:
- Encrypt all contents in the PDF document.
- Encrypt all document contents except metadata.
- Encrypt only file attachments.
You can choose any one of these options using the property EncryptionOptions of the PdfSecurity class.
The following code example illustrates how to encrypt only document attachments using Syncfusion PDF Library.
public void SecurePdfDocument()
{
    //Create a new PDF document.
    PdfDocument document = new PdfDocument();
    PdfPage page = document.Pages.Add();

    PdfGraphics graphics = page.Graphics;
    PdfStandardFont font = new PdfStandardFont(PdfFontFamily.TimesRoman, 20f, PdfFontStyle.Bold);
    PdfBrush brush = PdfBrushes.Black;

    //Document security.
    PdfSecurity security = document.Security;
    //Specifies key size and encryption algorithm.
    security.KeySize = PdfEncryptionKeySize.Key256Bit;
    security.Algorithm = PdfEncryptionAlgorithm.AES;
    security.UserPassword = "password";

    //Specifies the encryption option.
    security.EncryptionOptions = PdfEncryptionOptions.EncryptOnlyAttachments;
    //security.EncryptionOptions = PdfEncryptionOptions. EncryptAllContents;
    //security.EncryptionOptions = PdfEncryptionOptions. EncryptAllContentsExceptMetadata;

    graphics.DrawString("Encrypted with AES 256bit", font, brush, new PointF(0, 40));

    //Add attachment file.
    PdfAttachment attachment = new PdfAttachment(@"Hello world.docx");
    attachment.ModificationDate = DateTime.Now;
    attachment.Description = "Hello world.docx";
    attachment.MimeType = "application/txt";
    document.Attachments.Add(attachment);

    //Save and close the document.
    document.Save("Output.pdf");
    document.Close(true);
}
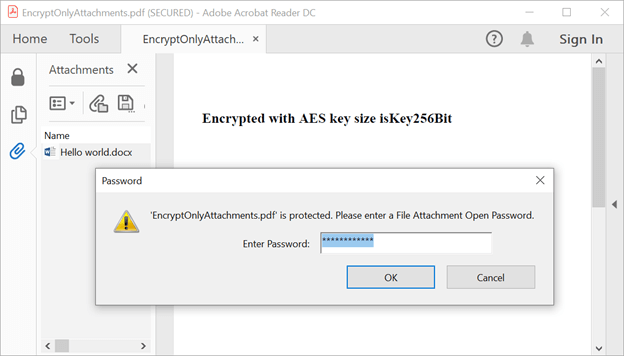
Encrypt only attachments present in the PDF document
To learn more about encrypting PDF documents, refer to the documentation.
Find corrupted PDF documents
With this release, you can find corrupted PDF documents using the Syncfusion PDF Library programmatically. This feature allows you to check for corruption in the PDF syntax by parsing each PDF object.
You can use the property IsCorrupted of SyntaxAnalyzerResult to check whether the PDF document is corrupted or not. You can also get the error details from the property Errors available in the class SyntaxAnalyzerResult.
The following code example illustrates how to find the corrupted PDF document using Syncfusion PDF Library.
public void FindCorruptedDocument()
{
    //Create a new instance for the PDF analyzer.
    PdfDocumentAnalyzer analyzer = new PdfDocumentAnalyzer("CorruptedDocument.pdf");

    //Get the analyzer result.
    SyntaxAnalyzerResult result = analyzer.AnalyzeSyntax();

    //Check whether the document is corrupted or not.
    if (result.IsCorrupted)
    {
        StringBuilder builder = new StringBuilder();
        builder.AppendLine("The PDF document is corrupted.");
        int count = 1;
        //Get the error details from the result.
        foreach (PdfException exception in result.Errors)
        {
            builder.AppendLine(count++.ToString() + ": " + exception.Message);
        }
    }
    analyzer.Close();
}
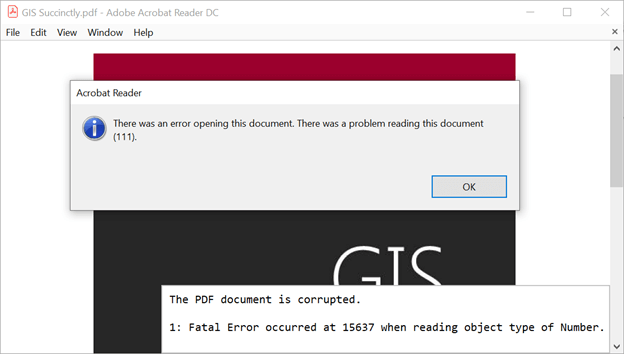
Showing the result of the PDF document analyzer
To learn more about finding corrupted PDF documents, refer to the documentation.
Convert XPS to PDF in .NET Core
Now you can convert XPS files to PDF documents in the ASP.NET Core platform.
The following code example illustrates the same.
//Load the PDF document.
FileStream fileStream = new FileStream(@"Input.xps", FileMode.Open, FileAccess.ReadWrite);

XPSToPdfConverter converter = new XPSToPdfConverter();

//Convert the XPS to PDF.
PdfDocument document = converter.Convert(fileStream);

MemoryStream stream = new MemoryStream();

//Save the PDF document.
document.Save(stream);

document.Close(true);
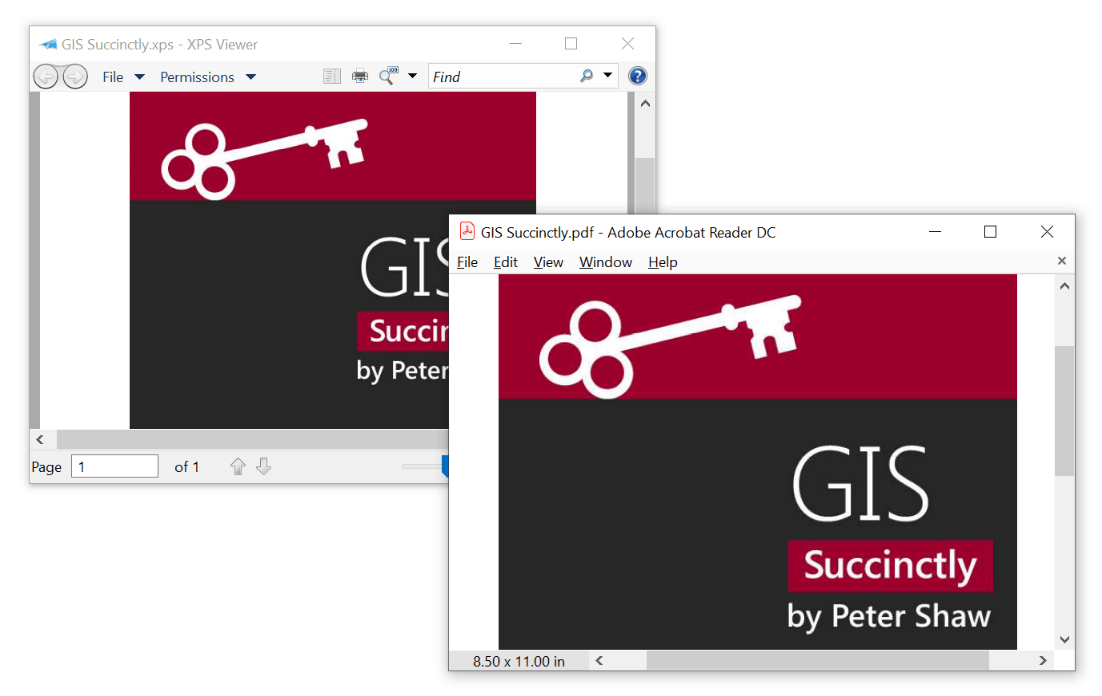
XPS to PDF conversion in ASP.NET Core
To learn more about converting XPS to PDF documents, refer to the documentation.
Create a PDF table from DataTable in .NET Core
Syncfusion PDF Library allows you to create a PDF table with DataTable (ADO.NET) for PdfGrid and PdfLightTable in .NET Core.
The following code example illustrates the creation of PdfLightTable with DataTable as source, using PDF Library in .NET Core.
public void CreatePDFTable()
{
    //Create a new PDF document.
    PdfDocument pdfDocument = new PdfDocument();
    //Add page to the created document.
    PdfPage pdfPage = pdfDocument.Pages.Add();
    //Create a PdfLightTable.
    PdfLightTable lightTable = new PdfLightTable();

    //Create a DataTable with details.
    DataTable table = GetTableSource();
    //Assign data source.
    lightTable.DataSource = table;
    //Apply built-in table style
    lightTable.ApplyBuiltinStyle(PdfLightTableBuiltinStyle.GridTable4Accent1);
    //Set cell padding, which specifies the space between border and content of the cell.
    lightTable.Style.CellPadding = 5;
    //Set cell spacing, which specifies the space between the adjacent cells.
    lightTable.Style.CellSpacing = 5;
    //Draw PdfLightTable.
    lightTable.Draw(pdfPage, new Syncfusion.Drawing.PointF(10, 10));

    MemoryStream stream = new MemoryStream();
    //Save and close the document.
    pdfDocument.Save(stream);
    pdfDocument.Close(true);
}

//Create simple data table.
public void DataTable GetTableSource()
{
    //Creating new data table.
    DataTable dataTable = new DataTable();

    //Adding columns.
    dataTable.Columns.Add("ID");
    dataTable.Columns.Add("Name");
    dataTable.Columns.Add("Roll Number");

    //Adding rows.
    dataTable.Rows.Add(new object[] { "EE0", "Robert", "SSE23000" });
    dataTable.Rows.Add(new object[] { "EE1", "Clay", "SSE23001" });
    dataTable.Rows.Add(new object[] { "EE2", "Thomas", "SSE23002" });
    dataTable.Rows.Add(new object[] { "EE3", "George", "SSE23003" });
    dataTable.Rows.Add(new object[] { "EE4", "Steffen", "SSE23004" });
    dataTable.Rows.Add(new object[] { "EE5", "Mathew", "SSE23005" });
    dataTable.Rows.Add(new object[] { "EE6", "Ash", "SSE23006" });
    dataTable.Rows.Add(new object[] { "EE7", "Andrew", "SSE23007" });
    dataTable.Rows.Add(new object[] { "EE8", "Simon", "SSE23008" });

    return dataTable;
}
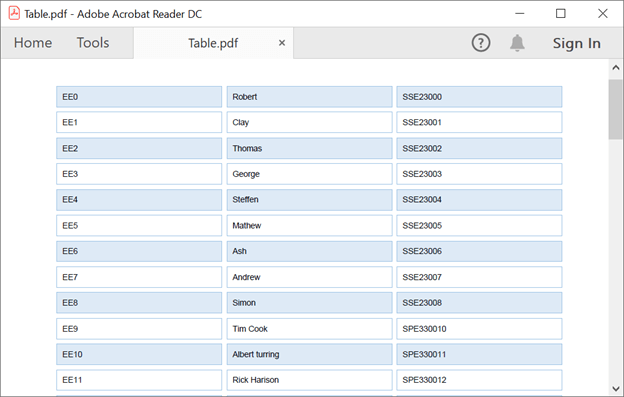
Creating a PDF table with DataTable in .NET Core
To learn more about PDF tables, refer to the documentation
Excel Library
Import data from nested collections to Excel worksheets
You may handle hierarchical data in nested objects collection, but may not be able to view the data in a good structure to analyze it. Syncfusion Excel Library provides the support to import data from nested collections to Excel worksheets with more flexible options to analyze data.
Data importing can be done with the following layout options:
- Default: Parent records imported in the first row of collection.
- Merge: Parent records imported in merged rows.
- Repeat: Parent records imported in all the rows.
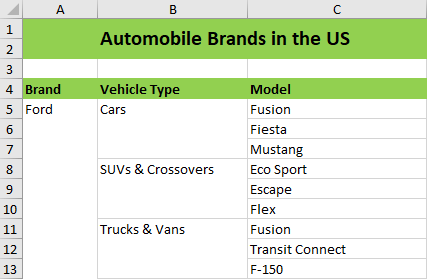
Imported data can be grouped and you can expand or collapse the groups using the following grouping options:
- Expand: Entire group will be expanded after import.
- Collapse: Groups will be collapsed at a specified level, up to a maximum of eight levels.
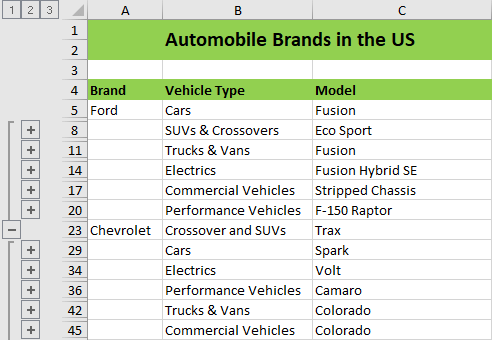
Grouped data: imported from a nested collection and collapsed at level two
To learn more about importing data from nested collections, refer to the documentation.
Skip a property while importing data from objects collection
Importing data from an objects collection will import from all the properties that are bound. To skip a property while importing, Syncfusion Excel Library now supports a Bindable attribute. If the attribute is set to false, then the property will be skipped on import.
In the following class structure, the SalesYear property won’t be imported, as its Bindable attribute is set to false. For more information, you can refer to the documentation.
//Customer details.
public class Customer
{
    public string SalesPerson { get; set; }
    public int SalesJanJun { get; set; }

    [Bindable(true)]
    public int SalesJulDec { get; set; }

    [Bindable(false)]
    public int SalesYear { get; set; }

    public Customer(string name, int janToJun, int julToDec, int salesYear)
    {
        SalesPerson = name;
        SalesJanJun = janToJun;
        SalesJulDec = julToDec;
        SalesYear = salesYear;
    }
}
Output with the column SalesYear skipped
Export data from Excel worksheets to nested class objects
Excel Library allows you to export worksheet data to nested class objects. A new overload to the existing ExportData<T>() method helps to achieve this requirement by mapping column headers with class properties.
Let’s look at an input Excel document that has the data shown in the following screenshot.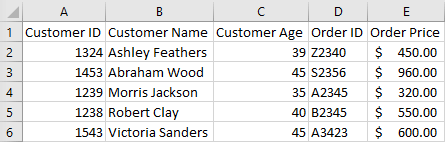
Excel worksheet with data
The following code illustrates how to export data from the Excel worksheet to nested class objects with column headers mapping collection.
using Syncfusion.XlsIO;
using System.Collections.Generic;

namespace ExportToNestedClass
{
    class Program
    {
        static void Main(string[] args)
        {
            using (ExcelEngine excelEngine = new ExcelEngine())
            {
                IApplication application = excelEngine.Excel;
                application.DefaultVersion = ExcelVersion.Excel2013;
                IWorkbook workbook = application.Workbooks.Open("Sample.xlsx");
                IWorksheet worksheet = workbook.Worksheets[0];

                //Map column headers in worksheet with class properties.
                Dictionary<string, string> mappingProperties = new Dictionary<string, string>();
                mappingProperties.Add("Customer ID", "CustId");
                mappingProperties.Add("Customer Name", "CustName");
                mappingProperties.Add("Customer Age", "CustAge");
                mappingProperties.Add("Order ID", "CustOrder.Order_Id");
                mappingProperties.Add("Order Price", "CustOrder.Price");

                //Export worksheet data into nested class Objects.
                List nestedClassObjects = worksheet.ExportData(1, 1, 10, 5, mappingProperties);

                workbook.SaveAs("NestedClassObjects.xlsx");
            }
        }
    }

    //Customer details class.
    public partial class Customer
    {
        public int CustId { get; set; }
        public string CustName { get; set; }
        public int CustAge { get; set; }
        public Order CustOrder { get; set; }
        public Customer()
        {

        }
    }

    //Order details class.
    public partial class Order
    {
        public int Order_Id { get; set; }
        public double Price { get; set; }
        public Order()
        {

        }
    }
}
Substitute unsupported fonts by font stream in Excel-to-PDF conversions
You can now convert Excel documents with missing fonts in the machine by substituting fonts as streams from an embedded resource. The following code example illustrates this.
Using Syncfusion.ExcelToPdfConverter;
using Syncfusion.Pdf;
using Syncfusion.XlsIO;
using Syncfusion.XlsIO.Implementation;
using System.IO;
using System.Reflection;

namespace FontSubstitution
{
    class Program
    {
        static void Main(string[] args)
        {
            using(ExcelEngine excelEngine = new ExcelEngine())
            {
                Iapplication application = excelEngine.Excel;
                application.DefaultVersion = ExcelVersion.Xlsx;

                //Initializes the SubstituteFont event to perform font substitution in Excel-to-PDF conversion.
                Application.SubstituteFont += new SubstituteFontEventHandler(SubstituteFont);

                Iworkbook workbook = application.Workbooks.Open(“Template.xlsx”);
                Iworksheet worksheet = workbook.Worksheets[0];

                ExcelToPdfConverter converter = new ExcelToPdfConverter(workbook);

                PdfDocument pdfDocument = new PdfDocument();
                pdfDocument = converter.Convert();
                pdfDocument.Save("ExcelToPDF.pdf");
            }
        }

        private static void SubstituteFont(object sender, SubstituteFontEventArgs args)
        {
            //Substitute a font if the specified font is not installed in the machine.
            if (args.OriginalFontName == "Arial Unicode MS")
            {
                //Substitute by font name.
                args.AlternateFontName = "Arial";
            }
            else if (args.OriginalFontName == "Homizio")
            {
                //Substitute by font stream.
                var assembly = Assembly.GetExecutingAssembly();
                var resourceName = "ExceltoPDF.Fonts.Homizio.ttf";
                Stream fileStream = assembly.GetManifestResourceStream(resourceName);
                MemoryStream memoryStream = new MemoryStream();
                fileStream.CopyTo(memoryStream);
                fileStream.Close();
                args.AlternateFontStream = memoryStream;
            }
        }
    }
}
To learn more about font substitution in Excel-to-PDF conversion, refer to the documentation.
Word Library
Custom table styles
Word Library now allows creating and applying custom table styles in Word documents (DOCX and WordML), and preserves them in DOCX-to-PDF, Word-to-image, and Word-to-HTML conversions. For more details, refer to the documentation.
The following code example illustrates creating and applying custom table styles in a Word document (DOCX).
//Opens the template document.
WordDocument document = new WordDocument("TemplateTableStyle.doc");
//Adds a new custom table style.
WTableStyle tableStyle = document.AddTableStyle("CustomStyle") as WTableStyle;
//Applies formatting for whole table.
tableStyle.TableProperties.RowStripe = 1;
tableStyle.TableProperties.ColumnStripe = 1;
tableStyle.TableProperties.Paddings.Top = 0;
tableStyle.TableProperties.Paddings.Bottom = 0;
tableStyle.TableProperties.Paddings.Left = 5.4f;
tableStyle.TableProperties.Paddings.Right = 5.4f;
//Applies conditional formatting for first row.
ConditionalFormattingStyle firstRowStyle = tableStyle.ConditionalFormattingStyles.Add(ConditionalFormattingType.FirstRow);
firstRowStyle.CharacterFormat.Bold = true;
firstRowStyle.CharacterFormat.TextColor = System.Drawing.Color.FromArgb(255, 255, 255, 255);
firstRowStyle.CellProperties.BackColor = System.Drawing.Color.Blue;
//Applies conditional formatting for first column.
ConditionalFormattingStyle firstColumnStyle = tableStyle.ConditionalFormattingStyles.Add(ConditionalFormattingType.FirstColumn);
firstColumnStyle.CharacterFormat.Bold = true;
//Applies conditional formatting for odd row.
ConditionalFormattingStyle oddRowBandingStyle = tableStyle.ConditionalFormattingStyles.Add(ConditionalFormattingType.OddRowBanding);
oddRowBandingStyle.CellProperties.BackColor = System.Drawing.Color.WhiteSmoke;
//Gets table to apply style.
WTable table = (WTable)document.LastSection.Tables[0];
//Applies the custom table style to the table.
table.ApplyStyle("CustomStyle");
//Saves the document as .docx.
document.Save("Sample.docx", FormatType.Docx);
document.Dispose();
Generated Word document with custom table style
Rotation support for shapes, text boxes, images, and group shapes
Word Library now allows you to rotate shapes, text boxes, images, and group shapes in Word documents and preserve them in DOCX-to-PDF and Word-to-image conversions. For more details, refer to the documentation.
The following code example illustrates creating group shapes with rotation in a Word document (DOCX) and converting it to PDF.
//Creates a new Word document.
WordDocument document = new WordDocument();
//Adds new section to the document.
IWSection section = document.AddSection();
//Sets page setup options.
section.PageSetup.Orientation = PageOrientation.Landscape;
section.PageSetup.Margins.All = 72;
section.PageSetup.PageSize = new SizeF(792f, 612f);
//Adds new paragraph to the section.
WParagraph paragraph = section.AddParagraph() as WParagraph;
//Creates new group shape.
GroupShape groupShape = new GroupShape(document);
//Adds group shape to the paragraph.
paragraph.ChildEntities.Add(groupShape);

//Create a RoundedRectangle shape with "Management" text.
CreateChildShape(AutoShapeType.RoundedRectangle, new RectangleF(324f, 107.7f, 144f, 45f), 0, false, false, Color.FromArgb(50, 48, 142), "Management", groupShape, document);
//Create a BentUpArrow shape to connect with "Development" shape.
CreateChildShape(AutoShapeType.BentUpArrow, new RectangleF(177.75f, 176.25f, 210f, 50f), 180, false, false, Color.White, null, groupShape, document);
//Create a BentUpArrow shape to connect with "Sales" shape.
CreateChildShape(AutoShapeType.BentUpArrow, new RectangleF(403.5f, 175.5f, 210f, 50f), 180, true, false, Color.White, null, groupShape, document);
//Create a DownArrow shape to connect with "Production" shape.
CreateChildShape(AutoShapeType.DownArrow, new RectangleF(381f, 153f, 29.25f, 72.5f), 0, false, false, Color.White, null, groupShape, document);
//Create a RoundedRectangle shape with "Development" text.
CreateChildShape(AutoShapeType.RoundedRectangle, new RectangleF(135f, 226.45f, 110f, 40f), 0, false, false, Color.FromArgb(104, 57, 157), "Development", groupShape, document);
//Create a RoundedRectangle shape with "Production" text.
CreateChildShape(AutoShapeType.RoundedRectangle, new RectangleF(341f, 226.5f, 110f, 40f), 0, false, false, Color.FromArgb(149, 50, 118), "Production", groupShape, document);
//Create a RoundedRectangle shape with "Sales" text.
CreateChildShape(AutoShapeType.RoundedRectangle, new RectangleF(546.75f, 226.5f, 110f, 40f), 0, false, false, Color.FromArgb(179, 63, 62), "Sales", groupShape, document);
//Create a DownArrow shape to connect with "Software" and "Hardware" shape.
CreateChildShape(AutoShapeType.DownArrow, new RectangleF(177f, 265.5f, 25.5f, 20.25f), 0, false, false, Color.White, null, groupShape, document);
//Create a DownArrow shape to connect with "Series" and "Parts" shape.
CreateChildShape(AutoShapeType.DownArrow, new RectangleF(383.25f, 265.5f, 25.5f, 20.25f), 0, false, false, Color.White, null, groupShape, document);
//Create a DownArrow shape to connect with "North" and "South" shape.
CreateChildShape(AutoShapeType.DownArrow, new RectangleF(588.75f, 266.25f, 25.5f, 20.25f), 0, false, false, Color.White, null, groupShape, document);
//Create a BentUpArrow shape to connect with "Software" shape.
CreateChildShape(AutoShapeType.BentUpArrow, new RectangleF(129.5f, 286.5f, 60f, 33f), 180, false, false, Color.White, null, groupShape, document);
//Create a BentUpArrow shape to connect with "Hardware" shape.
CreateChildShape(AutoShapeType.BentUpArrow, new RectangleF(190.5f, 286.5f, 60f, 33f), 180, true, false, Color.White, null, groupShape, document);
//Create a BentUpArrow shape to connect with "Series" shape.
CreateChildShape(AutoShapeType.BentUpArrow, new RectangleF(336f, 287.25f, 60f, 33f), 180, false, false, Color.White, null, groupShape, document);
//Create a BentUpArrow shape to connect with "Parts" shape.
CreateChildShape(AutoShapeType.BentUpArrow, new RectangleF(397f, 287.25f, 60f, 33f), 180, true, false, Color.White, null, groupShape, document);
//Create a BentUpArrow shape to connect with "North" shape.
CreateChildShape(AutoShapeType.BentUpArrow, new RectangleF(541.5f, 288f, 60f, 33f), 180, false, false, Color.White, null, groupShape, document);
//Create a BentUpArrow shape to connect with "South" shape.
CreateChildShape(AutoShapeType.BentUpArrow, new RectangleF(602.5f, 288f, 60f, 33f), 180, true, false, Color.White, null, groupShape, document);
//Create a RoundedRectangle shape with "Software" text.
CreateChildShape(AutoShapeType.RoundedRectangle, new RectangleF(93f, 320.25f, 90f, 40f), 0, false, false, Color.FromArgb(23, 187, 189), "Software", groupShape, document);
//Create a RoundedRectangle shape with "Hardware" text.
CreateChildShape(AutoShapeType.RoundedRectangle, new RectangleF(197.2f, 320.25f, 90f, 40f), 0, false, false, Color.FromArgb(24, 159, 106), "Hardware", groupShape, document);
//Create a RoundedRectangle shape with "Series" text.
CreateChildShape(AutoShapeType.RoundedRectangle, new RectangleF(299.25f, 320.25f, 90f, 40f), 0, false, false, Color.FromArgb(23, 187, 189), "Series", groupShape, document);
//Create a RoundedRectangle shape with "Parts" text.
CreateChildShape(AutoShapeType.RoundedRectangle, new RectangleF(404.2f, 320.25f, 90f, 40f), 0, false, false, Color.FromArgb(24, 159, 106), "Parts", groupShape, document);
//Create a RoundedRectangle shape with "North" text.
CreateChildShape(AutoShapeType.RoundedRectangle, new RectangleF(505.5f, 321.75f, 90f, 40f), 0, false, false, Color.FromArgb(23, 187, 189), "North", groupShape, document);
//Create a RoundedRectangle shape with "South" text.
CreateChildShape(AutoShapeType.RoundedRectangle, new RectangleF(609.7f, 321.75f, 90f, 40f), 0, false, false, Color.FromArgb(24, 159, 106), "South", groupShape, document);

//Convert Word document into PDF document.
DocToPDFConverter converter = new DocToPDFConverter();
PdfDocument pdfDoc = converter.ConvertToPDF(document);
document.Dispose();
//Save the PDF file.
pdfDoc.Save("Sample.pdf");
pdfDoc.Dispose();
The following code example shows the CreateChildShape method, which is used to create child shapes.
/// <summary>
/// Create a child shape with specified properties and add it to specified group shape.
/// </summary>
/// <param name="autoShapeType">Represent the AutoShapeType of child shape</param>
/// <param name="bounds">Represent the bounds of child shape to be placed</param>
/// <param name="rotation">Represent the rotation of child shape</param>
/// <param name="flipH">Represent the horizontal flip of child shape</param>
/// <param name="flipV">Represent the vertical flip of child shape</param>
/// <param name="fillColor">Represent the fill color of child shape</param>
/// <param name="text">Represent the text that to be append in child shape</param>
/// <param name="groupShape">Represent the group shape to add a child shape</param>
/// <param name="wordDocument">Represent the Word document instance</param>
private void CreateChildShape(AutoShapeType autoShapeType, RectangleF bounds, float rotation, bool flipH, bool flipV, Color fillColor, string text, GroupShape groupShape, WordDocument wordDocument)
{
    //Creates new shape to add to group.
    Shape shape = new Shape(wordDocument, autoShapeType);
    //Sets height and width for shape.
    shape.Height = bounds.Height;
    shape.Width = bounds.Width;
    //Sets horizontal and vertical position.
    shape.HorizontalPosition = bounds.X;
    shape.VerticalPosition = bounds.Y;
    //Set rotation and flipH for the shape.
    if (rotation != 0)
        shape.Rotation = rotation;
    if (flipH)
        shape.FlipHorizantal = true;
    if (flipV)
        shape.FlipVertical = true;
    //Applies fill color for shape.
    if (fillColor != Color.White)
    {
        shape.FillFormat.Fill = true;
        shape.FillFormat.Color = fillColor;
    }
    //Set wrapping style for shape.
    shape.WrapFormat.TextWrappingStyle = TextWrappingStyle.InFrontOfText;
    //Sets horizontal and vertical origin.
    shape.HorizontalOrigin = HorizontalOrigin.Page;
    shape.VerticalOrigin = VerticalOrigin.Page;
    //Sets no line to RoundedRectangle shapes.
    if (autoShapeType == AutoShapeType.RoundedRectangle)
        shape.LineFormat.Line = false;
    //Add paragraph for the shape textbody.
    if (text != null)
    {
        IWParagraph paragraph = shape.TextBody.AddParagraph();
        //Set required textbody alignments.
        shape.TextFrame.TextVerticalAlignment = Syncfusion.DocIO.DLS.VerticalAlignment.Middle;
        //Set required paragraph alignments.
        paragraph.ParagraphFormat.HorizontalAlignment = Syncfusion.DocIO.DLS.HorizontalAlignment.Center;
        IWTextRange textRange = paragraph.AppendText(text);
        //Applies a required text formatting
        textRange.CharacterFormat.FontName = "Calibri";
        textRange.CharacterFormat.FontSize = 15;
        textRange.CharacterFormat.TextColor = Color.White;
        textRange.CharacterFormat.Bold = true;
        textRange.CharacterFormat.Italic = true;
    }
    //Adds the specified shape to group shape.
    groupShape.Add(shape);
}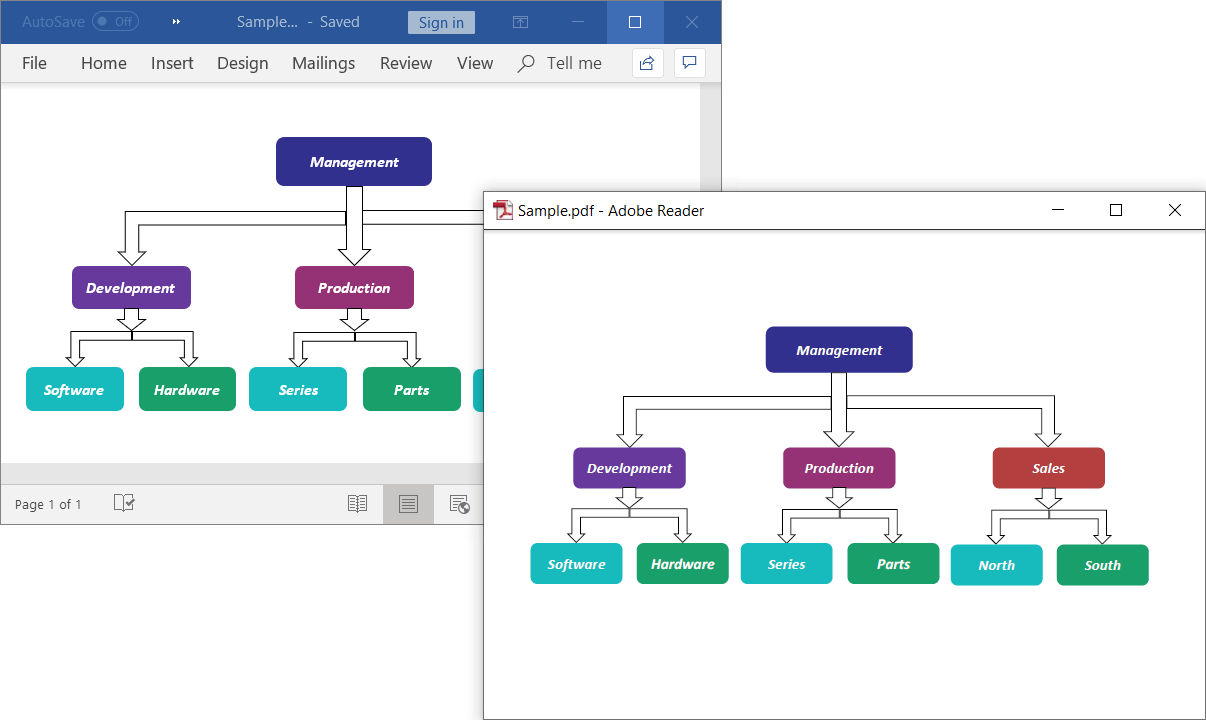
Generated Word document and PDF with a group shape
Conclusion
Are you excited to try out these new features and enhancements included in the 2019 Volume 3 beta release? You can download the latest beta version from this page, or you can get our NuGet packages from nuget.org.
If you don’t have a Syncfusion license, but would like to try out these new features, you can sign up for a free 30-day trial.
If you are new to Syncfusion’s file-format libraries, we highly recommend that you look at our user guide. To get started with a specific file format, follow these links:
- Generate a PDF file in C# without Adobe
- Create an Excel file in C# without Microsoft Office
- Generate a Word file in C# without Microsoft Office
- Create a PowerPoint file in C# without Microsoft Office
If you have any questions about these features, please let us know in the comments below. You can also contact us through our support forum, Direct-Trac, or feedback portal. We are happy to assist you!
 No spam, just valuable updates.