We are glad to announce that scaffolding support for Syncfusion Blazor components is now available with our Essential Studio® 2024 Vol 4 release. In this blog, we will explain how to use scaffolding in a Blazor application with the Syncfusion DataGrid control as an example.
What is scaffolding?
Scaffolding is a great way to kick-start model-view-controller (MVC) framework development. It is a code-generation framework for any application. It allows application developers to create the controller/service and Razor view quickly with respect to the existing models in the application.
Scaffolding support for Syncfusion Blazor controls
Developers can be more productive with Syncfusion scaffolding because it will add the necessary data to the controller/service and Razor view using Syncfusion code snippets automatically. The following are the Syncfusion Blazor controls that currently support scaffolding:
Install the Syncfusion Blazor extensions
The Blazor scaffolding is part of the Syncfusion Blazor extensions. To use it, you must install the Syncfusion Blazor extensions in Visual Studio.
Install from the Visual Studio Manage Extensions dialog box
Follow these steps to install the Syncfusion Blazor extensions through the Visual Studio Manage Extensions dialog box:
- Open Visual Studio 2022.
- Navigate to Extension ->Manage Extensions.
- Select the online tab on the left side and search for Syncfusion Blazor using the search box.
- Select the Blazor Extensions – Syncfusion option from the list and click the Download button.
- Close all Visual Studio instances and click Modify in the VSIX installer to install the extension.
Install from the Visual Studio Marketplace
Follow these steps to install the Syncfusion Blazor extensions from the Visual Studio Marketplace:
- Download the Syncfusion Blazor Extensions from the Visual Studio Marketplace.
- Close all running Visual Studio instances, if any.
- Double-click on the downloaded extension. The VSIX Installer window will open. In it, click the Install button.
In Syncfusion Blazor scaffolding, data binding to the selected component can be achieved using two types of data sources:
- Local Data
- Remote Data
When binding data to a selected component using local data, it is essential to create both a model and db context class.
Note: For DataGrid and TreeGrid components specifically, a model and db context class are required to bind data when selecting remote data from the data source type, URL adaptor from the adaptor type, and localhost URL from the remote service.
How to Create Model and DB context classes
To perform Syncfusion scaffolding, you should use Model and DB context classes in your application. Please do the following steps to create the Model and DB context classes in your Blazor application:
Step 1: Create a new database and table using SQL Server application, if it does not exist.
Step 2: Open an existing Blazor application project or create a new Blazor application using Visual Studio.
Step 3: Install following NuGet packages in the application:
- Mvc.NewtonsoftJson
- SqlServer
- Tools
- Logging.Debug
- Web.CodeGeneration.Design
Step 4: To connect your SQL Server, go to View->SQL Server Object Explorer in SQL Server Object Explorer, right-click your database, and then copy the connection string.
Step 5: Open the Package Manager Console by selecting the project and then go to Tools->NuGet Package Manager->Package Manager Console.
Step 6: Execute following commands in the Package Manager Console with the copied connection string: >Scaffold-DbContext “{Connection String}” Microsoft.EntityFrameworkCore.SqlServer -OutputDir Model -Context “{Db context class name}” -DataAnnotations
Step 7: Now, Model and DbContext classes will be created in the application. Then build the project.
How to use the Syncfusion Blazor Scaffolding
Follow these steps to use Syncfusion scaffolding in a Blazor application:
Step 1: Open an existing Blazor (ServerSide or Hosted) application project or create a new one with the Entity Framework Data Model. Ensure that the application has been compiled once.
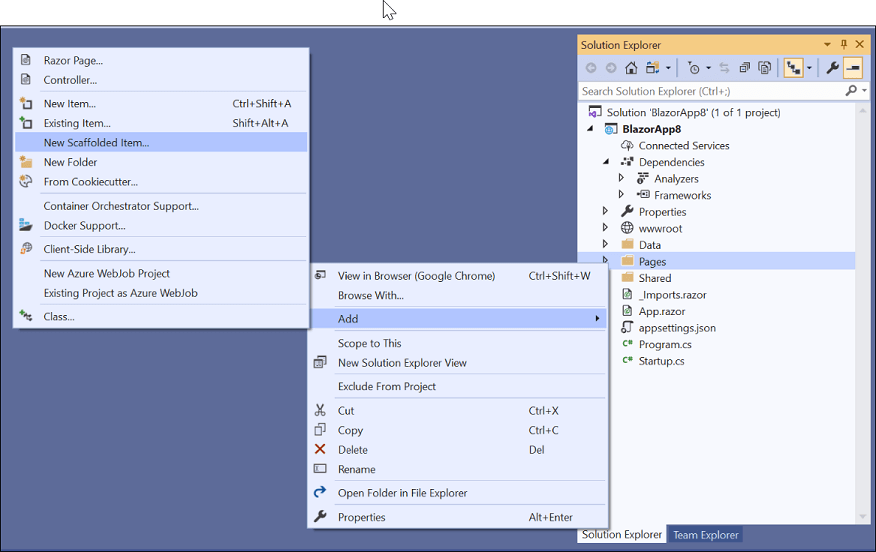
Step 2: If the project type is Blazor ServerSide, right-click the Pages folder in the Solution Explorer, click Add, and then select New Scaffolded Item….
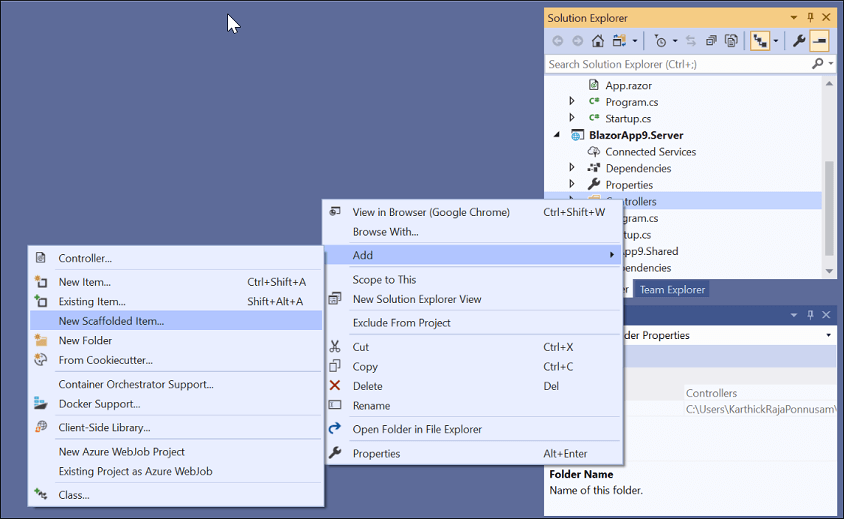
If the project type is Blazor Hosted, right-click the Controllers folder from the {Project Name}.Server project in the Solution Explorer, click Add, and then select New Scaffolded Item….
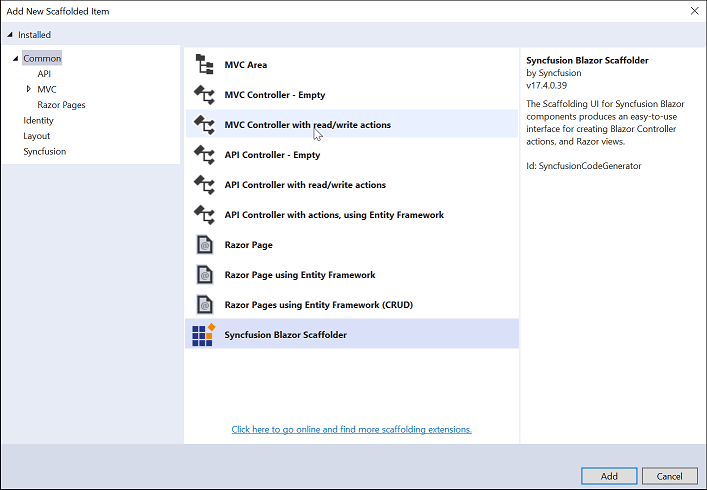
Step 3: In the Add Scaffold dialog, select Syncfusion Blazor Scaffolder and then click Add.
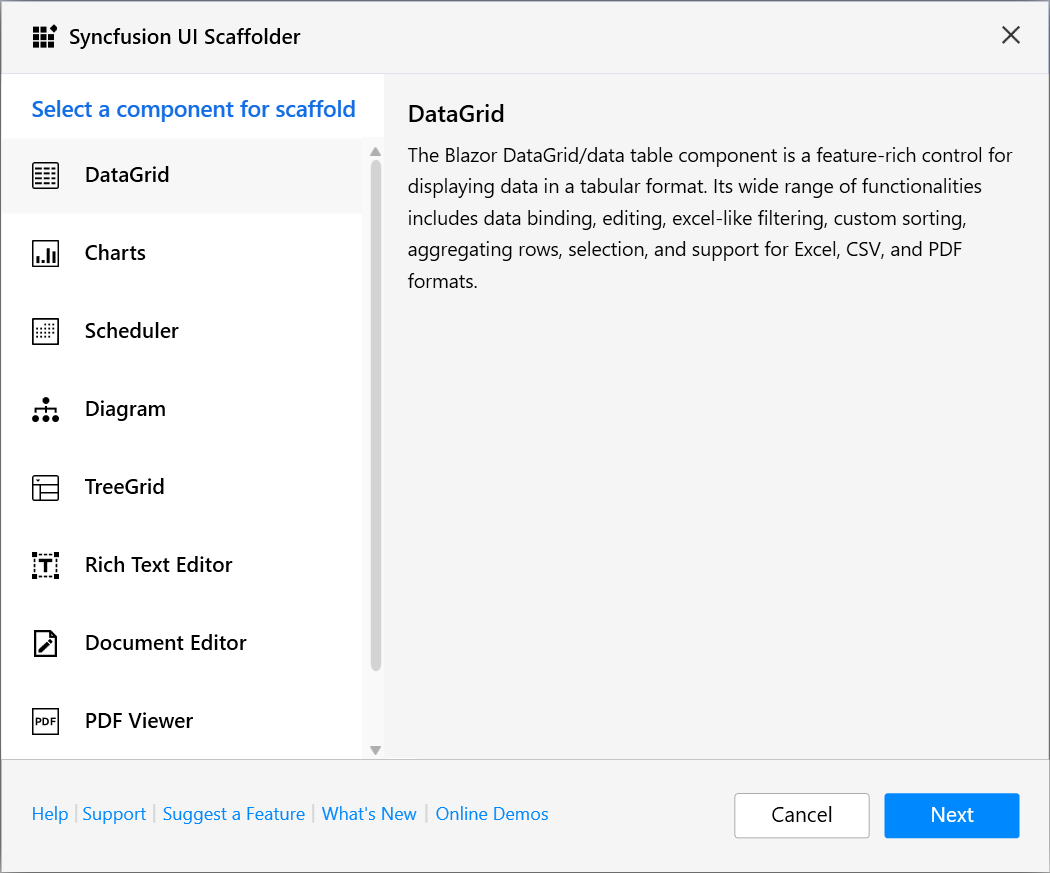
Step 4: In the Syncfusion UI Scaffolder dialog, select the desired control (DataGrid in our example) to perform scaffolding, and then click Next.
Step 5: The Syncfusion UI Scaffolder dialog will be opened for the selected control.
Note: For DataGrid and TreeGrid components, both local data and remote data types are available in a Server-Side application. In a Hosted application, only the remote data type is available.
1. To bind the data using Local Data.
- Choose the local data from the data source type.
- Enter the Controller/Service name and Razor name as application requirements, and then select the required Model Classof the active project and its relevant Data Context Class. Click Next.
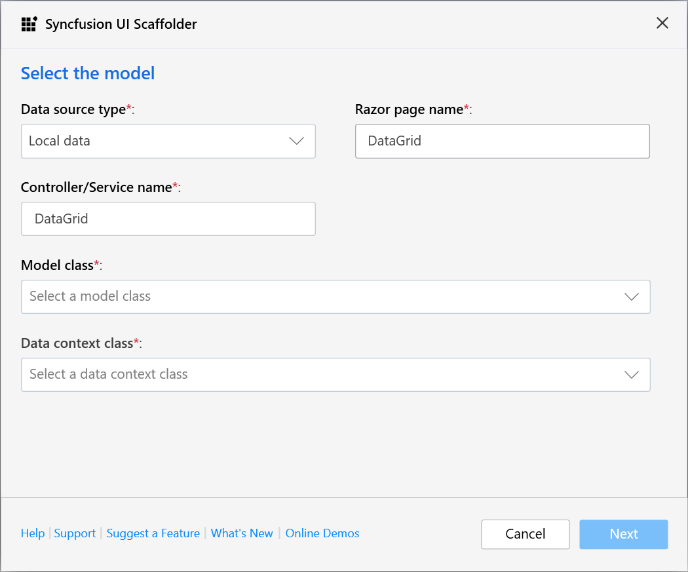
2. To bind the data using Remote Data.
- Choose the Remote data from the data source type.
- Enter the Razor page name, select the appropriate Adaptor type, provide the valid remote service URL, and specify the TValue. Then, click “Next.”
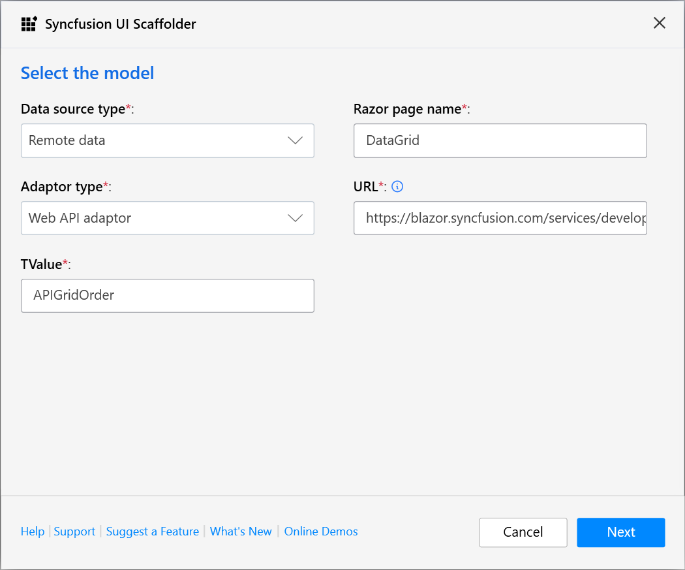
When using adaptor types in Blazor scaffolding, remember that the default adaptor links are for sample purposes only. They show you how adaptors work but do not support CRUD operations (Add, Edit, Update, Delete). These links are just placeholders to help you see how the integration works.
If you want to perform CRUD operations, you need to provide a valid link that can handle these actions. This link should point to a service or endpoint that manages database operations for your application. By providing this link, you ensure that your application can interact with the backend service to perform CRUD operations effectively.
Step 6: The Syncfusion UI Scaffolder dialog for the selected control feature will open. Select the required features, update the required data field, and then click Add.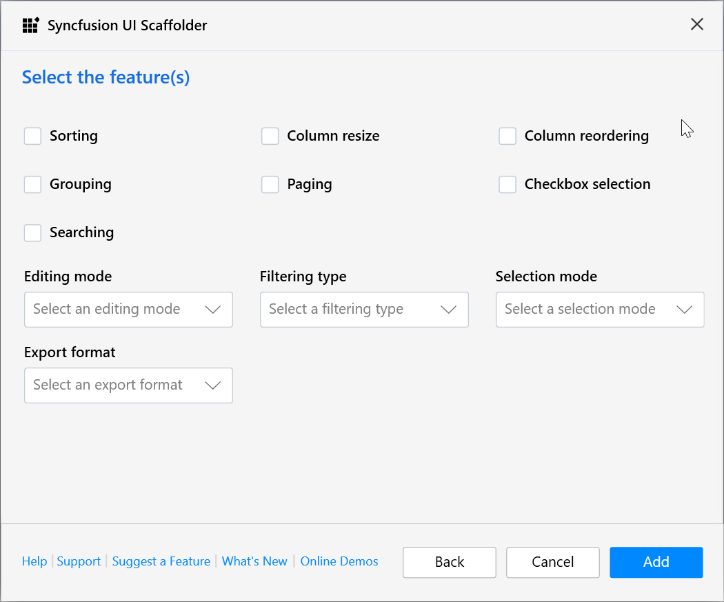
Step 7: The Controller/Service file and the corresponding Razor file are generated with the selected features of the Syncfusion control code snippet.
If you select Local Data, the service file and Razor files will be added to the project.
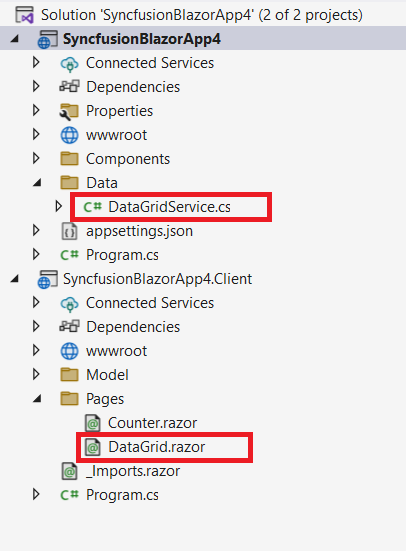
If you select Remote Data with Localhost URL, the controller file and razor file will be added to the application.
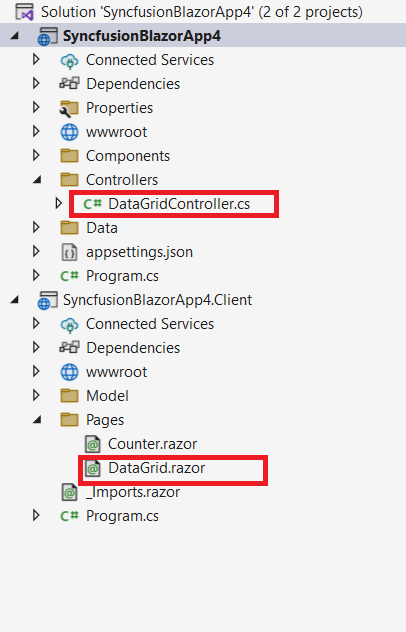
If you choose Remote Data with Web API adaptor types, the razor file will be added to the application.
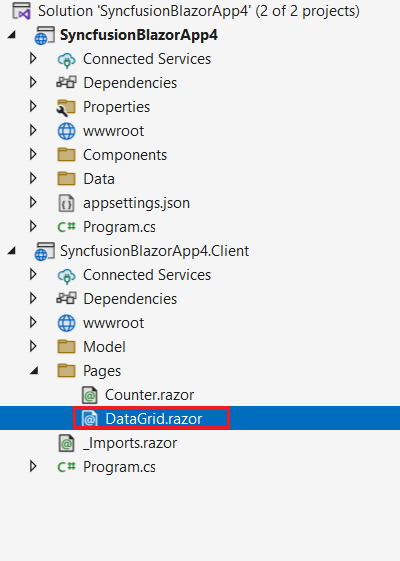
Step 8: Then, add navigation to the created razor file based on your requirement to open on the webpage.

Syncfusion Blazor components can be transformed into stunning and efficient web apps.
Conclusion
Use Syncfusion scaffolding in your project to add code that interacts with data models. Using it can reduce the amount of time it takes you to develop standard data operations in your project. Syncfusion provides more than 65 high-performance, lightweight, modular, and responsive Blazor UI controls such as DataGrid, Charts, and Scheduler to ease the work of developers. For which control are you anticipating scaffolding support? Let us know in the comment section below. You can also contact us through our support forum, support portal, or our feedback portal. We will implement requests based on the number of customers requesting them.




Comments (5)
Does scaffolding support grouped data when using the datagrid?
Hi Alan,
Yes, you can enable the grouping in DataGrid by checking the Grouping checkbox from the feature selection dialog.
HI, it is possible to have this example with the new syncfusion version 18.3 netCore3.1?.. scaffolding.. same example ?.. please .. thanks in advanced.
Hi Bob,
As per your request, we have created the basic Blazor Server application with Database here. After downloading the sample, please follow the below steps to add the Model classes and use the Syncfusion scaffolding
1. Open the downloaded application and go to Tools -> NuGet Package Manager -> Package Manager Console and run the below command
Scaffold-DbContext “Data Source=(LocalDB)\MSSQLLocalDB;AttachDbFilename=\SyncfusionScaffolding\SyncfusionScaffolding\Data\NORTHWND.MDF;Integrated Security=True” Microsoft.EntityFrameworkCore.SqlServer -OutputDir Model -Context “NORTHWNDContext” -DataAnnotations
For ex: Scaffold-DbContext “Data Source=(LocalDB)\MSSQLLocalDB;AttachDbFilename=C:\Users\\Downloads\SyncfusionScaffolding\SyncfusionScaffolding\Data\NORTHWND.MDF;Integrated Security=True” Microsoft.EntityFrameworkCore.SqlServer -OutputDir Model -Context “NORTHWNDContext” -DataAnnotations
2. Then follow the steps under the How to use Syncfusion Scaffolding section in this blog to add the Syncfusion controls through the Syncfusion Scaffolding for your development.
Note: The Syncfusion Scaffolding will be added to the Syncfusion NuGet packages with the latest version from nuget.org by default. If you have the Syncfusion Blazor NuGet packages in your application, the Syncfusion scaffolding will be added to the new NuGet packages with the already available version.
Regards,
Kannan
I know this is really boring and you are skipping to the next comment, but I just wanted to throw you a big thanks – you cleared up some things for me!