

A single diagram can simply explain a complex idea. In the same way, a single flowchart can clearly visualize the complex hierarchical structure of an organization, workflow, and more.
In this blog post, we’ll learn how to create an interactive flowchart designer with our built-in flowchart shapes using WPF Diagram control. Also, we’ll see the various interactions to use to position the flowchart shapes on the diagram surface.
Creating a stencil with flowchart shapes
The WPF Diagram control provides a gallery called Stencil of reusable symbols and diagram elements that can be dragged onto the diagram surface any number and in any place.
Let’s see how to create a stencil using our built-in shapes. The Diagram control has a set of predefined categories of shapes. For example, if we include a flowchart shape category, then all the shapes needed to create a flowchart will be added in the stencil as a group.
The following are the built-in shape categories available in the Diagram resource dictionary:
- BasicShapes
- FlowShapes
- ArrowShapes
- DataFlowShapes
- UMLActivity
- UMLUseCase
- UMLRelationship
- ElectricalShapes
The built-in shape categories can be loaded into the stencil by specifying the Keys and Title properties of the StencilCategory class.
- Keys: Specifies the static resource key name value of the category collection.
- Title: Specifies the title that should be displayed as a header of the category collection.
The following code creates the stencil with flow shapes using the FlowShapes categories.
XAML:
<Stencil:Stencil x:Name="stencil" Grid.Column="0">
    <Stencil:Stencil.Categories>
        <Stencil:StencilCategoryCollection>
            <!--Specify the shapes category with title and resource key-->
            <Stencil:StencilCategory Title="Flowchart Shapes" Keys="{StaticResource FlowShapes}"></Stencil:StencilCategory>
        </Stencil:StencilCategoryCollection>
    </Stencil:Stencil.Categories>
    <!--Initialize the SymbolGroup-->
    <Stencil:Stencil.SymbolGroups>
        <Stencil:SymbolGroups>
            <!--Map symbols using MappingName-->
            <Stencil:SymbolGroupProvider MappingName="Key">
            </Stencil:SymbolGroupProvider>
        </Stencil:SymbolGroups>
    </Stencil:Stencil.SymbolGroups>
</Stencil:Stencil>
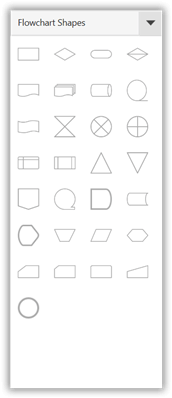
The following screenshot shows the collection of shapes in the created Flow Chart Shape Stencil.
You can refer to this Stencil documentation page for details on adding custom shapes and shape categories and for customizing the stencil appearance.
Creating a diagram surface
Now, we have set up reusable flowchart shapes in our stencil. Let’s add the diagram surface to create our flowchart editor environment with the following code example.
XAML:
<!--Initializes Diagram-->
<Syncfusion:SfDiagram x:Name="diagram"
                      Grid.Column="1"
                      Tool="{Binding Tool}"
                      DefaultConnectorType="{Binding DefaultConnectorType}"
                      Nodes="{Binding Nodes}"
                      Connectors="{Binding Connectors}"
                      Groups="{Binding Groups}"
                      PageSettings="{Binding PageSettings}"
                      SnapSettings="{Binding SnapSettings}"
                      HorizontalRuler="{Binding HorizontalRuler}"
                      VerticalRuler="{Binding VerticalRuler}"
</Syncfusion:SfDiagram>
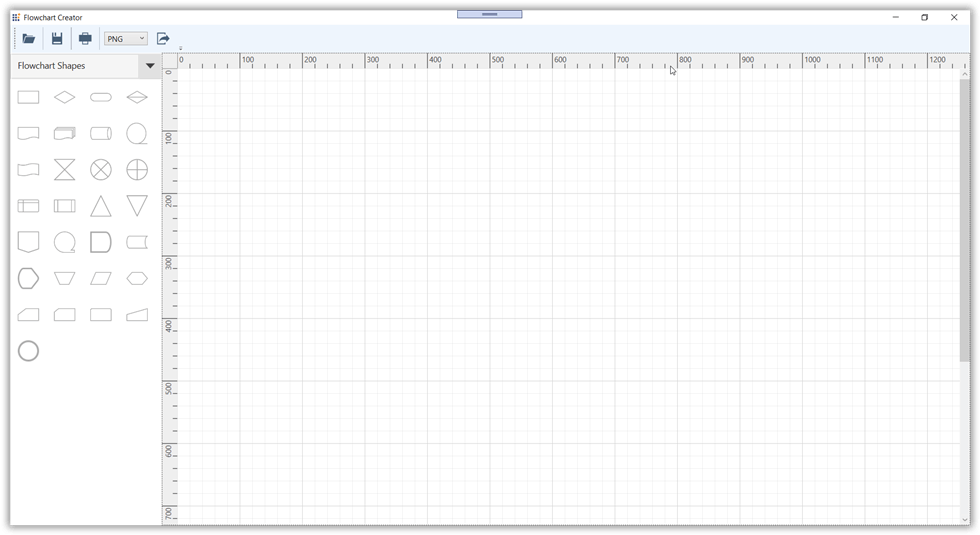
The following screenshot shows the created diagram surface along with the Flowchart Shapes stencil.
Create an interactive flowchart
You can create the flowchart by dragging the shapes from the stencil and dropping them onto the diagram surface at the desired location. The flow direction can be indicated by connecting the shapes with the available custom connectors.
Auto connect shapes
You can also create the automatic flow direction by dropping the new shape onto an existing shape. You can achieve this functionality by following these steps:
- Enable the AllowDrop constraint of each node while adding it into the diagram surface.
- Create a new ConnectorViewModel from the existing shape to the new shape in the DropCommand of the Diagram control.
Refer to the following code example to create a new ConnectorViewModel.
XAML:
<!--Initializes Diagram-->
<Syncfusion:SfDiagram x:Name="diagram"
                      Grid.Column="1"
                      Tool="{Binding Tool}"
                      DefaultConnectorType="{Binding DefaultConnectorType}"
                      Nodes="{Binding Nodes}"
                      Connectors="{Binding Connectors}"
                      Groups="{Binding Groups}"
                      PageSettings="{Binding PageSettings}"
                      SnapSettings="{Binding SnapSettings}"
                      HorizontalRuler="{Binding HorizontalRuler}"
                      VerticalRuler="{Binding VerticalRuler}"
                      ItemAddedCommand="{Binding ItemAddedCommand}"
                      DropCommand="{Binding DropCommand}">
</Syncfusion:SfDiagram>
C#:
     /// <summary>
    /// Custom diagram view model class
    /// </summary>
    public class DiagramVM : DiagramViewModel
    {
        public DiagramVM()
        {
            DropCommand = new Command(OnItemDropped);
            ItemAddedCommand = new Command(OnItemAdded);
        }

        /// <summary>
        /// The method will be invoked when any item is added in diagram.
        /// </summary>
        /// <param name="obj"></param>
        private void OnItemAdded(object obj)
        {
            ItemAddedEventArgs args = obj as ItemAddedEventArgs;
            if (args != null && args.Item is NodeViewModel)
            {
                //Enable the dropping of one node to another node.
                (args.Item as NodeViewModel).Constraints = (args.Item as NodeViewModel).Constraints.Add(NodeConstraints.AllowDrop);
            }
        }

        /// <summary>
        /// The method will be invoked when a node is dropped on to another node.
        /// </summary>
        /// <param name="obj">Item dropped event argument</param>
        private void OnItemDropped(object obj)
        {
            ItemDropEventArgs args = obj as ItemDropEventArgs;
            if (args != null)
            {
                if (!(args.Target is SfDiagram))
                {
                    foreach (object targetElement in args.Target as IEnumerable<object>)
                    {
                        if (targetElement is NodeViewModel)
                        {
                            //Newly dropped node.
                            NodeViewModel sourcenode = args.Source as NodeViewModel;
                            //Existing node
                            NodeViewModel targetnode = targetElement as NodeViewModel;
                            //Update the new node's offset x and y values.
                            sourcenode.OffsetX = targetnode.OffsetX;
                            sourcenode.OffsetY = targetnode.OffsetY + 130;
                            //Create connection from exiting node to new node.
                            ConnectorViewModel connectorVM = new ConnectorViewModel()
                            {
                                SourceNode = targetnode,
                                TargetNode = sourcenode
                            };
                            (Connectors as ObservableCollection<ConnectorViewModel>).Add(connectorVM);
                        }
                    }
                }
            }
        }
    }
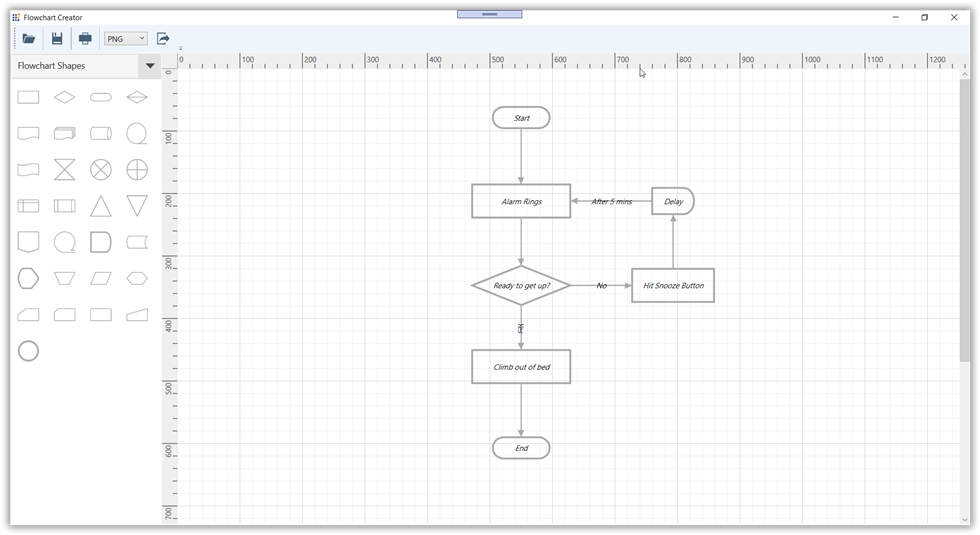
The following screenshot shows the flowchart created with the auto connect option.

Loading and saving
Diagram control provides the flexibility to save your current work and resume it by loading the saved diagram back to the diagram canvas. You can achieve this using the load and save functionality with the following code example.
C#:
    /// <summary>
    /// Custom diagram view model class.
    /// </summary>
    public class DiagramVM : DiagramViewModel
    {


        public DiagramVM()
        {
            //Custom command to execute export action.
            LoadCommand = new Command(OnLoadCommand);
            SaveCommand = new Command(OnSaveCommand);
        }
        public ICommand LoadCommand { get; set; }
        public ICommand SaveCommand { get; set; }


        private void OnLoadCommand(object obj)
        {
            OpenFileDialog dialog = new OpenFileDialog();
            dialog.Filter = "XAML File (*.xaml)|*.xaml";
            if (dialog.ShowDialog() == true)
            {
                using (Stream myStream = dialog.OpenFile())
                {
                    (Info as IGraphInfo).Load(myStream);
                }
            }
        }
        private void OnSaveCommand(object obj)
        {
            //To represent SaveFile dialog box.
            SaveFileDialog dialog = new SaveFileDialog();
            dialog.Title = "Save XAML";
            dialog.Filter = "XAML File (*.xaml)|*.xaml";
            if (dialog.ShowDialog() == true)
            {
                using (Stream str = File.Open(dialog.FileName, FileMode.CreateNew))
                {
                    (Info as IGraphInfo).Save(str);
                }
            }
        }
    }
Exporting and printing
You can export the created flowchart as an image, or you can print it directly using the printer. You can do this using the exporting and printing functionality with the following code example.
XAML:
<Syncfusion:SfDiagram x:Name="diagram"
                      Grid.Column="1"
                      Tool="{Binding Tool}"
                      DefaultConnectorType="{Binding DefaultConnectorType}"
                      Nodes="{Binding Nodes}"
                      Connectors="{Binding Connectors}"
                      Groups="{Binding Groups}"
                      PageSettings="{Binding PageSettings}"
                      SnapSettings="{Binding SnapSettings}"
                      HorizontalRuler="{Binding HorizontalRuler}"
                      VerticalRuler="{Binding VerticalRuler}"
                      PrintingService="{Binding PrintingService}"
                      ExportSettings="{Binding ExportSettings}"
</Syncfusion:SfDiagram>
C#:
    /// <summary>
    /// Custom diagram view model class.
    /// </summary>
    public class DiagramVM : DiagramViewModel
    {
        private string _exporttype;
        private List<string> _mexporttype = new List<string> { "PNG", "JPG", "TIF", "GIF", "BMP", "WDP", "XPS", "PDF" };

        public List<string> ExportTypes
        {
            get
            {
                return _mexporttype;
            }
        }

        public string ExportType
        {
            get
            {
                return _exporttype;
            }
            set
            {
                if(_exporttype != value)
                {
                    _exporttype = value;
                    OnPropertyChanged("ExportType");
                }
            }
        }

        public DiagramVM()
        {
            PrintingService = new PrintingService();
            //Custom command to execute export action.
            ExportCommand = new Command(OnExported);
            PrintClickCommand = new Command(OnPrintCommand);
        }

        public ICommand ExportCommand { get; set; }
        public ICommand PrintClickCommand { get; set; }


        private void OnExported(object ob)
        {
            String obj = this.ExportType;
            String extension = ("PNG File(*.png)|*.png");
            //Assigning eExtension based on the chosen exporttype.
            switch (obj)
            {
                case "BMP":
                    extension = ("BMP File(*.bmp)|*.bmp");
                    break;
                case "WDP":
                    extension = ("WDP File(*.wdp)|*.wdp");
                    break;
                case "JPG":
                    extension = ("JPG File(*.jpg)|*.jpg");
                    break;
                case "PNG":
                    extension = ("PNG File(*.png)|*.png");
                    break;
                case "TIF":
                    extension = ("TIF File(*.tif)|*.tif");
                    break;
                case "GIF":
                    extension = ("GIF File(*.gif)|*.gif");
                    break;
                case "XPS":
                    extension = ("XPS File(*.xps)|*.xps");
                    break;
                case "PDF":
                    extension = ("PDF File(*.pdf)|*.pdf");
                    break;
            }

            SaveFile(extension);
        }


        private void SaveFile(string filter)
        {
            //To represent SaveFile dialog bBox.
            SaveFileDialog m_SaveFileDialog = new SaveFileDialog();

            //Assign the selected extension to the SavefileDialog filter.
            m_SaveFileDialog.Filter = filter;

            //To display savefiledialog.
            bool? istrue = m_SaveFileDialog.ShowDialog();

            string filenamechanged;

            if (istrue == true)
            {
                //Aassign the filename to a local variable.
                string extension = System.IO.Path.GetExtension(m_SaveFileDialog.FileName).TrimStart('.');
                string fileName = m_SaveFileDialog.FileName;
                if (extension != "")
                {
                    if (extension.ToLower() != ExportType.ToLower())
                    {
                        fileName = fileName + "." + ExportType.ToLower();
                    }

                    if (ExportType.ToLower() == "pdf")
                    {
                        filenamechanged = fileName + ".xps";

                        ExportSettings.IsSaveToXps = true;

                        //Assigning exportstream from the saved file.
                        this.ExportSettings.FileName = filenamechanged;
                        // Method to eExport the SfDiagram.
                        (this.Info as IGraphInfo).Export();

                        //var converter = new XPSToPdfConverter { };

                        //var document = new PdfDocument();

                        //document = converter.Convert(filenamechanged);
                        //document.Save(fileName);
                        //document.Close(true);

                    }

                    else
                    {
                        if (ExportType.ToLower() == "xps")
                        {
                            ExportSettings.IsSaveToXps = true;
                        }
                        //Assigning exportstream from the saved file.
                        this.ExportSettings.FileName = fileName;
                        // Method to Eexport the SfDiagram.
                        (this.Info as IGraphInfo).Export();
                    }
                }
            }

        }
    }
The following screenshot shows the Print Diagram dialog box along with the custom print options.

Resource
You can download the source project for this flowchart designer from this GitHub location.
Conclusion
In this blog post, you have seen how to create an interactive flowchart designer application. Also, you have learned to load, save, export, and print the created flowchart diagram using the Syncfusion WPF Diagram library. Similarly, you can create your own diagram creation application like an organization chart creator, a logical circuit designer, or a network diagram. Syncfusion WPF Diagram library also supports rich interactive features, automatic layouts, and binding data from different data sources. To explore features in more depth, refer to our help documentation on the WPF Diagram library.
If you’re already a Syncfusion user, you can download the product setup from our website. Otherwise, you can download a free, 30-day trial here.
If you have any questions, please let us know in the comments section below. You can also contact us through our support forum, Direct-Trac, or feedback portal. We are always happy to assist you!


 No spam, just valuable updates.