
A good scheduling application can be better than having a human assistant. When it comes to developing a scheduling mobile application, the Syncfusion Flutter Event Calendar widget should be your component of choice. The Flutter Event Calendar can be used to schedule, manage, and represent appointments through an intuitive user interface that is similar to the native device calendar.
This blog post explains how the Flutter Event Calendar widget enables you to develop a scheduling application.
Configuring the Event Calendar
Browse our documentation to learn more about the Syncfusion Event Calendar widget and how to configure it in a Flutter application.
Adding a data source
The Syncfusion Event Calendar can handle appointment arrangement internally based on the appointments collection. You need to assign the created collection to the dataSource property of SfCalendar. You can also map custom appointment data to the Event Calendar. A custom appointment must contain two DateTime fields for the start and end times of an appointment.
By default, the Day View will be loaded in the scheduler, and today’s date will be displayed in all views.
Creating a business object
Let’s create a Meeting class that generates meeting details containing the time, subject, and other related information. In a real-world scenario, you can also bind the data from services and databases to render appointments.
class Meeting {
  Meeting(
      {@required this.from,
      @required this.to,
      this.background = Colors.green,
      this.isAllDay = false,
      this.eventName = '',
      this.startTimeZone = '',
      this.endTimeZone = '',
      this.description = ''});

  final String eventName;
  final DateTime from;
  final DateTime to;
  final Color background;
  final bool isAllDay;
  final String startTimeZone;
  final String endTimeZone;
  final String description;
}
Map the properties of the Meeting class with the Syncfusion Event Calendar by using the CalendarDataSource override methods properties.
class DataSource extends CalendarDataSource {
  DataSource(List<Meeting> source) {
    appointments = source;
  }

  @override
  bool isAllDay(int index) => appointments[index].isAllDay;

  @override
  String getSubject(int index) => appointments[index].eventName;

  @override
  String getStartTimeZone(int index) => appointments[index].startTimeZone;

  @override
  String getNotes(int index) => appointments[index].description;

  @override
  String getEndTimeZone(int index) => appointments[index].endTimeZone;

  @override
  Color getColor(int index) => appointments[index].background;

  @override
  DateTime getStartTime(int index) => appointments[index].from;

  @override
  DateTime getEndTime(int index) => appointments[index].to;
}
Now, schedule meetings for a day by setting the From and To properties of the Meeting class. Create a collection of Meeting objects and assign it to the appointments property of CalendarDataSource.
final DateTime today = DateTime.now();
final Random random = Random();
for (int month = -1; month < 2; month++) {
  for (int day = -5; day < 5; day++) {
    for (int hour = 9; hour < 18; hour += 5) {
      meetingCollection.add(Meeting(
        from: today
            .add(Duration(days: (month * 30) + day))
            .add(Duration(hours: hour)),
        to: today
            .add(Duration(days: (month * 30) + day))
            .add(Duration(hours: hour + 2)),
        background: _colorCollection[random.nextInt(9)],
        startTimeZone: '',
        endTimeZone: '',
        description: '',
        isAllDay: false,
        eventName: eventNameCollection[random.nextInt(7)],
      ));
    }
  }
}

return SfCalendar(
    view: _calendarView,
    dataSource: _calendarDataSource,
    onTap: calendarTapCallback,
    initialDisplayDate: DateTime(DateTime.now().year, DateTime.now().month,
        DateTime.now().day, 0, 0, 0),
    monthViewSettings: MonthViewSettings(
        appointmentDisplayMode: MonthAppointmentDisplayMode.appointment),
    timeSlotViewSettings: TimeSlotViewSettings(
        minimumAppointmentDuration: const Duration(minutes: 60)));
To learn more about appointments and the different types of appointments, refer to our documentation.
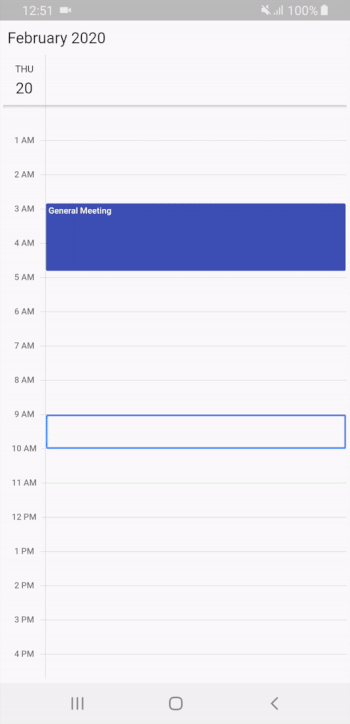
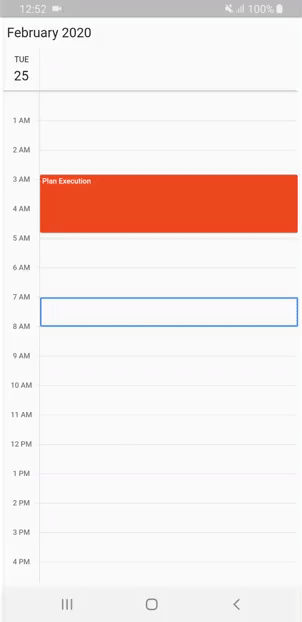
Now, a calendar is configured in the application. Running the sample after following the previous steps will render a calendar with appointments.
Designing a custom appointment editor
In the AppointmentEditor class, let’s create a custom appointment editor with the required data fields. This custom appointment editor will be used for both displaying the appointment details and for adding a new appointment to the Event Calendar.
Widget _getAppointmentEditor(BuildContext context) {
return Container(
color: Colors.white,
child: ListView(
padding: const EdgeInsets.all(0),
children: <Widget>[
ListTile(
contentPadding: const EdgeInsets.fromLTRB(5, 0, 5, 5),
leading: const Text(''),
title: TextField(
controller: TextEditingController(text: _subject),
onChanged: (String value) {
_subject = value;
},
keyboardType: TextInputType.multiline,
maxLines: null,
style: TextStyle(
fontSize: 25,
color: Colors.black,
fontWeight: FontWeight.w400),
decoration: InputDecoration(
border: InputBorder.none,
hintText: 'Add title',
),
),
),
const Divider(
height: 1.0,
thickness: 1,
),
ListTile(
contentPadding: const EdgeInsets.fromLTRB(5, 2, 5, 2),
leading: Icon(
Icons.access_time,
color: Colors.black54,
),
title: Row(children: <Widget>[
const Expanded(
child: Text('All-day'),
),
Expanded(
child: Align(
alignment: Alignment.centerRight,
child: Switch(
value: _isAllDay,
onChanged: (bool value) {
setState(() {
_isAllDay = value;
});
},
))),
])),
ListTile(
contentPadding: const EdgeInsets.fromLTRB(5, 2, 5, 2),
leading: const Text(''),
title: Row(
crossAxisAlignment: CrossAxisAlignment.center,
children: <Widget>[
Expanded(
flex: 7,
child: GestureDetector(
child: Text(
DateFormat('EEE, MMM dd yyyy')
.format(_startDate),
textAlign: TextAlign.left),
onTap: () async {
final DateTime date = await showDatePicker(
context: context,
initialDate: _startDate,
firstDate: DateTime(1900),
lastDate: DateTime(2100),
);
if (date != null && date != _startDate) {
setState(() {
final Duration difference =
_endDate.difference(_startDate);
_startDate = DateTime(
date.year,
date.month,
date.day,
_startTime.hour,
_startTime.minute,
0);
_endDate = _startDate.add(difference);
_endTime = TimeOfDay(
hour: _endDate.hour,
minute: _endDate.minute);
});
}
}),
),
Expanded(
flex: 3,
child: _isAllDay
? const Text('')
: GestureDetector(
child: Text(
DateFormat('hh:mm a').format(_startDate),
textAlign: TextAlign.right,
),
onTap: () async {
final TimeOfDay time = await showTimePicker(
context: context,
initialTime: TimeOfDay(
hour: _startTime.hour,
minute: _startTime.minute));
if (time != null && time != _startTime) {
setState(() {
_startTime = time;
final Duration difference =
_endDate.difference(_startDate);
_startDate = DateTime(
_startDate.year,
_startDate.month,
_startDate.day,
_startTime.hour,
_startTime.minute,
0);
_endDate = _startDate.add(difference);
_endTime = TimeOfDay(
hour: _endDate.hour,
minute: _endDate.minute);
});
}
})),
])),
ListTile(
contentPadding: const EdgeInsets.fromLTRB(5, 2, 5, 2),
leading: const Text(''),
title: Row(
crossAxisAlignment: CrossAxisAlignment.center,
children: <Widget>[
Expanded(
flex: 7,
child: GestureDetector(
child: Text(
DateFormat('EEE, MMM dd yyyy').format(_endDate),
textAlign: TextAlign.left,
),
onTap: () async {
final DateTime date = await showDatePicker(
context: context,
initialDate: _endDate,
firstDate: DateTime(1900),
lastDate: DateTime(2100),
);
if (date != null && date != _endDate) {
setState(() {
final Duration difference =
_endDate.difference(_startDate);
_endDate = DateTime(
date.year,
date.month,
date.day,
_endTime.hour,
_endTime.minute,
0);
if (_endDate.isBefore(_startDate)) {
_startDate = _endDate.subtract(difference);
_startTime = TimeOfDay(
hour: _startDate.hour,
minute: _startDate.minute);
}
});
}
}),
),
Expanded(
flex: 3,
child: _isAllDay
? const Text('')
: GestureDetector(
child: Text(
DateFormat('hh:mm a').format(_endDate),
textAlign: TextAlign.right,
),
onTap: () async {
final TimeOfDay time = await showTimePicker(
context: context,
initialTime: TimeOfDay(
hour: _endTime.hour,
minute: _endTime.minute));
if (time != null && time != _endTime) {
setState(() {
_endTime = time;
final Duration difference =
_endDate.difference(_startDate);
_endDate = DateTime(
_endDate.year,
_endDate.month,
_endDate.day,
_endTime.hour,
_endTime.minute,
0);
if (_endDate.isBefore(_startDate)) {
_startDate =
_endDate.subtract(difference);
_startTime = TimeOfDay(
hour: _startDate.hour,
minute: _startDate.minute);
}
});
}
})),
])),
ListTile(
contentPadding: const EdgeInsets.fromLTRB(5, 2, 5, 2),
leading: Icon(
Icons.public,
color: Colors.black87,
),
title: Text(_timeZoneCollection[_selectedTimeZoneIndex]),
onTap: () {
showDialog<Widget>(
context: context,
barrierDismissible: true,
builder: (BuildContext context) {
return _TimeZonePicker();
},
).then((dynamic value) => setState(() {}));
},
),
const Divider(
height: 1.0,
thickness: 1,
),
ListTile(
contentPadding: const EdgeInsets.fromLTRB(5, 2, 5, 2),
leading: Icon(Icons.lens,
color: _colorCollection[_selectedColorIndex]),
title: Text(
_colorNames[_selectedColorIndex],
),
onTap: () {
showDialog<Widget>(
context: context,
barrierDismissible: true,
builder: (BuildContext context) {
return _ColorPicker();
},
).then((dynamic value) => setState(() {}));
},
),
const Divider(
height: 1.0,
thickness: 1,
),
ListTile(
contentPadding: const EdgeInsets.all(5),
leading: Icon(
Icons.subject,
color: Colors.black87,
),
title: TextField(
controller: TextEditingController(text: _notes),
onChanged: (String value) {
_notes = value;
},
keyboardType: TextInputType.multiline,
maxLines: null,
style: TextStyle(
fontSize: 18,
color: Colors.black87,
fontWeight: FontWeight.w400),
decoration: InputDecoration(
border: InputBorder.none,
hintText: 'Add description',
),
),
),
const Divider(
height: 1.0,
thickness: 1,
),
],
));
}
Integrating the custom appointment editor
In the previous section, we designed a custom appointment editor. In this section, we are going to integrate that editor with the Event Calendar widget.
The onTap callback on the Syncfusion Event Calendar returns the tapped element, the date, and the appointment details. We can use these details to create the custom appointment editor and add it to the application.
The following code example illustrates this.
void onCalendarTapped(CalendarTapDetails calendarTapDetails) {
  if (calendarTapDetails.targetElement != CalendarElement.calendarCell &&
      calendarTapDetails.targetElement != CalendarElement.appointment) {
    return;
  }

  setState(() {
    _selectedAppointment = null;
    _isAllDay = false;
    _selectedColorIndex = 0;
    _selectedTimeZoneIndex = 0;
    _subject = '';
    _notes = '';
    if (_calendarView == CalendarView.month) {
      _calendarView = CalendarView.day;
    } else {
      if (calendarTapDetails.appointments != null &&
          calendarTapDetails.appointments.length == 1) {
        final Meeting meetingDetails = calendarTapDetails.appointments[0];
        _startDate = meetingDetails.from;
        _endDate = meetingDetails.to;
        _isAllDay = meetingDetails.isAllDay;
        _selectedColorIndex =
            _colorCollection.indexOf(meetingDetails.background);
        _selectedTimeZoneIndex = meetingDetails.startTimeZone == ''
            ? 0
            : _timeZoneCollection.indexOf(meetingDetails.startTimeZone);
        _subject = meetingDetails.eventName == '(No title)'
            ? ''
            : meetingDetails.eventName;
        _notes = meetingDetails.description;
        _selectedAppointment = meetingDetails;
      } else {
        final DateTime date = calendarTapDetails.date;
        _startDate = date;
        _endDate = date.add(const Duration(hours: 1));
      }
      _startTime =
          TimeOfDay(hour: _startDate.hour, minute: _startDate.minute);
      _endTime = TimeOfDay(hour: _endDate.hour, minute: _endDate.minute);
      Navigator.push<Widget>(
        context,
        MaterialPageRoute(
            builder: (BuildContext context) => AppointmentEditor()),
      );
    }
  });
}
Adding appointments using the editor
The custom appointment editor allows existing appointments to be edited and deleted, and new appointments to be added. The changes we make here should be reflected in the Event Calendar’s dataSource. This is achieved using notifiers in the CalendarDataSource.
The following code example illustrates this.
@override
Widget build([BuildContext context]) {
  return MaterialApp(
      debugShowCheckedModeBanner: false,
      home: Scaffold(
          appBar: AppBar(
            title: Text(getTile()),
            backgroundColor: _colorCollection[_selectedColorIndex],
            leading: IconButton(
              icon: const Icon(
                Icons.close,
                color: Colors.white,
              ),
              onPressed: () {
                Navigator.pop(context);
              },
            ),
            actions: <Widget>[
              IconButton(
                  padding: const EdgeInsets.fromLTRB(5, 0, 5, 0),
                  icon: const Icon(
                    Icons.done,
                    color: Colors.white,
                  ),
                  onPressed: () {
                    final List<Meeting> meetings = <Meeting>[];
                    if (_selectedAppointment != null) {
                      _events.appointments.removeAt(
                          _events.appointments.indexOf(_selectedAppointment));
                      _events.notifyListeners(CalendarDataSourceAction.remove,
                          <Meeting>[]..add(_selectedAppointment));
                    }
                    meetings.add(Meeting(
                      from: _startDate,
                      to: _endDate,
                      background: _colorCollection[_selectedColorIndex],
                      startTimeZone: _selectedTimeZoneIndex == 0
                          ? ''
                          : _timeZoneCollection[_selectedTimeZoneIndex],
                      endTimeZone: _selectedTimeZoneIndex == 0
                          ? ''
                          : _timeZoneCollection[_selectedTimeZoneIndex],
                      description: _notes,
                      isAllDay: _isAllDay,
                      eventName: _subject == '' ? '(No title)' : _subject,
                    ));

                    _events.appointments.add(meetings[0]);

                    _events.notifyListeners(
                        CalendarDataSourceAction.add, meetings);
                    _selectedAppointment = null;

                    Navigator.pop(context);
                  })
            ],
          ),
          body: Padding(
            padding: const EdgeInsets.fromLTRB(5, 5, 5, 5),
            child: Stack(
              children: <Widget>[_getAppointmentEditor(context)],
            ),
          ),
          floatingActionButton: _selectedAppointment == null
              ? const Text('')
              : FloatingActionButton(
                  onPressed: () {
                    if (_selectedAppointment != null) {
                      _events.appointments.removeAt(
                          _events.appointments.indexOf(_selectedAppointment));
                      _events.notifyListeners(CalendarDataSourceAction.remove,
                          <Meeting>[]..add(_selectedAppointment));
                      _selectedAppointment = null;
                      Navigator.pop(context);
                    }
                  },
                  child:
                      const Icon(Icons.delete_outline, color: Colors.white),
                  backgroundColor: Colors.red,
                )));
}
Summary
In this blog post, we had a quick overview of creating a scheduling application with the Syncfusion Event Calendar widget for Flutter. We also walked through the steps to create custom appointments and handle editor details with the calendar’s dataSource. Feel free to try out the Scheduling-Events sample on GitHub.
If you are a current Syncfusion user, please download the latest version from the License and Downloads page and try these features for yourself. If you aren’t a customer yet, you can try our 30-day free trial to check them out. Our other samples are available on GitHub.
If you wish to send us feedback or would like to submit any questions, please feel free to post them in the comments section below. Contact us through our support forum, Direct-Trac, or feedback portal. We are happy to assist you!


 No spam, just valuable updates.
Comments (6)
i have been looking for such example for the whole month, i have read the documntation,talked to syncfusion team support , non works. today i found it , relly happy to have that. but,
Can we have a full example of the whole above code,source code in gitHub ? if yes ,where to find it or how to get it ?
thank you in advance
Hi @Kareem,
Thanks for your interest in Syncfusion products.
Please find the complete example in this link [https://github.com/SyncfusionExamples/scheduling-events-flutter-calendar] which is already added to this blog Summary topic.
You can also refer to our PlayStore application – Syncfusion Flutter UI Widgets and web application -https://flutter.syncfusion.com/#/event-calendar/scheduling
I’m wondering !!
where are all those classes and functions you are using in the example above?
@kareem,
Find the complete example code in this link – https://github.com/SyncfusionExamples/scheduling-events-flutter-calendar
what if i need to post and get events to/from server using rest APIs?
and what if i need to edit and delete those events? any idea?
a bunch of thanks sir!
Hi,
We have KB documentation for getting the online JSON data with the help of the HTTP package.
Link: https://www.syncfusion.com/kb/11568/how-to-load-the-json-data-online-to-the-flutter-calendar-appointments
We have KB documentation for performing the CRUD operation with Firebase and Firestore databases. Please find the KB documentation from the following link.
KB links:
https://www.syncfusion.com/kb/12661/how-to-perform-the-crud-operations-in-flutter-calendar-using-firestore-database
https://www.syncfusion.com/kb/12623/how-to-perform-the-crud-operations-in-flutter-calendar-using-firebase-database
https://www.syncfusion.com/kb/12616/how-to-add-the-appointments-to-firestore-database-using-flutter-calendar
https://www.syncfusion.com/kb/12067/how-to-work-with-the-firebase-database-and-the-flutter-calendar-for-appointments
https://www.syncfusion.com/kb/12110/how-to-add-the-appointments-to-the-firebase-database-using-appointment-editor-in-the
Also please find the following link for creating the server in typicode link add, delete, and update the data using HTTP package. By using this link, you can create your own API link with the JSON data and do the required operations.
Link: https://jsonplaceholder.typicode.com/
We hope that this helps you. Please let us know if you need further assistance.