
In this blog, I am going to provide a walkthrough on developing REST APIs using ASP.NET Core 3.1, connecting with existing databases using Entity Framework, creating a JWT token, and securing APIs. I am going to develop a sample application for an inventory REST service with basic operations.
Table of contents:
- What is a REST API?
- What is a JWT token?
- Create an ASP.NET Core REST API application
- Install necessary NuGet packages
- Create database and connect it to application
- Build REST APIs
- Run and test APIs using Postman
- Create a JWT token
- Secure API endpoint
Note: In this demo application, I have used ASP.NET Core 3.1, Entity Framework Core 3.1 with Visual Studio 2019 16.4.0, SQL Server 2017, and Postman.
What is a REST API?
Due to the increasing number of different varieties of clients (mobile apps, browser-based SPAs, desktop apps, IOT apps, etc.), we need better ways for transferring data from servers to clients, independent of technology and server stacks.
REST APIs solve this problem. REST stands for representational state transfer. REST APIs are HTTP-based and provide applications the ability to communicate using lightweight JSON format. They run on web servers.
REST consists of the following entities:
Resource: Resources are uniquely identifiable entities (for example: data from a database, images, or any data).
Endpoint: A resource can be accessed through a URL identifier.
HTTP method: HTTP method is the type of request a client sends to a server. Operations we perform on the resource should follow this.
HTTP header: An HTTP header is a key-value pair used to share additional information between a client and server, such as:
- Type of data being sent to server (JSON, XML).
- Type of encryption supported by client.
- Authentication-related token.
- Customer data based on application need.
Data format: JSON is a common format to send and receive data through REST APIs.
What is a JWT Token?
In the previous section, we saw what a REST API is, and here we will see what a JWT bearer token is, which secures the REST APIs.
JWT stands for JSON Web Token. It is open standard and defines a better way for transferring data securely between two entities (client and server).
A JWT is digitally signed using a secret key by a token provider or authentication server. A JWT helps the resource server verify the token data using the same secret key, so that you can trust the data.
JWT consists of the following three parts:
Header: encoded data of token type and the algorithm used to sign the data.
Payload: encoded data of claims intended to share.
Signature: created by signing (encoded header + encoded payload) using a secret key.
The final JWT token will be like this: Header.Payload.Signature. Please find the token workflow in the following.
Step 1: Client requesting token
The client sends a request to the authentication server with the necessary information to prove its identity.
Step 2: Token creation
The authentication server receives the token request and verifies the identity. If it is found valid, a token will be created (as explained previously) with the necessary claims, and a JWT token will be sent back to the client.
Step 3: Client sends token to resource server
For each request to Resource or the API server, the client needs to include a token in the header and request the resource using its URI.
Step 4: Resource server verifies the token
Follow these steps to verify the token:
- Read the token from authentication header.
- Split the header, payload, and signature from token.
- Create signature of received header and payload using the same secret key used when creating the token.
- Check whether both newly created signature and signature received from token are valid.
- If the signatures are the same, the tokens are valid (not altered in the middle) and they provide access to the requested resource.
- If the signatures are different, an unauthorized response will be sent back to the client. (In the middle, if claims are alerted, they will generate a different signature, hence resource access will be restricted.)
Don’t share confidential information using a JWT, since a JWT can be decoded and the claims or data it possesses can be viewed.
The following section explains how to create a REST API and secure it using a token.
Create an ASP.NET Core REST API application
Follow these steps to create an ASP.NET Core application in Visual Studio 2019:
Step 1: Go to File -> New, and then select Project.
Step 2: Choose Create a new project.
Step 3: Select ASP.NET Core Web Application template.
Step 4: Enter the Project name, and then click Create. The Project template dialog will be displayed.
Step 5: Select .NET Core, ASP.NET Core 3.1, and API template (highlighted in the following).
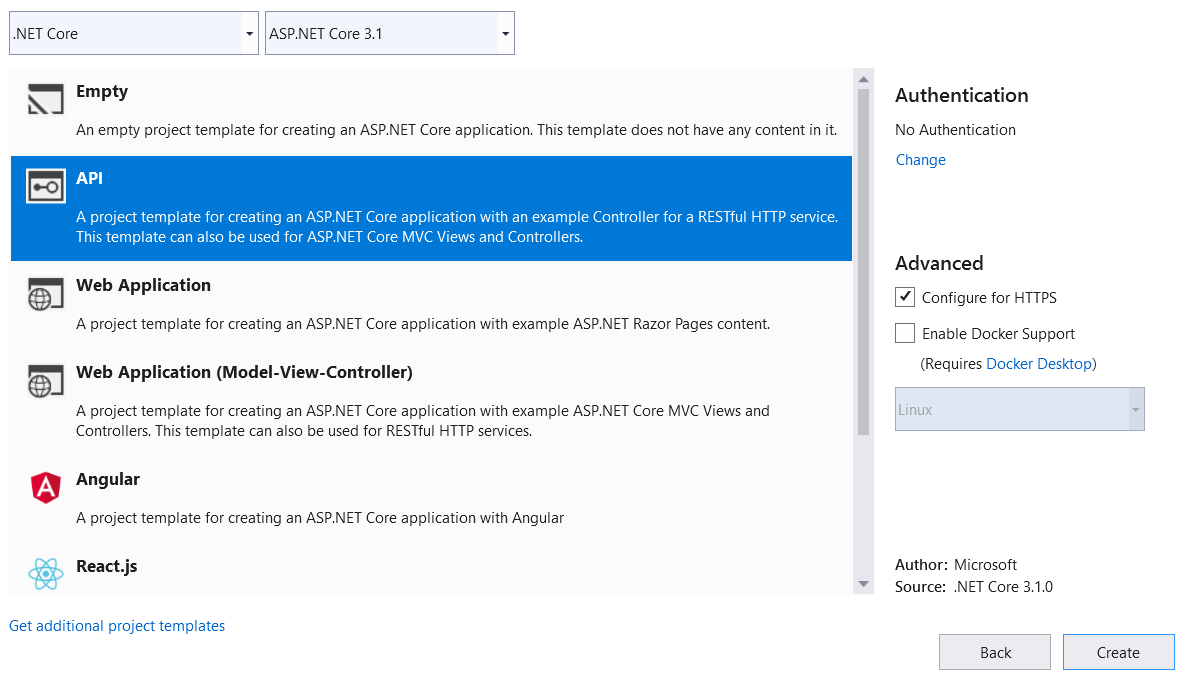
Step 6: Click Create. The sample ASP.NET Core API application will be created. Find the project structure in the following screenshot.
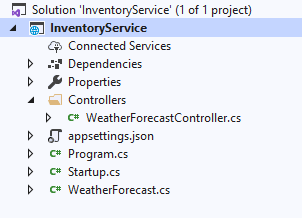
By default, a sample WeatherForecast API is created. We can remove this.
Install necessary NuGet packages
Add the following NuGet packages to work with SQL Server database and scaffolding, and run the following commands in Package Manager Console (Click Tools -> NuGet Package Manager -> Package Manager Console).
This package helps generate controllers and views.
- Install-Package Microsoft.VisualStudio.Web.CodeGeneration.Design -Version 3.1.4
This package helps create database context and model classes from the database.
- Install-Package Microsoft.EntityFrameworkCore.Tools -Version 3.1.8
Database provider allows Entity Framework Core to work with SQL Server.
- Install-Package Microsoft.EntityFrameworkCore.SqlServer -Version 3.1.8
It provides support for creating and validating a JWT token.
- Install-Package System.IdentityModel.Tokens.Jwt -Version 5.6.0
This is the middleware that enables an ASP.NET Core application to receive a bearer token in the request pipeline.
- Install-Package Microsoft.AspNetCore.Authentication.JwtBearer -Version 3.1.8
Create database and connect it to application
I hope you have installed SQL Server 2017 in your machine. (You can also use SQL Server 2008, 2012, or 2016.)
Step 1: Create a new database (Inventory).
Step 2: For this application, I am going to create tables called Products and UserInfo with basic attributes. Paste the following SQL query into the Query window to create necessary tables.
Create Table Products(
  ProductId Int Identity(1,1) Primary Key,
  Name Varchar(100) Not Null,
  Category Varchar(100),
  Color Varchar(20),
  UnitPrice Decimal Not Null,
  AvailableQuantity Int Not Null)

GO

Create Table UserInfo(
  UserId Int Identity(1,1) Not null Primary Key,
  FirstName Varchar(30) Not null,
  LastName Varchar(30) Not null,
  UserName Varchar(30) Not null,
  Email Varchar(50) Not null,
  Password Varchar(20) Not null,
  CreatedDate DateTime Default(GetDate()) Not Null)

GO

Insert Into UserInfo(FirstName, LastName, UserName, Email, Password)
Values ('Inventory', 'Admin', 'InventoryAdmin', '[email protected]', '$admin@2017')
Step 3: Run the following scaffold command in Package Manager Console to reverse engineer the database to create database context and entity POCO classes from tables. The scaffold command will create POCO class only for the tables that have a primary key.
Scaffold-DbContext “Server=******;Database=Inventory;Integrated Security=True” Microsoft.EntityFrameworkCore.SqlServer -OutputDir Models
- Connection: Sets connection string of the database.
- Provider: Sets the provider to be used to connect database.
- OutputDir: Sets the directory where the POCO classes are generated.
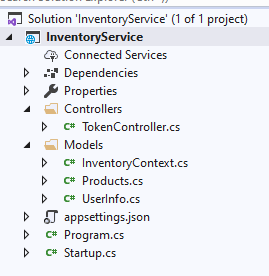
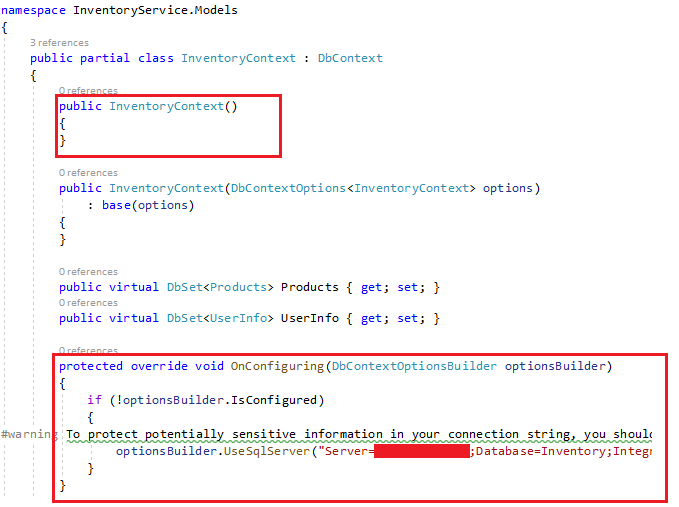
In our case, the Products class and Inventory context class will be created as shown in the following screenshot.
In the autogenerated InventoryContext class file, the database credentials you can see are hard coded in the OnConfiguring method. It is not a good practice to have SQL Server credentials in C# class, considering the security issues. So, remove the following OnConfiguring method and parameterless constructor from context file (highlighted).
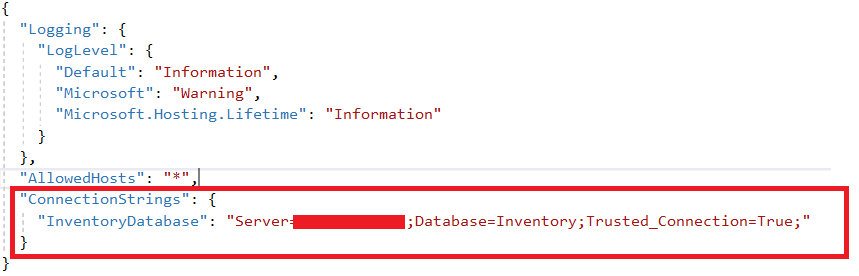
Add a connection string to the appsetting.json file.
Then, register the database context service (InventoryContext) during application startup. In the following code, the connection string is read from the appsetting file and is passed to the context service.

Add the following namespaces to the startup file:
using InventoryService.Models;
using Microsoft.EntityFrameworkCore;
Then this context service is injected with the required controllers via dependency injection.
Build REST APIs
Now, we have database and entity classes in place. Follow these steps to create Products API:
Step 1: Right–click the Controllers folder, choose Add, and then click Controller.
Step 2: Select API Controller with actions using the Entity Framework template.
Step 3: Choose the Products model class and InventoryContext context class, and then name the control ProductsController.
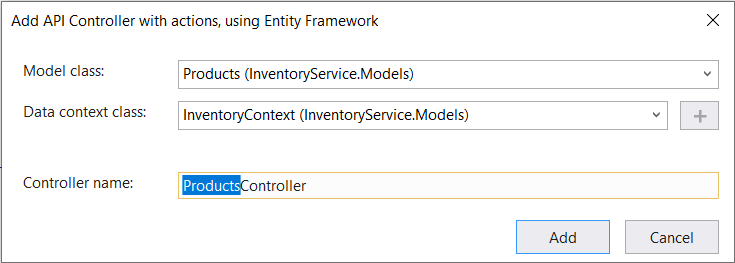
When we click Add, the API is automatically created using the ASP.NET CORE scaffolding code generation technique.
The following APIs are created:
- To list all products: HTTP Get method
- Get product detail: HTTP Get method
- Update product detail: HTTP Put method
- Create product: HTTP Post method
- Delete product: HTTP Delete method
As per REST best practice, each endpoint is assigned with respective HTTP methods based on its operation.
using System;
using System.Collections.Generic;
using System.Linq;
using System.Threading.Tasks;
using Microsoft.AspNetCore.Http;
using Microsoft.AspNetCore.Mvc;
using Microsoft.EntityFrameworkCore;
using InventoryService.Models;
using Microsoft.AspNetCore.Authorization;

namespace InventoryService.Controllers
{
    [Authorize]
    [Route("api/[controller]")]
    [ApiController]
    public class ProductsController : ControllerBase
    {
        private readonly InventoryContext _context;

        public ProductsController(InventoryContext context)
        {
            _context = context;
        }

        [HttpGet]
        public async Task<ActionResult<IEnumerable<Products>>> GetProducts()
        {
            return await _context.Products.ToListAsync();
        }


        // GET: api/Products/5
        [HttpGet("{id}")]
        public async Task<ActionResult<Products>> GetProducts(int id)
        {
            var products = await _context.Products.FindAsync(id);

            if (products == null)
            {
                return NotFound();
            }

            return products;
        }

        // PUT: api/Products/5
        // To protect from overposting attacks, please enable the specific properties you want to bind to, for
        // more details see https://aka.ms/RazorPagesCRUD.
        [HttpPut("{id}")]
        public async Task<IActionResult> PutProducts(int id, Products products)
        {
            if (id != products.ProductId)
            {
                return BadRequest();
            }

            _context.Entry(products).State = EntityState.Modified;

            try
            {
                await _context.SaveChangesAsync();
            }
            catch (DbUpdateConcurrencyException)
            {
                if (!ProductsExists(id))
                {
                    return NotFound();
                }
                else
                {
                    throw;
                }
            }

            return NoContent();
        }

        // POST: api/Products
        // To protect from overposting attacks, please enable the specific properties you want to bind to, for
        // more details see https://aka.ms/RazorPagesCRUD.
        [HttpPost]
        public async Task<ActionResult<Products>> PostProducts(Products products)
        {
            _context.Products.Add(products);
            await _context.SaveChangesAsync();

            return CreatedAtAction("GetProducts", new { id = products.ProductId }, products);
        }

        // DELETE: api/Products/5
        [HttpDelete("{id}")]
        public async Task<ActionResult<Products>> DeleteProducts(int id)
        {
            var products = await _context.Products.FindAsync(id);
            if (products == null)
            {
                return NotFound();
            }

            _context.Products.Remove(products);
            await _context.SaveChangesAsync();

            return products;
        }

        private bool ProductsExists(int id)
        {
            return _context.Products.Any(e => e.ProductId == id);
        }
    }
}
Now, we are going to make the following modifications to the Get Products API to filter the products:
- Return the products that are in stock.
- Support limiting the number of results returned.
[HttpGet]
public async Task<ActionResult<IEnumerable<Products>>> GetProducts(bool? inStock, int? skip, int? take)
{
    var products = _context.Products.AsQueryable();

    if (inStock != null) // Adds the condition to check availability
    {
        products = _context.Products.Where(i => i.AvailableQuantity > 0);
    }

    if (skip != null)
    {
        products = products.Skip((int)skip);
    }

    if (take != null)
    {
        products = products.Take((int)take);
    }

    return await products.ToListAsync();
}
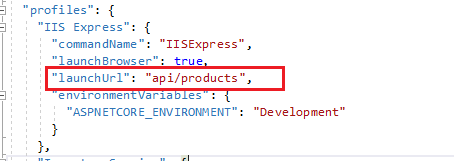
Change the launch URL to api/products in the launchSettings.js file.
Run and test APIs using Postman
Click Run to view the Inventory service. A new browser tab will open, and we’ll be able to see the product listing.
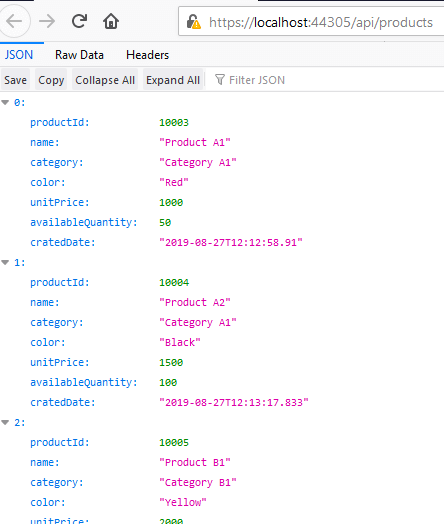
Our Inventory REST service is up and running.
Note: The localhost port number may be different in your development machine.
In this section, we will see how to consume our service using Postman (Postman is an API testing tool that helps developers consume and check how an API works).
Follow these steps to view the products list:
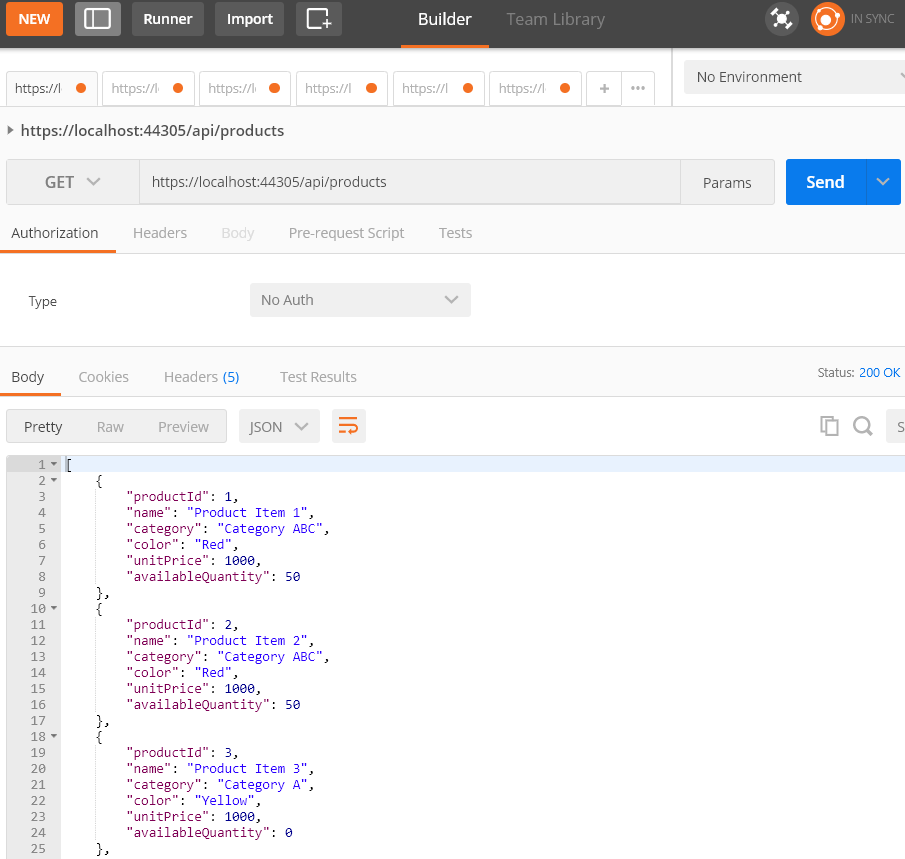
Step 1: Open Postman and enter this endpoint: https://localhost:44305/api/products.
Step 2: Choose the GET method and click Send. Now, all the products will be listed as shown in the following screenshot.
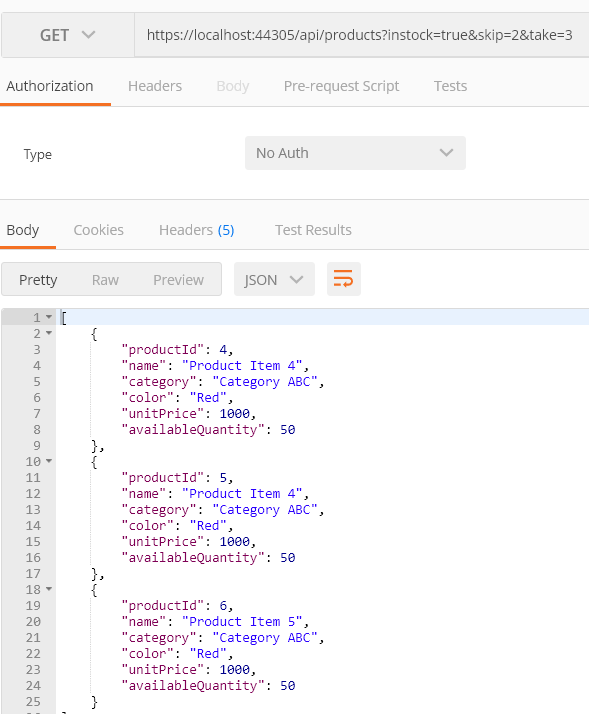
Now, apply the filter to return products that are in stock and fetch only necessary items using skip and take.
Enter the following endpoint into Postman: https://localhost:44305/api/products?instock=true&skip=2&take=3
Now, you can see only the products that are in stock. It skips the first two records and displays the next three records.
Read
Follow these steps to view the details of a product:
Step 1: Open Postman and enter this endpoint: https://localhost:44305/api/products/1.
Step 2: Choose GET method and click Send. Now, you can see the details of the product. Here, the product id is 1.
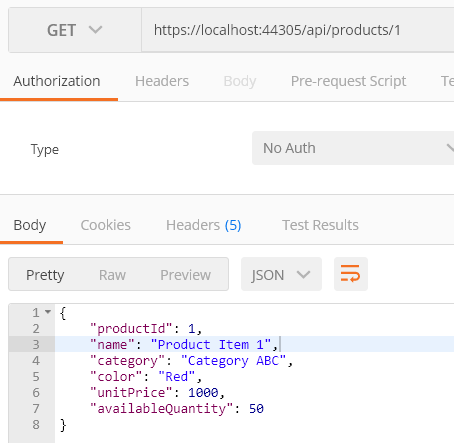
Note: Change ProductId based on records available in your database.
Create
Follow these steps to create a product:
Step 1: Enter this endpoint into Postman: https://localhost:44305/api/products.
Step 2: Choose POST method and set as header: ‘Content-Type’: ‘application/json’.
Step 3: Under Body -> Raw, choose type JSON (application/javascript) and paste the product details.
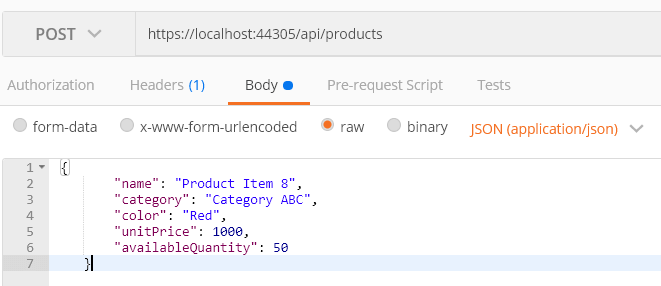
By clicking Send, a product is created, and by loading the product listing page, you can see the newly created product.
Update
Follow these steps to update the product:
Step 1: Enter this endpoint into Postman: https://localhost:44305/api/products/7.
Step 2: Choose the PUT method and set as header: ‘Content-Type’: ‘application/json’.
Step 3: Under Body -> Raw, choose type JSON (application/javascript) and paste the product details.
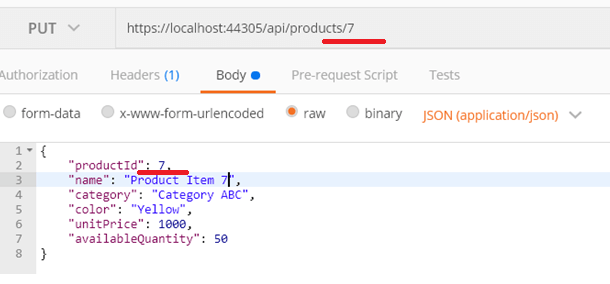
By clicking Send, the product details are updated.
Note: ProductId must be the same in the endpoint and product details (see the red highlight in the previous image), otherwise the API will throw bad request.
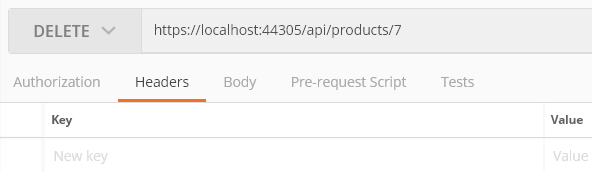
Delete
Follow these steps to delete a product:
Step 1: Enter this endpoint into Postman: https://localhost:44305/api/products/7.
Step 2: Choose the DELETE method and click Send. Now, the product will be deleted from the database.
Create a JWT
We can consume and test our API using Postman, but the problem here is anyone who knows the endpoint can consume it. So this is not the case, we need an option to control who can consume our service. This is achieved by a JWT bearer token.
Here, we will see how to create a token:
Step 1: Create an empty API controller called TokenController.
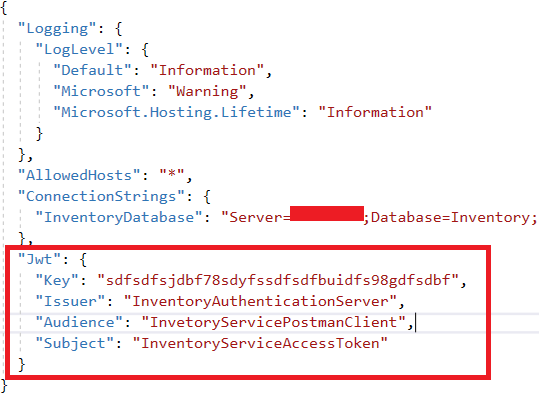
Step 2: Paste the following JWT configuration into the appsetting.json file.
Step 3: Add the action method under TokenController to perform the following operations:
- Accept username and password as input.
- Check users’ credentials with database to ensure users’ identity:
- If valid, access token will be returned.
- If invalid, bad request error will be returned.
The following code example demonstrates how to create a token.
using InventoryService.Models;
using Microsoft.AspNetCore.Mvc;
using Microsoft.EntityFrameworkCore;
using Microsoft.Extensions.Configuration;
using Microsoft.IdentityModel.Tokens;
using System;
using System.IdentityModel.Tokens.Jwt;
using System.Security.Claims;
using System.Text;
using System.Threading.Tasks;

namespace InventoryService.Controllers
{
    [Route("api/[controller]")]
    [ApiController]
    public class TokenController : ControllerBase
    {
        public IConfiguration _configuration;
        private readonly InventoryContext _context;

        public TokenController(IConfiguration config, InventoryContext context)
        {
            _configuration = config;
            _context = context;
        }

        [HttpPost]
        public async Task<IActionResult> Post(UserInfo _userData)
        {

            if (_userData != null && _userData.Email != null && _userData.Password != null)
            {
                var user = await GetUser(_userData.Email, _userData.Password);

                if (user != null)
                {
                    //create claims details based on the user information
                    var claims = new[] {
                    new Claim(JwtRegisteredClaimNames.Sub, _configuration["Jwt:Subject"]),
                    new Claim(JwtRegisteredClaimNames.Jti, Guid.NewGuid().ToString()),
                    new Claim(JwtRegisteredClaimNames.Iat, DateTime.UtcNow.ToString()),
                    new Claim("Id", user.UserId.ToString()),
                    new Claim("FirstName", user.FirstName),
                    new Claim("LastName", user.LastName),
                    new Claim("UserName", user.UserName),
                    new Claim("Email", user.Email)
                   };

                    var key = new SymmetricSecurityKey(Encoding.UTF8.GetBytes(_configuration["Jwt:Key"]));

                    var signIn = new SigningCredentials(key, SecurityAlgorithms.HmacSha256);

                    var token = new JwtSecurityToken(_configuration["Jwt:Issuer"], _configuration["Jwt:Audience"], claims, expires: DateTime.UtcNow.AddDays(1), signingCredentials: signIn);

                    return Ok(new JwtSecurityTokenHandler().WriteToken(token));
                }
                else
                {
                    return BadRequest("Invalid credentials");
                }
            }
            else
            {
                return BadRequest();
            }
        }

        private async Task<UserInfo> GetUser(string email, string password)
        {
            return await _context.UserInfo.FirstOrDefaultAsync(u => u.Email == email && u.Password == password);
        }
    }
}
Follow these steps to check the token endpoint using Postman:
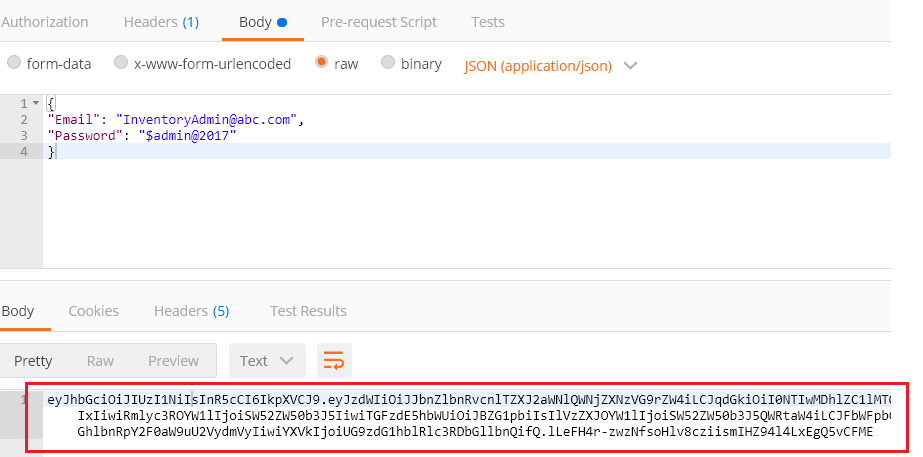
Step 1: Enter this endpoint https://localhost:44305/api/token.
Step 2: Choose the POST method and set the header to ‘Content-Type’: ‘application/json’.
Step 3: Under Body > Raw, choose type JSON (application/javascript) and paste the product details.
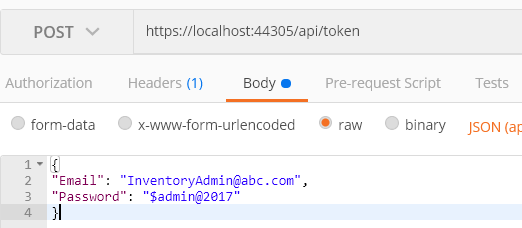
By clicking Send, user credentials will be checked, and a token will be generated and returned. See the highlighted body section.
Secure API endpoint
Now, we have a JWT token and will see how to secure our API.
Step 1: Add the following namespaces to the startup file:
using Microsoft.AspNetCore.Authentication.JwtBearer;
using Microsoft.IdentityModel.Tokens;
using System.Text;
Step 2: Configure authorization middleware in the startup configureService method.
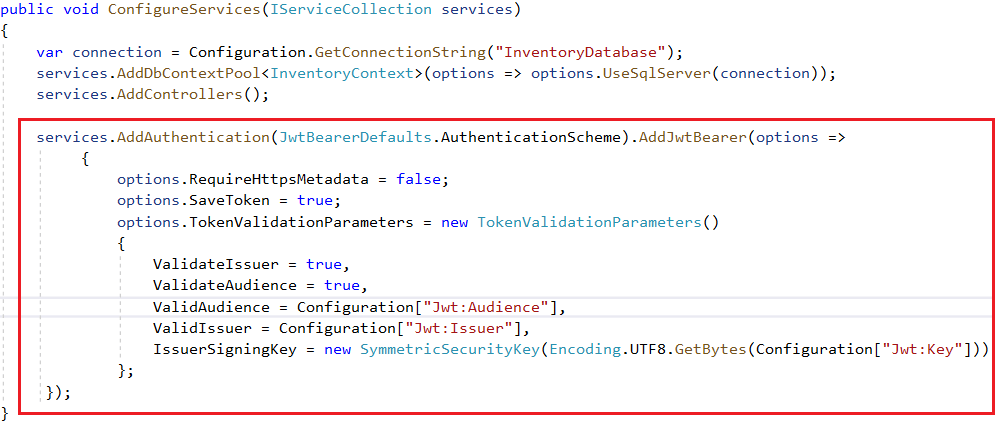
We have passed the security key used when creating the token, and we have also enabled validation of Issuer and Audience.
Also, we have set SaveToken to true, which stores the bearer token in HTTP Context. So we can access the token in the controller when needed.
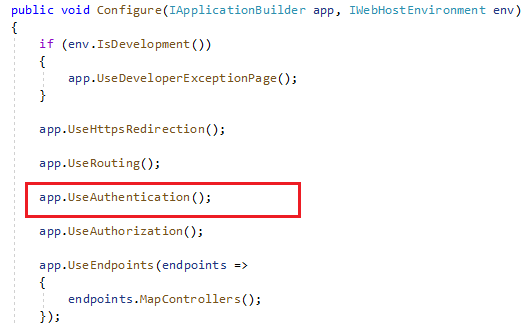
Step 3: Inject the authorization middleware into the Request pipeline.
Step 4: Add authorization attribute to the controller.
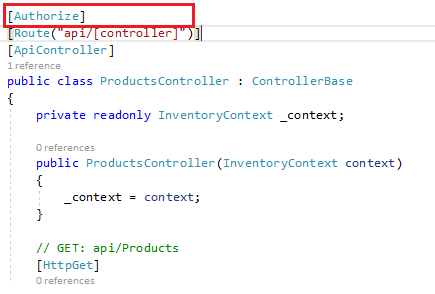
Here I have added authorization to the whole controller, so all the APIs under this controller will be secured with the token. You can also add authorization to a particular API method.
Test the API
Follow these steps to test whether the APIs are secured by the JWT:
Step 1: In Postman, enter this endpoint: https://localhost:44305/api/products.
Step 2: Choose the GET method and then click Send. Now, you can see the Status code is 401 Unauthorized.
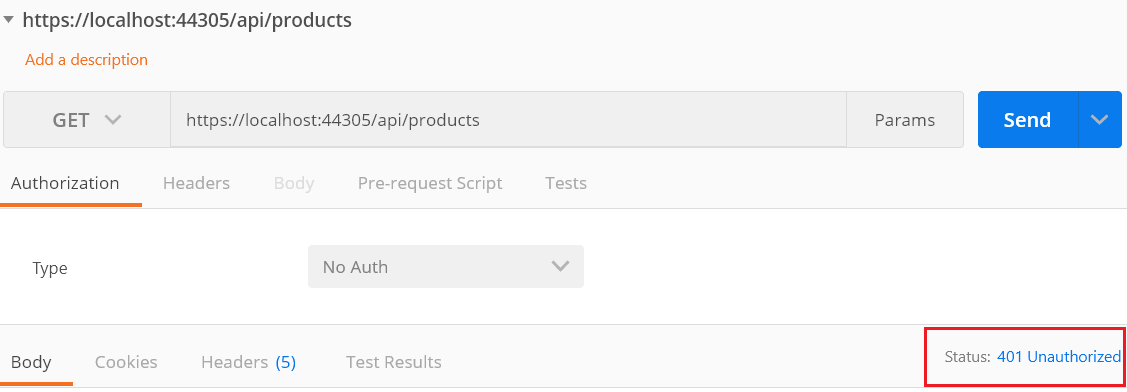
The anonymous access has been blocked and the APIs have been secured. Now, we will see how to access the APIs using the token.
Step 3: Copy the token that was created in earlier steps.

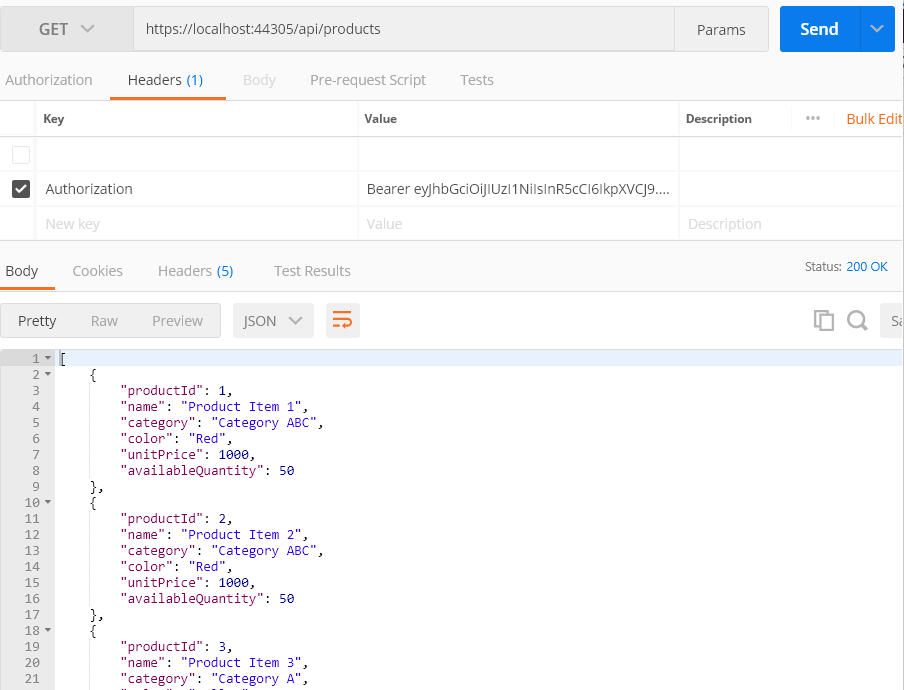
Step 4: Prepend text Bearer with this token, and finally you will have a token as follows.
| Bearer eyJhbGciOiJIUzI1NiIsInR5cCI6IkpXVCJ9.eyJzdWIiOiJJbnZlbnRvcnlTZXJ2aWNlQWNjZXNzVG9rZW4iLCJqdGkiOiIwMGY2MjcwYy05NmFlLTQwMDUtOWUwOS00YWVkMjU5NWNjMTIiLCJpYXQiOiIxMS8yOS8yMDE5IDY6MTc6MDIgQU0iLCJJZCI6IjEiLCJGaXJzdE5hbWUiOiJJbnZlbnRvcnkiLCJMYXN0TmFtZSI6IkFkbWluIiwiVXNlck5hbWUiOiJJbnZlbnRvcnlBZG1pbiIsIkVtYWlsIjoiSW52ZW50b3J5QWRtaW5AYWJjLmNvbSIsImV4cCI6MTU3NTA5NDYyMiwiaXNzIjoiSW52ZW50b3J5QXV0aGVudGljYXRpb25TZXJ2ZXIiLCJhdWQiOiJJbnZldG9yeVNlcnZpY2VQb3N0bWFuQ2xpZW50In0.r3gDqAL9FmH2LA_-nfyLDrihfhuY5ODk1bGOLECaKcI |
Step 5: Now, come back to the product list. Under the Authorization header, paste the previous token in the Value field, and then click Send. Now you can see the products from our API.
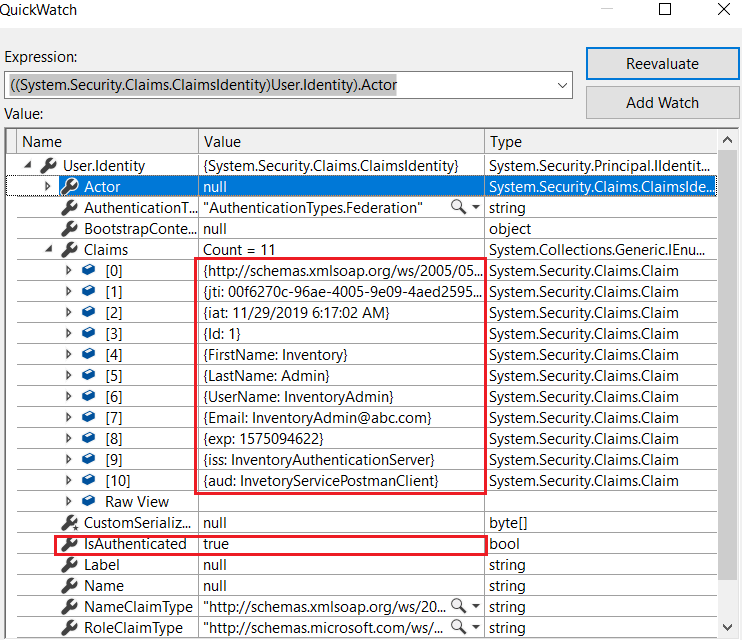
- In code-behind, when we pass the authorization header to the API, authentication middleware parses and validates the token. If it is found valid, it will set UIdentity.IsAuthenticated to true.
- The Authorize attribute added to the controller will check whether the request is authenticated. If it is true, the API can be accessed.
- If UIdentity.IsAuthenticated returns false, and a 401 unauthorized error will be returned.
- If you need to, you can read claims from Identity.
GitHub reference
For more information, refer to the project on GitHub.
Note: Extract the application, change the connection string in the appsettings.json file that points to your SQL Server, and then run the application.
Conclusion
Thanks for reading! In this blog, we have learned how to create a REST API using ASP.NET Core 3.1 and Entity Framework Core to perform basic CRUD operations, create a JWT token, and secure the API. I hope you found this blog useful.
Syncfusion provides high-performance, lightweight, modular, and responsive ASP.NET Core UI controls such as DataGrid, Charts, and Scheduler. You can use them to improve your application development.
Please share your feedback in the comments section. You can also contact us through our support forum, support portal, or Feedback Portal. We are waiting to hear your feedback!
 No spam, just valuable updates.
Comments (225)
Pretty sure jwt stands for Json web token not java web token .
Hi PAULO CARVALHO,
Thanks for notifying typo. Yes, JWT stands for JSON Web Token. We have updated in the blog.
Thanks,
Kannan Eswar.
Hi Sir, How can we add role based authorization in this example.
Hi SUSHIL KUMAR,
To enable role based authorization please make the following changes,
Step 1: Add role name into claim when generating token as below (Note below I have hardcode role name, you can load from user details)
new Claim(“role”, “Admin”)
Step 2: Add authorize header with role name as below,
[Authorize(Roles = “Admin”)]
Step 3 : Generate new token. Copy the token and Prepend text Bearer and pass in Authorization header.
Step 5: Now only user with Admin role can able to access your API.
Thanks,
Kannan Eswar.
Thanks. The only issue (not just with roles) is that if you want to revoke a user’s “admin” role, you can’t, until their token expires, as I understand it.. That sucks!
You need to update your blog now, as it does not help those who want to learn
I cannot post a separate comment, hence inserting my comment.
Thanks for the article without any strings attached, plain and simple, it is still very relevant even now.
I was able to run the same with slight modification in VS 2022 Preview (Entity framework latest Nuget upate and “endpoints.MapControllers().AllowAnonymous();” to avoid JWT for testing. It worked.
But how do you see yourself now after vs2022 preview have T4 Code generation comes by default? I wanted to hear your views.
Sooo, JWT stands for Java Web Token….
…
Kind of a big, weird typo there.
jwt.io
Hi JELLE,
Thanks for notifying typo. Yes, JWT stands for JSON Web Token. We have updated in the blog.
Thanks,
Kannan Eswar.
JWT stands for JSON Web Token, not Java Web Token.
What you you’ve described is also not RESTful, it’s just an HTTP JSON API that’s using some RESTful constraints.
None the less a useful article.
Hi JONNY,
Thanks for your feedback. Yes, JWT stands for JSON Web Token. We have updated in the blog.
Yes, here applied main constraints that needed for an Web API to be considered as RESTful.
To know more about RESTful API refer the below article,
https://hackernoon.com/restful-api-designing-guidelines-the-best-practices-60e1d954e7c9
https://mathieu.fenniak.net/the-api-checklist/
Thanks,
Kannan Eswar.
Hi, this tutorial use localDB in microsoft visual studio or we need to download sql server?
Hi NUBNLEARN,
You can also use Visual Studio localDB to create REST API.
Thanks,
Kannan Eswar.
Hi Edward,
Typo. jwt stands for JSON Web Token
Hi INDIRA RAKESH,
Thanks for notifying typo. Yes, JWT stands for JSON Web Token. We have updated in the blog.
Thanks,
Kannan Eswar.
Hi Kannan,
Did you have the source code available anywhere e.g. github?
Thanks.
Hi STEVEN WHITEHEAD,
Yes, sample application source code shared in the below GitHub location,
https://github.com/SyncfusionExamples/inventory-management-rest-service-asp-dotnet-core
Note: Extract the application, change the connection string in the appsettings.json file that points to your SQL Server, and then run the application.
Thanks,
Kannan Eswar.
Great job. Great direction without the fluff. Thank you.
Hi JOHN SMITH,
Thanks for your feedback.
Thanks,
Kannan Eswar.
JWT is JSON Web Token, isn’t it?
Hi ZOKEER,
Thanks for notifying typo. Yes, JWT stands for JSON Web Token. We have updated in the blog.
Thanks,
Kannan Eswar.
I very good article. I was quite a good one to get the hang of how JWT works. Keep it up.
Hi AK HASANUZZAMAN,
Yes sure, thanks for your feedback.
Thanks,
Kannan Eswar.
Excellent post with great no-nonsense examples and explanations. I’ve used Identity Server but wanted something simpler for a new project. The JWT creation and validation in this post is exactly what I needed. Plus the EF scaffolding from an existing DB is great to know. Thank You!
Hi ALEX C,
I am glad to hear that this blog helped you.
Thanks,
Kannan Eswar.
can you share code in github?
Hi SAEED ABDULLAH,
Please find the sample application’s source code in the below GitHub location,
https://github.com/SyncfusionExamples/inventory-management-rest-service-asp-dotnet-core
Note: Extract the application, change the connection string in the appsettings.json file that points to your SQL Server, and then run the application.
Thanks,
Kannan Eswar.
missing the field ” Password ” on create the table UserInfo.
Hi ARTHUR,
Thank you for notifying, we have now added password field on UserInfo table create query.
Thanks,
Kannan Eswar.
hi,
how i capture current date once i create signature
Thanks for this useful blog post. I currently using Java and JAX-RS so it’s very useful to see it from a .NET perspective and it does seem very clean.
I am curious about the use of JWT from a mobile app consumption perspective. If I wanted to prevent someone learning an API key then I assume they could install a certificate in the middle and then use that JWT token in postman for example. Is there a more secure way of an app using a hidden/encrypted API key, maybe different per authenticated user?
Hi ROB,
Thanks for your feedback. Please find my comments,
How to prevent JWT token being captured at transits?
– By securely transferring token using SSL, it cannot be watched in transits.
How to prevent JWT token being captured from mobile application?
– We need to use short-lived token, and before expiry we need to regenerate token using the refresh token. You can find more about refresh token from below links,
http://docs.identityserver.io/en/latest/
http://docs.identityserver.io/en/latest/topics/refresh_tokens.html
Whether do you refer JWT token as API Key?
Thanks,
Kannan Eswar.
Wow,
This has been one of the best blogs to follow through.
Thank you for sharing such great knowledge on Securing Web APIs using JWT.
Kind regards,
NB: I would like to talk to you on Cross Platform Mobile Application Development,
can you inbox me on that email.
Hi WYCLIFFE MUTUMBA,
Thanks for your feedback.
Regarding Cross Platform Mobile Application Development contact [email protected]
Thanks,
Kannan Eswar.
Hi,
I am getting Unauthorized response while running api/product. I put the exact token which i got from api/token api. What to do.. i am stuck on this.
Hi TIYA SHARMA,
Please make sure that you have prepended the text Bearer with the copied token, as mentioned in step 4.
Thanks,
Kannan Eswar.
Good morning,
I tried your example and it works fine, I have only one doubt: you set “Audience” for postman, how can I set the “Audience” for my angular app?
Hi MATTEO Z,
Audience refers to intended recipient of the token, it doesn’t care about who initiate the token creation.
So, you can set audience as any string that refers to your Resource Server (API server), refer the below link for more details,
https://tools.ietf.org/html/rfc7519#section-4.1.3
Thanks,
Kannan Eswar.
hello, i didnt created the exact tables like u , mine are product and category, so how i do control the table category ,the second table i add a new controller ?
Hi AHMED MUSTAFA,
Yes, you can create new scaffolding controller for category table as how we did for product table.
And add authorize attribute at controller level to secure the category API. Now you can consume the category API by passing token in header.
Thanks,
Kannan Eswar.
Good one Kannan,
Please note to make sure –> Key,Issuer,Audience length must be greater than 16 else will get below error
error:”TokenString.WriteToken(token) throws an exception of type ‘System.ArgumentOutOfRangeException'”
Can you please share Angular+ASP.netcore with JWT example
Regards
Santosh
Hi SANTOSH NAYAK,
Thanks for sharing valuable note.
Please refer the below articles for creating angular app with JWT authentication enabled,
https://www.freakyjolly.com/angular-json-web-token-authentication-tutorial-using-angular2-jwt/
https://medium.com/engineerbabu/angular-authentication-using-jwt-d846c5ce0ac6
Thanks,
Kannan Eswar.
Hi,
I token has been created but when using that token getting 401 error. Could you please let us know what the wrong?
Hi SHIWENDRA,
Please ensure the below items,
1. Ensure whether you are using Issuer, Audience, Key with authorization middleware (AddJwtBearer) same as what used when creating token.
2. Make sure that you have prepended the text Bearer with the copied token, as mentioned in step 4.
Thanks,
Kannan Eswar.
I’ve just followed this article through on my own environment and spotted a couple of issues.
1) IActionResult type is missing from the ProductController methods listed on the page. I was getting compilation errors on the code initially and couldn’t figure out why. It was only when I looked at the source code in GitHub that I realised I was missing the return Task type reference in the Controller Methods.
2) Jwt Authentication fails initially due to the Audience tag resolving to an empty string. In the page you add the authentication setup into the appsettings.json and use ClientID but the code is looking for an object name called Audience. Again, in your GitHub code, the appsettings.json references Audience not ClientID and once the object name has been changed in the appsettings.json file the authentication works as expected.
Aside from that, I found the article very informative and wanted to say thanks for writing it.
Hi JASON BROOMFIELD,
Thanks for notifying typos. We have updated in the blog.
Thanks,
Kannan Eswar.
Hi Kannan,
This was very helpful for a beginner like me who are not aware of JWT. The way you explained things was very good and clear. Easy to follow.Keep posting many articles…
Hi AMBIKA,
I am very happy to hear that this blog helped you.
Thanks,
Kannan Eswar.
Thank you for the article that really helped me, but I want to make a queue module for my hospital. The obstacle that I face is making retrieve data from the view table when inputting queue data
return CreatedAtAction (“GetQueue”, new {id = queue.QueueID}, queue);
how to get the data in the Post and response GET data menu from the view table
Thank you for the article
Hi BIMA ROY MANULLANG,
By default, CreatedAtAction method will return the newly created object in the response with status code 201 as below,
In our inventory application, when create product success the following response will be returned,
Response Body:
{
“productId”: 11,
“name”: “Product Item 11”,
“category”: “Category ABC”,
“color”: “Red”,
“unitPrice”: 1000,
“availableQuantity”: 50
}
Response Header:
content-type →application/json; charset=utf-8
date →Mon, 02 Mar 2020 08:32:22 GMT
location →https://localhost:44305/api/Products/11
server →Microsoft-IIS/10.0
status →201
x-powered-by →ASP.NET
Thanks,
Kannan Eswar.
Thank you for your response Mr. KANNAN ESWAR I have proven it and indeed it is, but I only want to display some not as a whole, for example: {
“ProductId”: 11,
“Name”: “Product Item 11”,
“Category”: “Category ABC”}
or taken from a different controller
Please help
Hi BIMA ROY MANULLANG,
Please find the code snippet for your case,
return CreatedAtAction(“GetProducts”, new { id = products.ProductId }, new
{
ProductId = products.ProductId,
Name = products.Name,
Category = products.Category
});
Here instead of returning whole product object, I have created anonymous object and returns whatever values we need.
Please find the output,
{
“productId”: 12,
“name”: “Product Item 8”,
“category”: “Category ABC”
}
Thanks,
Kannan Eswar.
Thanks KANNAN ESWAR
Hi,
How we host this Dotnet core API.
I got the 500.19 error while hosting this.
Can you help me on this?
Hi RAMIL,
I hope you are trying to host on Windows with IIS.
Please be sure to install the right version of .NET Core hosting bundle in that machine from the below link,
https://dotnet.microsoft.com/download/dotnet-core/3.1
Still you face any problems refer the below link,
https://docs.microsoft.com/en-us/aspnet/core/host-and-deploy/iis/index?view=aspnetcore-3.1
Thanks,
Kannan Eswar.
Thanks for the replay.
All methods are already tried, but still, I have the same issue.
This is an API I am trying to host.
Hi RAMIL,
I also faced this issue sometimes before and found root cause is not relevant .NET core hosting bundle was installed. After installing right version of .NET core hosting bundle, I able to consume API without any issues.
Also, please try the below troubleshooting links,
https://docs.microsoft.com/en-us/aspnet/core/host-and-deploy/azure-iis-errors-reference?view=aspnetcore-3.1
https://stackoverflow.com/questions/40805402/http-error-500-19-when-publish-net-core-project-into-iis
https://forums.asp.net/t/2121840.aspx?ASP+Net+Core+Publish+HTTP+Error+500+19+Internal+Server+Error
Thanks,
Kannan Eswar.
Great tutorial Kannan and very much appreciated.
Just a question on the HttpGet for the token. Since the Post returned something, the Task needed something, otherwise I got an error message. As you can see, I passed an object (Task), so that the token or failed request message would be returned. Is there a better way to do this, rather than use the Object? I guess, I could have to stringed everything as well for an alternative. But what would you suggest, as the best method?
Thanks again for the great job.
John
[HttpPost]
public async Task Post(UserInfo _userData)
{
if (_userData != null && _userData.Email != null && _userData.Password != null)
{
var user = await GetUser(_userData.Email, _userData.Password);
if (user != null)
{
//create claims details based on the user information
var claims = new[] {
new Claim(JwtRegisteredClaimNames.Sub, _configuration[“Jwt:Subject”]),
new Claim(JwtRegisteredClaimNames.Jti, Guid.NewGuid().ToString()),
new Claim(JwtRegisteredClaimNames.Iat, DateTime.UtcNow.ToString()),
new Claim(“Id”, user.UserId.ToString()),
new Claim(“FirstName”, user.FirstName),
new Claim(“LastName”, user.LastName),
new Claim(“UserName”, user.UserName),
new Claim(“Email”, user.Email)
};
var key = new SymmetricSecurityKey(Encoding.UTF8.GetBytes(_configuration[“Jwt:Key”]));
var signIn = new SigningCredentials(key, SecurityAlgorithms.HmacSha256);
var token = new JwtSecurityToken(_configuration[“Jwt:Issuer”], _configuration[“Jwt:Audience”], claims, expires: DateTime.UtcNow.AddDays(1), signingCredentials: signIn);
return Ok(new JwtSecurityTokenHandler().WriteToken(token));
}
else
{
return BadRequest(“Invalid credentials”);
}
}
else
{
return BadRequest();
}
}
Hi JOHN D. CUNDLE,
Actually there was a typo in token creation post method, that should return as Task<IActionResult>
Please try to change return type as Task<IActionResult> and you able to get token, we also updated same in the blog.
Thanks,
Kannan Eswar.
Thank you,
But how to destroy this token on logout?
Hi ANDRINIRINA NICOLAS,
JWT is self-contained stateless entity and it will not be stored in server. If you are using the token from front-end browser based application to consume the API, you can just remove those token from browser cookie or session.
Thanks,
Kannan Eswar.
pls change in article
public async Task Post(UserInfo _userData)
to
public async Task<IActionResult> Post(UserInfo _userData)
Hi TOMISLAV VALENT,
Thanks for notifying typo. We have updated it in the blog.
Thanks,
Kannan Eswar.
Very nice tutorial, thank you!
Struggled a bit with setting up sql server, the REST went well
Hi NICK,
Thanks for your feedback.
Thanks,
Kannan Eswar.
Kannan,
Realy good and useful
thanks a lot
Hi DHIREN NAIK,
I am very happy to hear that this blog helped you.
Thanks,
Kannan Eswar.
very helpful thanks <3
Hi Kannan,
Thanks for very useful blog.
I have added [Authorize] attribute with needed roles on PUT method, after signing in with a username and password, I expect signed in user can edit its information, but it can also edit other users’ information.
How can I prevent this?
Hi MEHDI,
Authorize attribute enable access to the PUT method if the current user’s role is equal to the role mentioned in attribute, it doesn’t enforce the restriction on the user’s information it edits.
Consider you mentioned role as ‘Admin’ in authorize attribute. Then all the user with admin role able to access the API and edit all the user’s information.
There are two ways you can achieve your scenarios,
– If you want to edit only current user details, then you can add custom authorize filter, there you can check UserId of token (Read userd from claims) is equal to the user information it going to edit. And add this filter attribute to the PUT method.
– Or within PUT method you can check UserId of token (Read userd from claims) is equal to the user information it going to edit.
Let me know if any queries.
Thanks,
Kannan Eswar.
So much thanks Kannan
I hadn’t any check on signed in user in my methods so way 2 works for me.
Adding var userId = User.FindFirst(ClaimTypes.Name)?.Value; solved my problem.
Appreciated
I am always getting 401 Error even after following every steps. Please help. Thanks
Hi MATHEW,
Please make sure that you have prepended the text Bearer with the copied token and added with header, as mentioned in step 4 and 5.
Thanks,
Kannan Eswar.
Nice article! Thanks.
Thanks for the publication, I ask if you will have a post that handles authentication under the oauth2 protocol.
Hi CARLOS,
In this we have followed the OAuth 2 specification to generate and validate the JWT token. Here sample application acts as Identity server (generates token) and resource server (consumes token and allows access to resources).
We have followed the Password Grant type to generate token.
If you need more Grant types support and some advanced features you can go with IdentityServer4. Please find the details below
https://identityserver4.readthedocs.io/en/latest/
Thanks,
Kannan Eswar.
Thank you for this very good post with simple, no-nonsense examples and explanations!
I saved it in my bookmarks.
Hi GIANLUCA,
Thanks for your feedback.
Thanks,
Kannan Eswar.
Hello excellent article.I wanted to know how to set the validity time of the token?
Hi ZAKARIA,
In the code snippet you can see how we set validity of the token (when it need to expire),
var token = new JwtSecurityToken(_configuration[“Jwt:Issuer”], _configuration[“Jwt:Audience”], claims, expires: DateTime.UtcNow.AddDays(1), signingCredentials: signIn);
In the sample application I have set validity as 1 day.
Thanks,
Kannan Eswar.
Thank you!
Hi Zakaria,
`Install-Package IdentityModel.Tokens.Jwt -Version 5.6.0` didn’t work for me, I tried with `Install-Package System.IdentityModel.Tokens.Jwt -Version 5.6.0`. By the way I am using Visual Studio 2019 and Asp.net core 3.1
Sorry I meant Kannan,
Thank you for the wonderful article kannan, Very informative and simple to understand.
Thanks
Uma
Hi UMAMAHESWARARAO MEKA,
Thanks for your feedback.
Actually there was a mistake in the NuGet package name mentioned in the blog, change as below and install.
Install-Package System.IdentityModel.Tokens.Jwt -Version 5.6.0
We have updated in the blog.
Thanks,
Kannan Eswar.
Step 4: Prepend text Bearer with this token, and finally you will have a token as follows.
How to use without Bearer text or Set text Bearer in token value
Hi BIMA ROY MANULLANG,
You can append with token and return as below,
return Ok(“Bearer ” + new JwtSecurityTokenHandler().WriteToken(token));
Thanks,
Kannan Eswar.
Thank you for the help
Awesome step by step. Much Appreciated
🙂
Thanks a lot!, great post!
How make response token this format : i am try but i can’t
{
“response”: {
“token” : “Bearer eyJhbGciOiJIUzI1NiIsInR5cCI6IkpXVCJ9.eyJzdWIiOi…..”
},
“metadata”: {
“message”: “Ok”,
“code”: 200
}
}
Hi BIMA ROY MANULLANG,
For your scenario return the token result as below,
return Ok(new
{
response = new
{
token = “Bearer ” + new JwtSecurityTokenHandler().WriteToken(token)
},
metadata = new
{
message = “Ok”,
code = 200
}
});
And the token output will be returned as below,
{
“response”: {
“token”: “Bearer eyJhbGciOiJIUzI1NiIsInR5cCI6IkpXVCJ9.eyJzdWIiOiJJbnZlbnRvcnlTZXJ2aWNlQWNjZXNzVG9rZW4iLCJqdGkiOiJlZDliNDMyZC0wZTc5LTQ1OGMtYjM4ZS0zYzYxNjQ5Y2JhMTYiLCJpYXQiOiI0LzEzLzIwMjAgNTowMzo0MSBBTSIsIklkIjoiMSIsIkZpcnN0TmFtZSI6IkludmVudG9yeSIsIkxhc3ROYW1lIjoiQWRtaW4iLCJVc2VyTmFtZSI6IkludmVudG9yeUFkbWluIiwiRW1haWwiOiJJbnZlbnRvcnlBZG1pbkBhYmMuY29tIiwiZXhwIjoxNTg2ODQwNjIxLCJpc3MiOiJJbnZlbnRvcnlBdXRoZW50aWNhdGlvblNlcnZlciIsImF1ZCI6IkludmV0b3J5U2VydmljZVBvc3RtYW5DbGllbnQifQ.49CIIhfhs3Qy1_w4H6MuJRAGtnRpXfBX4_O1bQzFJsY”
},
“metadata”: {
“message”: “Ok”,
“code”: 200
}
}
Thanks,
Kannan Eswar.
Great tutorial, thank you very much. I couldn’t find such a tutorial in asp.net documentation, neither in identity nor in web api sections so thank’s a lot, that really helped.
Hi OZAN YASIN DOGAN,
I am very happy to hear that this blog helped you.
Thanks,
Kannan Eswar.
Great tutorial, thank you very much. May I know that is there any good article like this for refresh token too.
HI JOJO,
Thanks for your feedback.
The steps for Refresh token workflow will be as below,
1. Create refresh token (with some random characters) along with JW token creation.
2. Store the refresh token into database with expiry date, user id and actual JWT token (or necessary claims).
3. When user pass refresh token to server, check the refresh token against database. If refresh token is valid create new JWT token and return to user.
Please refer the below link to know more about Refresh Token,
http://ericsmasal.com/2018/06/14/refresh-tokens-in-asp-net-core-2-api/
https://www.c-sharpcorner.com/article/handle-refresh-token-using-asp-net-core-2-0-and-json-web-token/
Thanks,
Kannan Eswar.
When I add the TokenController to the contoller folder, and paste the code, get a whole bunch of errors that prevent me from lounching the code and and getting the JWT Token in order to move forward. What I am doing wrong?
https://github.com/brunomoita/InventoryService
For me it’s not working when I add the TokenController.cs to the COntroller folder:
Severity Code Description Project File Line Suppression State
Error CS0815 Cannot assign void to an implicitly-typed variable InventoryService
Severity Code Description Project File Line Suppression State
Error CS1503 Argument 1: cannot convert from ‘string’ to ‘System.IO.BinaryReader’ InventoryService
Severity Code Description Project File Line Suppression State
Error CS1503 Argument 1: cannot convert from ‘string’ to ‘System.IO.BinaryReader’ InventoryService
Severity Code Description Project File Line Suppression State
Error CS1503 Argument 1: cannot convert from ‘string’ to ‘System.IO.BinaryReader’ InventoryService
Severity Code Description Project File Line Suppression State
Error CS1503 Argument 1: cannot convert from ‘string’ to ‘System.IO.BinaryReader’ InventoryService
Severity Code Description Project File Line Suppression State
Error CS1503 Argument 1: cannot convert from ‘string’ to ‘System.IO.BinaryReader’ InventoryService
Severity Code Description Project File Line Suppression State
Error CS1997 Since ‘TokenController.GetUser(string, string)’ is an async method that returns ‘Task’, a return keyword must not be followed by an object expression. Did you intend to return ‘Task’? InventoryService
Hi BRUNO,
Actually there was a typo in the line number 68, return type UserInfo is missed, which causes the issues.
private async Task GetUser(string email, string password)
{
return await _context.UserInfo.FirstOrDefaultAsync(u => u.Email == email && u.Password == password);
}
That should change as below,
private async Task<UserInfo> GetUser(string email, string password)
{
return await _context.UserInfo.FirstOrDefaultAsync(u => u.Email == email && u.Password == password);
}
We have also updated in the blog. Please change as above and try again.
Thanks,
Kannan Eswar.
Hi Kannan, thank you for the great Tutorial, only question I have is that I am battling to publish my API onto my Server which is running IIS. Do you perhaps have some advice or can you point me in the right direction? I cannot seem to connect to my API from outside even though I’ve checked that the ports are open on the firewall. How would I go about making this a part of my default website on IIS?
Hi CAREL GREAVES,
Please follow the below steps,
Step 1. Please be sure to install the right version of .NET Core hosting bundle in that machine from the below link,
https://dotnet.microsoft.com/download/dotnet-core/3.1
Step 2: Deploy ASP.NET Core application with IIS and choose port 80, then this will your default website, you can remove default website available in IIS or change that to some other port. (When you browse using server IP or domain name by default this website will be loaded)
Step 3: Ensure website working within server.
Step 4: Then enable inbound rule on port 80 from windows server firewall. And if your server is under Azure cloud, you need to enable port/endpoint from azure portal for that server.
Find more details on below link,
https://docs.microsoft.com/en-us/aspnet/core/host-and-deploy/iis/?view=aspnetcore-3.1#install-the-net-core-hosting-bundle
Thanks,
Kannan Eswar.
Amazing, thank you so muchKannan.
I had a challenge where I was trying to connect to the server where my solution was deployed from outside the internal environment when I ran the .exe file. I then found that it was listening on the local server ports and not non-local ports (RUN->CMD “netstat -a” for the win).
Another post I stumbled across trying to Google the problem lead me to a blog where they were discussing the issue and adding a Kestrel configuration endpoint into my appsettings.json file which made the app listen on non-local ports 0.0.0.0 instead of 127.0.0.1 and helped to resolve the problem.
https://stackoverflow.com/questions/34212765/how-do-i-get-the-kestrel-web-server-to-listen-to-non-localhost-requests
The solution I found that worked is below, but I will try your suggestion as I may need to host the app inside IIS as some stage.
Added the Kestrel section to my appsettings.json file
“Kestrel”: {
“EndPoints”: {
“Http”: {
“Url”: “http://0.0.0.0:5002”
}
}
},
“Logging”: {
“LogLevel”: {
“Default”: “Information”,
“Microsoft”: “Warning”,
“Microsoft.Hosting.Lifetime”: “Information”
}
},
Thanks
Kind regards,
Carel Greaves
Hi CAREL GREAVES,
Happy to hear that you found solution.
Thanks,
Kannan Eswar.
The system cannot find the file specified.
Getting this error when deployed to azure working fine in local
Hi SOWJANYA,
I hope you are publishing into azure app service and published successfully. I have published to azure app service and able to run without any issues.
Follow the below steps to check all files are published to azure,
Step 1: In the below URL replace {appname} with your azure app service name.
https://{appname}.scm.azurewebsites.net/wwwroot/Step 2: Open it in browser and all the published files will be listed.
Step 3: Check if all your files are listed there, if any files are found missing, try to publish again and check.
Still if you face issues, you can check more details of error using ‘Diagnose and solve problems’ from azure app service.
Thanks,
Kannan Eswar.
Nice Explanation. Using postman its good. What about when consuming the API from a different web application? How can we implement JWT there?Any article of yours or suggested article.
Thanks.
Hi PRASHANT,
I hope you are trying to integrate JWT with Single Page application (SPA),
Please find the article that talks about how to consume REST API from angular application,
https://www.techiediaries.com/angular/angular-8-7-tutorial-example-rest-api-httpclient-get-ngfor/
Please find the articles which talks about how to integrate JWT authentication with client application,
https://bezkoder.com/angular-jwt-authentication/
https://www.syncfusion.com/blogs/post/best-practices-for-jwt-authentication-in-angular-apps.aspx
Thanks,
Kannan Eswar.
With this tutorial how Can I add email activation link for new register user, and login using Google and facebook auth, password reset.
Hi WEALTH,
The current sample application explained here supports Password Grant type with limited functionalities.
If you need full set of Identity server functionality you can go with IdentityServer4, it supports registering social login as external login provider, multiple Grant types and refresh token etc..
Please find more details below,
https://docs.microsoft.com/en-us/aspnet/core/security/authentication/identity?view=aspnetcore-3.1&tabs=visual-studio
https://identityserver4.readthedocs.io/en/latest/
Thanks,
Kannan Eswar.
Nice tutorial. I created two tables one is order table the second one is product table, they are link with relationship ProductId, I want to perform operation when order is created , available quantity field should be reduce by the amount of quantity order. I want the quantityavailable of the product order should be reduce.
Field in order table are ProductName, Category,Price, Quantity, Amount
Field in product table ProductName,Category, AvailableQuantity
Second question how can I perform logical calculation of Price * Quantity save the total inside database. Thanks
Hi OLU,
Step 1: As explained in the blog, you have to create Scaffolding controller for Orders table.
Step 2: In the PostOrders action you can reduce available quantity and calculate order amount as below,
// POST: api/Orders
// To protect from overposting attacks, please enable the specific properties you want to bind to, for
// more details see https://aka.ms/RazorPagesCRUD.
[HttpPost]
public async Task<ActionResult<Orders>> PostOrders(Orders order)
{
var product = _context.Products.Find(order.ProductId);
product.AvailableQuantity -= order.Quantity;
order.Amount = order.Quantity * product.UnitPrice;
_context.Orders.Add(order);
await _context.SaveChangesAsync();
return CreatedAtAction(“GetOrders”, new { id = order.Id }, order);
}
Thanks,
Kannan Eswar.
Really nice post! I am new to .Net, so this post really speeds up my learning curve. Thanks for posting
i got 12 errors when i post this code inside my postorders , what am i getting wrong
?
using System;
using System.Collections.Generic;
using System.Linq;
using System.Threading.Tasks;
using Microsoft.AspNetCore.Http;
using Microsoft.AspNetCore.Mvc;
using Microsoft.EntityFrameworkCore;
using InventoryService.Models;
namespace InventoryService.Controllers
{
[Route(“api/[controller]”)]
[ApiController]
public class OrdersController : ControllerBase
{
private readonly InventoryContext _context;
public OrdersController(InventoryContext context)
{
_context = context;
}
// GET: api/Orders
[HttpGet]
public async Task<ActionResult<IEnumerable>> GetOrders()
{
return await _context.Orders.ToListAsync();
}
// GET: api/Orders/5
[HttpGet(“{id}”)]
public async Task<ActionResult> GetOrders(int id)
{
var orders = await _context.Orders.FindAsync(id);
if (orders == null)
{
return NotFound();
}
return orders;
}
// PUT: api/Orders/5
// To protect from overposting attacks, enable the specific properties you want to bind to, for
// more details, see https://go.microsoft.com/fwlink/?linkid=2123754.
[HttpPut(“{id}”)]
public async Task PutOrders(int id, Orders orders)
{
if (id != orders.OrderId)
{
return BadRequest();
}
_context.Entry(orders).State = EntityState.Modified;
try
{
await _context.SaveChangesAsync();
}
catch (DbUpdateConcurrencyException)
{
if (!OrdersExists(id))
{
return NotFound();
}
else
{
throw;
}
}
return NoContent();
}
// POST: api/Orders
// To protect from overposting attacks, enable the specific properties you want to bind to, for
// more details, see https://go.microsoft.com/fwlink/?linkid=2123754.
[HttpPost]
public async Task PostOrders(Orders orders)
{
var product = _context.Products.Find(orders.ProductId);
product.AvailableQuantity -= Convert.ToInt32(orders.Quantity);
orders.Amount = Convert.ToInt64( orders.Quantity * product.UnitPrice);
_context.Orders.Add(orders);
await _context.SaveChangesAsync();
return CreatedAtAction(“GetOrders” new { id = orders.OrderId }, orders);
}
}
// DELETE: api/Orders/5
[HttpDelete(“{id}”)]
public async Task<ActionResult> DeleteOrders(int id)
{
var orders = await _context.Orders.FindAsync(id);
if (orders == null)
{
return NotFound();
}
_context.Orders.Remove(orders);
await _context.SaveChangesAsync();
return orders;
}
private bool OrdersExists(int id)
{
return _context.Orders.Any(e => e.OrderId == id);
}
}
}
Hi @OLU,
There was a small typo in that comment. Now I have fixed that typo and modified the comment made on April 30th.
Please use that updated example.
Thanks,
Kannan Eswar.
How do you do authorization, with each user can edit its own content, not other peoples content in .net?
Hi JZ,
For your request,
There are two ways you can achieve your scenario,
– If you want to edit only current user details, then you can add custom authorize filter, there you can check UserId of token (Read userd from claims) is equal to the user information it going to edit. And add this filter attribute to the PUT method.
– Or within PUT method you can check UserId of token (Read userd from claims) is equal to the user information it going to edit.
Thanks,
Kannan Eswar.
Dear KANNAN ESWAR,
Can you help me make response mode in
{
“response”: {
“list”: [
{
“productId”: 1,
“name”: “Product Item 1”,
“category”: “Category ABC”,
“color”: “Red”,
“unitPrice”: 1000,
“availableQuantity”: 50
},
{
“productId”: 3,
“name”: “Product Item 3”,
“category”: “Category GHD”,
“color”: “Blue”,
“unitPrice”: 1000,
“availableQuantity”: 50
}
]
},
“metadata”: {
“message”: “OK”,
“code”: 1,
“totalitems”: 2
}
}
before that I say many thanks
Hi BIMA ROY MANULLANG,
Please find the code snippet to get the requested result,
—————————————————————————————————————————————
[HttpGet]
public async Task<ActionResult<IEnumerable<object>>> GetProducts(bool? inStock, int? skip, int? take)
{
var products = _context.Products.AsQueryable();
int totalItems;
if (inStock != null) // Adds the condition to check availability
{
products = _context.Products.Where(i => i.AvailableQuantity > 0);
}
totalItems = products.Count();
if (skip != null)
{
products = products.Skip((int)skip);
}
if (take != null)
{
products = products.Take((int)take);
}
return Ok(new
{
response = new
{
list = await products.Select(p => new
{
productId = p.ProductId,
name = p.Name,
category = p.Category,
color = p.Color,
unitPrice = p.UnitPrice,
availableQuantity = p.AvailableQuantity
}).ToListAsync()
},
metadata = new
{
message = “Ok”,
code = 1,
totalitems = totalItems
}
}); ;
}
——————————————————————————–
Output:
{
“response”: {
“list”: [
{
“productId”: 2,
“name”: “Product 1”,
“category”: “Category 1”,
“color”: “Black”,
“unitPrice”: 100,
“availableQuantity”: 20
},
{
“productId”: 4,
“name”: “Product 3”,
“category”: “Category 1”,
“color”: “Red”,
“unitPrice”: 100,
“availableQuantity”: 100
}
]
},
“metadata”: {
“message”: “Ok”,
“code”: 1,
“totalitems”: 2
}
}
Thanks,
Kannan Eswar.
Thank you for this tutorial!!
Could you explain to us how to password reset sending token by email?
Thank you again!
Hi ALEJANDRO,
Please refer the below article about how to implement password reset using asp.net core.
https://code-maze.com/password-reset-aspnet-core-identity/
Thanks,
Kannan Eswar.
Great tutorial, I would like to know if with this example, the way to give roles to the users having the tables in sqlserver of Users and Roles
Hi YOEL.
For including the support of roles follow the below steps,
Step 1: Create Roles table and add RoleId in Users table
Step 2: Add role name into claim when generating token as below (Note below I have hard-coded role name, you can load it from roles table)
new Claim(“role”, “Admin”)
Step 3: Add authorize header with role name as below,
[Authorize(Roles = “Admin”)]
Step 4: Now only user with Admin role can able to access your API.
Thanks,
Kannan Eswar.
Dear Kannan,
Thanks for such a nice blog. Even I am fine with most of this topic concepts but still loved to read and found it interesting. I have one question, what is the best convention to read the claims principal from existing token and create the new one. So rather than giving new claims list every time. But the problem is we already have tokenId as one in the claims list(jit) and would like to replace it with the new one also we would require to set the expiry of the new token. Does it keep expiry and is itself and we don’t need to add these into claims list or how it is?
Give me best conventional way to do this. Thanks
Hi MUHAMMAD,
Please find the answer for your queries,
1. What is the best convention to read the claims principal from existing token and create the new one
You able to read the claims from User.Identity property within the controller action, as below.
var identity = User.Claims.ToList();
var username = User.HasClaim(a => a.Type == “UserName”) ? identity.FirstOrDefault(c => c.Type == “UserName”).Value : null;
var email = User.HasClaim(a => a.Type == “Email”) ? identity.FirstOrDefault(c => c.Type == “Email”).Value : null;
2. But the problem is we already have tokenId as one in the claims list(jit) and would like to replace it with the new one
You can read other claims from existing token as above and set new tokenId and create token.
3. Does it keep expiry and is itself and we don’t need to add these into claims list or how it is?
We need to pass expiry explicitly when you create token. See below I have added expiry as one day. We no need to add expiry into claims.
var token = new JwtSecurityToken(_configuration[“Jwt:Issuer”], _configuration[“Jwt:Audience”], claims, expires: DateTime.UtcNow.AddDays(1), signingCredentials: signIn);
Thanks,
Kannan Eswar.
Great job!
I did find a bug however on the step:
Follow these steps to create a product:
Following your directions explicitly lead to this error:
(0x80131904): Cannot insert explicit value for identity column in table ‘Products’ when IDENTITY_INSERT is set to OFF.
The problem is that the instructions lead you to try to insert a value in the auto-increment field ProductID – see error message above.
The solution I found was to add the line:
products.ProductId = 0;
right after:
public async Task<ActionResult> PostProducts(Products products)
{
in the file ProductsController.cs
Regards,
Len
Hi LEN HANNAM,
Yes we don’t try to insert the value for auto increment identity column.
Actually if you don’t pass the ProductId to the POST API, it will be implicitly set as 0. You need not explicitly set the value 0 for ProductId.
In the postman POST API call, I haven’t passed ProductId. Hence values will be set to 0 and insert will work without any issues.
Thanks,
Kannan Eswar.
Hi Sir,
I published the web service and runtime 3.1.4 also installed
I am unable to receive a token and i am receiving error:
Error: connect ECONNREFUSED 127.0.0.1:44305
in PostMan.
can you please guide me where i am wrong.
Thank you for that article!
But how can we logout???
Hi GINO,
JWT is self-contained stateless entity.
Authorization server (Token provider) doesn’t store anything about generated token details in server.
If you are using the generated token from front end browser based application to consume API, you can simply remove those token from browser cookie or session.
Thanks,
Kannan Eswar.
Great tutorial; very helpful.
One question; if user credentials are stored on a table in the database, how can they be protected but still allow login? For example when a user is logging in, they have not yet been authorized, but I need to be able to hit the web service to see whether the user/password is valid.
Hi Derek,
Token generation(TokenController) API is open, without token we able to access it. The user can create token by passing the valid email and password to this API.
All other API’s are restricted access by adding Authorize attribute above the controller/action (By passing a valid token access will be granted).
Thanks,
Kannan Eswar.
The most important thing –
storing password as plain text is absolutely wrong practice.
Save to database the email and the encrypted password (hash). While fetching user info you compare then email and hash from sent password.
When somebody will get access to users table, with strong password, its very hard to get access to api data. Without password nobody cant get token.
…
private async Task GetUser(string email, string password)
{
var passHash= PasswordToHashEncryptFunc(password);
return await _context.UserInfo.FirstOrDefaultAsync(u => u.Email == email && u.Password == passHash);
}
Hi JANUSZ,
Thanks for your suggestions.
Yes, you are right the best practice is to store confidential details with encrypted format in database. With encrypted password even user get access to database, they cannot generate JWT token and access API.
Thanks,
Kannan Eswar.
Hi!
In microsofts website I only found SQl Management studio 2018, is it fine with that also for your tutorial? 🙂
Hi YAXUM CEDENO,
Yes, you can use SQL Server Management Studio 18.
Thanks,
Kannan Eswar.
Hi!
I am following this guide and got an error when trying to copy in the code you gave us about the “GetProducts” code which was guided to put inside of the “productscontroller”. I have printed the code below so you see what code I am talking about. But first I will print below the error code I got after trying out your guide.
I got this error in the “productscontroller”
Severity Code Description Project File Line Suppression State
Error CS0305 Using the generic type ‘IEnumerable’ requires 1 type arguments AlkoPriser D:\Alkorunner\Alkorunner\AlkoPriser\AlkoPriser\Controllers\ProductsController.cs 28 Active
Severity Code Description Project File Line Suppression State
Error CS0029 Cannot implicitly convert type ‘System.Collections.Generic.List’ to ‘Microsoft.AspNetCore.Mvc.ActionResult’ AlkoPriser D:\Alkorunner\Alkorunner\AlkoPriser\AlkoPriser\Controllers\ProductsController.cs 47 Active
” [HttpGet]
public async Task<ActionResult> GetProducts(bool? inStock, int? skip, int? take)
{
var products = _context.Products.AsQueryable();
if (inStock != null) // Adds the condition to check availability
{
products = _context.Products.Where(i => i.AvailableQuantity > 0);
}
if (skip != null)
{
products = products.Skip((int)skip);
}
if (take != null)
{
products = products.Take((int)take);
}
return await products.ToListAsync();
}”
Hi YAXUM CEDENO,
There were small typos due to problem with encoding of code snippet. Now I have corrected those in this blog, copy the code snippet and try again.
Also you can download full source code from the below URL,
https://github.com/SyncfusionExamples/inventory-management-rest-service-asp-dotnet-core
Download and extract the source, change the connection string in the appsettings.json file that points to your SQL Server, and then run the application.
Thanks,
Kannan Eswar.
Hi!
Sorry feel so bad to ask so much… But I copied your repo and changed the appsettings.json to my Database.
Then I got a new error:
” error MSB1003: Specify a project or solution file. The current working directory does not contain a project or solution file.”
Hi YAXUM CEDENO,
I have downloaded, extracted and able to run without any issues.
I hope you are trying to run application from command line, and seems you are trying to run from incorrect location. Follow the below steps and try again,
• Checkout this project to a location in your disk.
• If you downloaded ZIP file then extract the source
• Change the connection string in the appsettings.json file that points to your SQL Server
• Open command line in same directory where appsetting file is present and execute dotnet run
• Open the application URL which shown in command line.
Thanks,
Kannan Eswar.
Hi!
I did the dotnet run and got this:
But was not able to get any results when oppening the URL..
info: Microsoft.Hosting.Lifetime[0]
Now listening on: https://localhost:5001
info: Microsoft.Hosting.Lifetime[0]
Now listening on: http://localhost:5000
info: Microsoft.Hosting.Lifetime[0]
Application started. Press Ctrl+C to shut down.
info: Microsoft.Hosting.Lifetime[0]
Hosting environment: Development
info: Microsoft.Hosting.Lifetime[0]
Great tutorial – really helped me get it up and running – now I just need to understand how it works.
Thanks for the point in the right direction!!
Hi PAUL,
I am glad to hear that this blog helped you.
Thanks,
Kannan Eswar.
Hi YAXUM CEDENO,
Since no product is available it shows empty. You need to add products using Postman as I explained in this blog.
Once you added few products, open the below url and you able to see product listing.
https://localhost:5001
Thanks,
Kannan Eswar.
Hi!
Thank you for your support!
I managed to follow the guide and got it to work!!!!
My next step has been to change the code so I can access my own database. However, when I run the application I get the 404 error message on my localhost. But I do not get any error in the code. (I have changed the model folder and controller so it will reflect on my own database). So I have a hard time to debugg and understand where I should look to fix the problem.
Do you have any good ideas what I should look for?
Hi Kannan,
Thank you for this very informative post. I am new to the world of securing REST APIs and tokens and would really appreciate some clarity regarding my particular use case. I have an ASP .NET Core MVC application that uses a .NET Core web API to get all of its data. This is an intranet application, so when users hit the web application since it’s running with Windows Authentication I know who the user is. We are using Telerik UI controls for JQuery in the web app so the calls to the API take place after the web is loaded. I need to secure the API. I am thinking that the process flow would look something like this:
– User hits web URL
– ASP .NET detects network credentials (user is logged in and authenticated on the domain)
– MVC controller calls API to get a token, passing a client id (and a certificate signing secret when running under TLS), and also passing the users network user id.
– Token is created with the network user id as a claim and passed back to the web app
– ASP .NET saves the encrypted token in a cookie with an expiration date
– Once the page is fully loaded, client side code gets the encrypted token and passes that in API calls in the header
– API is configured for authorization and will only return data when the cookie is valid
Does the above seem correct? As I said, I am new to the world of securing REST APIs so any help would be greatly appreciated!
Thanks,
Bill
Hi Kannan,
Thank you for your blog.It is very useful.
I am beginner ,i need to send mail after creating the new entry in database. Shall i implement the send email function in the same controller and call the function before returning the status.please help me with this.
Thanks in advance
Hi PON GEETHA,
Thanks for your feedback.
You can write email sending function in some other class and call that function from controller before returning the status. (It is not good practice to write more business logic in controller itself.)
Thanks,
Kannan Eswar.
Hi Kannan,
Your blog has helped me at lot to develop an api in core 3.1. There is just one issue which I can not resolve. I tried using your above-instructions and everything works fine except when I add [Authorize] to my Products.cs Controller. When I do this, it turns out a 401 Error. Please advice on this.
Thanks,
Bing Gelanga
Hello, I have faced the same issue 401.
Please call app.UseAuthentication(); method before you call app.UseMvc(); probably this will solve your problem. This order is also important.
Hi Bineesh,
Thanks for the reply. My order of app is
app.UseHttpsRedirection();
app.UseRouting();
app.UseAuthentication();
app.UseAuthorization();
app.UseEndpoints(endpoints =>
I tried app.UseMvc but it won’t work because I am using endpoint routing in core mvc 3.1
Hi, it is working! I found my error.
options.TokenValidationParameters = new TokenValidationParameters()
{
ValidateIssuer = true;
ValidateAudience = true;
ValidAudience = Configuration[“Jwt:Audience”];
ValidIssuer = Configuration[“Jwt:Issuer”];
IssuerSigningKey = new symmetricSecurityKey(Encoding.UTF8.GetBytes(Configuration[“Jwt:key”]));
};
I just changed the semi-colons to comma, generated new token, and run Products and it works.
options.TokenValidationParameters = new TokenValidationParameters()
{
ValidateIssuer = true,
ValidateAudience = true,
ValidAudience = Configuration[“Jwt:Audience”],
ValidIssuer = Configuration[“Jwt:Issuer”],
IssuerSigningKey = new symmetricSecurityKey(Encoding.UTF8.GetBytes(Configuration[“Jwt:key”]))
};
Thank you very much.
Thank you for such as great tutorial,
I have found in this blog, as you have mentioned I indeed have learned much of such a simple and not much complications on how to create a REST API using ASP.NET Core 3.1 and Entity Framework Core.
create a JWT token, and secure the API. Indeed this so meaningful and so useful since I am just a starter, thank you.
And thank for sharing the EF scaffolding from an existing DB. Indeed a great relieve on my part.
Hi Joao Correia,
Thanks for your feedback.
Thanks,
Kannan Eswar.
Everything works fine.
You could write more about the Audience, Issuer etc. (what is this and how it works or something) because e.g. I never made an API app and never used JWT before and now I have to go somewhere else to read about that from theoretical side, anyway really good article, thanks!
Hi PATRYK,
Audience:
Audience (aud) claim is a string value, represents the indented user (resource server) of the JWT token. The application who process the JWT, should match with one of the audience mentioned in this claim, otherwise JWT will be rejected.
https://tools.ietf.org/html/rfc7519#section-4.1.3
Issuer:
Issuer (iss) claim is a string value, represents the application who created the JWT token.
https://tools.ietf.org/html/rfc7519#section-4.1.1
In this current application, both audience and Issuer is same. In typical use case, JWT will be created by Identity server and will be validated by Resource server. Both of these claims are optional.
We can enable whether issuer and audience validation by using the below attribute,
options.TokenValidationParameters = new TokenValidationParameters()
{
ValidateIssuer = true,
ValidateAudience = true,
ValidAudience = Configuration[“Jwt:Audience”],
ValidIssuer = Configuration[“Jwt:Issuer”],
IssuerSigningKey = new symmetricSecurityKey(Encoding.UTF8.GetBytes(Configuration[“Jwt:key”]))
};
Thanks,
Kannan Eswar.
Hello Kannan,
Great blog. You have a talent of explaining complex subjects in an easy way.
I would like to add a little more complexity:
In my development I need to secure some methods with certificate so any client can access them but admin functionality need to be secured as in your blog.
Is it possible to protect GET methods in your example with certificate leaving the rest of the methods secured with JWT?
Thank you,
Paul.
Hi PAUL,
Yes, for same application you can enable more than one authentication scheme mentioned in the below link,
https://docs.microsoft.com/en-us/aspnet/core/security/authorization/limitingidentitybyscheme?view=aspnetcore-3.1
https://wildermuth.com/2017/08/19/Two-AuthorizationSchemes-in-ASP-NET-Core-2
And in controller/action you can specify which authentication scheme should project that APIs.
[Authorize(AuthenticationSchemes = AuthSchemes)]
Thanks,
Kannan Eswar.
Hi Kannan
Thanks for great article. I am able to create .net core rest web api project using JWT.
I have a separate .net core MVC web application, how can I get the token and retrieve data from web api database.
Thanks.
Tim
Hi TIM,
You can request JWT and consumes REST API from ASP.NET CORE MVC web application using HttpClient, refer the below link,
http://www.binaryintellect.net/articles/db752e63-8e07-4760-b7f2-a882e67636ce.aspx
Thanks,
Kannan Eswar.
Hello Kannan, excellent article, could you teach me how to create connections to two databases with their respective dbcontext. thank you
Hi John Hawer,
Follow the steps explained under section (Create database and connect it to application) to create context for the second database.
Once database context created, you can use to create API’s. If you want to use two contexts in same API, follow the below steps,
Step1: Add the second context in the controller constructor as below,
public class ProductsController : ControllerBase
{
private readonly InventoryContext _context;
private readonly SecondDBContext _ secondContext;
public ProductsController(InventoryContext context, SecondDBContext secondContext)
{
_context = context;
_ secondContext = secondContext;
}
Step2: And you can use that context in API to perform CRUD operations.
Thanks,
Kannan Eswar.
Great article Kannan. Is it possible to expose the service on a static IP, so it can be accessed over the internet. Or is that a bad practice?
Hi Nischal,
Please follow the below steps,
Step 1. Please be sure to install the right version of .NET Core hosting bundle in the machine (where you want to deploy your API), follow the below link,
https://dotnet.microsoft.com/download/dotnet-core/3.1
Step 2: Deploy ASP.NET Core application with IIS and choose port 80.
Step 3: Ensure that website is working within server by loading the website using machine’s internal IP address.
Step 4: Then, enable inbound rule on port 80 from windows server firewall. If your server is under Azure cloud, you need to enable port/endpoint from azure portal for that server.
Find more details on below link,
https://docs.microsoft.com/en-us/aspnet/core/host-and-deploy/iis/?view=aspnetcore-3.1#install-the-net-core-hosting-bundle
Thanks,
Kannan Eswar.
Thank you Kannan. This article has greatly helped my understanding of REST API using ASP.Net Core 3.1
and mssql.
Hi Pekun Aweda,
I am glad to hear that this blog helped you.
Thanks,
Kannan Eswar.
Hello, please can you create tutorial on entity relationship? something like this:
{
“apGroupId”: 5,
“apGrpName”: “Fifth Floory”,
“apDescription”: “Access point to Fifth floory”,
“accessPoints”: [
{
“accessID”: 1,
“accessport”: 25,
“apGroupId”: 5
},
{
“accessID”: 2,
“accessport”: 15,
“apGroupId”: 5
}
]
}
Hi OLAJIRE OLUWAFEMI,
You can find more details loading related child data on the below link,
https://docs.microsoft.com/en-us/ef/core/querying/related-data/
Thanks,
Kannan Eswar.
Hi Kannan,
Thanks for the Blog, it is very interesting.
I am encountering an error when adding the controller:
“No parameterless constructor defined for type WebApplication1.Models.MyDBContext”
Can you please help?
Thanks once again
Hi J CACHIA,
Seems you have missed to register inventory context in startup, follow the below steps,
1. Add the below lines in ConfigureServices of startup class.
var connection = Configuration.GetConnectionString(“InventoryDatabase”);
services.AddDbContextPool(options => options.UseSqlServer(connection));
2. Also add the connection string in app.settings.json,
“ConnectionStrings”: {
“InventoryDatabase”: “Server=*******;Database=Inventory;Trusted_Connection=True;”
},
Please try and let us know.
Thanks,
Kannan Eswar.
Hello!
Really good guide!
I am curious about adding a lot more get functions in the controller.
I have a plan to make get functions that can both filter on different variables and also make functions that can filter on prices and countries, etc
My question is then should I make all logic in the code that is existing already (See below the code I am talking about) ? Or should I make multple functions below.
CODE
[HttpGet]
public async Task<ActionResult<IEnumerable>> GetProducts(bool? inStock, int? skip, int? take)
{
var products = _context.Products.AsQueryable();
if (inStock != null) // Adds the condition to check availability
{
products = _context.Products.Where(i => i.AvailableQuantity > 0);
}
if (skip != null)
{
products = products.Skip((int)skip);
}
if (take != null)
{
products = products.Take((int)take);
}
return await products.ToListAsync();
}
Hi YAXUM,
You can use same get method by adding filter parameter based on your need.
Thanks,
Kannan Eswar.
Hi,
Thanks for the POST. Im following each. I have an issue. I am have two tables.
Tasks(Id, Name Description, State)
SubTasks(Id, Name,Description,State, TaskID (Foreign KEY))
Now, i followed the post and now have two models and two controllers. Now when i use get methods.
For the Tasks get Response, I have a new attribute in the JSON. an array of subtasks. which is empty.
For the SubTasks get Response, i get TaskID but also “TASK” : null.
WHY does this happen? How can i leave subtasks in the main task api and This last “Task” attribute in subtasks api.
Hi YASH SOMANI,
Please refer the below link to load related child and parent entities using ‘Include’ method of entity framework.
https://docs.microsoft.com/en-us/ef/core/querying/related-data/eager
Thanks,
Kannan Eswar.
Thanks for this article, It is truly helpful. I want to know, Just like ProductController/Product API if there are multiple APIs then how to use the same Token for multiple API calls to get a response from these APIs
Hi WASIM BAGWAN,
Yes, that same token you can use to secure all API’s in your project by adding authorize attribute at controller level as below
[Authorize]
[Route(“api/[controller]”)]
[ApiController]
public class ProductsController : ControllerBase
Regards,
Kannan Eswar.
How to create canceling JWT with Logout?
Hi THIEN NGUYEN,
Please refer the below blog,
https://blog.indrek.io/articles/invalidate-jwt/
Thanks,
Kannan Eswar.
Hi,
After changing the launch URL to api/products in launchSettings.js and clicking run (Run and test APIs using Postman) i get this “InvalidOperationException: No authenticationScheme was specified, and there was no DefaultChallengeScheme found. The default schemes can be set using either AddAuthentication(string defaultScheme) or AddAuthentication(Action configureOptions).” Any advice?
Cheers!
Hi PIAJEMPI,
Seems you have missed to add JwtBearer authentication scheme. Please refer ‘SECURE API ENDPOINT’ section and ensure you have followed all steps and try again.
Thanks,
Kannan Eswar.
Can you please do this without Entity Framework.
Hi Vicky Panchal,
Please refer the below articles to work with database using ADO.NET.
https://www.c-sharpcorner.com/article/database-operations-in-asp-net-core-web-api-using-ado-net2/
https://dzone.com/articles/creating-a-net-core-21-class-library-project-using
Regards,
Kannan Eswar.
hi KANNAN ESWAR,
why use api CURD in ASP Core and what are beniftes of usding it ? many thanks
Thanks for the excellent article. It was super easy to follow even for a noob like me. And appreciate staying on the blog and helping people having issues.
I made a few changes, I used visual studio code and Postgres DB instead of visual studio community edition and SQL server. I plan to post that code in GitHub referring to your code and blog, hope that is okay with you.
Hi GAJA KANNAN,
Thanks for your feedback. Yes, you can modify and post code in GitHub.
Thanks,
Kannan Eswar.
Hi,
This is a great article. I was wondering. How would you filter by Name as well as ID using Http Get?
Hi @GAVIN,
As showed in the demo we have implemented the below filters,
– inStock
– skip
– take.
Same way you can pass additional filter parameters for Name and ID and, you can make LINQ query changes in code to filter accordingly.
Thanks,
Kannan Eswar.
Hi
How to get JWT Key?
Please give me a steps for that.
Great and very helpful article, Kannan. help me save lots of time.
AC
Great article! I learned a lot! I like your easy to follow instructions! My only (minor) criticism is that I wish you wouldn’t put code snippets in images…. I need to copy and paste a lot these days since I injured my right hand… (it’s ok though … I’m a pretty fair ‘two fingered’ typist! LOL)
Hi LEN HANNAM,
You can find the complete source code in the below GitHub location,
https://github.com/SyncfusionExamples/inventory-management-rest-service-asp-dotnet-core
Thanks,
Kannan Eswar.
Is this a safe enough way to make an API for the public network? What are the ASP.Net Core safety best practices on the production environment?
Hi HDW,
Please find the basic steps,
1. Store JWT token securely in client side using HttpOnly cookie.
https://latesthackingnews.com/2017/07/03/what-is-httponly-cookie/
2. And we need to create short-lived JWT token and before expiry need to generate new token using refresh token option. Please find the steps about how to create refresh token and create JWT token using refresh token in the below article,
https://www.c-sharpcorner.com/article/handle-refresh-token-using-asp-net-core-2-0-and-json-web-token/
3. Transfer JWT token using SSL, it cannot be watched in transits.
Thanks,
Kannan Eswar.
Hi Kannan,
Thanks for the Blog, it is very interesting.
Can you make a blog post about converting above db first approach to code first approach, so that folders like migration files are generated.
Thanks once again
Hi SUDAM YASODYA,
Please find the articles that explains about code first approach,
https://code-maze.com/net-core-web-api-ef-core-code-first/
https://www.c-sharpcorner.com/article/code-first-approach-in-asp-net-core-mvc-with-ef-core-migration/
Thanks,
Kannan Eswar.
Thank you for this article. I was able to follow this article and create the service without much trouble. I will look through other articles as well.
Hello Sir,
I have followed all of your steps and also I added my SQL server and it ran perfectly But when I am trying to add a JWT token it showed up with an error at exactly this line FirstOrDefaultAsync saying – Object does not contain a definition for FirstOrDefaultAsync and no accessible extension method FirstOrDefaultAsync accepting a first argument of type object could be found are you missing a using directive or an assembly reference.
Hoping for help, and I tried all the fixes in the comment section, unfortunately, could not fix it
Hi ASHISH PANDEY,
Seems the problem is you may missed to add the below reference in using section in TokenController.
using Microsoft.EntityFrameworkCore;
Also you confirm you have added the all below items in using section and try again.
using InventoryService.Models;
using Microsoft.AspNetCore.Mvc;
using Microsoft.EntityFrameworkCore;
using Microsoft.Extensions.Configuration;
using Microsoft.IdentityModel.Tokens;
using System;
using System.IdentityModel.Tokens.Jwt;
using System.Security.Claims;
using System.Text;
using System.Threading.Tasks;
Thanks,
Kannan Eswar.
Thank you for sharing such useful information.
Hi Kannan,
Thanks for the Blog, Very Good explonation.
Can you make a blog for Using OneIdentiyServer and want to allow specific URLs
Hi!
When I followed this guide I got this message the first time and do not understand what the message wants me to provide?
“cmdlet Scaffold-DbContext at command pipeline position 1
Supply values for the following parameters:
Provider:”
Hi!
Sorry I found out that my real issue is that my password contains ” and destroys my password… Do you know how to solve this so I scaffold works with a “
Hi YAXUM CEDENO,
Refer the below link to resolve it,
https://stackoverflow.com/questions/49451319/dotnet-ef-scaffold-login-fails-for-user-sa-on-a-sqlserver-macos-linux
Thanks,
Kannan Eswar.
Hello,
Thank you so much for the article and it helped me a lot to understand about the JWT.
Can you please provide a basic asp.net core mvc with Openid or openauth application
Hi SURENDRA,
Refer the below articles to know more about ASP.NET Core with OpenID Connect and OAuth.
https://andrewlock.net/an-introduction-to-oauth-2-using-facebook-in-asp-net-core/
https://andrewlock.net/an-introduction-to-openid-connect-in-asp-net-core/
Thanks,
Kannan Eswar.
Sorry for the interruption,
The example is amazing .
I have a question, when I identify and receive the token, is it automatically saved in the browser or should I save it on the client side and send it every time.
When I turn on the API, using AJAX, do I need to store the token in request or is it done automatically ?!
If there is a example code in javascript that shows this I would be glad to get it.
In your example when I turn to the API through the postman I have to enter the token manually to the Authorization Header, but what do I do when I turn to the API using AJAX.
Hi JONATHAN NECHEMIA,
When receiving the JWT token, it wont be stored in browser by default. We need to store in local/session storage and use it.
Also in every API call you need to add that token in the authorization header.
Please refer the following blog which talks about how to handle JWT authentication in angular app,
https://www.syncfusion.com/blogs/post/best-practices-for-jwt-authentication-in-angular-apps.aspx
Thanks,
Kannan Eswar.
Gm Sir,
In Department column, there will be multiple departments like EC,EE,CS…..in this list of departments how to retrieve particular department like EC only….in get method of web api …is it possible by scaffolding method(Asp.net core 5.0)
Hi POORNIMA,
You can use the like query as mentioned in the below article,
https://gunnarpeipman.com/ef-core-like-operator/
Thanks,
Kannan Eswar.
error When add api controller Product
here is error
“The DbContext of type ‘InventoryContext’ cannot be pooled because it does not have a public constructor accepting a single parameter of type DbContextOptions or has more than one constructor. StackTrace:
”
Please tell me
Hi NUROHMAT,
Seems you may missed to remove empty InventoryContext constructor in InventoryContext.cs file.
Please recheck the ‘step 3’ in ‘Create database and connect it to application’ section.
Also you can check the source code of this sample application in the below GitHub repository.
https://github.com/SyncfusionExamples/inventory-management-rest-service-asp-dotnet-core
Thanks,
Kannan Eswar.
Hello,this was very helpful,But I have a question, Can this replace identity? or these steps are identity themselves?
Hi MED,
I hope you are asking about ASP.NET Core identity,
It doesn’t replace ASP.NET Core identity. ASP.NET Core identity handles user signup and other user management related operations. This blog talks about how JWT authentication works and how JWT secures API endpoint. You can use both ASP.NET Core identity and JWT authentication in single application.
Thanks,
Kannan Eswar.
Thanks, Kannan! This is one of the easy-to-follow blogs on how to secure web apis.
Hello, I would like to know how can I perform role authentication when my user table depends on the role table.
I mean with this that I have a login table and another of roles and one depends on the other, because the administrator I have it in such a way that it is enabled by id
Hi KETY GUTIERREZ,
To enable role based authorization please make the following changes,
Step 1: Add role name into claim when generating token as below (Note below I have hard-code role name, you can load from role table)
new Claim(“role”, “Admin”)
Step 2: Add authorize header with role name as below,
[Authorize(Roles = “Admin”)]
Step 3 : Generate new token. Copy the token and Prepend text Bearer and pass in Authorization header.
Step 5: Now only user with Admin role can able to access your API.
The same way you can restrict API access based on role of the user.
Thanks,
Kannan Eswar.
Sorry for the newbie question, but how do I know who issued my token?
(Where do I find the info on the authentication server?)
Hi CARRIE,
In JWT payload we already added the Issuer (iss) claim. It is a string value, represents the application who created the JWT token. In the Authentication server you can get this from claims.
Check the Step 5 of Secure API Endpoint section.
Thanks,
Kannan Eswar.
when i run web api i got error site is not working,what to do
Hi TANVI,
Try the complete source code in the below GitHub location,
https://github.com/SyncfusionExamples/inventory-management-rest-service-asp-dotnet-core
Still you face error, share the errors you received, it will help me to troubleshoot.
Thanks,
Kannan Eswar.
Hi,
I have a couple of questions . can you please clarify this?
1. I got a token from the server. I just passed it to someone to use this token. he could able to access the API with the token until it expires. How can we restrict this?
2.I got a token from the server with an expiry time of 15 min. before 15 min I hit token controller and got another token with an expiry time of 15 min. Now I have two tokens with valid time. will the two tokens work? or only the latest one?
if so how can we validate?
Hi Chandu Subhakara Reddy,
Please find my response,
Question 1:
If you share to someone, then they can also access. You should maintain the confidentiality of the JWT token.
Question 2:
Yes both token will work until its expiry time.
Thanks,
Kannan Eswar.
Hello,
Thanks a lot for the great article and the simple explanation.
I’ve implemented JWT authentication following your instructions and everything was working fine until I`ve tried to implement some role based authorization with Admin, Customer and Employee roles, following again explanation which you gave in comment from March 16, 2020.
When I use [Authorize(Role = “Admin”), I’m getting from Postman status 403.
Could you tell me what could be the reason?
Thanks!
Borislava
Hi BORISLAVA PARVANOVA,
Can you ensure whether you have followed the steps correctly,
Step 1: Add role name into claim when generating token as below (Note below I have hardcoded the role name, you can use from user details)
new Claim(“role”, “Admin”)
Step 2: Add authorize header with role name to the controller action to which you want to restrict as below,
[Authorize(Roles = “Admin”)]
Step 3 : Generate new token. Copy the token and Prepend text Bearer and pass in Authorization header.
Step 5: Now only the user with Admin role can able to access your API.
Note: I ensured the above steps and it works as expected and, restricts the user based on role.
Thanks,
Kannan Eswar.
Hi Kannan,
Thanks for your post, it’s a good start for me. I have couple of questions.
I. In the QuickWatch window you are seeing the value for: ((System.Security.Claims.ClaimsIdentity)User.Identity).Actor. In which point of the code and which method call should i keep a break point to see the contents as you have seen.
2. you said, “authentication middleware parses and validates the token. If it is found valid, it will set UIdentity.IsAuthenticated to true.” where can i debug for this property UIdentity.IsAuthenticated
Hi RAM,
Please find my comments,
Question 1 & Question 2:
User.Identity.IsAuthenticated and Claims details both you can see by debugging in any of the APIs in the ProductsController.
Thanks,
Kannan Eswar.
Thanks for you response!!!. I am able to see the value for User.Identity.IsAuthenticated. for this ((System.Security.Claims.ClaimsIdentity)User.Identity).Actor, in the ProductsController i don’t see the values you see as in your screenshot in the blog. Please suggest