

The Syncfusion ASP.NET MVC Dropdown Tree component is used to display and select data in hierarchical tree-like structure with a quick, readable UI.
In this blog, we are going to walk you through the steps to use the ASP.NET MVC Dropdown Tree component with an organization’s structure. Let’s say, for example, an accounts team wants to ensure the payslips of all employees before delivering them with a readable UI.
Initialize the Dropdown Tree
Before proceeding further, please go through the getting started UG documentation to render the Dropdown Tree component.
Add your Dropdown Tree component to the Index.cshtml file, as shown in the following code example.
@using (Html.BeginForm())
{
    <h1>Admin payslip application</h1>
    <table>
        <tr>
            <td>Select employee(s): </td>
            <td>
                <div id='container' style="margin: 10px auto; width:300px;">
                    @Html.EJS().DropDownTree("ddt").Placeholder("Select an employee").Render()
                </div>
            </td>
        </tr>
        <tr>
            <td></td>
            <td>@Html.EJS().Button("btn").Content("Show").Render()</td>
        </tr>
    </table>
}
Binding the data source
Bind the organization’s data source to the Dropdown Tree component in the controller page, as explained in the following code example.
public class HomeController : Controller
{
    public List<Employee> GetData()
    {
        List<Employee> Employees = new List<Employee>();
        Employees.Add(new Employee
        {
            EmpId = "1",
            EmpName = "Steven Buchanan",
            EmpImage = "10",
            Role = "General Manager",
            HasTeam = true,
            Expanded = true
        });
        Employees.Add(new Employee
        {
            EmpId = "2",
            ReportingEmpId = "1",
            EmpName = "Laura Callahan",
            EmpImage = "2",
            Role = "Product Manager",
            HasTeam = true
        });
        Employees.Add(new Employee
        {
            EmpId = "3",
            ReportingEmpId = "1",
            EmpName = "Nancy Davolio",
            EmpImage = "4",
            Role = "Product Manager",
            HasTeam = true
        });
        Employees.Add(new Employee
        {
            EmpId = "4",
            ReportingEmpId = "1",
            EmpName = "Janet Leverling",
            EmpImage = "3",
            Role = "HR",
            HasTeam = true
        });
        Employees.Add(new Employee
        {
            EmpId = "5",
            ReportingEmpId = "2",
            EmpName = "Andrew Fulle",
            EmpImage = "7",
            Role = "Team Lead",
            HasTeam = true
        });
        Employees.Add(new Employee
        {
            EmpId = "6",
            ReportingEmpId = "3",
            EmpName = "Michael Suyama",
            EmpImage = "9",
            Role = "Team Lead",
            HasTeam = true
        });
        Employees.Add(new Employee
        {
            EmpId = "7",
            ReportingEmpId = "5",
            EmpName = "Anne Dodsworth",
            EmpImage = "1",
            Role = "Senior Developer",
            HasTeam = true
        });
        Employees.Add(new Employee
        {
            EmpId = "8",
            ReportingEmpId = "5",
            EmpName = "Lilly",
            EmpImage = "5",
            Role = "Developer",
            HasTeam = true
        });
        Employees.Add(new Employee
        {
            EmpId = "9",
            ReportingEmpId = "6",
            EmpName = "Robert King",
            EmpImage = "8",
            Role = "Senior Developer",
            HasTeam = true
        });
        Employees.Add(new Employee
        {
            EmpId = "10",
            ReportingEmpId = "6",
            EmpName = "Mary",
            EmpImage = "6",
            Role = "Developer",
            HasTeam = true
        });
        return Employees;
    }
    public ActionResult Index()
    {
        ViewBag.Val = null;
        ViewBag.DataSource = this.GetData();
        return View();
    }
}
Map the fields in the source to the property fields of the Dropdown Tree component in index.cshtml.
@Html.EJS().DropDownTree("ddt").Placeholder("Select an employee").Fields(field =>
field.DataSource(ViewBag.DataSource).Value("EmpId").ParentValue("ReportingEmpId").Text("EmpName").HasChildren("HasTeam").Expanded("Expanded")
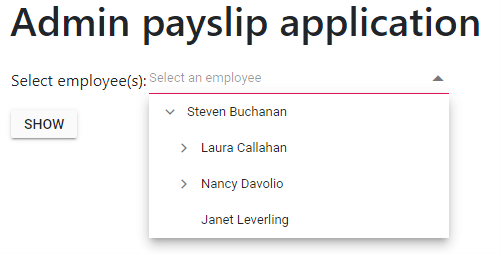
).Render()Now the component will be rendered similar to the following image.
Customizing the items
You can customize the Dropdown Tree items using ItemTemplate property to showcase a more readable and attractive UI in the Index.cshtml file, as shown in the following code example.
@Html.EJS().DropDownTree("ddt").Placeholder("Select an employee").CssClass("custom").Fields(field =>
    field.DataSource(ViewBag.DataSource).Value("EmpId").ParentValue("ReportingEmpId").Text("EmpName").HasChildren("HasTeam").Expanded("Expanded")
).ItemTemplate("<div><img class=\"eimage\" src=\"https://ej2.syncfusion.com/demos/src/drop-down-tree/images/employees/${EmpImage}.png\" alt=\"${EmpImage}\" /><div><div class=\"ename\">${EmpName}</div><div class=\"ejob\">${Role}</div></div></div>").Render()
Add the CSS to customize the items in the Index.cshtml page.
<style>
/* Customizing the Dropdown Tree items */
.e-ddt.custom .e-treeview .e-fullrow {
height: 72px;
}
.e-ddt.custom .e-treeview .e-list-text {
line-height: normal;
}
.e-ddt.custom .e-treeview .e-list-parent.e-ul {
width: 100%;
}
.custom .eimage {
float: left;
padding: 11px 16px 11px 0;
height: 48px;
width: 48px;
box-sizing: content-box;
}
.custom .ename {
font-size: 16px;
padding: 14px 0 0;
}
.custom .ejob {
font-size: 14px;
color: #979A9C;
opacity: .87;
padding: 5px;
}
/* Application level styles */
.layout {
width: 49%;
float: left;
height: 500px;
}
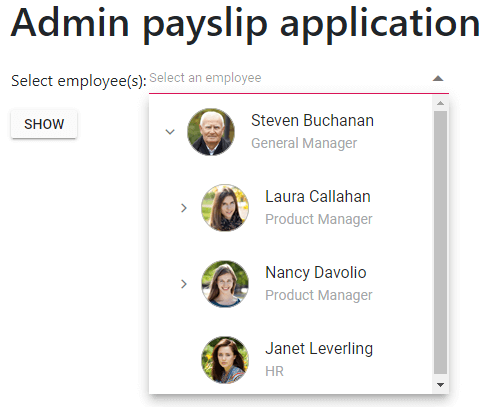
</style>Now the output will be similar to the following screenshot.
Multiple selection
You can enable multiple selection in the Dropdown Tree component using the ShowCheckBox property. Please refer to the following code example.
@Html.EJS().DropDownTree("ddt").Placeholder("Select an employee").CssClass("custom").ShowCheckBox(true).Fields(field =>
field.DataSource(ViewBag.DataSource).Value("EmpId").ParentValue("ReportingEmpId").Text("EmpName").HasChildren("HasTeam").Expanded("Expanded")
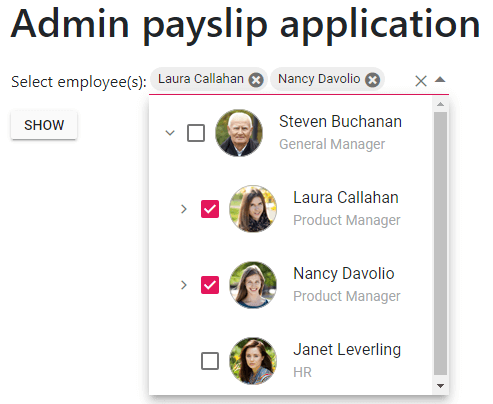
).ItemTemplate("<div><img class=\"eimage\" src=\"https://ej2.syncfusion.com/demos/src/drop-down-tree/images/employees/${EmpImage}.png\" alt=\"${EmpImage}\" /><div><div class=\"ename\">${EmpName}</div><div class=\"ejob\">${Role}</div></div></div>").Render()Now the output will look similar to the following screenshot.
Get the selected items in server-side
Get the selected items in the server-side using the Dropdown Tree component ID attribute. The string array represents the multiple values. During form submission, the selected Dropdown Tree values can be accessed.
[HttpPost]
public ActionResult Index(string[] ddt)
{
    ViewBag.DataSource = this.GetData();
}
Display the selected items payslip
Filter the payslip data from selected items and show these details in the main page. Please refer to the following code example.
public List<Payslip> GetPayslipData()
{
List<Payslip> Employees = new List<Payslip>();
Employees.Add(new Payslip
{
EmpId = "1",
EmpName = "Steven Buchanan",
Date = "1/1/2020",
Role = "General Manager",
Salary = "$5000",
Deductions = "$100",
NetSalary = "$4990"
});
Employees.Add(new Payslip
{
EmpId = "2",
EmpName = "Laura Callahan",
Date = "2/2/2020",
Role = "Product Manager",
Salary = "$1000",
Deductions = "$50",
NetSalary = "$950"
});
Employees.Add(new Payslip
{
EmpId = "3",
EmpName = "Nancy Davolio",
Date = "3/3/2020",
Role = "Product Manager",
Salary = "$900",
Deductions = "$50",
NetSalary = "$850"
});
Employees.Add(new Payslip
{
EmpId = "4",
EmpName = "Janet Leverling",
Date = "4/4/2020",
Role = "HR",
Salary = "$700",
Deductions = "$40",
NetSalary = "$660"
});
Employees.Add(new Payslip
{
EmpId = "5",
EmpName = "Andrew Fulle",
Date = "5/5/2020",
Role = "Team Lead",
Salary = "$500",
Deductions = "$30",
NetSalary = "$470"
});
Employees.Add(new Payslip
{
EmpId = "6",
EmpName = "Michael Suyama",
Date = "6/6/2020",
Role = "Team Lead",
Salary = "$400",
Deductions = "$30",
NetSalary = "$370"
});
Employees.Add(new Payslip
{
EmpId = "7",
EmpName = "Anne Dodsworth",
Date = "7/7/2020",
Role = "Senior Developer",
Salary = "$300",
Deductions = "$10",
NetSalary = "$290"
});
Employees.Add(new Payslip
{
EmpId = "8",
EmpName = "Lilly",
Date = "8/8/2020",
Role = "Developer",
Salary = "$200",
Deductions = "$10",
NetSalary = "$190"
});
Employees.Add(new Payslip
{
EmpId = "9",
EmpName = "Robert King",
Date = "9/9/2020",
Role = "Senior Developer",
Salary = "$250",
Deductions = "$10",
NetSalary = "$240"
});
Employees.Add(new Payslip
{
EmpId = "10",
EmpName = "Mary",
Date = "10/10/2020",
Role = "Developer",
Salary = "$150",
Deductions = "$10",
NetSalary = "$140"
});
return Employees;
}
[HttpPost]
public ActionResult Index(string[] ddt)
{
List<Payslip> PayData = new List<Payslip>();
ViewBag.Val = ddt;
ViewBag.DataSource = this.GetData();
List<Payslip> TempData = this.GetPayslipData();
if (ddt != null)
{
foreach (var Data in TempData)
{
for (var i = 0; i < ddt.Length; i++)
{
if (Data.EmpId == ddt[i])
{
PayData.Add(Data);
}
}
}
}
ViewBag.PayslipData = PayData;
return View();
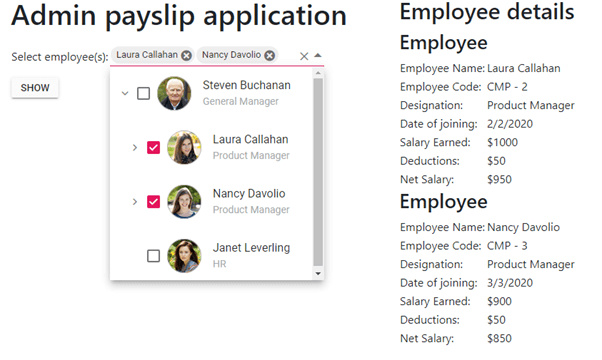
}You can maintain the selected data in the drop-down component during the form submission using the Value property. Also, you can display the selected employee payslip data in the main page. Please refer to the following code example.
<div class="layout">
    @using (Html.BeginForm())
    {
        <h1>Admin payslip application</h1>
        <table>
            <tr>
                <td>Select employee(s): </td>
                <td>
                    <div id='container' style="margin: 10px auto; width:300px;">
                        @Html.EJS().DropDownTree("ddt").Placeholder("Select an employee").CssClass("custom").ShowCheckBox(true).Fields(field =>
        field.DataSource(ViewBag.DataSource).Value("EmpId").ParentValue("ReportingEmpId").Text("EmpName").HasChildren("HasTeam").Expanded("Expanded")
        ).ItemTemplate("<div><img class=\"eimage\" src=\"https://ej2.syncfusion.com/demos/src/drop-down-tree/images/employees/${EmpImage}.png\" alt=\"${EmpImage}\" /><div><div class=\"ename\">${EmpName}</div><div class=\"ejob\">${Role}</div></div></div>").Value(ViewBag.Val).Render()
                    </div>
                </td>
            </tr>
            <tr>
                <td>@Html.EJS().Button("btn").Content("Show").Render()</td>
                <td></td>
            </tr>
        </table>
    }
</div>
<div class="layout">
    @if (ViewBag.PayslipData != null)
    {
        <h2>Employee details</h2>
        foreach (var CurData in ViewBag.PayslipData)
        {
            <h3>Employee</h3>
            <table>
                <tr>
                    <td>Employee Name: </td>
                    <td>@CurData.EmpName</td>
                </tr>
                <tr>
                    <td>Employee Code: </td>
                    <td>CMP - @CurData.EmpId</td>
                </tr>
                <tr>
                    <td>Designation: </td>
                    <td>@CurData.Role</td>
                </tr>
                <tr>
                    <td>Date of joining: </td>
                    <td>@CurData.Date</td>
                </tr>
                <tr>
                    <td>Salary Earned: </td>
                    <td>@CurData.Salary</td>
                </tr>
                <tr>
                    <td>Deductions: </td>
                    <td>@CurData.Deductions</td>
                </tr>
                <tr>
                    <td>Net Salary: </td>
                    <td>@CurData.NetSalary</td>
                </tr>
            </table>
        }
    }
</div>
The final output will be the following.
Resource
You can download this complete sample from this GitHub repository.
Summary
I hope you now have a clear idea of how to use our ASP.NET MVC Dropdown Tree for an organization’s structure. The Dropdown Tree component is designed to be completely customizable, as well as have flexible usage from the application point of view.
If you don’t have a Syncfusion license and would like to try the Dropdown Tree component, you can download our free trial. You can also visit the Dropdown Tree source in GitHub and check our sample browser and documentation for detailed explanations and the understanding to proceed further.
If you have any questions, please let us know in the comments section below. You can also contact us through our support forum or Direct-Trac. We are always happy to assist you!
 No spam, just valuable updates.