

A hospital appointment booking application eliminates the need to visit or call a hospital to schedule an appointment. It allows patients to book appointments with doctors or specialists at their convenience.
This blog post will provide a detailed guide on creating a hospital appointment booking app using Syncfusion .NET MAUI controls. We’ll see the steps to set up the project, design the user interface, and implement the necessary features to enable users to book appointments with their preferred doctors.
We’ll design the hospital appointment booking app by following these steps:
- Select specialists.
- Confirm the availability of the doctor.
- Schedule the appointments.
- List all upcoming and previous appointments.
Let’s get started!
Note: Before designing the UI, we need to create a .NET MAUI application.
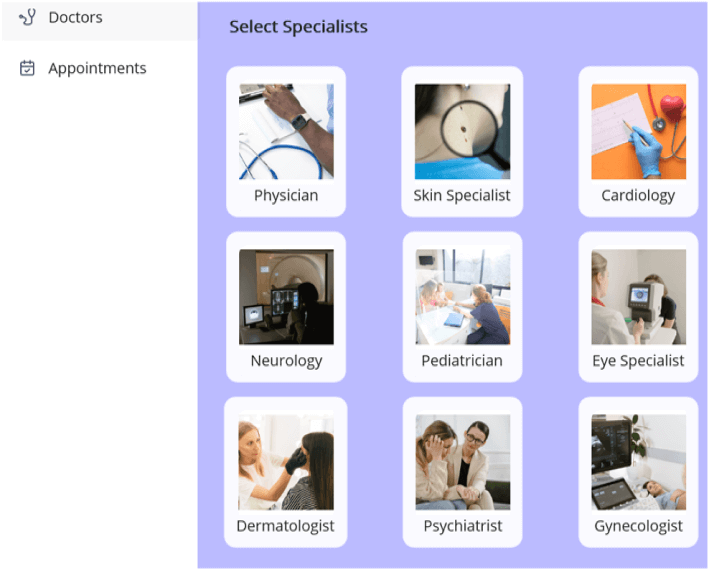
Step 1: Select specialists
In the Mainpage.xaml page, list the available specialists in the hospital, such as general practitioners, cardiologists, dentists, and others. To design this UI, we’ve used the grid layout. This will enable users to easily select specialists based on their needs.
Refer to the following code example.
MainPage.xaml
<Grid RowDefinitions="auto,0.9*" Background="#b8b8ff"  WidthRequest="{OnPlatform WinUI=500,MacCatalyst=500}" HeightRequest="560" HorizontalOptions="Center" VerticalOptions="Center">
 <Label Text="Select Specialists" FontSize="16" Margin="10" Padding="20,10" VerticalOptions="Start" FontAttributes="Bold"/>
 <Grid Grid.Row="1" ColumnDefinitions="*,*,*" Margin="0,0,0,30"  RowDefinitions="0.3*,0.3*,0.3*">
  <Border VerticalOptions="Center"  Stroke="#f8f7ff" Background="#f8f7ff" StrokeThickness="2" StrokeShape="RoundRectangle 10,10,10,10"  HorizontalOptions="Center" Margin="0" Padding="0">
   <VerticalStackLayout Margin="10">
    <ImageButton AutomationId="General"  x:Name="General" VerticalOptions="Start" Source="general.png" Clicked="ImageButton_Clicked" HeightRequest="100" WidthRequest="90" />
    <Label Text="Physician"  HorizontalOptions="Center"/>
   </VerticalStackLayout>
  </Border>

  <Border VerticalOptions="Center"  Stroke="#f8f7ff" Background="#f8f7ff"  Grid.Row="0" Grid.Column="1" StrokeThickness="2" StrokeShape="RoundRectangle 10,10,10,10"  HorizontalOptions="Center" Margin="0" Padding="0">
   <VerticalStackLayout Margin="10">
    <ImageButton AutomationId="skin" VerticalOptions="Start" Source="skin.png" Clicked="ImageButton_Clicked" HeightRequest="100" WidthRequest="90" />
    <Label Text="Skin Specialist" HorizontalOptions="Center"/>
   </VerticalStackLayout>
  </Border>
….
Add the MainPage as ContentTemplate of the FlyoutItem in the AppShell.xaml page.
AppShell.xaml
<Shell
….>

 <FlyoutItem Title="Doctors" FlyoutIcon="doctor.png"  >
  <ShellContent  ContentTemplate="{DataTemplate local:MainPage}" Route="home" />
 </FlyoutItem>
</Shell>
After that, set this AppShell page as the MainPage in the App.xaml.cs page.
App.xaml.cs
public App()
 {
   InitializeComponent();
   MainPage = new AppShell();
 }

Once the user selects a specialist, the UI will navigate to DoctorPage. Refer to the following code example.
MainPage.xaml.cs
private void ImageButton_Clicked(object sender, EventArgs e)
{
App.Current.MainPage = new NavigationPage();
var doctorPage = new DoctorPage();
var bindingContext = new DoctorInfoRepository((sender as ImageButton).AutomationId.ToString());
doctorPage.BindingContext = bindingContext;
App.Current.MainPage.Navigation.PushAsync(doctorPage);
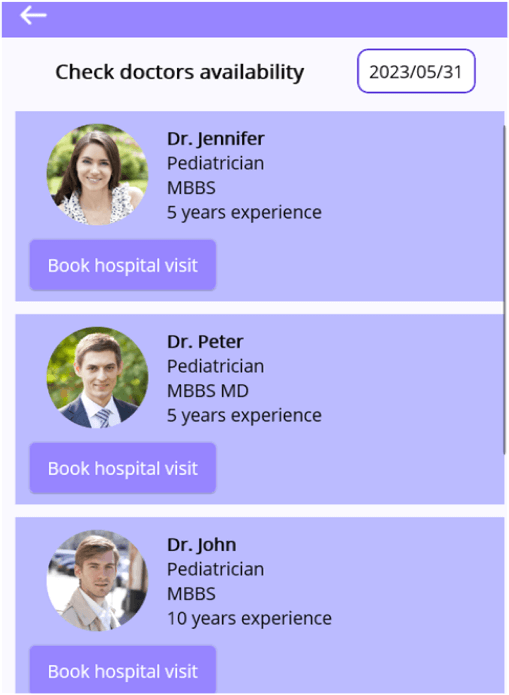
}Step 2: Confirm the availability of the doctor
Here, we’ve selected the Pediatrician specialist from the home page to book an appointment. You can find the doctors available for the hospital visit by selecting a date from the calendar. To achieve this UI, we are going to use Syncfusion .NET MAUI controls.
First, we need to register the Syncfusion handler in the MauiProgram.cs file.
MauiProgram.cs
builder
   .UseMauiApp<App>()
   .ConfigureSyncfusionCore()
We are going to use the Syncfusion .NET MAUI Calendar and Popup controls to select the dates.
DoctorPage.xaml
xmlns:popup="clr-namespace:Syncfusion.Maui.Popup;assembly=Syncfusion.Maui.Popup"
xmlns:calendar="clr-namespace:Syncfusion.Maui.Calendar;assembly=Syncfusion.Maui.Calendar"
……
<popup:SfPopup x:Name="popup"  ShowCloseButton="False" ShowFooter="False" ShowHeader="False" HeightRequest="380"  Padding="0" >
 <popup:SfPopup.ContentTemplate>
  <DataTemplate>
   <calendar:SfCalendar TodayHighlightBrush="#9381ff" SelectionBackground="#9381ff" MinimumDate="{Binding MinimumDate}" SelectedDate="{Binding SelectedDate}" MaximumDate="{Binding MaximumDate}" ActionButtonClicked="calendar_ActionButtonClicked" ActionButtonCanceled="calendar_ActionButtonCanceled" SelectionChanged="calendar_SelectionChanged" SelectionMode="Single" WidthRequest="300" VerticalOptions="Start" HorizontalOptions="Center" HeightRequest="360" x:Name="calendar" ShowActionButtons="True" />
  </DataTemplate>
 </popup:SfPopup.ContentTemplate>
 <popup:SfPopup.PopupStyle>
  <popup:PopupStyle  CornerRadius="0"/>
 </popup:SfPopup.PopupStyle>
</popup:SfPopup>
We will display the list of doctors based on the date selected using the Syncfusion .NET MAUI ListView.
DoctorPage.xaml
xmlns:listView="clr-namespace:Syncfusion.Maui.ListView;assembly=Syncfusion.Maui.ListView"

<listView:SfListView x:Name="listView" Margin="5,0,0,0" VerticalOptions="Start" ItemsSource="{Binding DoctorInfo}" ItemSize="160" >
 <listView:SfListView.ItemTemplate>
  <DataTemplate>
   <VerticalStackLayout IsClippedToBounds="True" Background="#b8b8ff" Margin="5">
    <Grid Padding="10" ColumnDefinitions="0.3*,0.7*" >
     <ImageButton InputTransparent="True" CornerRadius="5" VerticalOptions="Start" HorizontalOptions="Center" Background="#b8b8ff" Source="{Binding Image}" HeightRequest="80" WidthRequest="80"/>
     <VerticalStackLayout Grid.Column="1" VerticalOptions="Center" >
      <Label Text="{Binding Name}" TextColor="Black" FontAttributes="Bold"  />
      <Label Text="{Binding Department}" TextColor="Black"  />
      <Label Text="{Binding Details}" TextColor="Black" />
     </VerticalStackLayout>
    </Grid>
    <Button VerticalOptions="Center" TextColor="White" Background="#9381ff" CornerRadius="5" HorizontalOptions="Start" Margin="10,0" Text="Book hospital visit" BindingContext="{Binding}" Clicked="Button_Clicked" />
   </VerticalStackLayout>
  </DataTemplate>
 </listView:SfListView.ItemTemplate>
</listView:SfListView>
The following images show the resulting UI behavior.

Once the available doctor details are listed, we need to design the Book hospital visit button. When the button is clicked, the app will navigate to the next page, BookingAppointment, to schedule the appointments.
Refer to the following code example.
DoctorPage.xaml.cs
private void Button_Clicked(object sender, EventArgs e)
{
var button = sender as Button;
App.Current.MainPage = new NavigationPage();
App.Current.MainPage.Navigation.PushAsync(new BookingAppointment() { BindingContext = button.BindingContext });
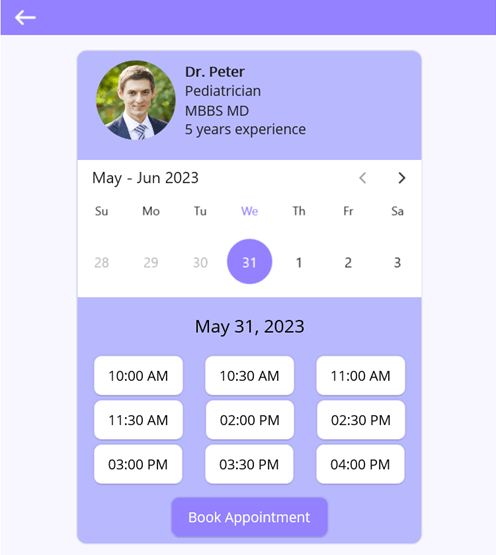
}Step 3: Schedule the appointments
After confirming the availability of the doctors, schedule a hospital visit by selecting the appropriate date and time. Once the time is confirmed, book the appointment.
Refer to the following code example.
BookingAppointment.xaml
xmlns:calendar="clr-namespace:Syncfusion.Maui.Calendar;assembly=Syncfusion.Maui.Calendar"
…
<calendar:SfCalendar Grid.Row="1" Background="white" TodayHighlightBrush="#9381ff" SelectionBackground="#9381ff" x:Name="appointmentBooking" EnablePastDates="False" AllowViewNavigation="False" SelectionChanged="AppointmentBooking_SelectionChanged" BackgroundColor="White" NavigationDirection="Horizontal">
 <calendar:SfCalendar.HeaderView>
  <calendar:CalendarHeaderView Background="white"/>
  </calendar:SfCalendar.HeaderView>
  <calendar:SfCalendar.MonthView>
   <calendar:CalendarMonthView NumberOfVisibleWeeks="1">
    <calendar:CalendarMonthView.HeaderView>
     <calendar:CalendarMonthHeaderView Background="white"/>
    </calendar:CalendarMonthView.HeaderView>
   </calendar:CalendarMonthView>
  </calendar:SfCalendar.MonthView>
 </calendar:SfCalendar>

…..

<FlexLayout x:Name="flexLayout" Wrap="Wrap" JustifyContent="SpaceAround" AlignItems="Center" VerticalOptions="Center" HorizontalOptions="Center">
 <FlexLayout.Resources>
  <Style TargetType="Button">
   <Setter  Property="TextColor" Value="Black"/>
   <Setter  Property="BackgroundColor" Value="White"/>
  </Style>
 </FlexLayout.Resources>
 <Button Text="10:00 AM" Clicked="SlotBooking_Changed"/>
 <Button Text="10:30 AM" Clicked="SlotBooking_Changed"/>
 <Button Text="11:00 AM" Clicked="SlotBooking_Changed"/>
 <Button Text="11:30 AM" Clicked="SlotBooking_Changed"/>
 <Button Text="02:00 PM" Clicked="SlotBooking_Changed"/>
 <Button Text="02:30 PM" Clicked="SlotBooking_Changed"/>
 <Button Text="03:00 PM" Clicked="SlotBooking_Changed"/>
 <Button Text="03:30 PM" Clicked="SlotBooking_Changed"/>
 <Button Text="04:00 PM" Clicked="SlotBooking_Changed"/>
</FlexLayout>
Refer to the following images.
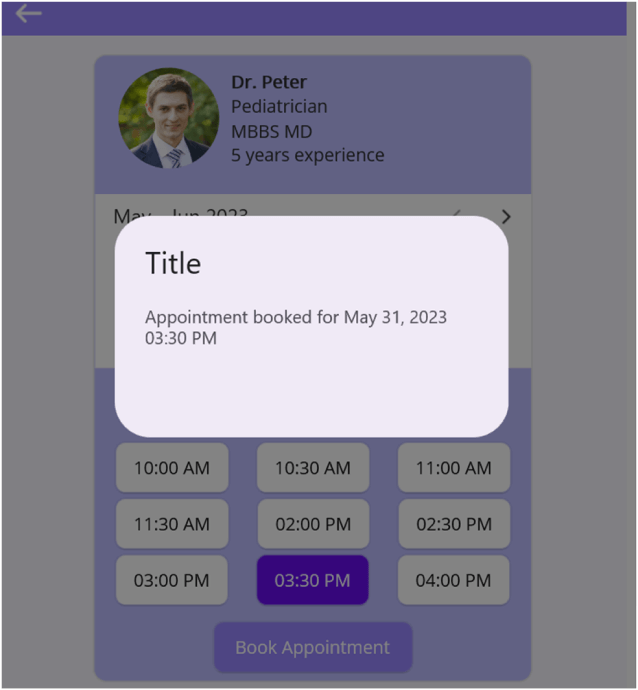
Once the date and time are selected, navigate to the home page. The booked appointment will be saved in the AppointmentsPage.
Refer to the following code example.
BookingAppointment.xaml.cs
private async void BookAppointment(Syncfusion.Maui.Calendar.SfCalendar calendar, FlexLayout buttonLayout)
{
if (calendar.SelectedDate == null)
{
Application.Current?.MainPage?.DisplayAlert("Alert !", "Please select a date to book an appointment ", "Ok");
return;
}
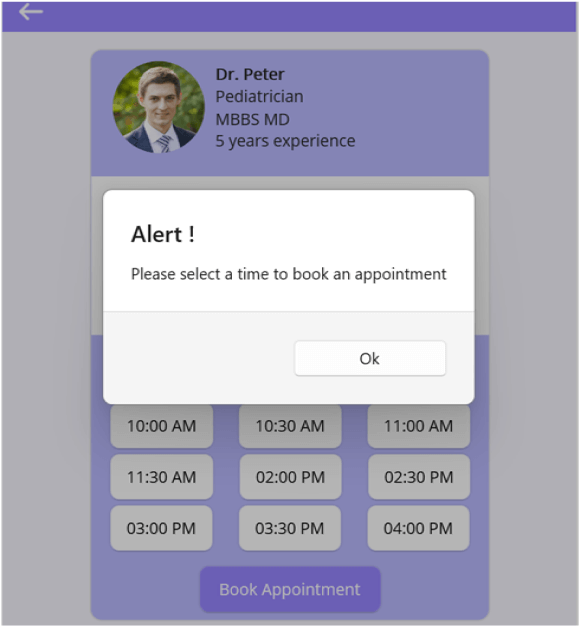
if (this.timeSlot == string.Empty)
{
Application.Current?.MainPage?.DisplayAlert("Alert !", "Please select a time to book an appointment ", "Ok");
return;
}
DateTime dateTime = calendar.SelectedDate.Value;
string dayText = dateTime.ToString("MMMM" + " " + dateTime.Day.ToString() + ", " + dateTime.ToString("yyyy"), CultureInfo.CurrentUICulture);
string text = "Appointment booked for " + dayText + " " + timeSlot;
popup.Message = text;
popup.Show();
await Task.Delay(1000);
popup.IsOpen = false;
var doctorInfo = this.BindingContext as DoctorInfo;
doctorInfo.AppointmentTime = Convert.ToDateTime(dayText + " " + timeSlot); ;
App.Appointments.Appointments.Add(doctorInfo);
App.Current.MainPage = new NavigationPage();
App.Current.MainPage.Navigation.PushAsync(new AppShell());
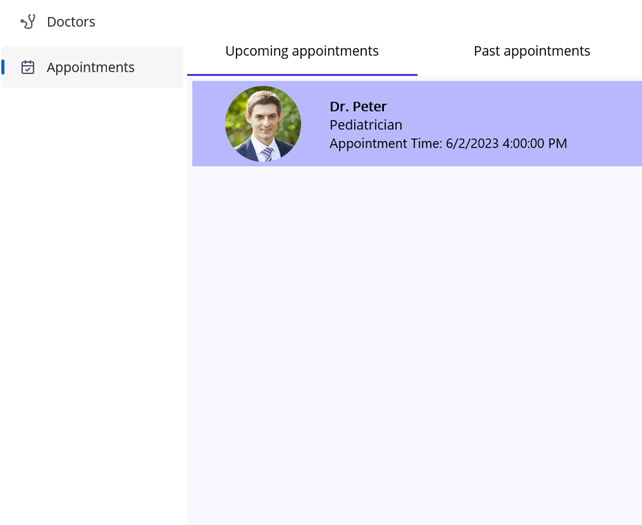
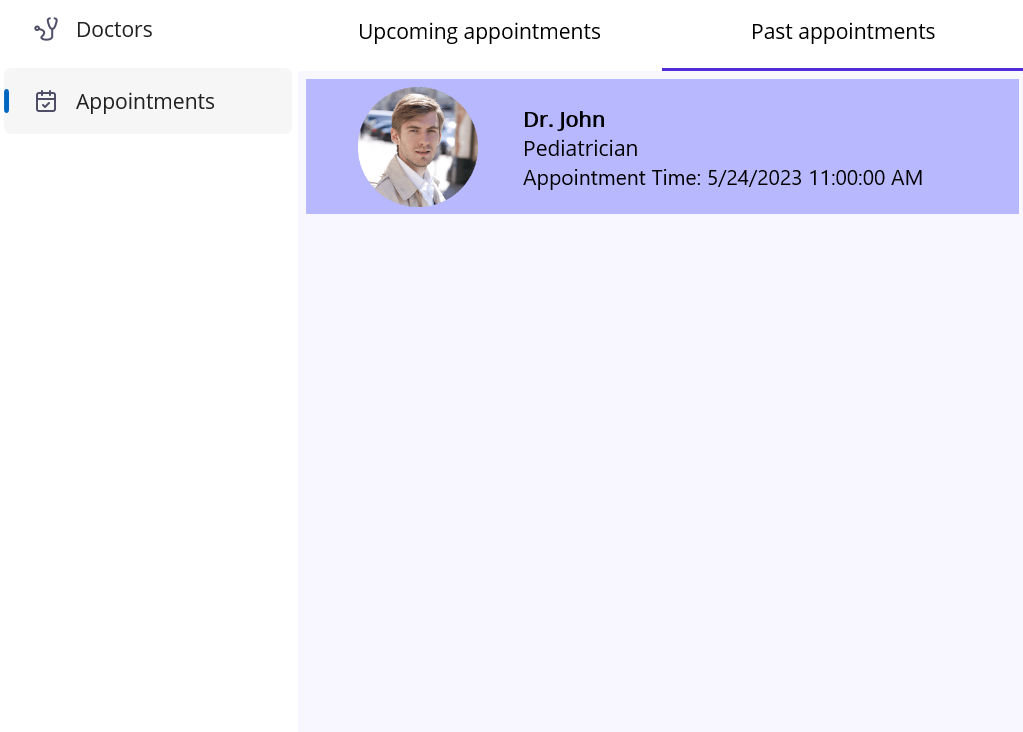
}Step 4: List all the upcoming and previous appointments
We also want the user to be able to keep track of upcoming and previous appointments.
Refer to the following code example. In it, we use the Syncfusion .NET MAUI ListView control to add appointments to the Appointments page.
AppointmentsPage.xaml
<listView:SfListView x:Name="listView" Grid.Row="1" VerticalOptions="Start" ItemSize="100" >
 <listView:SfListView.ItemTemplate>
  <DataTemplate>
   <VerticalStackLayout Background="#b8b8ff" IsClippedToBounds="True"  Margin="5">
    <Grid Padding="5" ColumnDefinitions="0.3*,0.7*">
     <ImageButton InputTransparent="True" VerticalOptions="Start" Background="#b8b8ff" Source="{Binding Image}"  HeightRequest="80" WidthRequest="80"/>
     <VerticalStackLayout Grid.Column="1" VerticalOptions="Center" >
      <Label Text="{Binding Name}" FontAttributes="Bold"  TextColor="Black" />
      <Label Text="{Binding Department}"  TextColor="Black" />
      <Label  TextColor="Black">
       <Label.FormattedText>
        <FormattedString>
         <Span Text="Appointment Time: "/>
         <Span Text="{Binding AppointmentTime}"/>
        </FormattedString>
       </Label.FormattedText>
      </Label>
     </VerticalStackLayout>
    </Grid>
   </VerticalStackLayout>
  </DataTemplate>
 </listView:SfListView.ItemTemplate>
</listView:SfListView>
Finally, add the AppointmentsPage as the ContentTemplate of the Flyout item on the AppShell page.
AppShell.xaml
<Shell>

 <FlyoutItem Title="Appointments" FlyoutIcon="appointment.png" >
  <ShellContent   ContentTemplate="{DataTemplate local:AppointmentsPage}" Route="appointments"/>
 </FlyoutItem>
Refer to the following images.
GitHub reference
For more details, you can download the complete example of creating a .NET MAUI hospital appointment booking app on GitHub.
Conclusion
Thanks for reading! We hope this blog provided valuable insight into creating a hospital appointment booking app using Syncfusion .NET MAUI controls. This powerful framework offers many tools and features to help you easily build high-quality, cross-platform apps.
If you have any comments or suggestions, please share them with us in the comments section below.
If you are not a Syncfusion customer, try our 30-day free trial to see how our components can enhance your projects.
You can also contact us through our support forum, support portal, or feedback portal. Our team of experts is always here to help you with any issues or challenges that you may encounter.


 No spam, just valuable updates.