Role-based authorization is a declarative way of limiting resource access that first appeared in ASP.NET (pre-Core). In order for the user to access certain resources, developers must specify a role that the user belongs to. This is done by using the [Authorize] attribute. Users can have a single role or multiple roles depending on the backing store used. The following procedure explains how to implement role-based authorization.
-
Create a Blazor WebAssembly app and add the following role service in the Startup class under ConfigureServices.
 public void ConfigureServices(IServiceCollection services)
         {
          ………………….. .
             services.AddDefaultIdentity<IdentityUser>()
                     .AddRoles<IdentityRole>()
.AddEntityFrameworkStores<ApplicationDbContext>();} -
Add specific roles in your database by overriding the OnModelCreating method of ApplicationDBContext. The User and Admin roles are added in the following code.
Once the roles are added, generate a migration and apply it to your database.public class ApplicationDbContext : IdentityDbContext
{
public ApplicationDbContext(DbContextOptions options) : base(options)
{
}
protected override void OnModelCreating(ModelBuilder builder)
{
base.OnModelCreating(builder);
builder.Entity<IdentityRole>().HasData(new IdentityRole { Name = "User", NormalizedName = "USER", Id = Guid.NewGuid().ToString(), ConcurrencyStamp = Guid.NewGuid().ToString() });
builder.Entity<IdentityRole>().HasData(new IdentityRole { Name = "Admin", NormalizedName = "ADMIN", Id = Guid.NewGuid().ToString(), ConcurrencyStamp = Guid.NewGuid().ToString() });
}
} -
Add users to the roles by updating the action on the Accounts controller. All new users are added to the User role, except for the admin email.
[AccountsController.cs][HttpPost]
public async Task<IActionResult> Post([FromBody]RegisterModel model)
{
var newUser = new IdentityUser { UserName = model.Email, Email = model.Email };
var result = await _userManager.CreateAsync(newUser, model.Password);
if (!result.Succeeded)
{
var errors = result.Errors.Select(x => x.Description);
return BadRequest(new RegisterResult { Successful = false, Errors = errors });
}
await _userManager.AddToRoleAsync(newUser, "User");
if (newUser.Email.StartsWith("admin"))
{
await _userManager.AddToRoleAsync(newUser, "Admin");
}
return Ok(new RegisterResult { Successful = true });
} -
Update the Login method in the LoginController.
Add roles as claims to the JSON web token (JWT) since we are assigning new users to roles at signup, so we need to pass this information to Blazor. Add the following code in the Login method. Current users can be taken through UserManager, which is used to get their roles. -
Add roles in client-side Blazor.
Once the new users are signed up, we have to get those roles via JWT. To do this, we add the following code in the ParseClaimsFromJwt method, which will take JWT, decode it, extract claims, and return it.
We have to check that the first character is [, indicating it’s a JSON array. If the role claim is present and if the [ character is found, then we have to extract the individual role names from the roles entered. We have to loop these role names and add each as a claim, but if the role is not an array, then it is added as a single role claim.private IEnumerable<Claim> ParseClaimsFromJwt(string jwt)
{
var claims = new List<Claim>();
var payload = jwt.Split('.')[1];
var jsonBytes = ParseBase64WithoutPadding(payload);
var keyValuePairs = JsonSerializer.Parse<Dictionary<string, object>>(jsonBytes);
keyValuePairs.TryGetValue(ClaimTypes.Role, out object roles);
if (roles != null)
{
if (roles.ToString().Trim().StartsWith("["))
{
var parsedRoles = JsonSerializer.Parse<string[]>(roles.ToString());
foreach (var parsedRole in parsedRoles)
{
claims.Add(new Claim(ClaimTypes.Role, parsedRole));
}
}
else
{
claims.Add(new Claim(ClaimTypes.Role, roles.ToString()));
}
keyValuePairs.Remove(ClaimTypes.Role);
}
claims.AddRange(keyValuePairs.Select(kvp => new Claim(kvp.Key, kvp.Value.ToString())));
return claims;
}
private byte[] ParseBase64WithoutPadding(string base64)
{
switch (base64.Length % 4)
{
case 2: base64 += "=="; break;
case 3: base64 += "="; break;
}
return Convert.FromBase64String(base64);
}
To call ParseClaimsFromJwt, we need to update the MarkUserAsAuthenticated method as shown.public void MarkUserAsAuthenticated(string token)
{
var authenticatedUser = new ClaimsPrincipal(new ClaimsIdentity(ParseClaimsFromJwt(token), "jwt"));
var authState = Task.FromResult(new AuthenticationState(authenticatedUser));
NotifyAuthenticationStateChanged(authState);
} -
Update the Login method on the AuthService to pass the token rather than the email when calling MarkUserAsAuthenticated.
public async Task<LoginResult> Login(LoginModel loginModel)
{
……………. .
var result = await _httpClient.PostJsonAsync<LoginResult>("api/Login", loginModel);
if (result.Successful)
{
await _localStorage.SetItemAsync("authToken", result.Token);
((ApiAuthenticationStateProvider)_authenticationStateProvider).MarkUserAsAuthenticated(result.Token);
_httpClient.DefaultRequestHeaders.Authorization = new AuthenticationHeaderValue("bearer", result.Token);
return result;
}
return result;
} -
Apply role-based authentication to the API.
We can allow access to a specific page by an admin user alone through the Authorize attribute as shown.
namespace BlazorWebAssembly.Server.Controllers
{
…………. . .
public class SampleDataController : Controller
{
…… . .
[Authorize(Roles = "Admin")]
[HttpGet("[action]")]
public IEnumerable<WeatherForecast> WeatherForecasts()
{
var rng = new Random();
return Enumerable.Range(1, 5).Select(index => new WeatherForecast
{
Date = DateTime.Now.AddDays(index),
TemperatureC = rng.Next(-20, 55),
Summary = Summaries[rng.Next(Summaries.Length)]
});
}
} -
Apply role-based authentication in the Blazor page.
Use the @attribute directive with the [Authorize] attribute in a Blazor page to restrict the user access to specific pages.
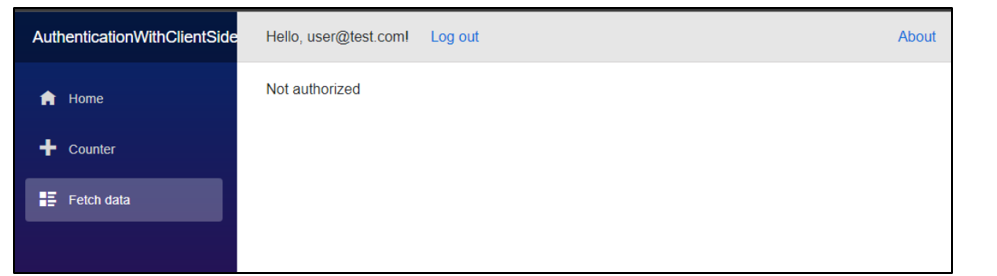
The following code allows the admin user alone to see the fetchdata page.@page "/fetchdata"
@attribute [Authorize(Roles = "Admin")]
@using BlazorAuthorization.Shared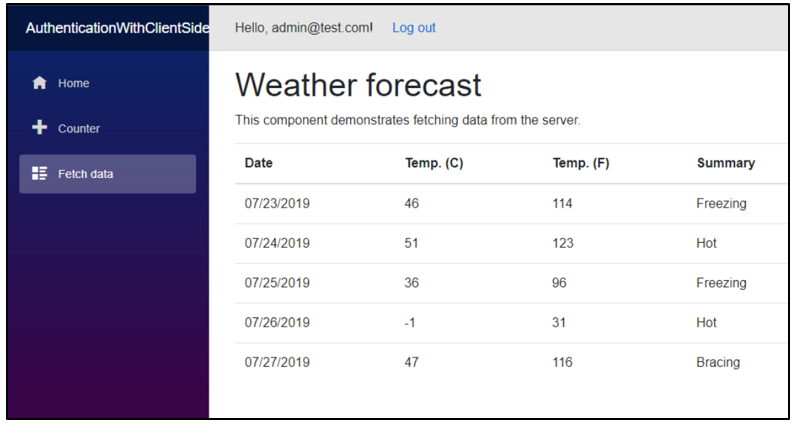
When we log in using accounts other than admin, we are unable to load the fetchdata page.
-
We can also add role-based authorization using the AuthorizeView component in the Index.razor page as shown in the following code.
<AuthorizeView Roles="User">
<p>You can only see this if you satisfy the IsUser policy.</p>
</AuthorizeView>
<AuthorizeView Roles="Admin">
<p>You can only see this if you satisfy the IsAdmin policy.</p>
</AuthorizeView>The output text is shown according to the accounts (admin/user) the user is signed in as.
Refer to this link for further information about role-based authorization in Blazor WebAssembly.
| Add – Migration SeedRoles Update-Database |
public async Task<IActionResult> Login([FromBody] LoginModel login)
{
 …………….. .
 var user = await _signInManager.UserManager.FindByEmailAsync(login.Email);
             var roles = await _signInManager.UserManager.GetRolesAsync(user);
             var claims = new List<Claim>();

             claims.Add(new Claim(ClaimTypes.Name, login.Email));

              foreach (var role in roles)
             {
                 claims.Add(new Claim(ClaimTypes.Role, role));
             }
 …………….. . .
 }

Share with