We are glad to announce the availability of the 2019 Volume 3 beta release. This release is packed with many new controls and feature enhancements for controls in different platforms.
In this blog, I am going to introduce Syncfusion Xamarin project templates for Visual Studio for Mac, which ease the configuration of the Syncfusion Xamarin Components in the Xamarin projects. In our previous release, we had Xamarin project templates available for Visual Studio for Windows machines. Now, we have extended this support to Visual Studio for Mac, too.
Installation
Download and install the Essential Studio® for Xamarin Mac build by following the steps in this guideline. Then:
- Open Visual Studio 2019 for Mac.
- Click Visual Studio [Community|Enterprise|Professional] and select Extensions…
- Select the Install from file… in the Extension Manager.
- The Install Extension Package dialog will appear. Navigate to the Syncfusion Xamarin installed location and open the Syncfusion Xamarin Mac Extensions file(.mpack).
Default Location: {Documents}\{User}\{version}\Xamarin\Extension\Syncfusion Xamarin VS Mac Extensions.mpack
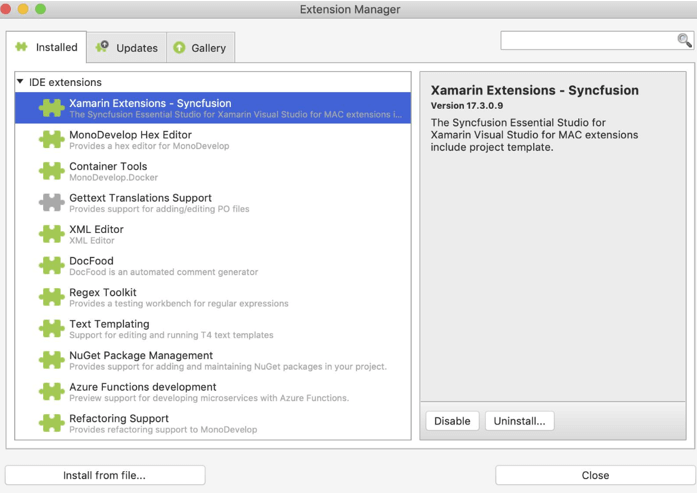
- Once the extension is installed, the Syncfusion Xamarin Extensions will be listed in the IDE extension section.

Create Xamarin application using project templates
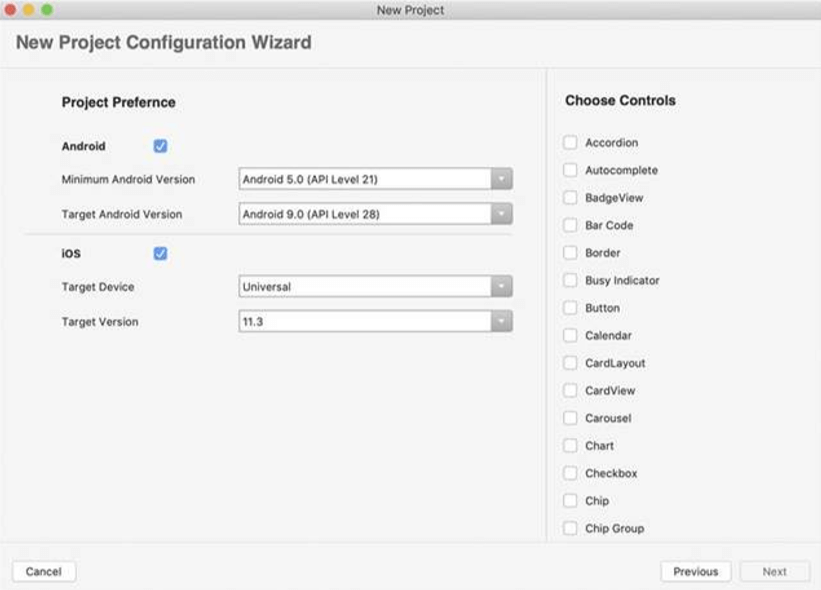
The Syncfusion Xamarin project templates package installs the required NuGet packages and configures the application with Syncfusion components.
To open the Syncfusion configuration wizard, choose either of the following first steps in Visual Studio 2019 for Mac, and then continue through the other steps:
- Click the Syncfusion menu and choose Essential Studio® for Xamarin > Create New Syncfusion Project.
(or)
Choose File > New Solution… and navigate to Syncfusion > App > Syncfusion Xamarin Project Template. - Choose the required project preference and Syncfusion components in the configuration wizard and click Next.

- Name the application and click Create.
- The required Syncfusion NuGet packages will be installed and configured in the project based on the selected Syncfusion components.
Now, you can follow the user guide to render the Syncfusion Xamarin UI components.
Conclusion
I hope you now have a clear idea of how to install and use Syncfusion Xamarin project templates for Visual Studio for Mac and create preconfigured Xamarin projects. Try this with the 2019 Volume 3 beta release.
If you have any questions about these features, please let us know in the comments below. You can also contact us through our support forum, Direct-Trac, or feedback portal. We are happy to assist you!

Comments (3)
[…] Introducing Syncfusion Xamarin Project Templates for Visual Studio for Mac (Kannan) […]
Why doesn’t it working? VS for Mac 2019 doesn’t have New->File->Project…
Hi Marek,
Please create the Syncfusion Xamarin template by choosing File > New Solution… and navigate to Syncfusion > App > Syncfusion Xamarin Project Template.
Also, please make sure the Syncfusion Xamarin Extension installed in Extension Manager. If still facing the issue, please share the latest log file of IDE by referring to the below guideline.
https://docs.microsoft.com/en-us/visualstudio/mac/troubleshooting?view=vsmac-2019#viewing-logs-in-visual-studio-for-mac