

We are excited to announce that we are including a chunk upload feature in the Essential JS 2 uploader component in the 2018 Volume 2 release. This feature is the best way to upload large files and it comes with pause, resume, retry, and abort options.
In this blog post, we are going to look at how to upload large files using the chunk upload features.
Why chunk upload?
Generally, uploading a large file is a very difficult process, especially uploading a file from mobile devices or other weak network connections. The large files may be high resolution images, audio or video files, etc. Trying to upload a large file in a single upload request is not reliable; it may cause a timeout issue or fail at the end of the file upload. So, the chunked upload concept was introduced, which helps handle the large file uploads.
What is chunk upload?
In chunk upload, large files are sliced into small chunks based on specified chunk size and uploaded to the server as these small chunks. Chunk upload is applicable only for the asynchronous mode of uploader.
How chunk upload works?
How chunk upload works:
- You browse for or drag the large file you want to upload to the uploader.
- The uploader accepts the file and slices the file into small chunks based on specified chunk size value.
- The chunks are transferred to the server asynchronously in a sequential order.
- The server creates a file with a part extension (.part) and overrides it for every chunk.
- Once the final chunk is received, the file is reassembled and saved with its original extension in the server.
Configuration
Chunk upload is implemented based on HTML5 File API. To make it work, here are the client-side and server-side configurations.
Client-side configuration
To enable the chunk upload in uploader component, following are the steps in an Angular application:
- Create an Angular application by following the getting started section, and configure the necessary settings to render the uploader component.
- Set the chunkSize property in bytes as shown in the following. We configured 2 MB as the chunk size in this code snippet.
public path: Object = { saveUrl: 'https://aspnetmvc.syncfusion.com/services/api/uploadbox/Save', removeUrl: 'https://aspnetmvc.syncfusion.com/services/api/uploadbox/Remove', chunkSize: 2097152 }; - Run the sample using “npm run start”.
Server-side configuration
The chunk file upload depends on how we are processing it server-side. There are various ways to process the chunks on the server end.
In the following method, we read the file data and chunk index from posted parameters. If the chunk index is 0, save the chunk as a new file, otherwise append the new chunk to the existing file. The process will continue until the last chunk is received.
Save action handler:
[AcceptVerbs("Post")]
public void Save()
{
    if (HttpContext.Current.Request.Files.AllKeys.Length > 0)
    {
        // Get the chunk file
        var httpPostedChunkFile = HttpContext.Current.Request.Files["chunkFile"];
        if (httpPostedChunkFile != null)
        {
            var index = HttpContext.Current.Request.Form["chunk-index"];
            var saveFile = HttpContext.Current.Server.MapPath("UploadedFiles");
            var SaveFilePath = Path.Combine(saveFile, httpPostedChunkFile.FileName);
            if (index == "0")
            {
                httpPostedChunkFile.SaveAs(SaveFilePath);
            }
            else
            {
                MergeChunkFile(SaveFilePath, httpPostedChunkFile.InputStream);
            }
            HttpResponse ChunkResponse = HttpContext.Current.Response;
            ChunkResponse.Clear();
            ChunkResponse.ContentType = "application/json; charset=utf-8";
            ChunkResponse.StatusDescription = "File uploaded succesfully";
            ChunkResponse.End();
        }
    }
}
Remove action handler:
[AcceptVerbs("Post")]
public void Remove()
{
    try
    {
        var fileSave = HttpContext.Current.Server.MapPath("UploadedFiles");
        var fileName = HttpContext.Current.Request.Form["UploadFiles"];
        var fileSavePath = fileSave + "\\" + fileName;
        if (System.IO.File.Exists(fileSavePath))
        {
            System.IO.File.Delete(fileSavePath);
        }
        HttpResponse Response = HttpContext.Current.Response;
        Response.Clear();
        Response.Status = "200 Ok";
        Response.StatusCode = 200;
        Response.ContentType = "application/json; charset=utf-8";
        Response.StatusDescription = "File removed successfully.";
        Response.End();
    }
    catch (Exception e)
    {
        throw (new Exception(e.Message));
    }
}
Merge chunk file:
public void MergeChunkFile(string fullPath, Stream chunkContent)
{
    try
    {
        using (FileStream stream = new FileStream(fullPath, FileMode.Append, FileAccess.Write, FileShare.ReadWrite))
        {
            using (chunkContent)
            {
                chunkContent.CopyTo(stream);
            }
        }
    }
    catch (IOException ex)
    {
        throw ex;
    }
}
Pause and resume upload
The resumable upload is helpful for restarting a file upload where it failed instead of uploading the whole file again. The uploader provides necessary options to achieve the resumable upload and is implemented using the Essential JS 2 AJAX library.
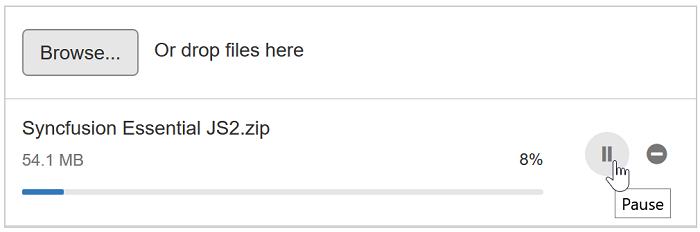
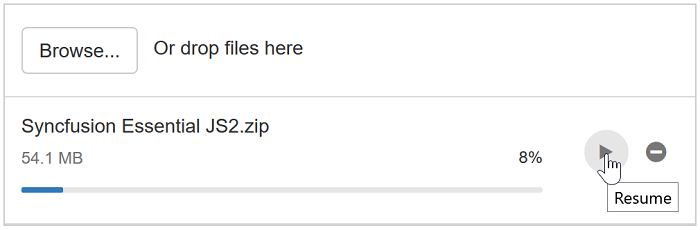
Workflow of resumable upload
When a user pauses a file upload, these are the processes that will execute:
- Send an abort request from a client.
- Save the current progress level and further process.
- Replace pause icon with resume icon.
When a user resumes a file upload, these are the processes that will execute:
- Previously aborted chunk upload request is raised.
- Resume icon replaces pause icon.
- Progress bar resumes, showing the current progress value of the upload.
- Server starts to merge the chunks into a .part extension file.
Retry upload
It is possible to retry a failed or aborted file upload caused by a network connection issue, an interruption, or user cancellation. You can retry the upload in the following ways:
- Autoretry
- Retry through UI
Autoretry
By configuring the retryCount and retryAfterDelay properties, you can enable the autoretry option, which tries to upload a failed chunk automatically until it reaches the maxRetry count.
Configure the following code to enable the autoretry option in uploader:
Retry through UI
When you click on the retry icon, it triggers the upload process again. The retry icon is visible in the following scenarios:
- After trying the maximum number of retries without the file uploading.
- Canceling a file upload.

Conclusion
We hope that you will like this chunk upload and we look forward to you trying it out in the 2018 Volume 2 release. You can find the 2018 Volume 2 Essential JS 2 install download link here. Please feel free to leave your feedback in the comments section below.
The feature is available on Angular, React, JavaScript, Vue, ASP.NET MVC, and ASP.NET Core upload component.
If you like this blog post, we think you’ll also like the following free e-books
 No spam, just valuable updates.