

In this blog, we’ll see how to bind and populate data from an SQLite database in the Syncfusion .NET MAUI ListView. We’ll also see how to perform CRUD (create, read, update, and delete) operations on the database and update the changes in the ListView.
The Syncfusion .NET MAUI ListView control is used to present lists of data in a vertical or horizontal orientation with different layouts. It supports essential features such as selection, template selectors, horizontal and vertical orientation, load more, and autofitting items. The control also supports sorting, grouping, and filtering with optimization for working with large amounts of data.
SQLite is a lightweight, open-source, and self-contained relational database management system (RDBMS). It stands out for its simplicity and efficiency, making it a popular choice for embedded and mobile apps, as well as desktop software.
Note: If you are new to the ListView control, refer to the .NET MAUI ListView getting started documentation.
Binding SQLite data to the .NET MAUI ListView
In this demo, we’re going to bind and populate data regarding contact details from an SQLite database in Syncfusion .NET MAUI ListView control.
To do so, please follow these steps:
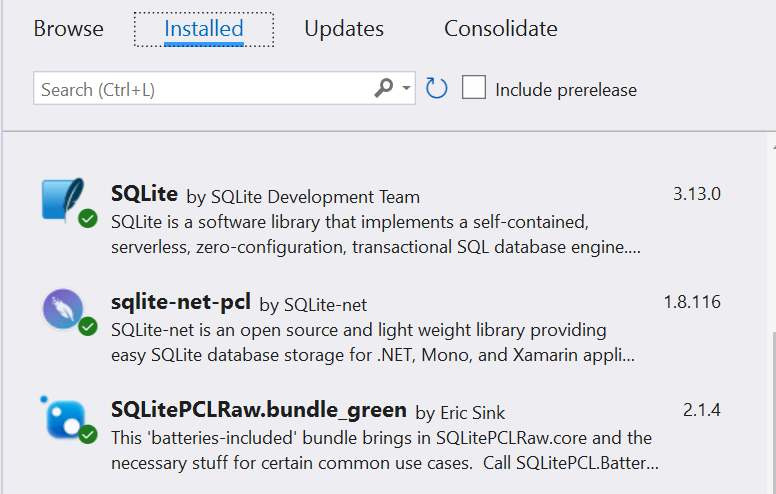
Step 1: Install the required packages
Install the following required packages for the SQLite DB connection in your project.
Step 2: Define the class to access the database
Define the Constants class with the required database properties.
public static class Constants
{
    public const string DatabaseFilename = "SQLiteDB.db";

    public const SQLite.SQLiteOpenFlags Flags =
        // open the database in read/write mode
        SQLite.SQLiteOpenFlags.ReadWrite |
        // create the database if it doesn't exist
        SQLite.SQLiteOpenFlags.Create |
        // enable multi-threaded database access
        SQLite.SQLiteOpenFlags.SharedCache;

    public static string DatabasePath =>
        Path.Combine(Environment.GetFolderPath(Environment.SpecialFolder.LocalApplicationData), DatabaseFilename);
}
Define the SQLite connection using the SQLiteAsyncConnection API with the database properties we defined in the Constants class. Then, create a table named Contact in that SQLite database.
public class SQLiteDatabase
{
    readonly SQLiteAsyncConnection _database;

    public SQLiteDatabase()
    {
        _database = new SQLiteAsyncConnection(Constants.DatabasePath, Constants.Flags);
        _database.CreateTableAsync<Contact>();
    }
}
Step 3: Create an instance for the SQLite connection
Now, we can create a singleton instance for the SQLite connection and initialize it in the App.Xaml.cs file to use the database in our business class ViewModel.
Refer to the following code example.
Public partial class App : Application
{
    public App()
    {
      InitializeComponent();

    }

    static SQLiteDatabase database;

    // Create the database connection as a singleton.
    Public static SQLiteDatabase Database
    {
        get
        {
            if (database == null)
            {
                database = new SQLiteDatabase();
            }
            return database;
        }
    }
}
Step 4: Create the Contact class
Define a Model class named Contact to hold the property values from the database table.
Public class Contact : InotifyPropertyChanged
{
    #region Fields

    public int id;
    private string name;
    private string number;
    private string image;

    #endregion

    [PrimaryKey, AutoIncrement]
    [Display(AutoGenerateField = false)]
    public int ID { get; set; }
    public string Name
    {
        get { return this.name; }
        set
        {
            this.name = value;
            RaisePropertyChanged(“Name”);
        }
    }

    public string Number
    {
        get { return number; }
        set
        {
            this.number = value;
            RaisePropertyChanged(“Number”);
        }
    }

    [Display(AutoGenerateField = false)]
    public string Image
    {
        get { return this.image; }
        set
        {
            this.image = value;
            this.RaisePropertyChanged(“Image”);
        }
    }

    #region InotifyPropertyChanged implementation

    public event PropertyChangedEventHandler PropertyChanged;

    private void RaisePropertyChanged(String name)
    {
        if (PropertyChanged != null)
            this.PropertyChanged(this, new PropertyChangedEventArgs(name));
    }

    #endregion
}
Step 5: Populating database data in the ViewModel
Populate the data from the SQLite database in the ContactsViewModel class, as shown in the following code example.
public class ContactsViewModel : INotifyPropertyChanged
{
    #region Fields

    private ObservableCollection<Contact> contactsInfo;
    private Contact selectedContact;

    #endregion

    #region Properties
    public Contact SelectedItem
    {
        get
        {
            return selectedContact;
        }
        set
        {
            selectedContact = value;
            OnPropertyChanged("SelectedItem");
        }
    }
    public ObservableCollection<Contact> ContactsInfo
    {
        get
        {
            return contactsInfo;
        }
        set
        {
            contactsInfo = value;
            OnPropertyChanged("ContactsInfo");
        }
    }

    #endregion

    #region Constructor
    public ContactsViewModel()
    {
        GenerateContacts();
    }
    #endregion

    #region Methods

    private void GenerateContacts()
    {
        ContactsInfo = new ObservableCollection<Contact>();
        ContactsInfo = new ContactsInfoRepository().GetContactDetails(20);
        PopulateDB();
    }

    private async void PopulateDB()
    {
        foreach (Contact contact in ContactsInfo)
        {
            var item = await App.Database.GetContactAsync(contact);
            if(item == null)
                await App.Database.AddContactAsync(contact);
        }
    }
    private async void OnAddNewItem()
    {
        await App.Database.AddContactAsync(SelectedItem);
        ContactsInfo.Add(SelectedItem);
        await App.Current.MainPage.Navigation.PopAsync();
    }

    #endregion

    #region Interface Member

    public event PropertyChangedEventHandler PropertyChanged;

    public void OnPropertyChanged(string name)
    {
        if (this.PropertyChanged != null)
            this.PropertyChanged(this, new PropertyChangedEventArgs(name));
    }

    #endregion
}
Step 6: Define ListView with DataTemplate
Using the Contact table name, let’s define the .NET MAUI ListView DataTemplate with the database properties.
<?xml version="1.0" encoding="utf-8" ?>
<ContentPage xmlns="http://schemas.microsoft.com/dotnet/2021/maui"
             xmlns:x="http://schemas.microsoft.com/winfx/2009/xaml"
             xmlns:local="clr-namespace:ListViewMAUI"
             xmlns:syncfusion="clr-namespace:Syncfusion.Maui.ListView;assembly=Syncfusion.Maui.ListView"
             Title="Contacts Page"
             x:Class="ListViewMAUI.MainPage">
 <ContentPage.ToolbarItems>
  <ToolbarItem Command="{Binding CreateContactsCommand}" IconImageSource="add.png">
  </ToolbarItem>
 </ContentPage.ToolbarItems>

 <ContentPage.BindingContext>
  <local:ContactsViewModel x:Name="viewModel"/>
 </ContentPage.BindingContext>

 <ContentPage.Resources>
  <ResourceDictionary>
   <local:TextConverter x:Key="TextConverter"/>
   <local:ColorConverter x:Key="ColorConverter"/>
  </ResourceDictionary>
 </ContentPage.Resources>

 <ContentPage.Content>
  <syncfusion:SfListView x:Name="listView" TapCommand="{Binding EditContactsCommand}" ScrollBarVisibility="Always" ItemSize="70">
   <syncfusion:SfListView.ItemTemplate>
    <DataTemplate>
     <Grid x:Name="grid" RowSpacing="0">
      <Grid.RowDefinitions>
       <RowDefinition Height="*" />
       <RowDefinition Height="1" />
      </Grid.RowDefinitions>
      <Grid RowSpacing="0">
       <Grid.ColumnDefinitions>
        <ColumnDefinition Width="70" />
        <ColumnDefinition Width="*" />
        <ColumnDefinition Width="Auto" />
       </Grid.ColumnDefinitions>

       <Image Source="{Binding Image}" VerticalOptions="Center" HorizontalOptions="Center" HeightRequest="50" WidthRequest="50"/>

       <Grid Grid.Column="1" RowSpacing="1" Padding="10,0,0,0" VerticalOptions="Center">
        <Grid.RowDefinitions>
         <RowDefinition Height="*" />
         <RowDefinition Height="*" />
        </Grid.RowDefinitions>

        <Label LineBreakMode="NoWrap" TextColor="#474747" Text="{Binding Name}"  FontSize="{OnPlatform Android={OnIdiom Phone=16, Tablet=18}, iOS={OnIdiom Phone=16, Tablet=18}, MacCatalyst=18, WinUI={OnIdiom Phone=18, Tablet=20, Desktop=20}}" />
        <Label Grid.Row="1" Grid.Column="0" TextColor="#474747" LineBreakMode="NoWrap" Text="{Binding Number}" FontSize="{OnPlatform Android={OnIdiom Phone=12, Tablet=14}, iOS={OnIdiom Phone=12, Tablet=14}, MacCatalyst=14, WinUI={OnIdiom Phone=12, Tablet=12, Desktop=12}}" />
       </Grid>
       <Grid Grid.Row="0" Grid.Column="2" RowSpacing="0" HorizontalOptions="End" VerticalOptions="Start" Padding='{OnPlatform Default="0,10,10,0", MacCatalyst="0,10,15,0"}'>
        <Label LineBreakMode="NoWrap" TextColor="#474747" Text="{Binding ContactType}" FontSize="{OnPlatform Android={OnIdiom Phone=10, Tablet=12}, iOS={OnIdiom Phone=10, Tablet=12}, MacCatalyst=12, WinUI={OnIdiom Phone=10, Tablet=11, Desktop=11}}" />
       </Grid>
      </Grid>
      <StackLayout Grid.Row="1" BackgroundColor="#E4E4E4" HeightRequest="1"/>
     </Grid>
    </DataTemplate>
   </syncfusion:SfListView.ItemTemplate>
  </syncfusion:SfListView>
 </ContentPage.Content>
</ContentPage>
Step 7: Bind SQLite data to .NET MAUI ListView
Then, bind the data from the SQLite database to the .NET MAUI ListView control.
public partial class MainPage : ContentPage
{
public MainPage()
{
InitializeComponent();
}
protected async override void OnAppearing()
{
base.OnAppearing();
listView.ItemsSource = await App.Database.GetContactsAsync();
}
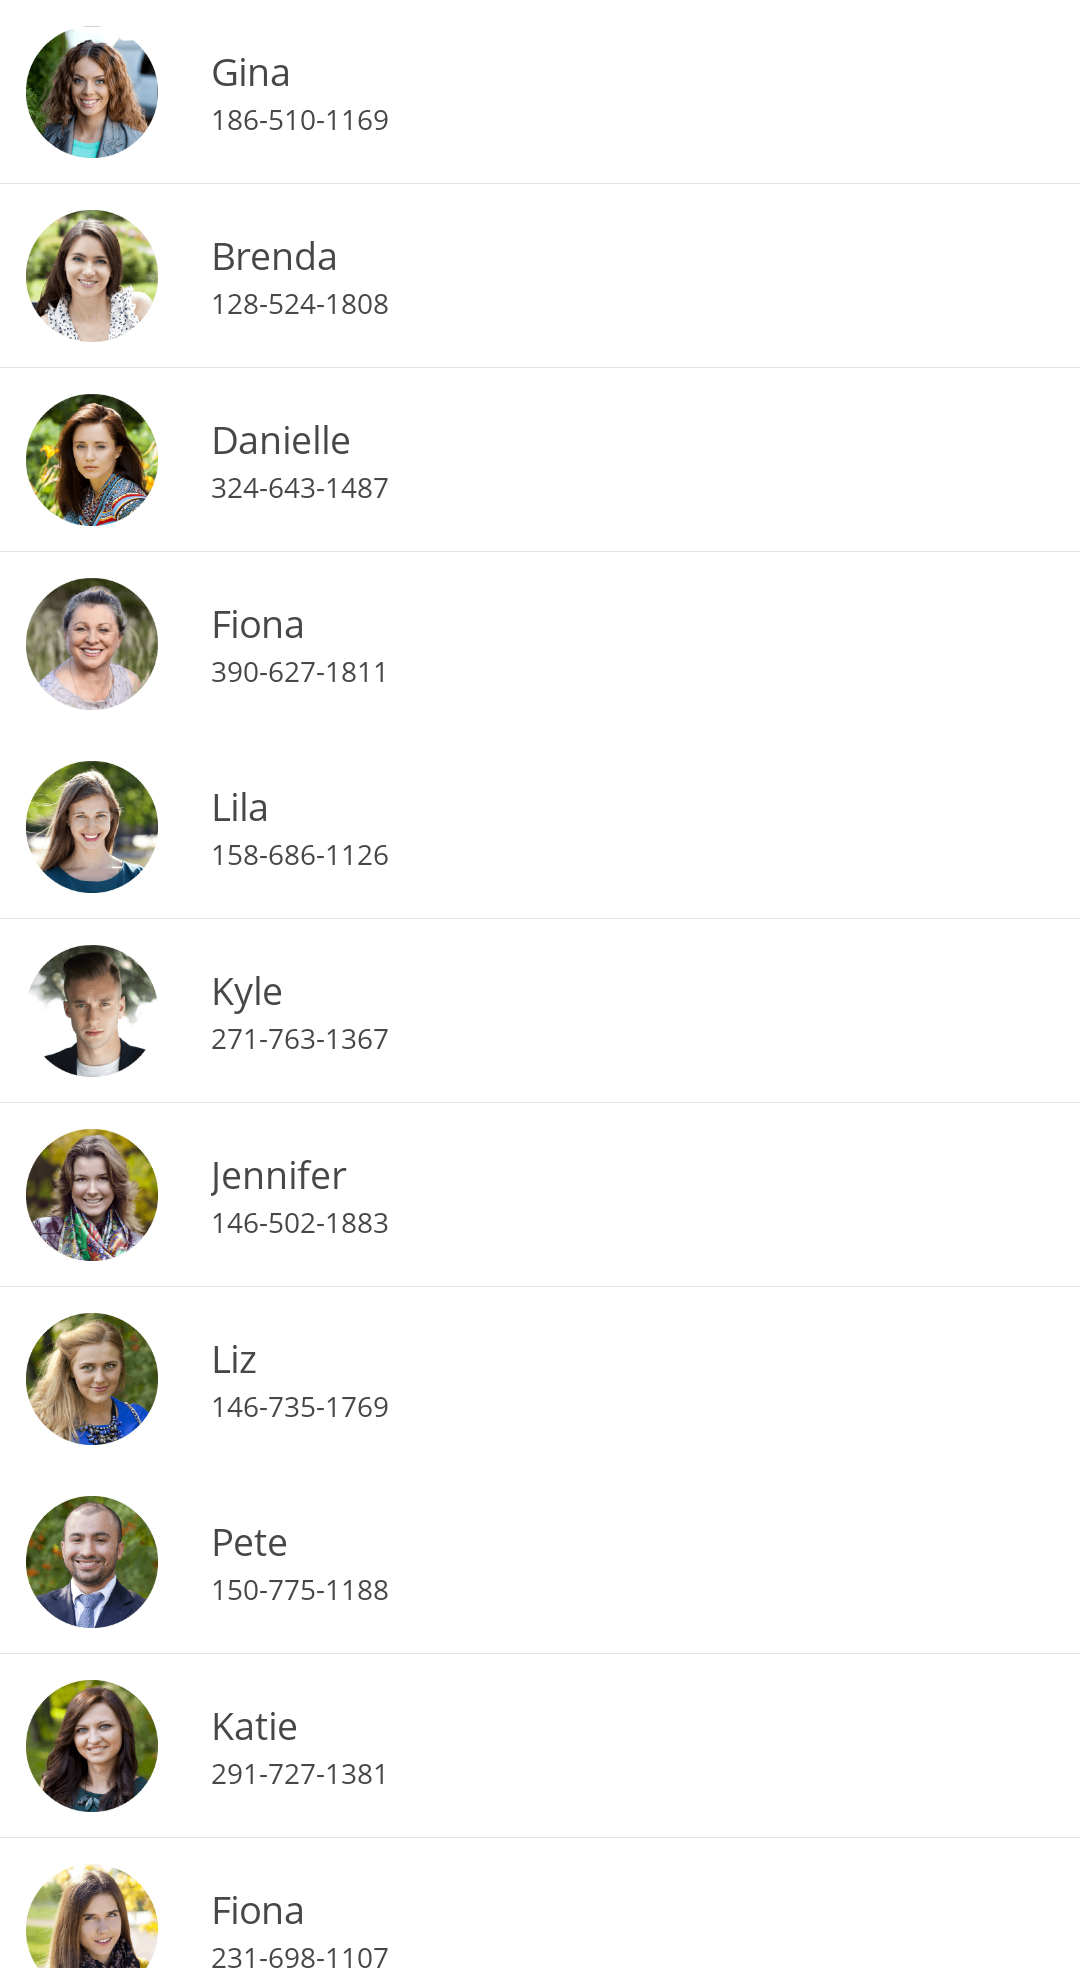
}After executing the previous code example, we’ll get the following output.
Perform CRUD operations with SQLite database and update in .NET MAUI ListView
Let’s see how to perform CRUD actions on the SQLite database and update the changes in the .NET MAUI ListView control.
Here, we have the EditPage, which enables us to add, save, and delete contact details. To perform such actions on this page, we must implement the code for performing CRUD operations on the SQLite database and commands in the ViewModel class, as mentioned in the following sections.
Database implementation for CRUD operations
We have predefined methods in the SQLite-net-pcl assembly to perform CRUD operations. Refer to the following code example for database updates.
public class SQLiteDatabase
{
    readonly SQLiteAsyncConnection _database;

    // Read Data
    public async Task<List<Contact>> GetContactsAsync()
    {
        return await _database.Table<Contact>().ToListAsync();
    }

    // Read particular data
    public async Task<Contact> GetContactAsync(Contact item)
    {
        return await _database.Table<Contact>().Where(i => i.ID == item.ID).FirstOrDefaultAsync();
    }

    // Add data
    public async Task<int> AddContactAsync(Contact item)
    {
        return await _database.InsertAsync(item);
    }

    // Remove data
    public Task<int> DeleteContactAsync(Contact item)
    {
        return _database.DeleteAsync(item);
    }

    // Update data
    public Task<int> UpdateContactAsync(Contact item)
    {
        if (item.ID != 0)
            return _database.UpdateAsync(item);
        else
            return _database.InsertAsync(item);
    }
}
Implement CRUD commands in the ViewModel class
The commands to add a new item, edit an item, or delete a selected item have been defined in the ViewModel.cs file.
Refer to the following code example.
public class ContactsViewModel : INotifyPropertyChanged
{
    #region Properties

    public Command CreateContactsCommand { get; set; }
    public Command<object> EditContactsCommand { get; set; }
    public Command SaveItemCommand { get; set; }
    public Command DeleteItemCommand { get; set; }
    public Command AddItemCommand { get; set; }

    #endregion

    #region Constructor
    public ContactsViewModel()
    {
        CreateContactsCommand = new Command(OnCreateContacts);
        EditContactsCommand = new Command<object>(OnEditContacts);
        SaveItemCommand = new Command(OnSaveItem);
        DeleteItemCommand = new Command(OnDeleteItem);
        AddItemCommand = new Command(OnAddNewItem);
    }
    #endregion

    #region Methods
    private async void OnAddNewItem()
    {
        await App.Database.AddContactAsync(SelectedItem);
        ContactsInfo.Add(SelectedItem);
        await App.Current.MainPage.Navigation.PopAsync();
    }

    private async void OnDeleteItem()
    {
        await App.Database.DeleteContactAsync(SelectedItem);
        ContactsInfo.Remove(SelectedItem);
        await App.Current.MainPage.Navigation.PopAsync();
    }

    private async void OnSaveItem()
    {
        await App.Database.UpdateContactAsync(SelectedItem);
        await App.Current.MainPage.Navigation.PopAsync();
    }

    private void OnEditContacts(object obj)
    {
        SelectedItem = (obj as Syncfusion.Maui.ListView.ItemTappedEventArgs).DataItem as Contact;
        var editPage = new Views.EditPage();
        editPage.BindingContext = this;
        App.Current.MainPage.Navigation.PushAsync(editPage);
    }

    private void OnCreateContacts()
    {
        SelectedItem = new Contact() { Name = "", Number = "", Image = "" };
        var editPage = new Views.EditPage();
        editPage.BindingContext = this;
        App.Current.MainPage.Navigation.PushAsync(editPage);
    }
    #endregion

    #region Interface Member

    public event PropertyChangedEventHandler PropertyChanged;

    public void OnPropertyChanged(string name)
    {
        if (this.PropertyChanged != null)
            this.PropertyChanged(this, new PropertyChangedEventArgs(name));
    }

    #endregion
}
Binding ViewModel commands to the EditPage
To design the EditPage, I’ve used the Syncfusion .NET MAUI DataForm control. Then, I bound the commands from the ViewModel class to it. To edit the selected list view item and save the change back to the SQLite database, set the CommitMode property value to PropertyChanged.
Refer to the following code example.
<?xml version="1.0" encoding="utf-8" ?>
<ContentPage xmlns="http://schemas.microsoft.com/dotnet/2021/maui"
             xmlns:x="http://schemas.microsoft.com/winfx/2009/xaml"
             xmlns:dataForm="clr-namespace:Syncfusion.Maui.DataForm;assembly=Syncfusion.Maui.DataForm"
             x:Class="ListViewMAUI.Views.EditPage">
    <StackLayout>
        <dataForm:SfDataForm DataObject="{Binding SelectedItem}" CommitMode="PropertyChanged" />
        <Grid HeightRequest="50">
            <Grid.ColumnDefinitions>
                <ColumnDefinition Width="*" />
                <ColumnDefinition Width="*" />
                <ColumnDefinition Width="*" />
            </Grid.ColumnDefinitions>
            <Button Text="Add" Grid.Column="0" Command="{Binding AddItemCommand}" />
            <Button Text="Save" Grid.Column="1" Command="{Binding SaveItemCommand}" />
            <Button Text="Delete" Grid.Column="2" Command="{Binding DeleteItemCommand}" />
        </Grid>
    </StackLayout>
</ContentPage>
Refer to the following image.
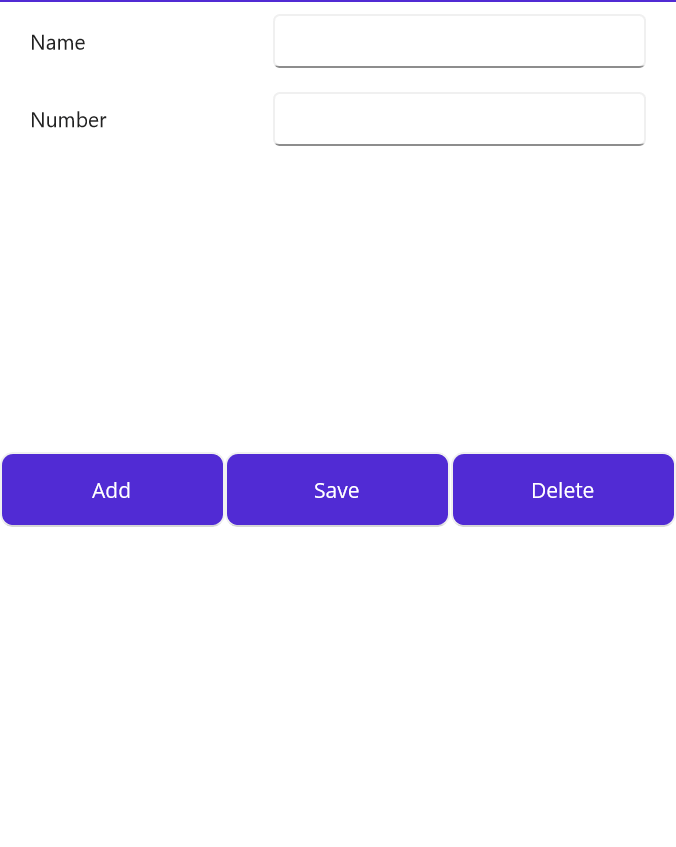
After executing all the previous code examples, you will get the following output. On tapping an item, you will get an edit page to change values or delete the tapped item. We’ve also added an icon (+) at the top-right corner of the ListView to add a new item to the list.
GitHub reference
For more details, refer to the Binding SQLite data to .NET MAUI ListView demos on GitHub

Conclusion
Thanks for reading! In this blog, we’ve seen how to integrate and populate data from an SQLite database in the Syncfusion .NET MAUI ListView. We encourage you to try the steps and share your feedback in the comments below.
Our customers can access the latest version of Essential Studio® for .NET MAUI from the License and Downloads page. If you are not a Syncfusion customer, you can download our free evaluation to explore all our controls.
For questions, you can contact us through our support forum, support portal, or feedback portal. We are always happy to assist you!


Related blogs
- Chart of the Week: Creating a .NET MAUI Tornado Chart for Comparing Petrol and Diesel Prices in the UK
- Effortless Google Calendar Events Synchronization in .NET MAUI Scheduler
- Chart of the Week: Creating a .NET MAUI Radial Bar Chart for the Most and Least Powerful Passports in 2023
- Load Appointments on Demand via Web Services in .NET MAUI Scheduler Using JSON Data
 No spam, just valuable updates.