
In this blog you will get a quick overview of our Flutter Radial Gauge and its features by designing a speedometer mobile application.
The Radial Gauge for Flutter is a data visualization widget written in Dart that displays numerical values on a circular scale. It has a rich set of features such as axes, ranges, pointers, and annotations that are fully customizable and extendable. You can use this to design mobile applications that include a speedometer, temperature monitor, dashboard, multi-axis clock, watch, compass, and so on.
To design a speedometer, you need the following features in a radial gauge widget:
- Axes: Define the speedometer scale values in numbers from start to end with tick marks.
- Ranges: Indicate the speedometer color ranges as a gradient.
- Pointers: Indicate the current speedometer value on the range.
- Pointer animation: Animate the pointer in a visually appealing way when the pointer moves from one value to another.
- Annotations: Display the current speedometer value.
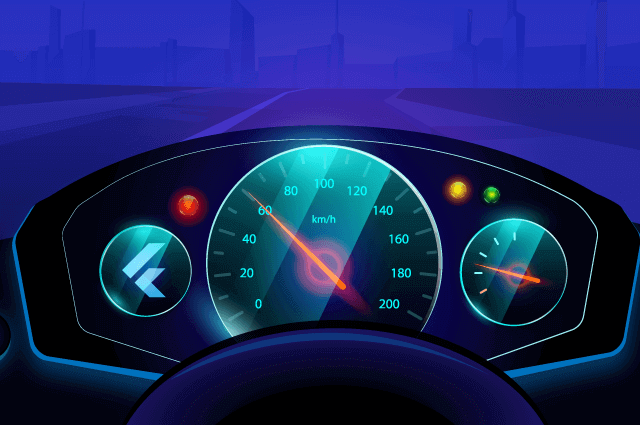
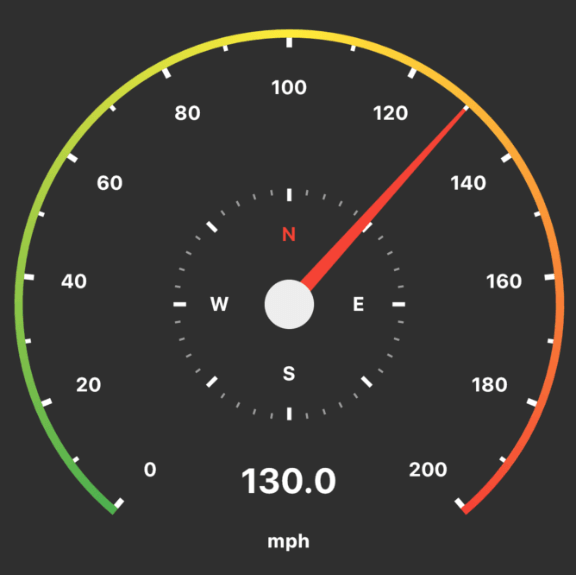
This section explains how to design a speedometer with a directional compass that indicates the current direction by customizing the appearance of the radial gauge. The fully developed application will appear as shown in the following screenshot.
Note: Dark theme mode is used for this demo app.
Configuring the Radial Gauge widget in the Flutter project
Create a simple project using the instructions given in the Get Started documentation on the Flutter website.
Add dependency
Add the Syncfusion Flutter Gauge dependency to your pubspec.yaml file.
dependencies: syncfusion_flutter_gauges: ^18.2.44
Get packages
Run the following command to get the required packages.
$ flutter pub get
Import package
Import the following package in your Dart code.
import 'package:syncfusion_flutter_gauges/gauges.dart';
After the package has been imported, initialize the SfRadialGauge as a child of any widget, such as a container widget.
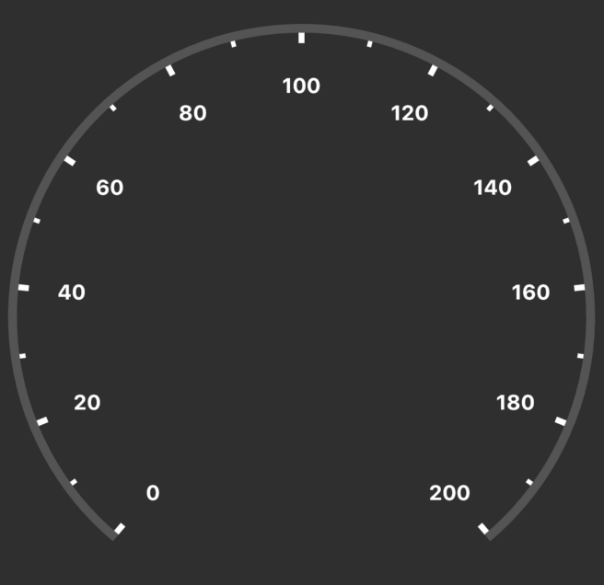
Add speedometer scale range
The first step in designing a speedometer is to add speed scale values as numbers from the minimum, 0, to the maximum, 200, with a specific interval. This can be achieved using the axes in the radial gauge.
Axes contain a collection of axis elements, and you can add any number of radial axes inside the gauge. In the Radial Gauge, you can display the speedometer labels from 0 to 200 using the minimum and maximum properties and customize their style using the axisLabelStyle property.
Axes have two types of tick marks: major and minor. Major ticks have labels and are used to specify the primary value intervals. Minor ticks do not have labels and are used to define the secondary value interval. You can specify the ticks’ appearance and position-related properties using the majorTickStyle and minorTickStyle properties for the axis.
SfRadialGauge(
    axes: <RadialAxis>[
      RadialAxis(minimum: 0, maximum: 200, labelOffset: 30,
          axisLineStyle: AxisLineStyle(
          thicknessUnit: GaugeSizeUnit.factor,thickness: 0.03),
          majorTickStyle: MajorTickStyle(length: 6,thickness: 4,color: Colors.white),
          minorTickStyle: MinorTickStyle(length: 3,thickness: 3,color: Colors.white),
          axisLabelStyle: GaugeTextStyle(color: Colors.white,fontWeight: FontWeight.bold,fontSize: 14 )
      )
    ]
)
Add speed limit alert
Next, we’ll add speed alerts in the form of color indicators of how fast a person is traveling. The green end of the color range will indicate a safe speed, the yellow color range will indicate a precarious speed, and the red color range will indicate a dangerous, high speed. To achieve this, we’ll use the range support in the Radial Gauge widget.
A range is a visual element that helps you visualize where a value falls on a radial scale. You can set color indicators as either a single range with a gradient or multiple ranges. In this blog, we’ll use a range with a gradient that contains three colors.
Every range has start and end values, and these can be specified using the startValue and endValue properties. The width of a range can be customized using the startWidth and endWidth properties.
ranges: <GaugeRange>[
  GaugeRange(startValue: 0, endValue: 200, sizeUnit: GaugeSizeUnit.factor,startWidth: 0.03,endWidth: 0.03,
      gradient: SweepGradient(
          colors: const<Color>[Colors.green,Colors.yellow,Colors.red],
          stops: const<double>[0.0,0.5,1]))],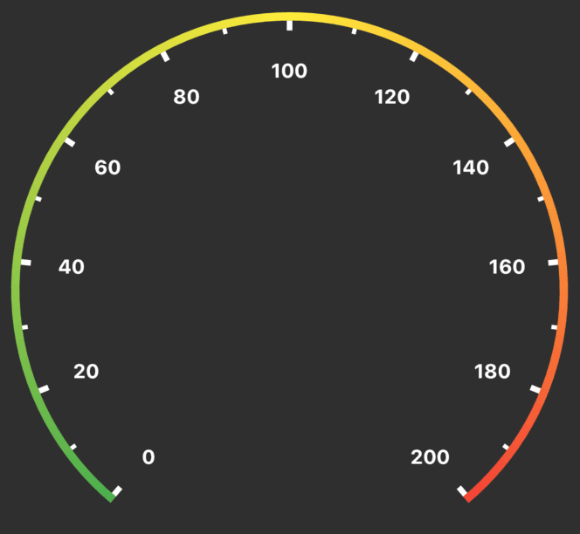
Add needle pointer
Next, we need to add a needle pointer to indicate the speed in the speedometer. This can be achieved using the pointer support in the Radial Gauge.
A needle pointer will be used to design the value indication symbol and point out the current value. Add the needle pointer in the Pointers collection and customize its length, size, and knob style.
pointers: <GaugePointer>[NeedlePointer(value:_value, needleLength: 0.95, enableAnimation: true,
    animationType: AnimationType.ease, needleStartWidth: 1.5, needleEndWidth: 6, needleColor: Colors.red,
    knobStyle: KnobStyle(knobRadius: 0.09))],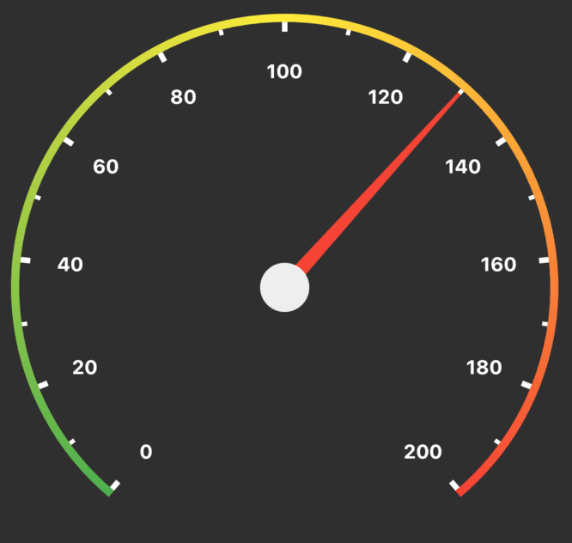
Display current speed value
Finally, we need to display the current speed value at the bottom of the speedometer. This can be achieved using the annotation support in the Radial Gauge.
Using annotations, you can add text widgets over the gauge to display the current pointer value and measurement info. The position of annotations can be customized using the angle and positionFactor properties.
annotations: <GaugeAnnotation>[
  GaugeAnnotation(widget: Container(child:
  Column(
    children: <Widget>[
      Text(_value.toString(), style: TextStyle(fontSize: 25,fontWeight: FontWeight.bold)),
      SizedBox(height: 20),
      Text('mph', style: TextStyle(fontSize: 14,fontWeight: FontWeight.bold))]
  )), angle: 90, positionFactor: 0.75)]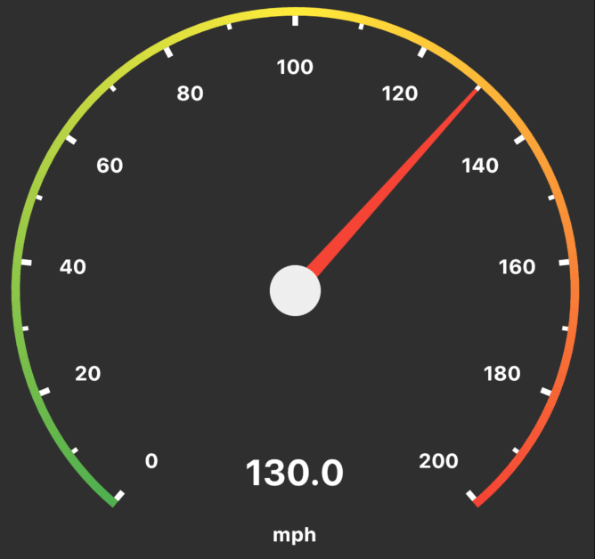
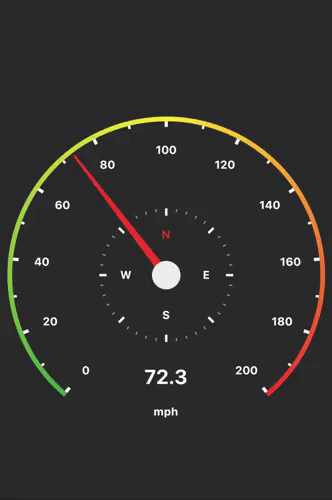
Add directional compass inside the speedometer
Additionally, you can add a directional compass to the speedometer to show the current direction of travel. This will increase the functionality of the speedometer app. To implement a compass, we will add another axis inside the Radial Gauge widget using the Axes property. This axis will be included behind the main axis at the 0 index in the axes collection so that the needle pointer will be displayed on top as shown in the following figure.
axes: <RadialAxis>[
  RadialAxis(startAngle: 270, endAngle: 270,minimum: 0,maximum: 80,interval: 10,radiusFactor: 0.4,
      showAxisLine: false, showLastLabel: false, minorTicksPerInterval: 4,
      majorTickStyle: MajorTickStyle(length: 8,thickness: 3,color: Colors.white),
      minorTickStyle: MinorTickStyle(length: 3,thickness: 1.5,color: Colors.grey),
      axisLabelStyle: GaugeTextStyle(color: Colors.white,fontWeight: FontWeight.bold,fontSize: 14 ),
      onLabelCreated: labelCreated),
  RadialAxis()]
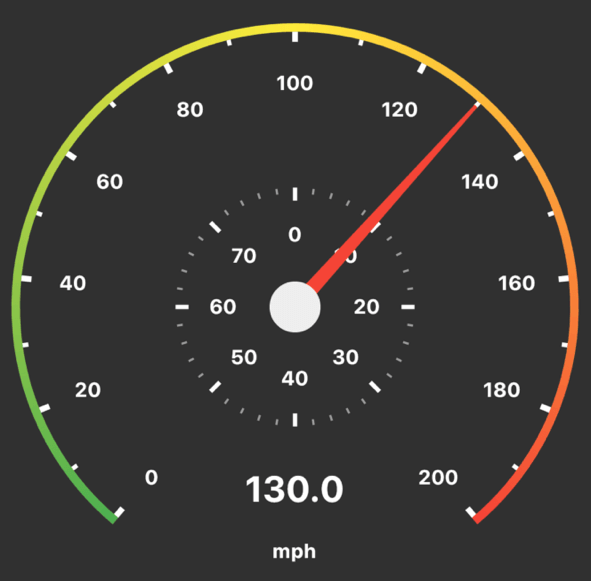
In the previous figure, the axis labels are displayed from 0 to 80 with an interval of 20. In the directional compass, we need to define string labels that denote corresponding directions. So, we will customize the numeric axis labels using the onLabelCreated event in the axis to note the north, east, south, and west directions.
axes: <RadialAxis>[
  RadialAxis(startAngle: 270, endAngle: 270,minimum: 0,maximum: 80,interval: 10,radiusFactor: 0.4,
      onLabelCreated: labelCreated),
  RadialAxis()]
void labelCreated(AxisLabelCreatedArgs args) {
  if(args.text =='0') {
    args.text = 'N';
    args.labelStyle=GaugeTextStyle(color: Colors.red,fontWeight: FontWeight.bold,fontSize: 14);
  }
  else if(args.text=='10')
    args.text='';
  else if(args.text=='20')
    args.text='E';
  else if(args.text=='30')
    args.text='';
  else if(args.text=='40')
    args.text='S';
  else if(args.text=='50')
    args.text='';
  else if(args.text=='60')
    args.text='W';
  else if(args.text=='70')
    args.text='';
}
Animate pointer with real-time data
In a real-time speedometer app, data may be fetched from a data service or device GPS to update the pointer value. For this demo, data will be updated using a timer with a 1-second duration, and the app state will be changed to rebuild the widgets. The _value double variable is used to set the pointer value and the annotation’s text value. In each time tick, the _value variable is assigned with some random value in the setState callback as shown in the following code to update the pointer and annotation text value.
_timer = Timer.periodic(const Duration(milliseconds: 1000),(_timer)
{
  setState(() {
    _value = (Random().nextDouble() * 40) + 60;
  });
});
You can download the complete sample code from this GitHub location.
Conclusion
The Syncfusion Radial Gauge widget for Flutter has been designed with flexible UI customization options to make adapting your app easy. It includes developer-friendly APIs to increase productivity.
Feel free to browse the Radial Gauge documentation to learn more about its features and APIs. You can also see Syncfusion’s Flutter app with many examples in this GitHub repo. Don’t miss our demo app in Google Play and the App Store.
Also, if you need a new widget for the Flutter framework that we don’t offer currently, please let us know in the comments section below. You can also contact us through our support forum, Direct-Trac, or feedback portal. As always, we are happy to assist you!


 No spam, just valuable updates.
Comments (10)
really cool
Very cool, though i haven’t been able to place the secondary meter the first one does look great, would love to see the full code to understand where to place the secondary meter.
Hi John,
You can add a secondary axis (meter) inside the Radial Gauge using the Axes property. This axis will be included behind the main axis at the 0 index in the axes collection so that the needle pointer in the primary axis will be displayed on top. You can see the full code below the GitHub location.
Link: https://github.com/SyncfusionExamples/flutter_speedometer_demo
Nice tutorial. I tried to recreate the speedometer but the annotations keep on flickering. Any idea how to stop the flickering?
Hi Ashish,
If you set a different length of annotation text, it shifts based on size to arrange in the center location. To avoid this, you can give the fixed length of the text by using the below code.
_value.toStringAsFixed(1)
if you still face the issue, you can create a support incident with details using the below link.
https://www.syncfusion.com/support/directtrac/incidents/newincident
Thanks for the reply, I will try the your suggestion. On the other hand, I tried adding image to GaugeAnnotation, it also flicks everytime. Is there any way to stop that? I have gone through the documentation and I cannot figure it out.
Hi Ashish,
Can you create a support incident with details such as your actual code or sample using the below link? It will help us to validate your issue and provide you with a quick solution.
https://www.syncfusion.com/support/directtrac/incidents/newincident
Here I have an app which is using a simple speedometer for analog reading. Can you make it possible to change colors when speed is on 70 green , 70-80 Blue and 80+ Red ..
https://play.google.com/store/apps/details?id=com.digitalspeedometer.odometer.speedometer.speed
I am using flutter.
Hi Mujahid,
Yes, we can achieve your requirement with Radial Gauge. We have created a sample for your reference and you can find it in the below link.
Sample – https://www.syncfusion.com/downloads/support/directtrac/general/ze/speedometer_flutter-1836651746.zip
Please let us know if you need any further assistance in this.
Thanks
Meikandan
Thank You Very Much