

In the recent Essential Studio® 2023 Volume 3 release, we introduced an innovative TreeView control for our Syncfusion .NET Multi-Platform App UI (MAUI) platform.
The .NET MAUI TreeView, or SfTreeView in the code, is a control designed to display hierarchical data structures within your app. This includes structures such as organizational hierarchies and nested connections. It offers a user-friendly interface for interacting with complex data structures and navigating through multiple levels of information. It allows users to expand and collapse nodes, revealing or concealing underlying information as needed.
This new control significantly enhances how you present hierarchical data, improving navigation within your .NET MAUI apps. Whether you’re an experienced .NET developer or just starting, we invite you to explore the capabilities of this exciting new control with us.
Stay with us as we delve deeper into the features and benefits of the .NET MAUI TreeView control!
Key features
The .NET MAUI TreeView control offers a variety of user-friendly features, including:
Data population—bound and unbound modes
You can populate the .NET MAUI TreeView with a data source using the SfTreeView.ItemsSource property, or you can create and add the TreeViewNode in a hierarchical structure to the SfTreeView.Nodes property.
Selection
The TreeView lets users select items either programmatically or through touch interactions using the SfTreeView.SelectionMode property. The property must not be set to None. The control supports different selection modes to perform selection operations:
- None: Disable selection.
- SelectionMode.Single: Users can select only a single item. When they click on the selected item, the selection will not be cleared. This is the default value for SelectionMode.
- SelectionMode.SingleDeselect: Users can select only a single item. When clicking on the selected item, the selection is cleared.
- SelectionMode.Multiple: Users can select more than one item. Selection is not cleared when selecting more than one item. A selection can be cleared by clicking on it again.
- SelectionMode.Extended: Users can select multiple items using the common key modifiers.
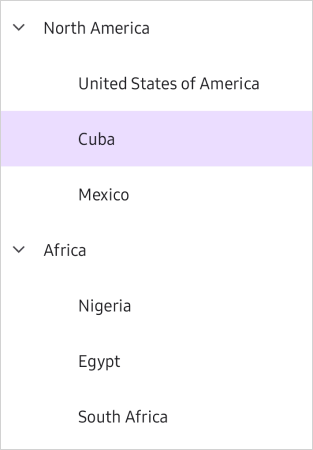
Selecting an item in the .NET MAUI TreeView control
Item templating
The .NET MAUI TreeView allows you to customize the appearance of the content view and expander view by setting the SfTreeView.ItemTemplate and SfTreeView.ExpanderTemplate properties.
Expand and collapse nodes
You can expand and collapse the nodes in the TreeView programmatically or through user interaction:
- ExpandActionTarget: Expanding and collapsing of nodes can be performed by tapping the expander view or content view by setting the SfTreeView.ExpandActionTarget property:
- ExpandActionTarget.Expander: Users can expand and collapse nodes by tapping the expander.
- ExpandActionTarget.Node: Users can expand and collapse nodes by tapping either the expander or the content.
- AutoExpandMode: By default, the items in the tree view will be in a collapsed state. You can define how the nodes should expand when loading TreeView by using the SfTreeView.AutoExpandMode property. This property is only applicable in bound mode. In unbound mode, you must set the IsExpanded property to true while creating the nodes. Define the SfTreeView.AutoExpandMode property with:
- AutoExpandMode.RootNodesExpanded: Expands only the root items when loaded.
- AutoExpandMode.AllNodesExpanded: Expands all items when loaded.
- AutoExpandMode.None: When the TreeView loads, it initially collapses all items. Despite this, you or the user can manually or programmatically expand these items. This feature offers significant flexibility in how you present and interact with your data in the TreeView.
- Programmatic expand and collapse: The TreeView also allows programmatic expansion and collapse based on the TreeViewNode and level using the following methods:
- ExpandNode(TreeViewNode item): To expand the particular TreeViewNode passed to it.
- CollapseNode(TreeViewNode item): To collapse the particular TreeViewNode passed to it.
- ExpandNodes(int level): To expand all items of a level passed to it.
- CollapseNodes(int level): To collapse all items of a level passed to it.
- ExpandAll(): To expand all the items in the TreeView.
- CollapseAll(): To collapse all the items in the TreeView.
Expanding and collapsing items in .NET MAUI TreeView control
Getting started with the .NET MAUI TreeView control
We have seen the top features of the .NET MAUI TreeView control. Now, let’s see how to add it to your application.
Step 1: Create a .NET MAUI project
First, create a .NET MAUI project.
Step 2: Add the .NET MAUI TreeView NuGet package
Syncfusion .NET MAUI controls are available in the NuGet gallery. To add the .NET MAUI TreeView control to your project, open the NuGet package manager in Visual Studio, and search for Syncfusion.Maui.TreeView, and then install it.
Step 3: Register the handler
In the MauiProgram.cs file, register the handler for Syncfusion core. Refer to the following code.
using Syncfusion.Maui.Core.Hosting;

public static class MauiProgram
{
   public static MauiApp CreateMauiApp()
   {
	var builder = MauiApp.CreateBuilder();
	builder
	  .UseMauiApp<App>()
	  .ConfigureSyncfusionCore()
	  .ConfigureFonts(fonts =>
	   {
		fonts.AddFont("OpenSans-Regular.ttf", "OpenSansRegular");
		fonts.AddFont("OpenSans-Semibold.ttf", "OpenSansSemibold");
                fonts.AddFont("Roboto-Medium.ttf", "Roboto-Medium");
                fonts.AddFont("Roboto-Regular.ttf", "Roboto-Regular");
            });
	return builder.Build();
   }
}
Step 4: Add the namespaces
Add the Syncfusion.Maui.TreeView and Syncfusion.TreeView.Engine namespaces in your XAML page.
<xmlns:syncfusion ="clr-namespace:Syncfusion.Maui.TreeView;assembly=Syncfusion.Maui.TreeView"
     xmlns:treeviewengine="clr-namespace:Syncfusion.TreeView.Engine;assembly=Syncfusion.Maui.TreeView"/>
Step 5: Define the TreeView control
Add the .NET MAUI TreeView control using the included namespace.
<syncfusion:SfTreeView x:Name="treeView"/>
Step 6: Define the TreeView nodes
To build a tree view, you can use the TreeView control and a hierarchical structure of TreeViewNode objects. This tree structure is established by adding one or more root nodes to the SfTreeView.Nodes collection (without a data source, in unbound mode).
Refer to the following code example.
<ContentPage xmlns="http://schemas.microsoft.com/dotnet/2021/maui"
xmlns:x="http://schemas.microsoft.com/winfx/2009/xaml"
xmlns:syncfusion="clr-namespace:Syncfusion.Maui.TreeView;assembly=Syncfusion.Maui.TreeView"
xmlns:treeviewengine="clr-namespace:Syncfusion.TreeView.Engine;assembly=Syncfusion.Maui.TreeView"
x:Class="TreeViewMaui.MainPage">
<ContentPage.Content>
<syncfusion:SfTreeView x:Name="treeView" ExpandActionTarget="Node" FullRowSelect="True">
<syncfusion:SfTreeView.Nodes>
<treeviewengine:TreeViewNode Content="Australia" IsExpanded="True">
<treeviewengine:TreeViewNode.ChildNodes>
<treeviewengine:TreeViewNode Content="New South Wales" IsExpanded="True">
<treeviewengine:TreeViewNode.ChildNodes>
<treeviewengine:TreeViewNode Content="Sydney" IsExpanded="True"/>
<treeviewengine:TreeViewNode Content="Wollongong" IsExpanded="True"/>
<treeviewengine:TreeViewNode Content="Newcastle–Maitland" IsExpanded="True"/>
</treeviewengine:TreeViewNode.ChildNodes>
</treeviewengine:TreeViewNode>
<treeviewengine:TreeViewNode Content="Victoria" IsExpanded="True">
<treeviewengine:TreeViewNode.ChildNodes>
<treeviewengine:TreeViewNode Content="Melbourne" IsExpanded="True"/>
</treeviewengine:TreeViewNode.ChildNodes>
</treeviewengine:TreeViewNode>
<treeviewengine:TreeViewNode Content="Queensland" IsExpanded="True">
<treeviewengine:TreeViewNode.ChildNodes>
<treeviewengine:TreeViewNode Content="Brisbane" IsExpanded="True"/>
</treeviewengine:TreeViewNode.ChildNodes>
</treeviewengine:TreeViewNode>
<treeviewengine:TreeViewNode Content="Western Australia" IsExpanded="True">
<treeviewengine:TreeViewNode.ChildNodes>
<treeviewengine:TreeViewNode Content="Perth"/>
</treeviewengine:TreeViewNode.ChildNodes>
</treeviewengine:TreeViewNode>
<treeviewengine:TreeViewNode Content="South Australia" IsExpanded="True">
<treeviewengine:TreeViewNode.ChildNodes>
<treeviewengine:TreeViewNode Content="Adelaide"/>
</treeviewengine:TreeViewNode.ChildNodes>
</treeviewengine:TreeViewNode>
</treeviewengine:TreeViewNode.ChildNodes>
</treeviewengine:TreeViewNode>
<treeviewengine:TreeViewNode Content="Brazil" IsExpanded="True">
<treeviewengine:TreeViewNode.ChildNodes>
<treeviewengine:TreeViewNode Content="São Paulo" IsExpanded="True">
<treeviewengine:TreeViewNode.ChildNodes>
<treeviewengine:TreeViewNode Content="São Paulo"/>
<treeviewengine:TreeViewNode Content="Campinas"/>
<treeviewengine:TreeViewNode Content="Sorocaba"/>
</treeviewengine:TreeViewNode.ChildNodes>
</treeviewengine:TreeViewNode>
<treeviewengine:TreeViewNode Content="Rio de Janeiro"/>
<treeviewengine:TreeViewNode Content="Minas Gerais">
<treeviewengine:TreeViewNode.ChildNodes>
<treeviewengine:TreeViewNode Content="Belo Horizonte"/>
<treeviewengine:TreeViewNode Content="Distrito Federal e Entorno (Brasilia)"/>
</treeviewengine:TreeViewNode.ChildNodes>
</treeviewengine:TreeViewNode>
<treeviewengine:TreeViewNode Content="Ceará">
<treeviewengine:TreeViewNode.ChildNodes>
<treeviewengine:TreeViewNode Content="Fortaleza"/>
<treeviewengine:TreeViewNode Content="Caucaia"/>
</treeviewengine:TreeViewNode.ChildNodes>
</treeviewengine:TreeViewNode>
<treeviewengine:TreeViewNode Content="Paraná">
<treeviewengine:TreeViewNode.ChildNodes>
<treeviewengine:TreeViewNode Content="Curitiba"/>
</treeviewengine:TreeViewNode.ChildNodes>
</treeviewengine:TreeViewNode>
</treeviewengine:TreeViewNode.ChildNodes>
</treeviewengine:TreeViewNode>
<treeviewengine:TreeViewNode Content="China" IsExpanded="True">
<treeviewengine:TreeViewNode.ChildNodes>
<treeviewengine:TreeViewNode Content="Guangdong">
<treeviewengine:TreeViewNode.ChildNodes>
<treeviewengine:TreeViewNode Content="Guanghou"/>
</treeviewengine:TreeViewNode.ChildNodes>
</treeviewengine:TreeViewNode>
<treeviewengine:TreeViewNode Content="Jingjinji">
<treeviewengine:TreeViewNode.ChildNodes>
<treeviewengine:TreeViewNode Content="Beijing"/>
<treeviewengine:TreeViewNode Content="Tianjin"/>
</treeviewengine:TreeViewNode.ChildNodes>
</treeviewengine:TreeViewNode>
<treeviewengine:TreeViewNode Content="Yangtze River Delta">
<treeviewengine:TreeViewNode.ChildNodes>
<treeviewengine:TreeViewNode Content="Shanghai"/>
</treeviewengine:TreeViewNode.ChildNodes>
</treeviewengine:TreeViewNode>
<treeviewengine:TreeViewNode Content="Chengyu">
<treeviewengine:TreeViewNode.ChildNodes>
<treeviewengine:TreeViewNode Content="Chongqing"/>
</treeviewengine:TreeViewNode.ChildNodes>
</treeviewengine:TreeViewNode>
<treeviewengine:TreeViewNode Content="Zhejiang Province">
<treeviewengine:TreeViewNode.ChildNodes>
<treeviewengine:TreeViewNode Content="Hangzhou"/>
</treeviewengine:TreeViewNode.ChildNodes>
</treeviewengine:TreeViewNode>
</treeviewengine:TreeViewNode.ChildNodes>
</treeviewengine:TreeViewNode>
<treeviewengine:TreeViewNode Content="United States of America" IsExpanded="True">
<treeviewengine:TreeViewNode.ChildNodes>
<treeviewengine:TreeViewNode Content="New York"/>
<treeviewengine:TreeViewNode Content="California">
<treeviewengine:TreeViewNode.ChildNodes>
<treeviewengine:TreeViewNode Content="Los Angeles"/>
<treeviewengine:TreeViewNode Content="San Jose"/>
<treeviewengine:TreeViewNode Content="San Francisco"/>
</treeviewengine:TreeViewNode.ChildNodes>
</treeviewengine:TreeViewNode>
<treeviewengine:TreeViewNode Content="Illinois">
<treeviewengine:TreeViewNode.ChildNodes>
<treeviewengine:TreeViewNode Content="Chicago"/>
</treeviewengine:TreeViewNode.ChildNodes>
</treeviewengine:TreeViewNode>
<treeviewengine:TreeViewNode Content="Texas">
<treeviewengine:TreeViewNode.ChildNodes>
<treeviewengine:TreeViewNode Content="Houston"/>
<treeviewengine:TreeViewNode Content="San Antonio"/>
<treeviewengine:TreeViewNode Content="Dallas"/>
</treeviewengine:TreeViewNode.ChildNodes>
</treeviewengine:TreeViewNode>
<treeviewengine:TreeViewNode Content="Pennsylvania">
<treeviewengine:TreeViewNode.ChildNodes>
<treeviewengine:TreeViewNode Content="Philadelphia"/>
</treeviewengine:TreeViewNode.ChildNodes>
</treeviewengine:TreeViewNode>
</treeviewengine:TreeViewNode.ChildNodes>
</treeviewengine:TreeViewNode>
<treeviewengine:TreeViewNode Content="India" IsExpanded="True">
<treeviewengine:TreeViewNode.ChildNodes>
<treeviewengine:TreeViewNode Content="Delhi">
<treeviewengine:TreeViewNode.ChildNodes>
<treeviewengine:TreeViewNode Content="New Delhi"/>
</treeviewengine:TreeViewNode.ChildNodes>
</treeviewengine:TreeViewNode>
<treeviewengine:TreeViewNode Content="Maharashtra">
<treeviewengine:TreeViewNode.ChildNodes>
<treeviewengine:TreeViewNode Content="Mumbai"/>
<treeviewengine:TreeViewNode Content="Pune"/>
</treeviewengine:TreeViewNode.ChildNodes>
</treeviewengine:TreeViewNode>
<treeviewengine:TreeViewNode Content="West Bengal">
<treeviewengine:TreeViewNode.ChildNodes>
<treeviewengine:TreeViewNode Content="Kolkatta"/>
</treeviewengine:TreeViewNode.ChildNodes>
</treeviewengine:TreeViewNode>
<treeviewengine:TreeViewNode Content="Karnataka">
<treeviewengine:TreeViewNode.ChildNodes>
<treeviewengine:TreeViewNode Content="Bangalore"/>
</treeviewengine:TreeViewNode.ChildNodes>
</treeviewengine:TreeViewNode>
<treeviewengine:TreeViewNode Content="Tamil Nadu">
<treeviewengine:TreeViewNode.ChildNodes>
<treeviewengine:TreeViewNode Content="Chennai"/>
</treeviewengine:TreeViewNode.ChildNodes>
</treeviewengine:TreeViewNode>
</treeviewengine:TreeViewNode.ChildNodes>
</treeviewengine:TreeViewNode>
</syncfusion:SfTreeView.Nodes>
</syncfusion:SfTreeView>
</ContentPage.Content>
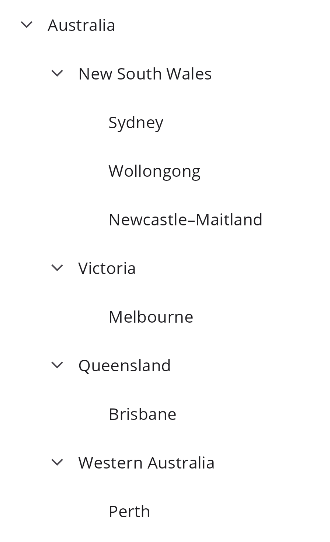
</ContentPage>Refer to the following output image.
Data population—bound mode
The .NET MAUI TreeView also enables binding data by using the ItemsSource property. To achieve this, please follow these steps.
Step 1: Create a data model
Create a simple data model to bind the data for the TreeView, as shown in the following code example.
public class FileManager : INotifyPropertyChanged
{
    #region Fields

    private string itemName;
    private ImageSource imageIcon;
    private ObservableCollection<FileManager> subFiles;

    #endregion

    #region Constructor
    public FileManager()
    {
    }

    #endregion

    #region Properties
    public ObservableCollection<FileManager> SubFiles
    {
        get { return subFiles; }
        set
        {
            subFiles = value;
            RaisedOnPropertyChanged("SubFiles");
        }
    }

    public string ItemName
    {
        get { return itemName; }
        set
        {
            itemName = value;
            RaisedOnPropertyChanged("ItemName");
        }
    }

    public ImageSource ImageIcon
    {
        get { return imageIcon; }
        set
        {
            imageIcon = value;
            RaisedOnPropertyChanged("ImageIcon");
        }
    }

    #endregion

    #region INotifyPropertyChanged

    public event PropertyChangedEventHandler PropertyChanged;

    public void RaisedOnPropertyChanged(string propertyName)
    {
        if (PropertyChanged != null)
        {
            PropertyChanged(this, new PropertyChangedEventArgs(propertyName));
        }
    }

    #endregion
Step 2: Create the view model
Create a FileManagerViewModel class with a Files collection property initialized with 20 data objects, as shown in the following code example.
public class FileManagerViewModel
{
    #region Fields

    private ObservableCollection<FileManager> files;

    #endregion

    #region Constructor

    public FileManagerViewModel()
    {
        GenerateSource();
    }

    #endregion

    #region Properties

    public ObservableCollection<FileManager> Files
    {
        get { return files; }
        set { this.files = value; }
    }

    #endregion

    #region Generate Source

    private void GenerateSource()
    {
        var nodeImageInfo = new ObservableCollection<FileManager>();

        var doc = new FileManager() { ItemName = "Documents", ImageIcon = "folder.png" };
        var download = new FileManager() { ItemName = "Downloads", ImageIcon = "folder.png" };
        var mp3 = new FileManager() { ItemName = "Music", ImageIcon ="folder.png" };
        var pictures = new FileManager() { ItemName = "Pictures", ImageIcon = "folder.png" };
        var video = new FileManager() { ItemName = "Videos", ImageIcon ="folder.png" };

        var pollution = new FileManager() { ItemName = "Environmental Pollution.docx", ImageIcon = "word.png" };
        var globalWarming = new FileManager() { ItemName = "Global Warming.ppt", ImageIcon = "ppt.png" };
        var sanitation = new FileManager() { ItemName = "Sanitation.docx", ImageIcon = "word.png"};
        var socialNetwork = new FileManager() { ItemName = "Social Network.pdf", ImageIcon ="pdfimage.png" };
        var youthEmpower = new FileManager() { ItemName = "Youth Empowerment.pdf", ImageIcon = "pdfimage.png" };


        var tutorials = new FileManager() { ItemName = "Tutorials.zip", ImageIcon = "zip.png" };
        var typeScript = new FileManager() { ItemName = "TypeScript.7z", ImageIcon ="zip.png" };
        var uiGuide = new FileManager() { ItemName = "UI-Guide.pdf", ImageIcon = "pdfimage.png"};

        var song = new FileManager() { ItemName = "Gouttes", ImageIcon = "audio.png" };

        var camera = new FileManager() { ItemName = "Camera Roll", ImageIcon = "folder.png" };
        var stone = new FileManager() { ItemName = "Stone.jpg", ImageIcon = "image.png" };
        var wind = new FileManager() { ItemName = "Wind.jpg", ImageIcon = "image.png"};

        var img0 = new FileManager() { ItemName = "WIN_20160726_094117.JPG", ImageIcon = "people_circle23.png" };
        var img1 = new FileManager() { ItemName = "WIN_20160726_094118.JPG", ImageIcon = "people_circle2.png" };

        var video1 = new FileManager() { ItemName = "Naturals.mp4", ImageIcon = "video.png" };
        var video2 = new FileManager() { ItemName = "Wild.mpeg", ImageIcon = "video.png" };       doc.SubFiles = new ObservableCollection<FileManager>
       {
           pollution,
           globalWarming,
           sanitation,
           socialNetwork,
           youthEmpower
       };

       download.SubFiles = new ObservableCollection<FileManager>
       {
           tutorials,
           typeScript,
           uiGuide
       };

       mp3.SubFiles = new ObservableCollection<FileManager>
       {
           song
       };

       pictures.SubFiles = new ObservableCollection<FileManager>
       {
           camera,
           stone,
           wind
       };
       camera.SubFiles = new ObservableCollection<FileManager>
       {
           img0,
           img1
       };

       video.SubFiles = new ObservableCollection<FileManager>
       {
           video1,
           video2
       };

       nodeImageInfo.Add(doc);
       nodeImageInfo.Add(download);
       nodeImageInfo.Add(mp3);
       nodeImageInfo.Add(pictures);
       nodeImageInfo.Add(video);
       files = nodeImageInfo;
   }

   #endregion
}
Step 3: Set the binding context
Then, set the FileManagerViewModel class instance as the BindingContext of your page to bind its properties to the TreeView.
<ContentPage xmlns="http://schemas.microsoft.com/dotnet/2021/maui"
             xmlns:x="http://schemas.microsoft.com/winfx/2009/xaml"
             xmlns:syncfusion="clr-namespace:Syncfusion.Maui.TreeView;assembly=Syncfusion.Maui.TreeView"
             xmlns:local="clr-namespace:TreeViewMaui"
             x:Class="TreeViewMaui.MainPage">

    <ContentPage.BindingContext>
        <local:FileManagerViewModel x:Name="viewModel"/>
    </ContentPage.BindingContext>
</ContentPage>
Step 4: Bind data collection to TreeView
You can now use the ItemsSource property to bind data to the SfTreeView by filling it with a hierarchical data source. The SfTreeView.ChildPropertyName property can be used to set the name of the child objects.
Refer to the following code example.
<syncfusion:SfTreeView x:Name="treeView"
                       ChildPropertyName="SubFiles"
                       ItemsSource="{Binding Files}">
Step 5: Define the tree view items
Refer to the following code example. In it, we create a custom user interface (UI) to display the data items by using the ItemTemplate property.
<syncfusion:SfTreeView x:Name="treeView"
ChildPropertyName="SubFiles"
ItemsSource="{Binding Files}"
AutoExpandMode="AllNodesExpanded">
<syncfusion:SfTreeView.ItemTemplate>
<DataTemplate>
<Grid x:Name="grid" RowSpacing="0">
<Grid.ColumnDefinitions>
<ColumnDefinition Width="40" />
<ColumnDefinition Width="*" />
</Grid.ColumnDefinitions>
<Grid Grid.Column="0">
<Image Source="{Binding ImageIcon}"
VerticalOptions="Center"
HorizontalOptions="Center"
HeightRequest="24"
WidthRequest="24"/>
</Grid>
<Grid Grid.Column="1">
<Label LineBreakMode="NoWrap"
Text="{Binding ItemName}"
VerticalTextAlignment="Center">
</Label>
</Grid>
</Grid>
</DataTemplate>
</syncfusion:SfTreeView.ItemTemplate>
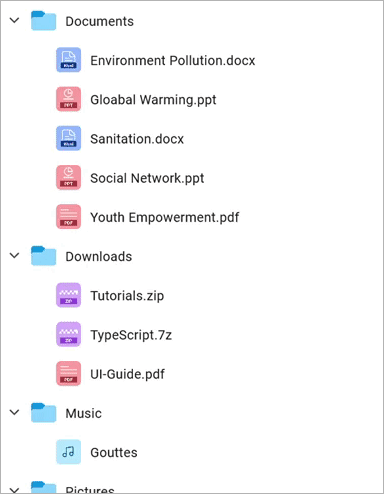
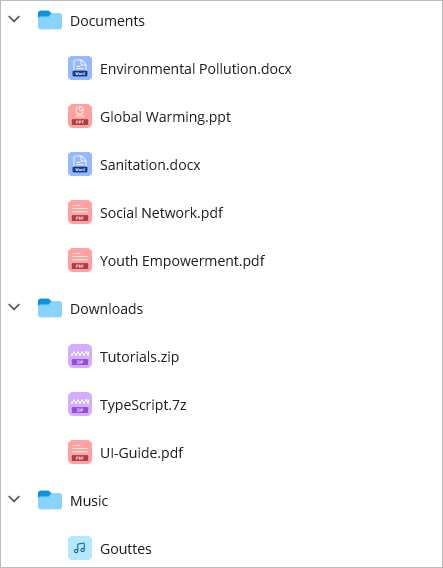
</syncfusion:SfTreeView>After executing the previous code examples, we’ll get a TreeView like in the following image.
GitHub references
For more details, refer to the populating nodes in unbound and bound modes in .NET MAUI TreeView demos on GitHub.
Conclusion
Thanks for reading! In this blog, we’ve explored the features of the new Syncfusion .NET MAUI TreeView control, unveiled in the 2023 Volume 3 release. Details about this control are also available on our Release Notes and What’s New pages. We encourage you to try out the control and share your thoughts in the comments below!
To start evaluating this control immediately, download Essential Studio® for .NET MAUI.
For questions, you can contact us via our support forum, support portal, or feedback portal. We’re always here to assist you!
 No spam, just valuable updates.