TLDR: Creating a .NET MAUI app with dependencies, loading a PDF form document, filling, validating the data in the form fields, and sharing the filled form externally by designing a Share button.
PDF forms are an essential part of modern-day documentation. They are used for various purposes, including job applications, registration, medical forms, etc. However, manually filling out these forms can take time and effort.
Fortunately, the Syncfusion .NET MAUI PDF Viewer provides an easy-to-use solution for filling out PDF forms electronically. It allows you to fill, edit, save, export, and import the AcroForm fields in a PDF document.
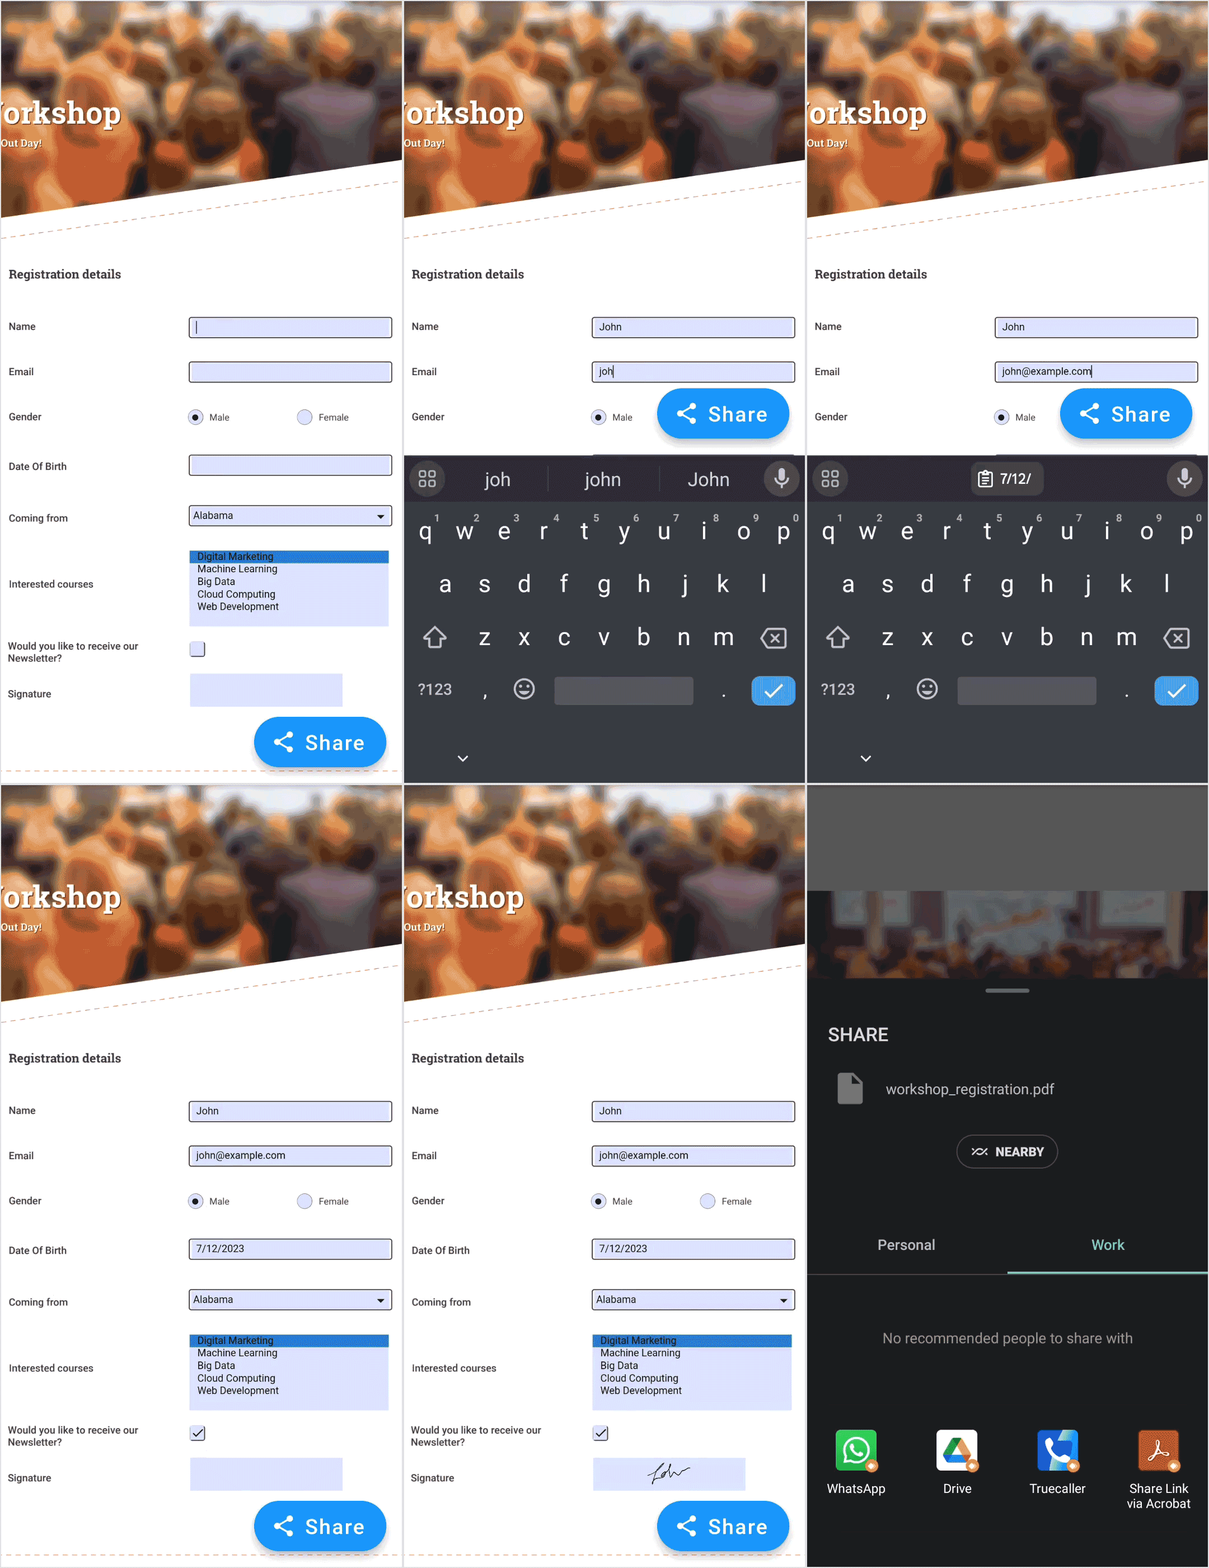
Let’s see how to fill out a registration form with proper validations using Syncfusion .NET MAUI PDF Viewer and share the filled PDF form.
Benefits of filling out PDF Forms electronically
Filling out PDF forms electronically has several benefits:
- Digitizes the manual process of filling out paper forms.
- Streamlines data collection processes.
- Enhances accuracy.
- Efficient and environmentally friendly approach to handling information.
Supported form fields in .NET MAUI PDF Viewer
The .NET MAUI PDF Viewer allows you to load and fill in the following form fields in a PDF.
- Text box
- Combo box
- Radio button
- Check box
- Signature
- List box
You can edit the values of all these controls. Using the Tab key, you can also preserve the tab order while navigating among the form fields.
Create a .NET MAUI app and add dependencies
Let’s create a new .NET MAUI app and add the following NuGet package references to your project from the NuGet Gallery:
- Syncfusion.Maui.PdfViewer
- Syncfusion.Maui.Picker
- Syncfusion.Maui.Button
Next, register the Syncfusion core handler in the MauiProgram.cs file.
using Syncfusion.Maui.Core.Hosting;

namespace PdfFormFillingExample
{
    public static class MauiProgram
    {
        public static MauiApp CreateMauiApp()
        {
            var builder = MauiApp.CreateBuilder();
            builder
                .UseMauiApp<App>()
                .ConfigureFonts(fonts =>
                {
                    fonts.AddFont("OpenSans-Regular.ttf", "OpenSansRegular");
                    fonts.AddFont("OpenSans-Semibold.ttf", "OpenSansSemibold");
                });
            builder.ConfigureSyncfusionCore();
            return builder.Build();
        }
    }
}
Fill and share a registration form
Let’s see how to fill and share a PDF form for workshop registration using Syncfusion .NET MAUI PDF Viewer by following these steps.
Here, we’ll implement all the design and code-behind logic in the MainPage.xaml and MainPage.xaml.cs files.
Step 1: In the MainPage.xaml file, import the control namespaces Syncfusion.Maui.PdfViewer, Syncfusion.Maui.Picker, and Syncfusion.Maui.Buttons to display the fillable registration PDF form in a PDF. The date picker is used to choose a date for the date of birth field. We’ll also design a floating Share button to share the filled PDF form externally.
Refer to the following code example.
<?xml version="1.0" encoding="utf-8" ?>
<ContentPage xmlns="http://schemas.microsoft.com/dotnet/2021/maui"
             xmlns:x="http://schemas.microsoft.com/winfx/2009/xaml"
             xmlns:viewer="clr-namespace:Syncfusion.Maui.PdfViewer;assembly=Syncfusion.Maui.PdfViewer"
             xmlns:picker="clr-namespace:Syncfusion.Maui.Picker;assembly=Syncfusion.Maui.Picker"
             xmlns:button="clr-namespace:Syncfusion.Maui.Buttons;assembly=Syncfusion.Maui.Buttons"
             Title="Registration Form"
             x:Class="PdfFormFillingExample.MainPage">

 <Grid>
  <viewer:SfPdfViewer x:Name="pdfViewer" FormFieldFocusChanged="pdfViewer_FormFieldFocusChanged" />
  <button:SfButton x:Name="shareButton" ImageSource="share_icon.png" ShowIcon="True" VerticalOptions="End" HorizontalOptions="End" Margin="0,0,20,20" Text="Share" TextColor="White" Clicked="shareButton_Clicked" />
  <Grid x:Name="datePickerGrid" IsVisible="False">
   <Grid BackgroundColor="Black" Opacity="0.5" />
   <picker:SfDatePicker x:Name="datePicker" WidthRequest="250" HeightRequest="250" BackgroundColor="White" HorizontalOptions="Center" VerticalOptions="Center" OkButtonClicked="datePicker_OkButtonClicked" CancelButtonClicked="datePicker_CancelButtonClicked" >
    <picker:SfDatePicker.FooterView>
     <picker:PickerFooterView ShowOkButton="True" Height="40" />
    </picker:SfDatePicker.FooterView>
   </picker:SfDatePicker>
  </Grid>
 </Grid>

</ContentPage>
Step 2: In the MainPage.xaml.cs class, load the required PDF document in the constructor.
Refer to the following code example.
public MainPage()
{
    InitializeComponent();

    // Load the PDF document.
    Stream? stream = typeof(MainPage).GetTypeInfo().Assembly.GetManifestResourceStream("PdfFormFillingExample.Assets.workshop_registration.pdf");
    pdfViewer.LoadDocument(stream);
}
In this example, we used the PDF named workshop_registration and added it to the Assets folder in the project. This PDF form document will have the following form fields:
- Name
- Gender
- Date of Birth
- State (Coming from)
- Interested courses
- Newsletter subscription and
- Signature
Step 3: To make things easier for the users, let’s add the SfDatePicker control to pick a date when the Date of Birth field is focused. This can be made possible through the PDF Viewer’s FormFieldFocusChanged event.
Refer to the following code example.
/// <summary>
/// Handling the focus change on the DOB field to display DatePicker.
/// </summary>
private void pdfViewer_FormFieldFocusChanged(object sender, FormFieldFocusChangedEvenArgs e)
{
    // Check whether the focused field is the date of birth field and let the user choose a date.
    if (e.FormField.Name == "dob")
    {
       if (e.HasFocus)
       {
           datePickerGrid.IsVisible = true;

           // Hide the soft keypad shown when clicking the text form field on Android and iOS devices.
           #if ANDROID
           if(this.Handler.PlatformView is Android.Views.View inputView)
           {
               using (var inputMethodManager = (Android.Views.InputMethods.InputMethodManager?)inputView.Context?
                 .GetSystemService(Android.Content.Context.InputMethodService))
                   {
                       if (inputMethodManager != null)
                       {
                           var token = Platform.CurrentActivity?.CurrentFocus?.WindowToken;
                           inputMethodManager.HideSoftInputFromWindow(token, Android.Views
                             .InputMethods.HideSoftInputFlags.None);
                           Platform.CurrentActivity?.Window?.DecorView.ClearFocus();
                       }
                    }
           }
           #elif IOS && !MACCATALYST
           UIKit.UIApplication.SharedApplication.SendAction(new ObjCRuntime.Selector("resignFirstResponder"), null, null, null);
           #endif
       }
    }
}

/// <summary>
/// Handle DatePicker's Ok button action.
/// </summary>
private void datePicker_OkButtonClicked(object sender, EventArgs e)
{
     FormField field = pdfViewer.FormFields.Where(f => f.Name == "dob").First();
     if (field is TextFormField dateOfBirthField)
     {
          // Remove time and retain only the date from the selected DateTime object.
          string date = datePicker.SelectedDate.ToString().Split(' ')[0];

           // Convert the date to dd/mm/yyyy format.
           string[] dateComponents = date.Split("/");
           date = $"{dateComponents[1]}/{dateComponents[0]}/{dateComponents[2]}";

           dateOfBirthField.Text = date;
      }
      datePickerGrid.IsVisible = false;
}

/// <summary>
/// Handle DatePicker's Cancel button action.
/// </summary>
private void datePicker_CancelButtonClicked(object sender, EventArgs e)
{
   datePickerGrid.IsVisible = false;
}
Note: Like this, you can also use the FormFieldFocusChanged event to present your controls and messages.
Step 4: Once the required fields are filled, we must validate the data in the form fields.
Let’s use the ValidateFormData( ) method to perform validation. This method is invoked in the Share floating button’s Clicked event’s handler method named shareButton_Clicked.
Refer to the following code example.
/// <summary>
/// Perform validations on the data filled on the form fields.
/// </summary>
/// <returns>”True”, if all the validations are passed. Otherwise, “False”.</returns>
async Task<bool> ValidateFormData()
{
    List<string> errors = new List<string>();

    foreach (FormField formField in pdfViewer.FormFields)
    {
        if (formField is TextFormField textFormField)
        {
            if (textFormField.Name == “Name”)
            {
                 if (string.IsNullOrEmpty(textFormField.Text))
                 {
                     errors.Add(“Name is required.”);
                 }
                 else if (textFormField.Text.Length < 3)
                 {
                     errors.Add(“Name should be at least 3 characters.”);
                 }
                 else if (textFormField.Text.Length > 30)
                 {
                     errors.Add(“Name should not exceed 30 characters.”);
                 }
                 else if (Regex.IsMatch(textFormField.Text, @”[0-9]”))
                 {
                     errors.Add(“Name should not contain numbers.”);
                 }
                 else if (Regex.IsMatch(textFormField.Text, @”[!@#$%^&*(),.?””{}|<>]”))
                 {
                     errors.Add(“Name should not contain special characters.”);
                 }
             }
             else if (textFormField.Name == “dob”)
             {
                 if (string.IsNullOrEmpty(textFormField.Text))
                 {
                     errors.Add(“Date of birth is required.”);
                 }
                 else if (!DateTime.TryParseExact(textFormField.Text, “dd/MM/yyyy”, CultureInfo.InvariantCulture, DateTimeStyles.None, out _))
                 {
                     errors.Add(“Date of birth should be in dd/mm/yyyy format.”);
                 }
             }
             else if (textFormField.Name == “email”)
             {
                 if (string.IsNullOrEmpty(textFormField.Text))
                 {
                    errors.Add(“Email is required.”);
                 }
                 else if (!Regex.IsMatch(textFormField.Text, @”^[\w-\.]+@([\w-]+\.)+[\w-]{2,4}$"))
                 {
                    errors.Add(“Email should be in correct format.”);
                 }
             }
         }
         else if (formField is ListBoxFormField listBoxFormField)
         {
            if (listBoxFormField.SelectedItems.Count == 0)
            {
                errors.Add(“Please select at least one course.”);
            }
         }
         else if (formField is SignatureFormField signatureFormField)
         {
            if (signatureFormField.Signature == null)
           {
              errors.Add(“Please sign the document.”);
           }
         }
     }

     if (errors.Count > 0)
     {
        await DisplayAlert(“Errors”, string.Join(“\n”, errors), “Try Again”);
        return false;
     }
     else
       return true;
   }
}
Step 5: Upon successful validation, share the filled PDF form externally using the shareButton_Clicked event.
Refer to the following code example.
/// <summary>
/// Share the PDF form externally via the platform’s share dialog.
/// </summary>
private async void shareButton_Clicked(object sender, EventArgs e)
{
    bool isFormDataValid = await ValidateFormData();
    if (isFormDataValid)
    {
        MemoryStream outputStream = new MemoryStream();
        await pdfViewer.SaveDocumentAsync(outputStream);

        string filePath = Path.Combine(Environment.GetFolderPath(Environment.SpecialFolder.LocalApplicationData), “ workshop_registration.pdf”);
        File.WriteAllBytes(filePath, outputStream.ToArray());

        await Share.Default.RequestAsync(new ShareFileRequest
        {
            Title = “Share filled form”,
            File = new ShareFile(filePath)
        });
    }
}
After executing the above code examples, you will get the following output.
References
For more details, refer to Filling and sharing PDF forms using NET MAUI PDF Viewer documentation and GitHub demos.

Supercharge your cross-platform apps with Syncfusion's robust .NET MAUI controls.
Conclusion
Thanks for reading! In this blog, we’ve seen how to effortlessly fill out forms, validate the data, and share the filled PDF form using the .NET MAUI PDF Viewer. Try out this powerful tool and share your feedback in the comments section.
To our existing customers, the new version of Essential Studio® is available on the License and Downloads page. If you’re new to Syncfusion, we offer a 30-day free trial to experience the vast array of features we provide.
You can also reach us through our support forum, support portal, or feedback portal. We’re always happy to assist you!
Related blogs
- Chart of the Week: Creating a .NET MAUI Fast Line Chart to Visualize the Arctic Sea Ice Extent Since 2000
- Introducing the 11th Set of New .NET MAUI Controls and Features
- Enhancing User Experience: Implementing Typos Tolerance in .NET MAUI Autocomplete
- Sneak Peek at 2024 Volume 1: .NET MAUI
