

For anyone who is looking for flight availability, checking for the lowest available airfare is the very first thing you do. Isn’t it nice when a single calendar can show you the lowest prices of all available flights on each day of a month for a specific route? Let’s walk through how to customize the scheduler component to design an airfare calendar displaying these lowest prices.
Before starting with the customization part, let’s go through an overview of the basic functionalities available in scheduler.
Overview
Scheduling can be anything that relates to a date and time. With our pure JavaScript scheduler component (Essential JS 2), you can plan and manage events or tasks during any specific interval of time. You can easily customize all the schedule elements based on your application-specific needs.
Built-in views
There are six display modes available—day, week, work week, month, agenda, and month agenda—out of which week mode is displayed as an active view. Each view can have its own set of configurations, allowing the same feature to be exhibited with different values on each view.
To navigate among views and dates, navigation options are available on the schedule header bar. The date range of the active view will also be displayed in the header bar, and clicking on it will open a calendar pop-up for ease of date selection.
Module injection
Module injection plays a vital role in our pure JavaScript platforms, as each schedule view is maintained as an individual module. Therefore, to work with specific views, the appropriate module needs to be first injected into the application. For example, to work only with the day view on scheduler, it is enough to inject the Day module alone.
Binding appointment data
Providing start and end time data is enough to display appointments in the scheduler.
import { Schedule, Day, Week, WorkWeek, Month, Agenda } from '@syncfusion/ej2-schedule';

Schedule.Inject(Day, Week, WorkWeek, Month, Agenda);

let scheduleObj: Schedule = new Schedule({
    height: '550px',
    selectedDate: new Date(2018, 1, 15),
    eventSettings: {
        dataSource: [{
            Subject: 'Prayer Time',
            StartTime: new Date(2018, 1, 15, 9, 30),
            EndTime: new Date(2018, 1, 15, 10, 30)
        }, {
            Subject: 'Lunch Break',
            StartTime: new Date(2018, 1, 15, 13, 30),
            EndTime: new Date(2018, 1, 15, 14, 30)
        }]
    }
});
scheduleObj.appendTo('#Schedule');
To bind the data with different field names rather than the default available ones, map them accordingly using the fields mapping property as shown.
let scheduleObj: Schedule = new Schedule({
    height: '550px',
    …
    …
    eventSettings: {
        dataSource: [{
           Id: 12,
           Departure: new Date(2018, 1, 11, 9, 30),
           Arrival: new Date(2018, 1, 11, 11, 30),
           Fare: "110.34"
        },
        {
           Id: 13,
           Departure: new Date(2018, 1, 11, 15, 30),
           Arrival: new Date(2018, 1, 11, 17, 30),
           Fare: "115.28"
        }],
        fields: {
            id: { name: "Id" },
            startTime: { name: "Departure" },
            endTime: { name: "Arrival" },
            subject: { name: "Fare" }
        }
    }
});
Customizing scheduler to display airfare calendar
Let’s display only the month view for this customization. To achieve this, inject only the Month module using the code Schedule.Inject(Month). The lowest price available on each day needs to be displayed as appointments with style customization applied to them using a template option.
Here, the entire flight data of a specific month needs to be sorted based on the available fares. Since we’ve planned to display only a single piece of data per day, restrict the total data count to be the number of days of a month and assign only that filtered data count to the scheduler dataSource.
Other than these functionalities, we will also highlight the day of a month that has the comparatively overall lowest price.
Getting started
To build and run a new Essential JS 2 application in TypeScript, make use of the QuickStart project from GitHub and also install the necessary packages using the following command line.
Choose an appropriate path in your system and navigate to that path in the command prompt. Then type in the following commands one by one.
git clone https://github.com/syncfusion/ej2-quickstart.git quickstart
cd quickstart
npm install
The npm install command will install all the needed JS 2 packages in the quickstart project. Now you can start directly adding the scheduler component-related code to it.
An additional step before starting to code is to check the settings within your system.config.js file, to see whether the schedule component’s dependency packages are mapped appropriately, as shown in the following code listing.
System.config({
    paths: {
        'npm:': './node_modules/',
        'syncfusion:': 'npm:@syncfusion/'
    },
    map: {
        app: 'app',
        //Syncfusion packages mapping
        "@syncfusion/ej2-base": "syncfusion:ej2-base/dist/ej2-base.umd.min.js",
        "@syncfusion/ej2-data": "syncfusion:ej2-data/dist/ej2-data.umd.min.js",
        "@syncfusion/ej2-inputs": "syncfusion:ej2-inputs/dist/ej2-inputs.umd.min.js",
        "@syncfusion/ej2-buttons": "syncfusion:ej2-buttons/dist/ej2-buttons.umd.min.js",
        "@syncfusion/ej2-lists": "syncfusion:ej2-lists/dist/ej2-lists.umd.min.js",
        "@syncfusion/ej2-navigations": "syncfusion:ej2-navigations/dist/ej2-navigations.umd.min.js",
        "@syncfusion/ej2-dropdowns": "syncfusion:ej2-dropdowns/dist/ej2-dropdowns.umd.min.js",
        "@syncfusion/ej2-popups": "syncfusion:ej2-popups/dist/ej2-popups.umd.min.js",
        "@syncfusion/ej2-calendars": "syncfusion:ej2-calendars/dist/ej2-calendars.umd.min.js",
        "@syncfusion/ej2-schedule": "syncfusion:ej2-schedule/dist/ej2-schedule.umd.min.js"
    },
    packages: {
        'app': { main: 'app', defaultExtension: 'js' }
    }
});
System.import('app');
Ensure the CSS is referenced properly within the [src/styles/styles.css] file with the following code.
@import '../../node_modules/@syncfusion/ej2/material.css';
Using scheduler component
Now, define a div element with an ID to represent scheduler within the body section of your index.html file, as shown in the following code listing. To learn more basic details about how to get started with our pure JavaScript controls, refer to our documentation.
<!DOCTYPE html>
<html lang="en">
<head>
    <title>Essential JS 2</title>
    <meta charset="utf-8" />
    <meta name="viewport" content="width=device-width, initial-scale=1.0, user-scalable=no" />
    <meta name="description" content="Essential JS 2" />
    <meta name="author" content="Syncfusion" />
    <link rel="shortcut icon" href="resources/favicon.ico" />
    <link href="https://maxcdn.bootstrapcdn.com/bootstrap/3.3.7/css/bootstrap.min.css" rel="stylesheet" />
    <!--style reference from node_modules/@syncfusion/ej2/-->
    <link href="/styles/styles.css" rel="stylesheet" />
    <script src="node_modules/systemjs/dist/system.src.js" type="text/javascript"></script>
    <script src="system.config.js" type="text/javascript"></script>
</head>
<body>
    <div style="margin: 50px;">
        <!-- Element to be rendered as Schedule -->
        <div id="Schedule"></div>
    </div>
</body>
</html>
To render the scheduler on a page, import and initialize it within the app.ts file, as shown in the next code listing. Using the module injection method, inject only the Month module, using Schedule.Inject(Month).
Set the required properties, such as height, views and selectedDate.
views—To set a specific view in schedule. Here, we will be using only month view.
readonly—To prevent CRUD-related actions from being performed in a schedule.
selectedDate—To make the schedule display with this provided date.
/**
 * The need for importing DataManager-related items is described in the appropriate section.
*/
import { Schedule, Month } from '@syncfusion/ej2-schedule';
import { DataManager, Query, Predicate } from '@syncfusion/ej2-data';

/**
 * Inject only month view here.
*/
Schedule.Inject(Month);

/**
 * Schedule defined with readonly mode, as we are simply displaying the fare details and no interactions on it.
*/
    let scheduleObj: Schedule = new Schedule({
        height: '550px',
        views: ['Month'],
        readonly: true,
        selectedDate: new Date(2018, 3, 1)
    });
    scheduleObj.appendTo('#Schedule');
To prevent any of the pop-ups from opening while clicking on the scheduler appointments or cells, make use of the popupOpen event and define args.cancel as true within it.
/**
 * PopupOpenEventArgs needs to be imported to use the arguments of popupOpen event.
*/
import { Schedule, Month, PopupOpenEventArgs } from '@syncfusion/ej2-schedule';
import { DataManager, Query, Predicate } from '@syncfusion/ej2-data';

/**
 * Inject only month view here.
*/
Schedule.Inject(Month);

/**
 * Schedule defined with readonly mode, as we are simply displaying the fare details and no interactions on it.
*/
    let scheduleObj: Schedule = new Schedule({
        height: '550px',
        views: ['Month'],
        readonly: true,
        selectedDate: new Date(2018, 3, 1),

/**
 *  `popupOpen` is an event that triggers before any of the pop-ups opens on scheduler.
*/
        popupOpen: (args: PopupOpenEventArgs) => {
            args.cancel = true;
        }
    });
    scheduleObj.appendTo('#Schedule');
Populating required data
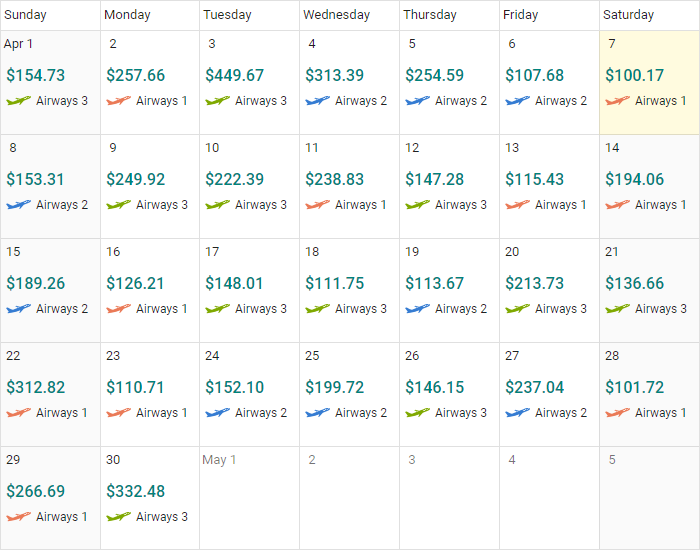
Let’s assume we have the dataSource object with the following flight data: departure, arrival, airline name, fare, and other related fields, if needed. Let’s compare the rates of three flights per day on a specific route for the month of April 2018.
Since data for three flights a day for a whole month will be huge to define and handle here, for demo purposes, we are generating the random data object of count 90 with the required fields (three appointments per day for 30 days) through looping as defined in the following function.
function generateEvents(): Object[] {
    let collections: Object[] = [];
    let dataCollections: { [key: string]: Object }[] = [
        {
            Id: 100,
            Departure: new Date(2018, 3, 1, 8, 30),
            Arrival: new Date(2018, 3, 1, 10, 0),
            AirlineId: 1
        }, {
            Id: 102,
            Departure: new Date(2018, 3, 1, 11, 0),
            Arrival: new Date(2018, 3, 1, 12, 0),
            AirlineId: 2
        }, {
            Id: 103,
            Departure: new Date(2018, 3, 1, 14, 0),
            Arrival: new Date(2018, 3, 1, 15, 0),
            AirlineId: 3
        }
    ];
    let start: Date = new Date(2018, 3, 1);
    let dateCollections: Date[] = Array.apply(null, { length: 30 })
        .map((value: number, index: number) => { return new Date(start.getTime() + (1000 * 60 * 60 * 24 * index)); });
    let id: number = 1;
    let day: number = 0;
    for (let date of dateCollections) {
        let resource: number = 1;
        for (let data of dataCollections) {
            let strDate: Date = new Date((<date>data.Departure).getTime());
            let endDate: Date = new Date((<date>data.Arrival).getTime());
            collections.push({
                Id: id,
                Departure: new Date(strDate.setDate(strDate.getDate() + day)),
                Arrival: new Date(endDate.setDate(endDate.getDate() + day)),
                AirlineId: resource,
                Fare: ((Math.random() * 500) + 100).toFixed(2)
            });
            resource += 1;
            id += 1;
        }
        day += 1;
    }
    return collections;
}
Now the data collection is ready, and we need to filter it based on the lowest fare per day, with a logic as given in the following.
function filterByFare(start: Date, dateCollections: Date[], appointments: Object[]): Object[] {
    let finalData: Object[] = [];
    for (let date of dateCollections) {
        let strTime: Date = new Date(+date);
        let endTime: Date = new Date(new Date(strTime.getTime()).setHours(23, 59, 59, 59));
        let predicate: Predicate = new Predicate('Departure', 'greaterthanorequal', strTime).
            and(new Predicate('Arrival', 'greaterthanorequal', strTime)).
            and(new Predicate('Departure', 'lessthan', endTime)).
            or(new Predicate('Departure', 'lessthanorequal', strTime).
                and(new Predicate('Arrival', 'greaterthan', strTime)));
        let filteredEvents: Object[] = new DataManager({ json: appointments }).executeLocal(new Query().where(predicate));
        let perDayData: Object[] = filteredEvents;
        if (perDayData.length > 0) {
            perDayData.sort((a: { [key: string]: Object }, b: { [key: string]: Object }) => ((<number>a.Fare) - (<number>b.Fare)));
            finalData.push(perDayData[0]);
        }
    }
    return finalData;
}
NOTE: In the previous code, we have used the data manager-related code to make use of the data manager, and it is necessary to import its necessary items from @syncfusion/ej2-data.
Filtering based on fare needs to be called within the generateEvents method before returning the result, as follows.
function generateEvents(): Object[] {
    let collections: Object[] = [];
    …
    …
    …
    let filteredCollection: Object[] = filterByFare(start, dateCollections, collections);
    return filteredCollection;
}
The filtering process on the data collection is done and it is time to assign it to the schedule’s dataSource and display it on the scheduler. Now, each day will hold exactly one appointment, as per the filtering result.
let scheduleObj: Schedule = new Schedule({
    height: '550px',
    …
    …
    eventSettings: {
        dataSource: generateEvents(),
        fields: {
            id: { name: "Id" },
            startTime: { name: "Departure" },
            endTime: { name: "Arrival" },
            subject: { name: "Fare" }
        }
    }
});
Also, the appropriate fields given in the dataSource are mapped onto scheduler through the fields property.
Appearance customization
The readonly scheduler now displays with our provided flight data in a usual appointment style. To customize the appearance of it, we need to define the template option within the eventSettings property.
The template definition can be referenced from the following and its ID needs to be mapped to the template option of eventSettings property. Also, the styles used to customize the events need to be defined within the index.html file.
// Template design for appointments to be defined within the index.html file

<script id="apptemplate" type="text/x-template">
    <div class='template-wrap'>
        <div class='fare-detail'>$${Fare}</div>
        <div class='airline-name' style='display:flex;padding-left:5px;'>
            <div class="airline-logo ${getImage(data.AirlineId)}"></div>
            <div class='airway-name'>${getName(data.AirlineId)}</div>
        </div>
    </div>
</script>

// Styles to be applied to events
<style type="text/css">
    .e-schedule .e-appointment .template-wrap {
        width: 100%;
    }

    .e-schedule .template-wrap .airline-logo {
        background-size: cover;
        margin-top: -3px;
        width: 25px;
        height: 25px;
    }

    .e-schedule .template-wrap .airline-logo.air1 {
        background: url('/images/airways-1.svg') no-repeat 50% 50%;
    }

    .e-schedule .template-wrap .airline-logo.air2 {
        background: url('/images/airways-2.svg') no-repeat 50% 50%;
    }

    .e-schedule .template-wrap .airline-logo.air3 {
        background: url('/images/airways-3.svg') no-repeat 50% 50%;
    }

    .e-schedule .fare-detail {
        color: #00837B;
        font-size: 16px;
        font-weight: 500;
        height: 25px;
        padding-left: 5px;
    }

    .e-schedule.e-device .fare-detail {
        font-size: 11px;
    }

    .e-schedule .airway-name {
        font-size: 12px;
        overflow: hidden;
        padding-left: 5px;
        text-overflow: ellipsis;
        color: rgba(0,0,0,0.87);
    }

    .e-schedule.e-device .airway-name {
        display: none;
    }

    .e-schedule .e-month-view .e-appointment {
        height: 45px;
        background: none;
        border-width: 0;
        top: 10px !important;
    }

    .e-schedule.e-device .e-month-view .e-appointment {
        height: 40px;
    }

    .e-schedule .e-month-view .e-appointment .e-appointment-details {
        height: inherit;
    }

    .e-schedule .e-month-view .e-appointment.e-appointment-border,
    .e-schedule .e-month-view .e-appointment:focus {
        border-width: 0;
    }
</style>
In the previous template definition, we made a function call to get the airway name and image based on the airline ID, which needs to be defined appropriately within the app.ts file.
interface TemplateFunction extends Window {
    getImage?: Function;
    getName?: Function;
}

// Below function to be defined within the .ts file
(window as TemplateFunction).getImage = (value: number) => {
    return (value === 1) ? 'air1' : (value === 2) ? 'air2' : 'air3';
};

(window as TemplateFunction).getName = (value: number) => {
    return (value === 1) ? 'Airways 1' : (value === 2) ? 'Airways 2' : 'Airways 3';
};
All is done and now the final thing is to highlight the overall lowest fare date of a month. To do so, we will make use of the dataBound event, within which we will check for the lowest fare for the month.
import { Schedule, Month } from '@syncfusion/ej2-schedule';
import { DataManager, Query, Predicate } from '@syncfusion/ej2-data';

/**
 * Inject only month view here.
*/
Schedule.Inject(Month);

/**
 * Interface for defining template function
*/

interface TemplateFunction extends Window {
    getImage?: Function;
    getName?: Function;
}

// Below function to be defined within the .ts file
(window as TemplateFunction).getImage = (value: number) => {
    return (value === 1) ? 'air1' : (value === 2) ? 'air2' : 'air3';
};

(window as TemplateFunction).getName = (value: number) => {
    return (value === 1) ? 'Airways 1' : (value === 2) ? 'Airways 2' : 'Airways 3';
};

/**
 * Schedule defined with readonly mode, as we are simply displaying the fare details and no interactions on it.
*/
let scheduleObj: Schedule = new Schedule({
    height: '550px',
    views: ['Month'],
    readonly: true,
    showHeaderBar: false, // To hide the header bar
    selectedDate: new Date(2018, 3, 1),
    eventSettings: {
        template: "#apptemplate",
        dataSource: generateEvents(),
        fields: {
            id: { name: "Id" },
            startTime: { name: "Departure" },
            endTime: { name: "Arrival" },
            subject: { name: "Fare" }
        }
    },

/**
 *  `popupOpen` is an event that triggers before any of the pop-ups opens on scheduler.
*/
    popupOpen: (args: PopupOpenEventArgs) => {
        args.cancel = true;
    },

/**
 * To customize and highlight the cell background of the cell that has the best offer.
*/
    dataBound: () => {
        let eventCollections: Object[] = scheduleObj.getCurrentViewEvents();
        eventCollections.sort((a: { [key: string]: Object }, b: { [key: string]: Object }) =>
            ((<number>a.Fare) - (<number>b.Fare)));
        let indexDate: Date = new Date((<date>(<{ [key: string]: Object }>eventCollections[0]).Departure).getTime());
        indexDate.setHours(0, 0, 0, 0);
        let index: number = scheduleObj.getIndexOfDate(scheduleObj.activeView.renderDates, indexDate);
        let target: HTMLElement = scheduleObj.element.querySelectorAll('.e-work-cells')[index] as HTMLElement;
        target.style.background = '#FFFBDF';
    }
});
Summary
In summary, we have seen how to customize the scheduler through its built-in properties, using additional styling options to display it as an airfare calendar. Stay tuned, we will write more blogs showing how to customize scheduler in more enhanced ways to achieve other use case scenarios.
Try our scheduler component by downloading from the free trial or GitHub. Feel free to have a look at our online samples and documentation to explore other available options. If you have any queries or require clarification, please let us know in the comments section below. You can also contact us through our support forum or Direct-Trac. We are always happy to assist you!
You can download the complete sample from GitHub.
 No spam, just valuable updates.