
Data validation allows you to define rules that restrict the type, length, and data values that can be entered into an Excel cell. By implementing data validation, you can prevent data entry errors, enforce consistency, and improve the overall quality of your Excel workbooks. Whether you’re building a data entry form, creating templates, or automating data import processes, adding data validation using C# provides a robust and flexible solution.
Syncfusion Excel library (XlsIO) is a C# library that provides a high-level API for creating and editing Excel files. It provides support for adding data validation to your Excel documents.
This blog post will show you how to use the Syncfusion Excel Library to add data validation to an Excel worksheet. We will cover the following data validation contexts:
Dropdown List
A dropdown list is a common worksheet feature that is very helpful for restricting a cell value to a predefined set of values. The user can provide an array of values for the list separately or specify them from a cell range inside the workbook. This ensures that the cell value is always one of the expected values.
The following code example illustrates how to create a dropdown list data validation:
//List data validation
IDataValidation listValidation = worksheet.Range["C3"].DataValidation;
listValidation.ListOfValues = new string[] { "ListItem1", "ListItem2", "ListItem3" };
Number
Number validation lets you specify whether the cell should accept only integers or decimal numbers with specific limits.
The following code example illustrates how to set number validation:
//Data Validation for Numbers
IDataValidation numberValidation = worksheet.Range["D3"].DataValidation;
numberValidation.AllowType = ExcelDataType.Integer;
numberValidation.CompareOperator = ExcelDataValidationComparisonOperator.Between;
numberValidation.FirstFormula = "0";
numberValidation.SecondFormula = "10";
Text length
Text length validation is useful to limit the number of characters entered in a cell. By specifying the minimum and maximum length, you can ensure that only valid text is entered by the users.
Here’s an example of setting up text length validation:
//Text length data validation
IDataValidation txtLengthValidation = worksheet.Range["A3"].DataValidation;
txtLengthValidation.AllowType = ExcelDataType.TextLength;
txtLengthValidation.CompareOperator = ExcelDataValidationComparisonOperator.Between;
txtLengthValidation.FirstFormula = "0";
txtLengthValidation.SecondFormula = "5";
Date or time
Restricting date or time values is crucial in many applications. You can validate and limit the entered date or time range to ensure data accuracy. For example, start date, end date, buy time, and sell time are important key values that need to be accurate for processing data and producing a finance report.
The following code example illustrates how to set date and time data validation:
// Date validation
IDataValidation dateValidation = worksheet.Range["E3"].DataValidation;
dateValidation.AllowType = ExcelDataType.Date;
dateValidation.CompareOperator = ExcelDataValidationComparisonOperator.Between;
dateValidation.FirstDateTime = new DateTime(2003, 5, 10);
dateValidation.SecondDateTime = new DateTime(2004, 5, 10);

// Time validation
IDataValidation timeValidation = worksheet.Range["B3"].DataValidation;
timeValidation.AllowType = ExcelDataType.Time;
timeValidation.CompareOperator = ExcelDataValidationComparisonOperator.Between;
timeValidation.FirstFormula = "10.00";
timeValidation.SecondFormula = "12.00";
Formula
In cases where you need to evaluate cell values based on custom conditions, formula validation can be helpful. Excel formulas can be employed to validate cell values against specific criteria.
The following code example illustrates how to set formula validation:
// Custom data validation
IDataValidation dataValidation = worksheet.Range["A3"].DataValidation;

// Set the data validation type to Formula
dataValidation.AllowType = ExcelDataType.Formula;

// Set the formula for validation
dataValidation.FirstFormula = "=A3>0";
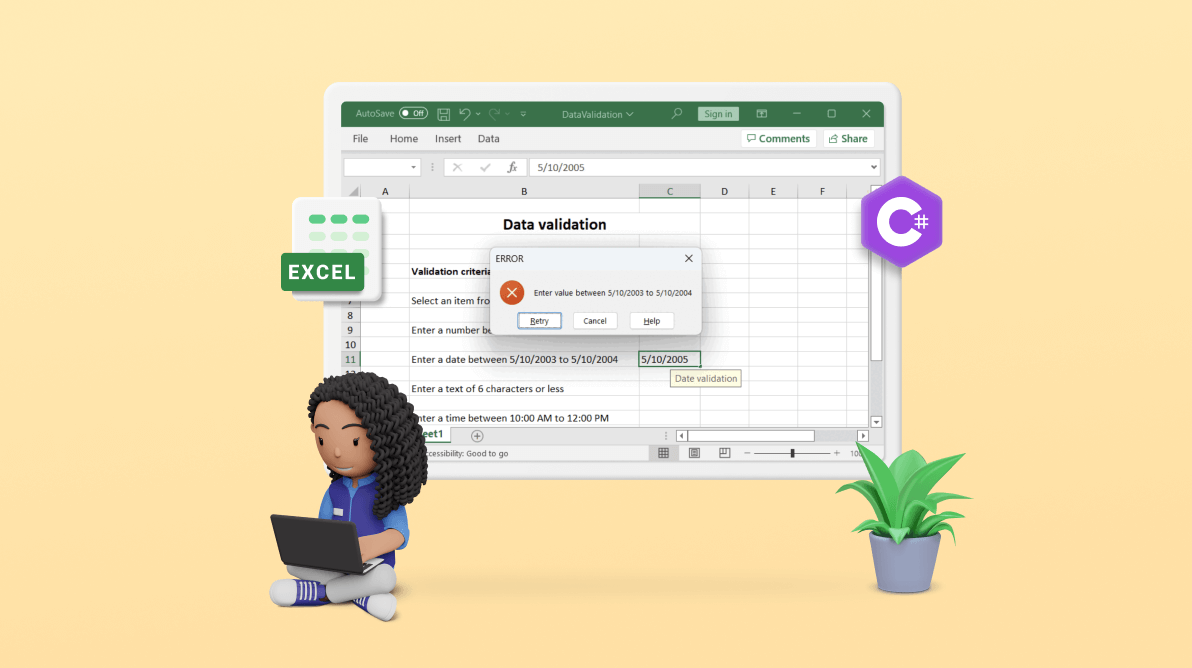
The following example shows the code for adding data validation to an Excel document:
using (ExcelEngine excelEngine = new ExcelEngine())
{
    IApplication application = excelEngine.Excel;
    application.DefaultVersion = ExcelVersion.Xlsx;
    IWorkbook workbook = application.Workbooks.Create(1);
    IWorksheet sheet = workbook.Worksheets[0];

    //Adding list validation
    IDataValidation listValidation = sheet.Range["C7"].DataValidation;
    sheet.Range["B7"].Text = "Select an item from the dropdown list";
    listValidation.ListOfValues = new string[] { "Brand", "Price", "Product" };
    listValidation.PromptBoxText = "List validation";
    listValidation.IsPromptBoxVisible = true;
    listValidation.ShowPromptBox = true;

    //Adding number validation
    IDataValidation numbervalidation = sheet.Range["C9"].DataValidation;
    sheet.Range["B9"].Text = "Enter a number between 0 to 10";
    numbervalidation.AllowType = ExcelDataType.Integer;
    numbervalidation.CompareOperator = ExcelDataValidationComparisonOperator.Between;
    numbervalidation.FirstFormula = "0";
    numbervalidation.SecondFormula = "10";
    numbervalidation.ShowErrorBox = true;
    numbervalidation.ErrorBoxText = "Enter value between only 0 to 10";
    numbervalidation.ErrorBoxTitle = "ERROR";
    numbervalidation.PromptBoxText = "Number validation";
    numbervalidation.ShowPromptBox = true;

    //Adding date validation
    IDataValidation dateValidation = sheet.Range["C11"].DataValidation;
    sheet.Range["B11"].Text = "Enter a date between 5/10/2003 to 5/10/2004";
    dateValidation.AllowType = ExcelDataType.Date;
    dateValidation.CompareOperator = ExcelDataValidationComparisonOperator.Between;
    dateValidation.FirstDateTime = new DateTime(2003, 5, 10);
    dateValidation.SecondDateTime = new DateTime(2004, 5, 10);
    dateValidation.ShowErrorBox = true;
    dateValidation.ErrorBoxText = "Enter value between 5/10/2003 to 5/10/2004";
    dateValidation.ErrorBoxTitle = "ERROR";
    dateValidation.PromptBoxText = "Date validation";
    dateValidation.ShowPromptBox = true;

    //Adding text length validation
    IDataValidation textValidation = sheet.Range["C13"].DataValidation;
    sheet.Range["B13"].Text = "Enter a text of 6 characters or less";
    textValidation.AllowType = ExcelDataType.TextLength;
    textValidation.CompareOperator = ExcelDataValidationComparisonOperator.Between;
    textValidation.FirstFormula = "1";
    textValidation.SecondFormula = "6";
    textValidation.ShowErrorBox = true;
    textValidation.ErrorBoxText = "Enter a text with length of maximum 6 characters";
    textValidation.ErrorBoxTitle = "ERROR";
    textValidation.PromptBoxText = "Text length validation";
    textValidation.ShowPromptBox = true;

    //Adding time validation
    IDataValidation timeValidation = sheet.Range["C15"].DataValidation;
    sheet.Range["B15"].Text = "Enter a time between 10:00 AM to 12:00 PM";
    timeValidation.AllowType = ExcelDataType.Time;
    timeValidation.CompareOperator = ExcelDataValidationComparisonOperator.Between;
    timeValidation.FirstFormula = "10";
    timeValidation.SecondFormula = "12";
    timeValidation.ShowErrorBox = true;
    timeValidation.ErrorBoxText = "Enter the time between 10 to 12 ";
    timeValidation.ErrorBoxTitle = "ERROR";
    timeValidation.PromptBoxText = "Time validation";
    timeValidation.ShowPromptBox = true;


    //Adding time validation
    IDataValidation formulaValidation = sheet.Range["C17"].DataValidation;
    sheet.Range["B17"].Text = "Enter a negative number";
    formulaValidation.AllowType = ExcelDataType.Formula;
    formulaValidation.FirstFormula = "=C17 < 0";
    formulaValidation.ShowErrorBox = true;
    formulaValidation.ErrorBoxText = "Enter only negative numbers";
    formulaValidation.ErrorBoxTitle = "ERROR";
    formulaValidation.PromptBoxText = "Formula validation";
    formulaValidation.ShowPromptBox = true;

    sheet.Range["B2:C2"].Merge();

    sheet.Range["B2"].Text = "Data validation";
    sheet.Range["B5"].Text = "Validation criteria";
    sheet.Range["C5"].Text = "Validation";
    sheet.Range["B5"].CellStyle.Font.Bold = true;
    sheet.Range["C5"].CellStyle.Font.Bold = true;
    sheet.Range["B2"].CellStyle.Font.Bold = true;
    sheet.Range["B2"].CellStyle.Font.Size = 16;
    sheet.Range["B2"].CellStyle.HorizontalAlignment = ExcelHAlign.HAlignCenter;

    sheet.UsedRange.AutofitColumns();
    sheet.UsedRange.AutofitRows();

    //Saving the workbook
    FileStream outputStream = new FileStream("DataValidation.xlsx", FileMode.Create, FileAccess.Write);
    workbook.SaveAs(outputStream);
    outputStream.Dispose();
}
GitHub samples
You can download examples of data validation in C# from this GitHub page.
Conclusion
As you can see, the Syncfusion Excel (XlsIO) Library supports data validation in C#. Take a moment to peruse the documentation, where you’ll find other Excel options and features like conditional formatting, tables, pivot tables, and charts.
Using the XlsIO library, you can export Excel data to PDF, image, data table, CSV, TSV, HTML, collections of objects, ODS, JSON, and more file formats.
If you are new to our Excel Library, following our getting started guide is highly recommended.
Are you already a Syncfusion user? You can download the product setup here. If you’re not a Syncfusion user yet, you can download a free 30-day trial here.
Please let us know in the comments section below if you have any questions about these features. Also, you can contact us through our support forum, support portal, or feedback portal. We are always happy to assist you!
 No spam, just valuable updates.