
TL;DR: Query parameters define sorting, pagination, or filter operations and are more readable because they include the keys in the URL. URL parameters are less readable because they don’t, and they are used to define locations of resources or entities. This blog shows how to use URL parameters and query strings in a Blazor app to make it responsive to user input.
As developers, it is essential to understand how URL parameters and query strings work to get the maximum out of them in Blazor routing. This article will explore the use of URL parameters and query strings using a Blazor application.

Prerequisites
Before creating the app, you need to have these installed:
- Visual Studio 2022
- .NET SDK 5.0 or later (this blog uses .NET 6.0)
What is a URL parameter?
URL parameters are a way to pass data using the route URL. They are enclosed within curly braces ({}) and separated by forward slashes (/), as shown in the following code example.
api/employee/{id}In the example, {id} is a URL parameter of the endpoint. It is possible to have multiple URL parameters separated by forward slashes in a single URL. For example, if we need to get employee details using the employee ID and employee type, we can pass multiple parameters, as in the following example.
api/employee/{id}/{type}Using URL parameters in a Blazor app
Let’s create a simple Blazor app to demonstrate how to use URL parameters.
Step 1: Initialize a new project
First, we need to create a Blazor app using Visual Studio. To do this, open Visual Studio and create a new Blazor WebAssembly app called BlazorRoutingParameters, as shown in the following image.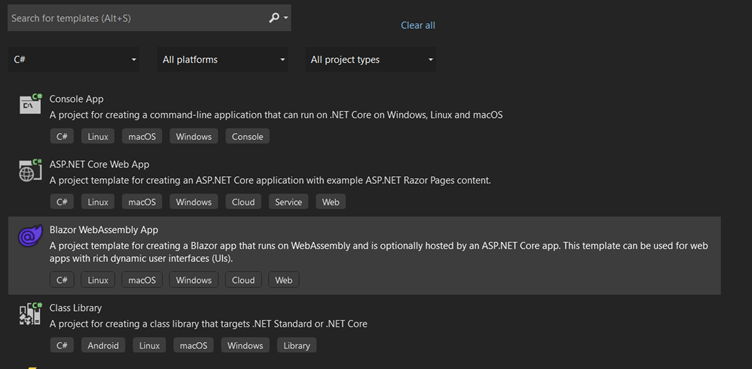
Step 2: Implement models and services
Create a folder called Models inside the root directory. Then, create a model class called User inside that folder, Project/Models/User.cs, as shown in the following code example.
public class User
{
    public int Id { get; set; }
    public string Name { get; set; }
    public int Age { get; set; }
    public string Address { get; set; }
}
After creating the User model class, we need to create the data access service for the user. To do that, create a folder called Services inside the root directory. Then, create the interface called IUserDataAccessService inside the Services folder Project/Services/IUserDataAccessService.cs as in the following code example.
public interface IUserDataAccessService
{
    List<User> GetUsers();
}
Next, inherit the IUserDataAccessService by creating a class called UserDataAccessService Project/Services/UserDataAccessService.cs, which implements the IUserDataAccessService interface.
public class UserDataAccessService : IUserDataAccessService
{
    private User[] users = {new User()
    {
        Id = 1,
        Name = "Samith Patel",
        Address = "London, Uk",
        Age = 27
    },new User()
    {
        Id = 2,
        Name = "Yohan Silva",
        Address = "London, Uk",
        Age = 28
    }};

    public List<User> GetUsers()
    {
        return users.ToList();
    }
}
We can observe the implementation of the IUserDataAccessService interface and the GetUsers method, which returns a list of users. In this example, a predefined user array (users) is used to return the list of users.
Next, create an interface called IUserService inside the Services folder: Project/Services/IUserService.cs.
public interface IUserService
{
    public User GetUser(int id);
}
Then, inherit IUserService and implement a new class called UserService inside the Services folder Project/Services/UserService.cs.
public class UserService : IUserService
{
    private readonly IUserDataAccessService _userDataAccessService;

    public UserService(IUserDataAccessService userDataAccessService)
    {
        _userDataAccessService = userDataAccessService;
    }

    public User GetUser(int id)
    {
        var user = _userDataAccessService.GetUsers().FirstOrDefault(s => s.Id == id);
        return user;
    }
}
The previous code injects the IUserDataAccessService interface in the constructor of the UserService, and the GetUser method returns the user details for a specific user by using the ID. The GetUser method essentially queries a data source through the injected _userDataAccessService to retrieve user details by filtering for a specific id. It employs LINQ to locate the user with the matching id efficiently and then returns the user object if found.
Step 3: Register services
Register all services created in the previous steps using the program.cs as in the following code example.
builder.Services.AddScoped<IUserDataAccessService, UserDataAccessService>();
builder.Services.AddScoped<IUserService, UserService>();
Step 4: Create a Razor page
Create a Razor page called FetchURLData inside the Pages folder to display fetched data: Project/Pages/FetchURLData.razor.
First, we need to define the route with the URL parameter called UserId for this page using the @page directive. This UserId must be an integer.
@page "/fetchURLdata/{UserId:int}"This route definition specifies that this page will be accessible at a URL like /fetchURLdata/1, where 1 is the UserId passed as a URL parameter.
In addition, we need to inject the IUserService interface using the @inject directive. We will use IUserService to get user details using the UserId.
@inject IUserService _userService;
Step 5: Get the URL Parameter
We have used the Parameter attribute for the UserId variable. This attribute allows the Razor page to capture the value of UserId from the URL and assign it to the UserId variable. We also set a default value of 0 for UserId if it is not provided in the URL.
[Parameter]
public int UserId { get; set; } = 0;
Then, the UserId variable value is used to get user details.
@code {
    private User _user;

    [Parameter]
    public int UserId { get; set; } = 0;

    protected override void OnInitialized()
    {
        _user = _userService.GetUser(UserId);
    }

}
Inside the @code block, we declare a private _user variable of type User to store user details. This variable is used to display the user’s information on the page.
We override the OnInitialized method, which is part of the Blazor component lifecycle and is called when the component is initialized. In this method, we use the _userService to get user details by passing the UserId value as a parameter.
The GetUser method retrieves user details based on the UserId provided in the URL.
Finally, we can visualize the user details on the Razor page using HTML elements. The user details are displayed if the _user is not null, and a loading message is shown while the data is being fetched.
@page "/fetchURLdata/{UserId:int}"
@inject IUserService _userService;

<PageTitle>User</PageTitle>

<h1>User Details</h1>

<p>This component will show the user details.</p>

@if (_user == null)
{
    <p><em>Loading...</em></p>
}
else
{
    <p >User Id : @_user.Id</p>
    <p >Name : @_user.Name</p>
    <p >Age : @_user.Age</p>
    <p >Address : @_user.Address</p>
}
Step 6: Set the route path using the navigation bar
Now, create a new Razor page called NavMenu inside the Shared folder Project/Shared/NavMenu.razor. There, update the href tag of the NavLink as in the following code example.
<div class="nav-item px-3">
 <NavLink class="nav-link" href="fetchURLdata/1">
  <span class="oi oi-list-rich" aria-hidden="true"></span> Fetch URL data
 </NavLink>
</div>
Here, the value 1 is passed as a URL parameter.
fetchURLdata/1
We can run and test the app to ensure everything is working as expected. We can see that it returns the user data for the UserId, which is passed using the URL parameter.
What is the query string?
A query string is a URL section containing data given to a web app or back-end database. Query strings allow the transmission of data (parameters) from one page to another, making them accessible on the receiving page.
api/employee? Name=John
In the previous example, the query string is separated by a question mark. There is a single query parameter in the URL. It contains a parameter named name with the value John.
Additionally, it is possible to include multiple query parameters in the URL. However, we need to separate each query string using &, as shown in the following code line.
api/employee? Name=John&age=20
Using query strings in the Blazor app
We are using the same project for this example as we did for the previous one. Here, we are trying to get user details using the IUserService and IUserDataAccessService interfaces.
Step 1: Installing necessary packages
First, we need to install the NuGet package called the Microsoft.AspNetCore.WebUtilities 2.2.0.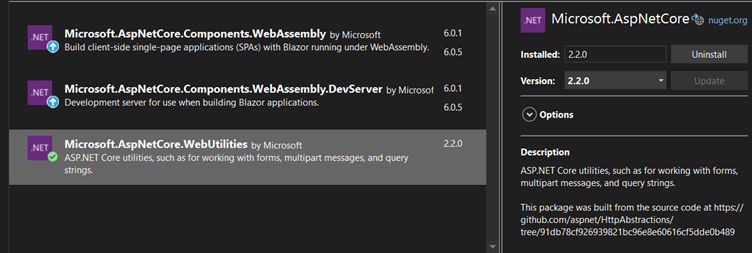
Step 2: Creating a new razor page
Next, create a Razor page named FetchQueryData inside the Pages folder Project/Pages/FetchQueryData.razor and follow the next flow.
First, we have defined the route using the @page directive in the FetchQueryData.razor file. So, we need to add the following code to the FetchQueryData.razor file.
@page "/fetchquerydata"
In addition, the NavigationManager class is injected into the page since it is used to access the query string parameter using the URL. So, we need to add the following code to the FetchQueryData.razor file.
@inject NavigationManager NavManager
Step 3: Extracting query string
Next, import the Microsoft.AspNetCore.WebUtilities package to use the QueryHelpers class to parse the query string.
@using Microsoft.AspNetCore.WebUtilities
Then, we can get user details using the GetUser method from the IUserService interface. In that case, we need to inject the IUserService interface into the FetchQueryData.razor file.
@inject IUserService _userService;
The query string values are initially stored as strings, but we can convert them as needed. In this example, the string value is converted to an integer. We can see this conversion in the following code example.
protected override void OnInitialized()
{
  var uri = NavManager.ToAbsoluteUri(NavManager.Uri);

  if (QueryHelpers.ParseQuery(uri.Query).TryGetValue("userId", out var userId))
  {
    _userId = Convert.ToInt32(userId);
  }

  _user = _userService.GetUser(_userId);

}
Here, we can use the QueryHelpers class for implementation. The QueryHelpers class is generally used to work with query strings in URLs. It provides methods to encode and decode query string values, helping us properly format and parse URLs for web apps.
The QueryHelpers class is used to parse the query string with the ParseQuery method, and the TryGetValue method is used to get the values of the query string named userId. If there is a userId keyword in the returned value, it returns true. Otherwise, it returns false. Then, the GetUser() method is used to get user details by passing the UserId value as a parameter.
We need to visualize the user details. For that, we can use the following HTML code example.
<PageTitle>User</PageTitle>

<h1>User Details</h1>

<p>This component will show the user details.</p>

@if (_user == null)
{
    <p><em>Loading...</em></p>
}
else
{
    <p >User Id : @_user.Id</p>
    <p >Name : @_user.Name</p>
    <p >Age : @_user.Age</p><p >Address : @_user.Address</p>
}
In this code block, the _user variable is checked for null using the if-else statement. We visualize the user data only if it isn’t null.
Step 4: Setting the route path using the navigation bar
We need to open the Razor page called NavMenu inside the Shared folder. Next, we modify the href attribute of the NavLink, as in the following code example.
<div class="nav-item px-3">
 <NavLink class="nav-link" href="fetchquerydata?userId=1">
  <span class="oi oi-list-rich" aria-hidden="true"></span> Fetch Query data
 </NavLink>
</div>
We can then test the app to ensure everything works as expected, and it should return the user data for the userId set to 1.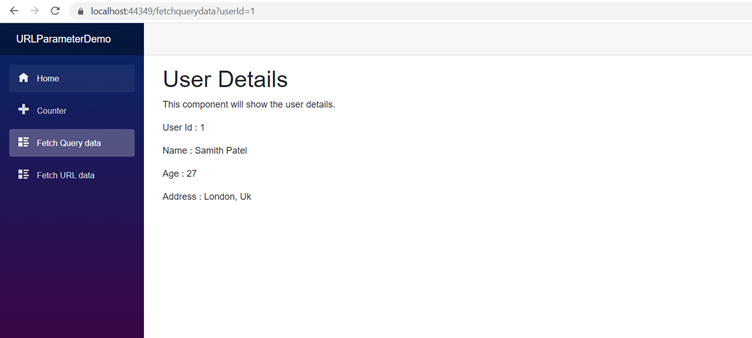
Differences between a URL parameter and query string
- A URL parameter is a part of a URL. It is mainly used to define the location of the resources or entity. However, a query string is not a part of the URL. It is added to the URL by users using a question mark, and it is mostly used to define sorting, pagination, or filter operations.
- The query string can be null, but the URL parameter can’t be null since it’s part of the URL. So, if you don’t append the URL parameter to the URL, you will get a 404 error (Not Found). But you can avoid this issue by using the nullable parameter (userId:int?) with the URL parameter.
- Query parameters are more readable because they include the keys in the URL. URL parameters are less readable because they don’t represent or show keys with the URL.
Keep in mind
When considering security, you should not use these approaches to pass sensitive information like passwords, secrets, or credit card numbers. If you use query parameters to include sensitive information, they may be saved in the browser history. In other words, anyone with access to the browser history may view the URLs that were browsed, as well as any query or URL parameters provided. This means malicious malware can search a user’s browser history for sensitive data.
Conclusion
This article discussed how to use URL parameters and query strings in a Blazor WebAssembly app and the difference between URL and query parameters. I hope this article was informative. Thank you for reading.
For those interested in exploring the latest version of Essential Studio®, it is readily accessible to existing customers via the License and Downloads page. If you’re not currently a Syncfusion customer, we invite you to experience our 30-day free trial, enabling you to explore all available features.
Should you have any questions or require assistance, please reach out to us through our support forums, support portal, or feedback portal. We’re dedicated to providing comprehensive support and are always delighted to assist you!


 No spam, just valuable updates.
Comments (1)
Thanks for finally talking about > Blazor Routing Essentials:
Mastering URL Parameters and Query Strings signal forex