
Annotations in PDFs are additional elements or comments that can be added to a PDF document to provide extra information, clarification, or interactivity. They can be used for a variety of purposes, including reviewing, collaborating, or studying. They enhance the usability and collaborative aspects of PDFs.
The Syncfusion Blazor PDF Viewer is a UI component for displaying PDFs from byte arrays, streams, or file paths. In addition to allowing users to print PDFs, it supports reviewing them with annotation tools.
This blog delves into the diverse annotation types available in the Syncfusion Blazor PDF Viewer.
Note: If you’re new to our Blazor PDF Viewer, please refer to its getting started documentation before proceeding.
Annotation types in Syncfusion Blazor PDF Viewer
The Syncfusion Blazor PDF Viewer is a powerful tool with an edit annotation toolbar. This toolbar is a treasure trove of annotation options, enabling users to add a variety of annotations to a PDF. These annotations can be comments, highlights, drawings, or textual feedback.

The Syncfusion Blazor PDF Viewer supports the following annotation types, each with unique functionalities:
These annotations enrich your PDF viewing experience and your ability to edit and interact with PDFs. So, let’s look at these features in detail to see how to unlock the full potential of your PDFs.
Refer to the following image.

Text markup annotations
The text markup annotations in Blazor PDF Viewers are a powerful tool for editors and proofreaders, enabling them to identify and communicate changes or issues in a document efficiently.
These annotations offer a range of functionalities:
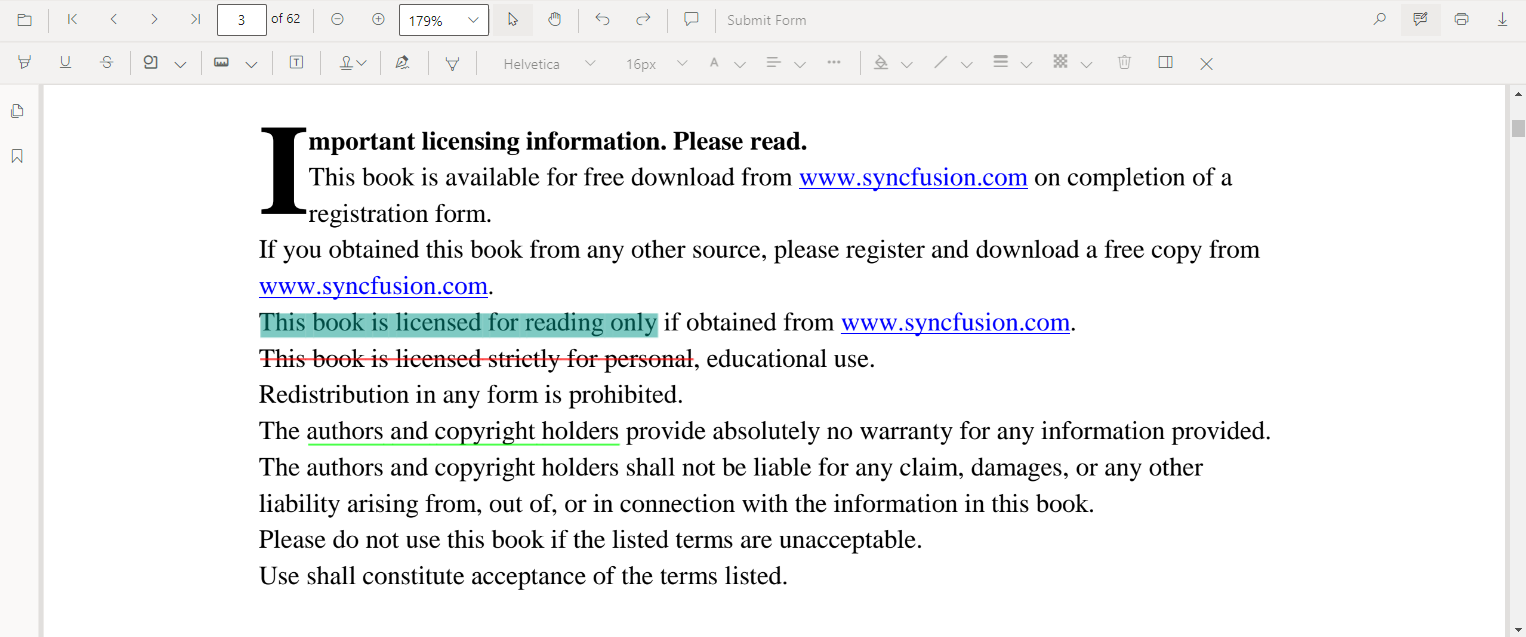
- Highlighting: To mark grammatical errors or important text sections. It provides a clear visual cue that draws attention to the highlighted content.
- Underlining: Sentences or phrases that need rephrasing can be quickly underlined, making them stand out for further review.
- Strikethrough: Words or sentences suggested for deletion can be struck through, indicating content needing removal.
In addition to these visual indicators, the text markup annotations allow us to add comments or notes. These can provide explanations or suggestions for improvement, further enhancing the clarity of the proofreading process.
Leveraging text markup annotations makes the proofreading process more streamlined and efficient. It reduces the chances of miscommunication and ensures the production of polished, error-free documents.
Add text markup annotation using the annotation toolbar
Adding text markup annotations using the annotation toolbar in the Syncfusion Blazor PDF Viewer is straightforward:
- First, choose Edit Annotation. Then, select the highlight, underline, or strikethrough icon.

Text markup annotation options in the annotation toolbar - Next, select the text you wish to annotate. The annotation style you chose in the previous step will be automatically applied to the selected text.
Alternative method
There’s also an alternative way to add annotations. First, select the text you want to annotate. Then, apply your desired annotation style using the highlight, underline, or strikethrough button in the edit annotation toolbar.
With these simple steps, you can efficiently add text markup annotations to your PDF, enhancing their readability and making them more interactive.
Add text markup annotations with properties from the toolbar
You can edit the color and the opacity of text markup annotations.
- Modifying color settings: Customize the color settings for your annotations. Whether you’re highlighting, underlining, or striking through text, you can choose the color that best suits your needs. Use the color palette in the Edit Color tool to select your preferred annotation color.
- Adjusting opacity: Change the opacity of your annotations. This can be particularly useful when you want your annotations to be more or less conspicuous, depending on their importance. Use the range slider in the Edit Opacity tool to adjust the opacity.
Refer to the following image.

Configuring text markup annotation properties from code behind
You can also configure the properties of a text markup annotation before creating the control using the HighlightSettings, UnderlineSettings, and StrikethroughSettings properties.
Refer to the following code example.
@using Syncfusion.Blazor.SfPdfViewer

<SfPdfViewer2 @ref="@viewer" DocumentPath="@DocumentPath" HighlightSettings="@HighlightSettings" UnderlineSettings="@UnderlineSettings" StrikethroughSettings="@StrikethroughSettings" Height="100%" Width="100%">
</SfPdfViewer2>

@code {
    SfPdfViewer2 viewer;
    private string DocumentPath { get; set; } = "wwwroot/Data/PDF_Succinctly.pdf";

    PdfViewerHighlightSettings HighlightSettings = new PdfViewerHighlightSettings {
        Color = "green",
        Opacity = 0.6
    };

    PdfViewerUnderlineSettings UnderlineSettings = new PdfViewerUnderlineSettings {
        Color = "blue",
        Opacity = 0.6
    };

    PdfViewerStrikethroughSettings StrikethroughSettings = new PdfViewerStrikethroughSettings {
        Color = "orange",
        Opacity = 0.6
    };
In the previous code, we configured the Syncfusion Blazor PDF Viewer with specific settings for highlighting, underlining, and strikethrough annotations. We also defined the color and opacity for each annotation type, which will be applied to the annotations when created in the viewer. This allows for a high degree of customization and control over the appearance of the annotations.
Refer to the following image.
Shape annotations
Shape annotations are powerful, especially when a design team reviews a new website layout. These annotations allow team members to highlight and comment directly on specific elements of the webpage mockup, such as buttons, navigation bars, and images. This visual feedback method streamlines communication, ensuring everyone is aligned when discussing design changes and improvements.
The team can quickly identify areas that require adjustment by using shape annotations. This leads to a more efficient and collaborative review process, resulting in a more polished and user-friendly website design.
Adding shape annotations using the annotation toolbar
Follow these steps to add shape annotations using the annotation toolbar:
- First, choose Edit Annotation.
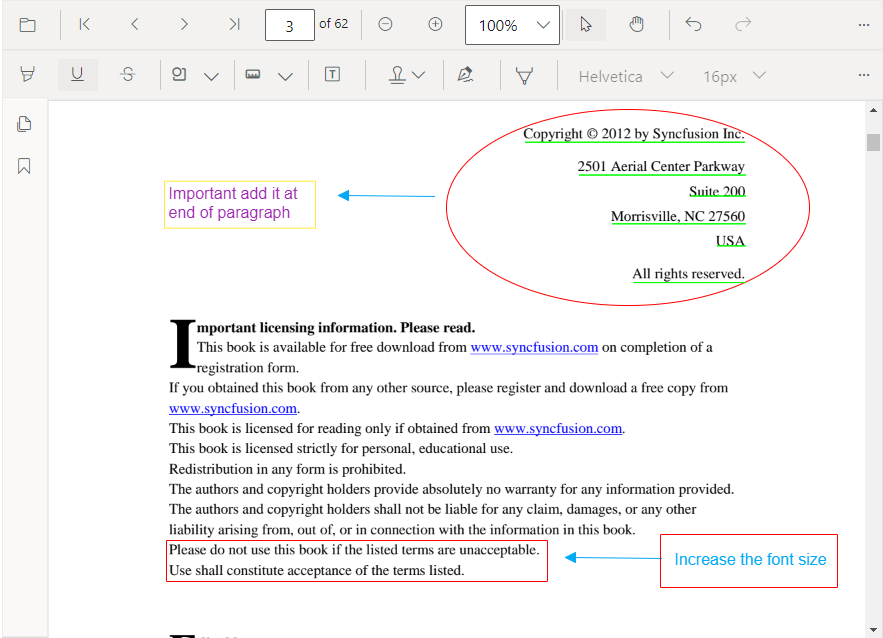
- Then, click the Shape Annotation dropdown to view the available shape annotations. These include lines, arrows, rectangles, circles, and polygons.
- Select your desired shape type from the dropdown to activate the corresponding shape annotation mode.
You can now add shapes to the pages of your PDF as needed. This allows you to highlight and comment on specific areas in the document.
Refer to the following image.

Editing the properties of shape annotations
Follow these steps to edit the properties of a shape annotation:
Step 1: Modify the fill color
The edit color tool houses a color palette that you can use to change the fill color of your annotation.
Step 2: Adjust the stroke color
The edit stroke color tool also provides a color palette, but this one is for altering the stroke color of your annotation. This can help to enhance the visibility of your annotations against different backgrounds.
Step 3: Change the border thickness
The edit thickness tool features a range slider that you can use to adjust the border thickness of your annotation. This can be particularly useful when you want your annotations to be more or less conspicuous.
Step 4: Customize the opacity
The edit opacity tool also has a range slider, but it is for modifying the opacity of your annotation. This allows you to control how transparent or opaque your annotations are.
Step 5: Edit the line properties
You can access the Line Properties window to make further adjustments for line shapes, including arrow annotations. To do so, right-click on the added line or arrow annotation and select Properties from the context menu.
With these tools, you can customize your shape annotations to suit your specific needs.

Configuring shape annotation properties from code behind
The properties of the shape annotations can be configured before creating the control using LineSettings, ArrowSettings, RectangleSettings, CircleSettings, and PolygonSettings properties.
Refer to the following code.
@using Syncfusion.Blazor.SfPdfViewer

<SfPdfViewer2 @ref="@viewer" DocumentPath="@DocumentPath" LineSettings="@LineSettings" ArrowSettings="@ArrowSettings" RectangleSettings="@RectangleSettings" CircleSettings="@CircleSettings" PolygonSettings="@PolygonSettings" Width="100%" Height="100%">
</SfPdfViewer2>

@code {
    SfPdfViewer2 viewer;
    private string DocumentPath { get; set; } = "wwwroot/Data/PDF_Succinctly.pdf";

    PdfViewerLineSettings LineSettings = new PdfViewerLineSettings {
        Opacity = 0.6,
        StrokeColor = "green"
    };

    PdfViewerArrowSettings ArrowSettings = new PdfViewerArrowSettings {
        FillColor = "green",
        Opacity = 0.6,
        StrokeColor = "blue"
    };

    PdfViewerRectangleSettings RectangleSettings = new PdfViewerRectangleSettings {
        Opacity = 0.6,
        StrokeColor = "orange"
    };

    PdfViewerCircleSettings CircleSettings = new PdfViewerCircleSettings {
        Opacity = 0.6,
        StrokeColor = "pink"
    };

    PdfViewerPolygonSettings PolygonSettings = new PdfViewerPolygonSettings {
        Opacity = 0.6,
        StrokeColor = "yellow"
    };
}
Refer to the following output image.
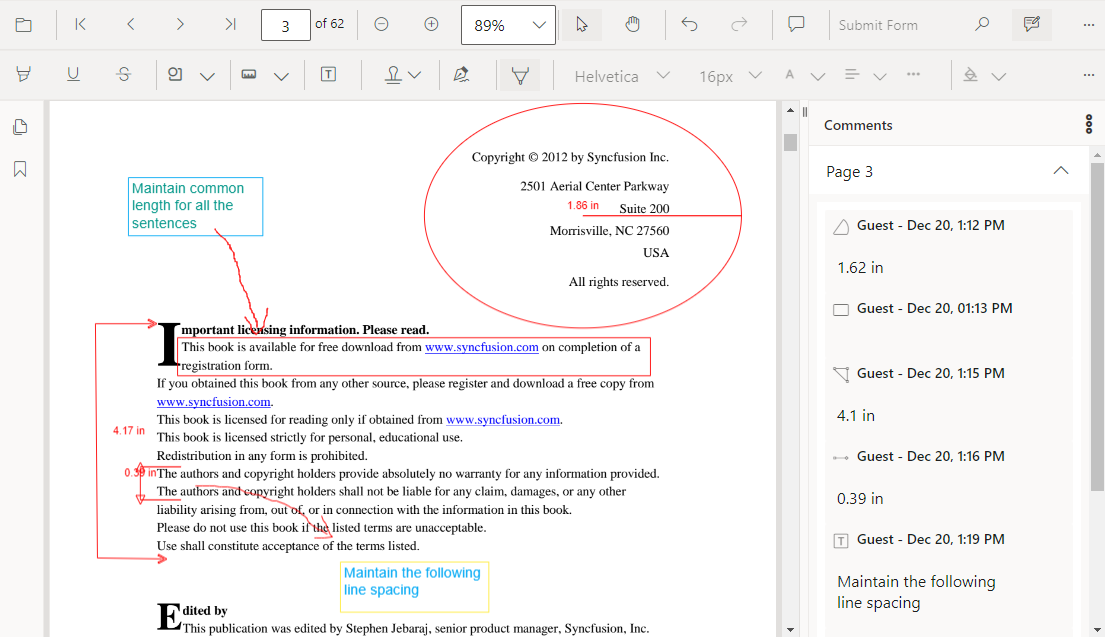
Measurement annotations for precise analysis
Measurement annotations, encompassing distance, perimeter, area, radius, and volume, are indispensable in scenarios such as reviewing a technical document. Engineers and researchers can leverage these annotations within the PDF viewer to measure critical parameters accurately, ensuring the document aligns with specifications and standards. This process aids in quality assurance, error detection, and compliance with project requirements. Collaborators can easily communicate and verify intricate details, fostering efficient decision-making and reducing the risk of errors. Ultimately, it leads to the successful development and implementation of complex technical solutions.
Adding measurement annotations using the annotation toolbar
Follow these steps to add measurement annotations using the annotation toolbar:
- First, choose Edit Annotation.
- Then, click the Measurement Annotation dropdown to view the available measurements.
- Select your desired measurement type from the dropdown to activate the corresponding measurement annotation mode.
You can now add measure annotations to the pages of your PDF as needed.
Refer to the following image.

Customizing the properties of measurement annotations
You can customize the properties of measurement annotations by following these steps:
Step 1: Modify the fill color
Use the edit color tool, containing a color palette, to change the fill color of your annotation.
Step 2: Adjust the stroke color
Use the edit stroke color tool to alter the stroke color of your annotation.
Step 3: Change the border thickness
Use the edit thickness tool, containing a range slider, to adjust the border thickness of your annotation.
Step 4: Customize the opacity
Use the edit opacity tool to modify the opacity of your annotation.
Step 5: Edit the line properties
You can access the Line Properties window to make further adjustments for line shapes like distance and perimeter annotations. Right-click on the added line or perimeter annotation and select Properties from the context menu.
Refer to the following image.

Configuring measurement annotation properties from code behind
The properties of the shape annotations can be set before creating the control using DistanceSettings, PerimeterSettings, AreaSettings, RadiusSettings, and VolumeSettings.
@using Syncfusion.Blazor.Buttons
@using Syncfusion.Blazor.SfPdfViewer

<SfPdfViewer2 @ref="@viewer" DocumentPath="@DocumentPath" Height="100%" Width="100%" DistanceSettings="@DistanceSettings" PerimeterSettings="@PerimeterSettings" AreaSettings="@AreaSettings" RadiusSettings="@RadiusSettings" VolumeSettings="@VolumeSettings">
</SfPdfViewer2>

@code {
    SfPdfViewer2 viewer;
    private string DocumentPath { get; set; } = "wwwroot/Data/PDF_Succinctly.pdf";

    PdfViewerDistanceSettings DistanceSettings = new PdfViewerDistanceSettings {
        Opacity = 0.6,
        StrokeColor = "red",
        LineHeadEndStyle = LineHeadStyle.Closed,
        LineHeadStartStyle = LineHeadStyle.Closed
    };

    PdfViewerPerimeterSettings PerimeterSettings = new PdfViewerPerimeterSettings {
        Opacity = 0.6,
        StrokeColor = "red"
    };

    PdfViewerAreaSettings AreaSettings = new PdfViewerAreaSettings {
        Opacity = 0.6,
        StrokeColor = "red"
    };

    PdfViewerVolumeSettings VolumeSettings = new PdfViewerVolumeSettings {
        Opacity = 0.6,
        StrokeColor = "red"
    };

    PdfViewerRadiusSettings RadiusSettings = new PdfViewerRadiusSettings {
        Opacity = 0.6,
        StrokeColor = "red"
    };
}
Free text annotations
Free text annotations significantly enhance user interactivity and the ability to annotate information. Users can effortlessly provide additional details by inserting free text annotations directly onto a PDF.
This enables them to highlight key points, jot down personal notes, or collaborate with others by adding context-specific information. This feature fosters communication and enriches the information within the document. It’s a useful tool for professionals, educators, and anyone seeking to use PDFs for collaborative projects.
Adding free-text annotations using the annotation toolbar
Follow these steps to add free text annotations using the annotation toolbar:
- First, choose Edit Annotation.
- Then, locate and click the free text annotation icon in the annotation toolbar. This action activates the free text annotation mode.
You can now insert text directly onto any page within the PDF, allowing you to add your comments.

Customizing the properties of free text annotations
You can customize the following properties of free text annotations:
- Font family: To choose your desired font style.
- Font size: To adjust the size of your text.
- Font color: To select your preferred text color from a palette.
- Text alignment: To align your annotation text.
- Text style: To customize your text style by selecting from a dropdown.
- Fill color: To apply a fill color to your text using a palette.
- Stroke color: To adjust the color of your text stroke with the palette provided.
- Thickness: To modify the thickness of your text’s border using a slider.
- Opacity: To control the opacity of your text with the slider in the tool.
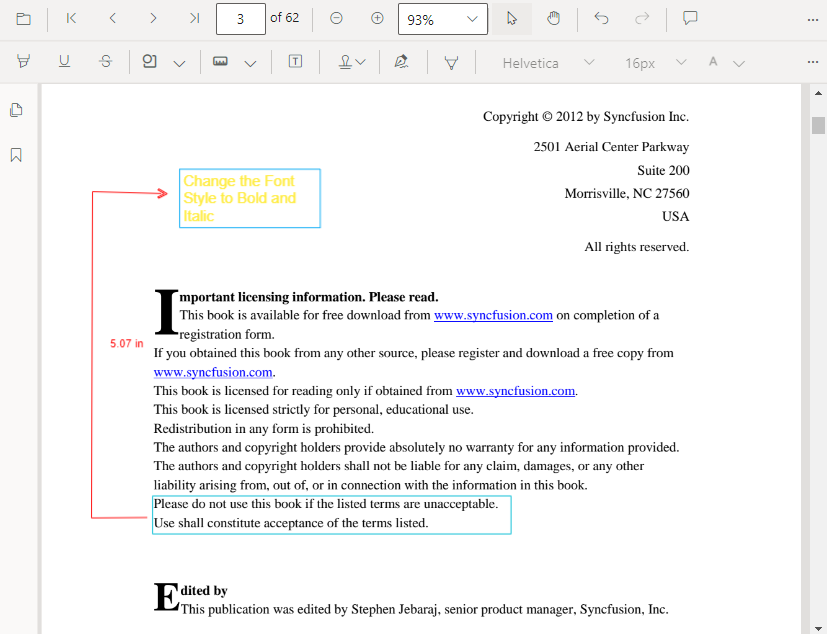
Refer to the following image.

Configuring free text annotation properties from code behind
The properties of free text annotations can be set before creating the control using FreeTextSettings.
@using Syncfusion.Blazor.SfPdfViewer

<SfPdfViewer2 @ref="viewer" DocumentPath=@DocumentPath Height="100%" Width="100%" FreeTextSettings=@FreeTextSettings>
</SfPdfViewer2>

@code {
    SfPdfViewer2 viewer;
    private string DocumentPath { get; set; } = "wwwroot/Data/PDF_Succinctly.pdf";

    PdfViewerFreeTextSettings FreeTextSettings = new PdfViewerFreeTextSettings {
        BorderColor = "blue",
        FontColor = "yellow"
    };
}
Stamp annotations
Stamp annotations are an invaluable tool in a bustling legal office, where they play a crucial role in efficiently reviewing legal documents. Lawyers and paralegals utilize PDF stamp annotations to mark sections for approval, highlight critical clauses, and indicate areas that require revision while examining contracts and agreements.
Each attorney adds their electronic signature and date to approval stamps, ensuring a clear and authentic record of the review process. Confidentiality concerns are addressed by stamping sections as Confidential or For Internal Use Only. Compliance with specific regulations is also confirmed through customized stamp annotations.
These digital marks facilitate version control, creating a transparent history of document revisions. The process culminates in a final Approved stamp, signaling that the document is ready for execution. This streamlined approach enhances document management, fosters accuracy, and ensures legal compliance in legal document review.
Adding stamp annotations using the annotation toolbar
Follow these steps to add stamp annotations using the annotation toolbar:
- First, choose Edit Annotation.
- Then, click the Stamp Annotation dropdown to view the available stamp annotations. These include dynamic, sign here, standard business, and custom stamp.
- Select your desired stamp type from the menu.
You can now add the selected stamp to any page within your PDF.
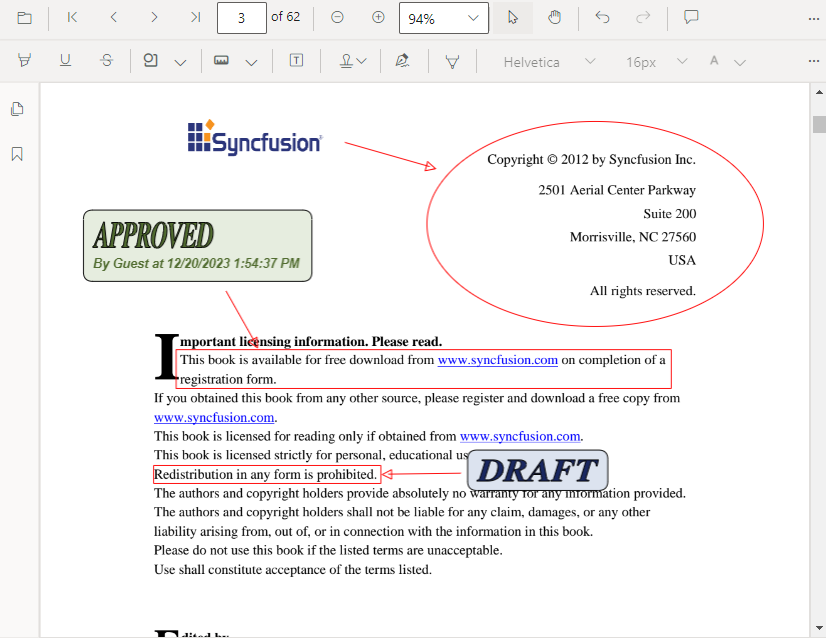
Refer to the following image.

Configuring stamp annotation properties from code behind
The properties of stamp annotations can be set before creating the control using StampSettings.
@using Syncfusion.Blazor.SfPdfViewer

<SfPdfViewer2 @ref="viewer" DocumentPath="@DocumentPath" Height="100" Width="100%" StampSettings=@StampSettings>
</SfPdfViewer2>

@code {
    // Sets the PDF document path for initial loading.
    private string DocumentPath { get; set; } = "wwwroot/data/PDF_Succinctly.pdf";

    SfPdfViewer2 viewer;

    PdfViewerStampSettings StampSettings = new PdfViewerStampSettings {
        Opacity = 0.3,
        Author = "Blazor"
    };
}
Refer to the following output image.
Ink annotations
Ink annotations in the Blazor PDF Viewer offer a unique tool that allows users to draw freehand, highlight, underline, or strikethrough text, simulating the experience of writing or drawing directly on a physical document using a digital pen or stylus.
Ink annotations are used for reviewing and editing documents, electronically signing contracts or forms, and providing feedback on shared PDFs.
These annotations can be customized with various colors, thicknesses, and styles, enhancing the clarity and visual impact of the remarks on a PDF. Users can then easily print the annotated document for reference or archival purposes.
Adding ink annotations using the annotation toolbar
Let’s see the steps to add ink annotations using the annotation toolbar:
- First, choose Edit Annotation.
- Then, select the draw ink icon to activate the ink annotation mode.
- Use this mode to draw, highlight, or add signatures directly to your PDF for collaborative editing or personal notes. You can then easily print the annotated PDF for reference or sharing.
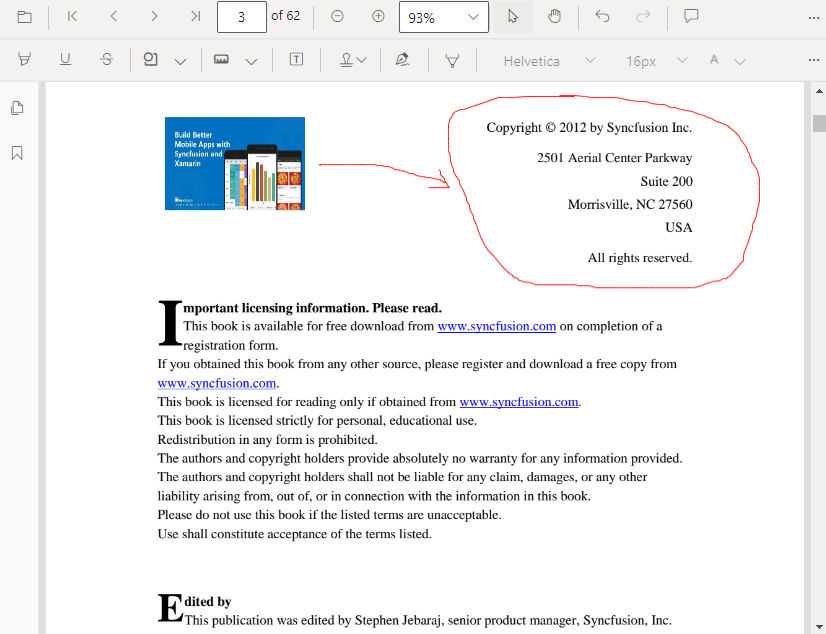
Refer to the following image.

Customizing the properties of ink annotations
You can use the following tools to customize the ink annotations:
- Stroke color: Use the color palette in the edit stroke color tool to change the annotation’s stroke color.
- Border thickness: Use the range slider in the edit thickness tool to adjust the border thickness of the annotation.
- Opacity: Use the range slider in the edit opacity tool to control the annotation’s opacity.
Refer to the following image.

Configuring ink annotation properties from code behind
The properties of ink annotations can be set before creating the control using the InkAnnotationSettings.
@using Syncfusion.Blazor.SfPdfViewer

<SfPdfViewer2 @ref="viewer" DocumentPath=@DocumentPath Height="100%" Width="100%" InkAnnotationSettings="@InkAnnotationSettings">
</SfPdfViewer2>

@code {
    SfPdfViewer2 viewer;
    private string DocumentPath { get; set; } = "wwwroot/Data/PDF_Succinctly.pdf";

    PdfViewerInkAnnotationSettings InkAnnotationSettings = new PdfViewerInkAnnotationSettings {
        Author = "Syncfusion",
        StrokeColor = "green",
        Thickness = 3,
        Opacity = 0.6
    };
}
Sticky note annotations
Sticky note annotations in Blazor PDF Viewer are a tool for collaborative document review and feedback processes.
Consider a scenario where a project manager shares a complex proposal with multiple team members. Each team member can use sticky notes to highlight specific proposal sections, ask questions, suggest edits, or provide general comments. These digital annotations facilitate a seamless exchange of ideas and feedback, ensuring that all stakeholders can contribute their insights directly to the document.
This makes the review process more efficient and enhances overall collaboration. Sticky notes also provide a clear and organized way to track various suggestions and discussions within the PDF.
Adding sticky note annotations using the annotation toolbar
Let’s see how to add sticky note annotations using the annotation toolbar:
- First, select Edit Annotation.
- Then, select the comments icon in the toolbar to activate the sticky notes mode.
- Click on the desired position in the PDF where you want to add a sticky note annotation. The sticky note annotation will be placed at your chosen position, allowing you to add your comments.
Refer to the following image.

Configuring sticky notes annotation properties from code behind
The properties of sticky note annotations can be set before creating the control using the StickyNoteSettings.
@using Syncfusion.Blazor.SfPdfViewer

<SfPdfViewer2 @ref="@viewer" DocumentPath="@DocumentPath" StickyNotesSettings="@StickyNotesSettings" Height="100%" Width="100%">
</SfPdfViewer2>

@code {
    SfPdfViewer2 viewer;
    private string DocumentPath { get; set; } = "wwwroot/Data/PDF_Succinctly.pdf";

    PdfViewerStickyNotesSettings StickyNotesSettings = new PdfViewerStickyNotesSettings {
        Author = "Syncfusion"
    };
}
Refer to the following output image.
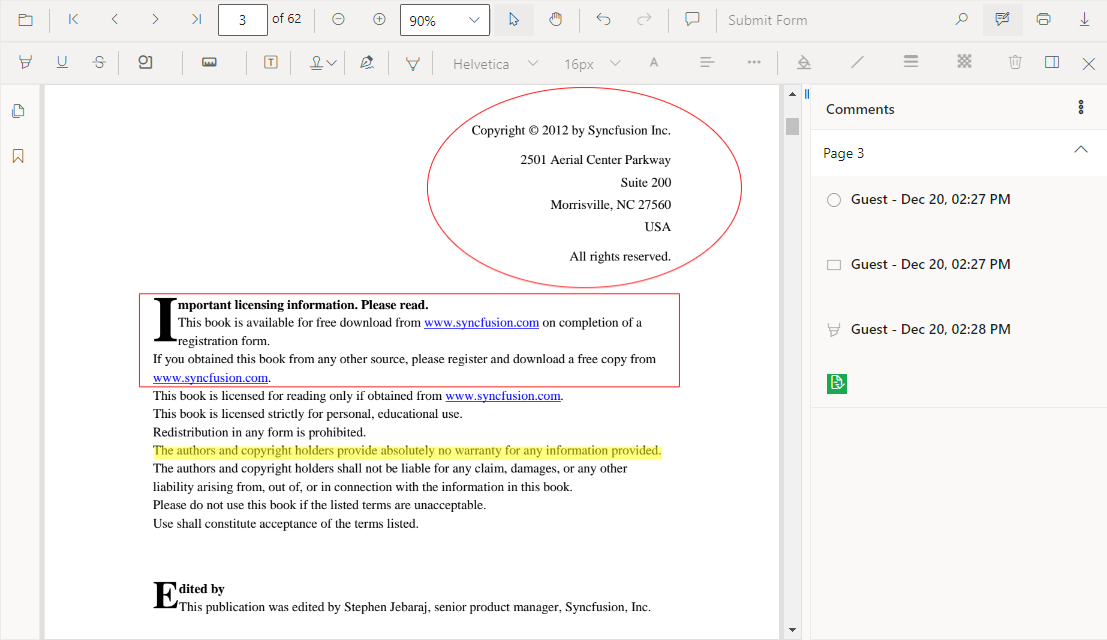
Comments
The Comments feature allows you to add, edit, and delete comments for annotations. This support ensures that your PDF can be thoroughly reviewed and collaboratively annotated.
Accessing the comment panel and adding comments
There are three convenient ways to access the comment panel in the Blazor PDF Viewer:
- Through the annotation menu: Click Edit Annotation, located in the toolbar. This action will reveal a dedicated toolbar, where you can easily select the comment panel icon to access the comment panel.

- Via the context menu: Right-click on an annotation within your PDF. This opens a context menu, from which you can select the Comment option to access the comment panel for annotation.
- Using a mouse click: Double-click on an annotation within your PDF. This quick action will immediately open the comment panel. You can select annotations and add comments if the comment panel is open.
Adding comments to PDF documents
Adding comments to your PDF documents is a breeze with these two simple steps:
- Select and highlight: Begin by selecting an annotation in your PDF. Upon clicking, the comment container for the selected annotation will be instantly highlighted within the comment panel.
- Add comments: You can add comments once the annotation container is highlighted. You can also engage in comment replies using the comment panel.
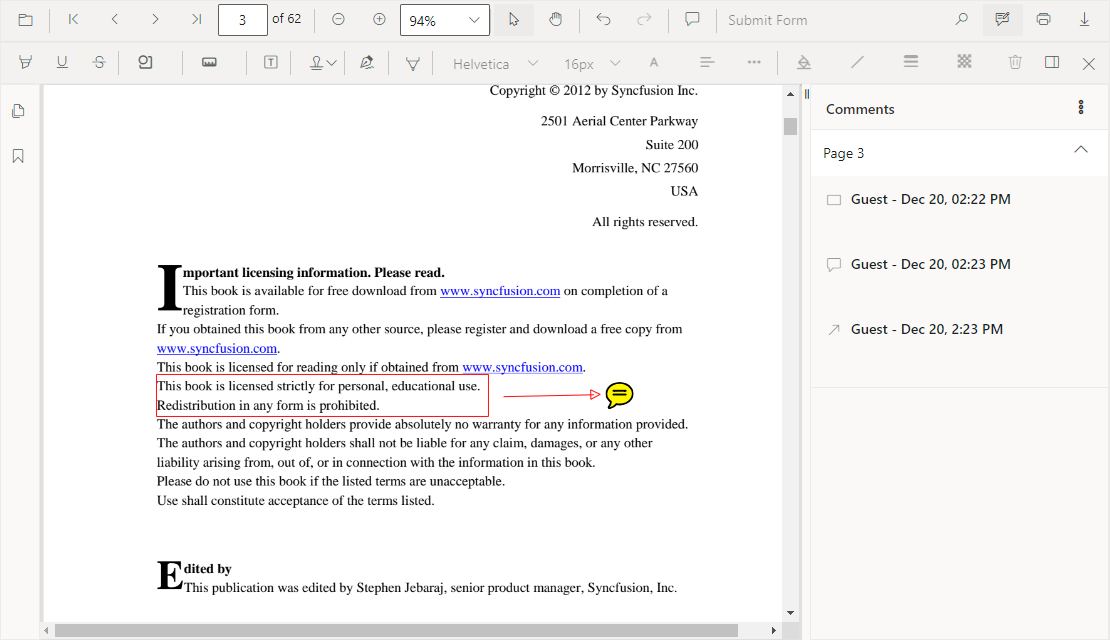
Refer to the following image.
Import and export annotations
The ability to import and export annotations in Blazor PDF Viewer enhances order management efficiency in a small e-commerce business. This process begins when customers place orders via a website, which generates PDF order forms. These forms are subsequently opened in PDF Viewer for customization and confirmation.
Customers save these forms as XFDF files, capturing all the order details and annotations. The website’s PDF Viewer then imports these XFDF files upon submission, extracting the order information for processing. The viewer’s export functionality converts the order data into JSON format, facilitating inventory and shipping systems integration.
Once the orders are processed, the viewer exports status and tracking data as JSON for creating shipping labels. This seamless import and export process enhances order management and customer communication.
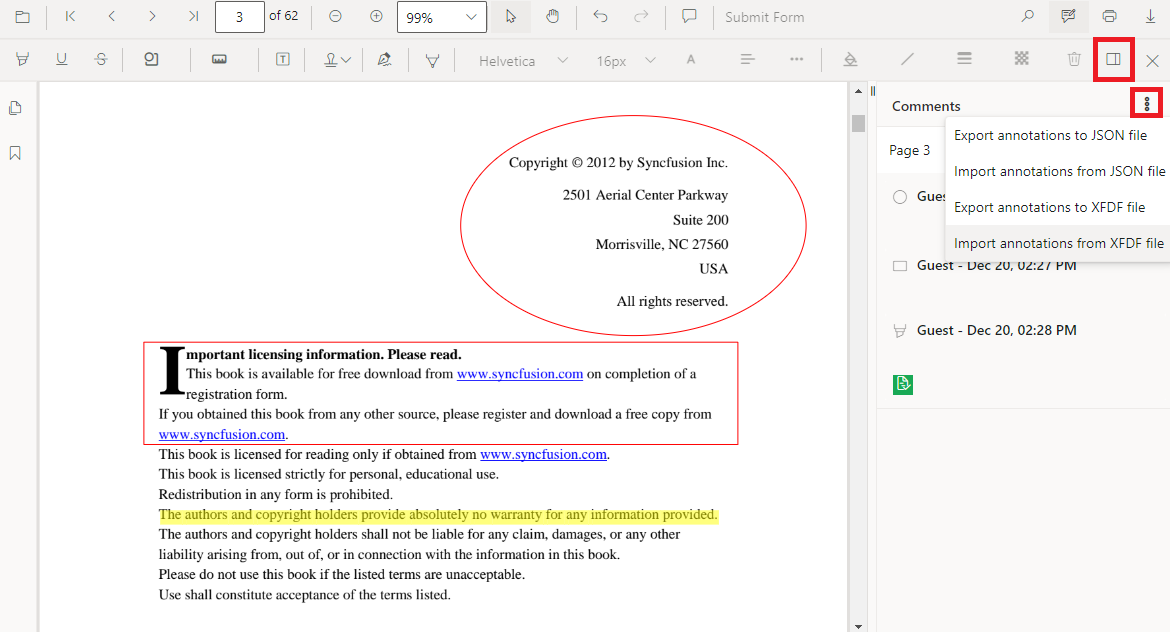
Importing annotations to a PDF
To import annotations into a PDF using the Blazor PDF Viewer, please follow these steps:
- To display the annotation toolbar, click the Add or Edit Annotation button in the toolbar.
- Then, click the comment panel icon within the annotation toolbar to open the comments panel.
- Click the kebab menu icon in the comments panel container for more options.
- Select Import Annotations as JSON/XFDF or as per your requirement.
- A file explorer dialog will open. Choose the JSON file you wish to import into the loaded PDF document.
Refer to the following image.
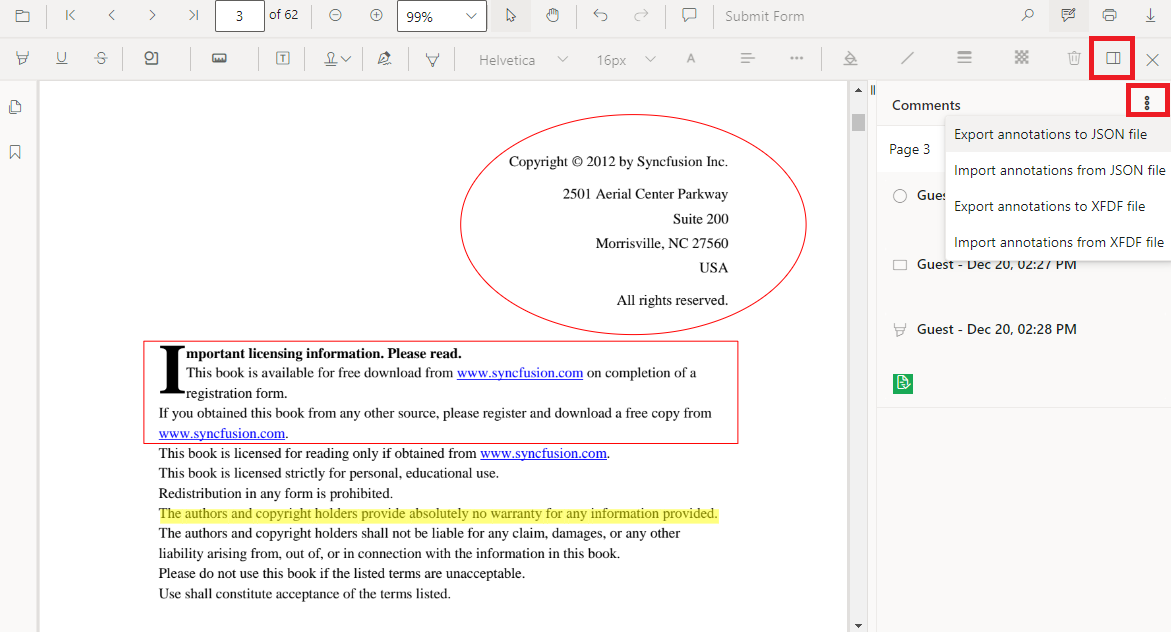
Exporting annotations from a PDF
You can also easily export annotations in JSON/XFDF format by following these steps:
- Access the annotation toolbar by clicking the Add or Edit Annotation button.
- Open the comments panel by clicking the comments panel icon within the annotation toolbar.
- Click the kebab menu icon in the comments panel for more options.
- Choose Export Annotations as JSON/XFDF to save the annotations as a JSON/XFDF file or as required.
Refer to the following image.
Conclusion
Thanks for reading! We’ve explored the various types of annotations in the Syncfusion Blazor PDF Viewer and their practical applications in a work environment. Your thoughts and feedback are important to us, so we encourage you to try out the steps outlined and share your experiences or any specific requirements in the comments section below.
If you’re not a Syncfusion customer, you can download a free trial of Essential Studio® for Blazor and begin evaluating its controls immediately.
Don’t hesitate to contact us through our support forum, support portal, or feedback portal for assistance. We’re always ready to assist you!


 No spam, just valuable updates.