

Are you a person who cares about providing crystal clear images to different screens with different DPIs?
If so, this blog will definitely help you to achieve that!
In this blog, we’ll see how to set images of different DPIs to WinForms UI controls that will be automatically chosen with respect to the DPI (dots per inch) of the machine. This will ensure images retain clarity when a single application is deployed to different machines.
In this blog, we’ll use the Syncfusion Ribbon control as an example. The ImageListAdv component will act as the backbone for what we are accomplishing.
The ImageListAdv component is used to store a collection of images. The images are stored based on index, that is, in an array. Other controls that have the Image property can use the image list in order to get the appropriate images. We have classified this approach in two sections:
- Populating an image list with images for different DPIs.
- Mapping Ribbon control images with the image list component.
Populating an image list with images for different DPIs
Follow these steps to populate an image list with images for different DPIs:
Step 1: Drag the ImageListAdv component to the designer and navigate to the properties window.
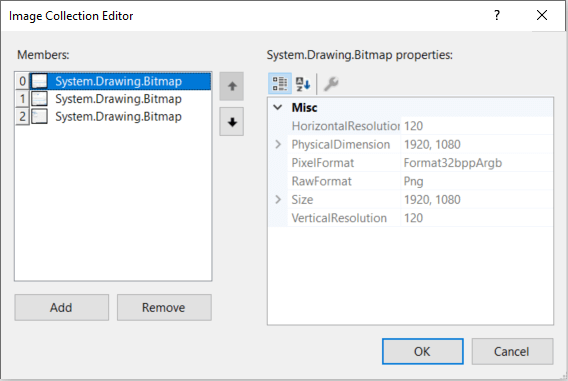
Step 2: In the Images collection, add the desired images. They will act as the default images. Also, these images will be displayed when no DPI images are set by the user.
Please refer to the following screenshot for better understanding.
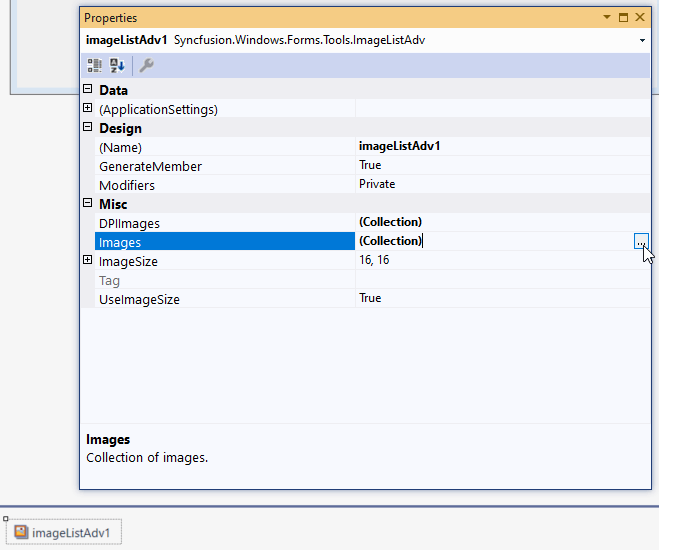
Note: For illustration, consider that we are setting Cut, Copy, and Paste in the 0, first and second index positions, respectively, in the Images collection.
In the meantime, another option named DPIImages collection is present in the properties window and helps to set the images for different DPIs.
Step 1: Click the option and you can see the DPIAwareImage Collection Editor window.
Step 2: Click Add and the DPIAwareImage instance will be created, where you can see the following properties:
- DPI120Image: Sets the image of the item for 125 scaling and above.
- DPI144Image: Sets the image of the item for 150 scaling and above.
- DPI192Image: Sets the image of the item for 200 scaling and above.
- Index: Maps the index of the default image present in the Images collection bound to the ImageListAdv component here.

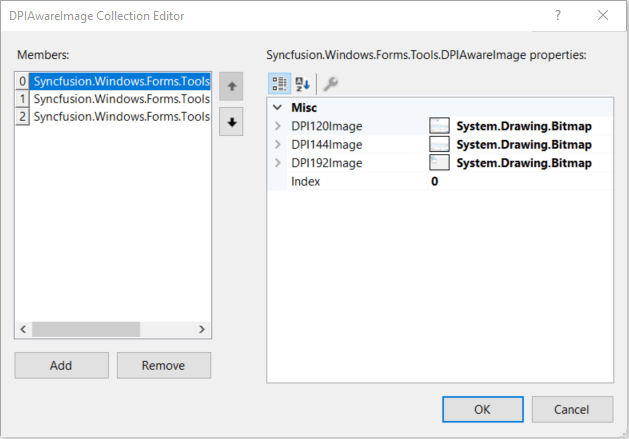
Note: Continuing with our illustration, for actual images Cut, Copy, and Paste, we need to add images for different DPIs.
So, in DPIAwareImage[0]:
- Set different Cut images for different DPIs in DPI120Image, DPI144Image, and DPI192Image properties.
- Map its Index to 0 since Cut image is present in the 0 index of the Images Likewise, do the same for the Copy and Paste images.
Important Note: If you prefer to add Paste images for different DPIs in DPIAwareImage[0], then you must set its Index to 2 since the Paste image is present in the second index of the Images collection.
So, this is how the actual image is mapped with its equivalent images set for different DPIs via the Index property as the key.
Mapping Ribbon control images with the image list component
Follow these steps to map Ribbon control images with image list components:
Step 1: Drag the Ribbon control to the designer.
Step 2: Create a UI with tabs, buttons, and a gallery based on your application requirements.
Step 3: As usual, map the images for the button, drop-down button, split button, and gallery items with the Image collection present in the ImageListAdv component using appropriate index values.
Now, the Ribbon control checks the When attempting to get images from the Images collection, Ribbon control also checks for its relevant DPI images from the DPIImages collection.
If image is available, then appropriate image will be picked for display. If there are no images in the DPIImages collection, then the image in Images collection will be set as default.
Please refer to the following code example.
[Form  Designer Code – C#]

// Initialize image list component and add images to both "Images" and "DPIImages" collections.
private Syncfusion.Windows.Forms.Tools.ImageListAdv imageListAdv1 =  = new
Syncfusion.Windows.Forms.Tools.ImageListAdv(this.components);

this.imageListAdv1.Images.AddRange(new System.Drawing.Image[] {
((System.Drawing.Image)(resources.GetObject("imageListAdv1.Images1"))),
((System.Drawing.Image)(resources.GetObject("imageListAdv1.Images2"))),
((System.Drawing.Image)(resources.GetObject("imageListAdv1.Images3")))});

Syncfusion.Windows.Forms.Tools.DPIAwareImage dpiAwareImage1 = new
Syncfusion.Windows.Forms.Tools.DPIAwareImage();
Syncfusion.Windows.Forms.Tools.DPIAwareImage dpiAwareImage2 = new
Syncfusion.Windows.Forms.Tools.DPIAwareImage();
Syncfusion.Windows.Forms.Tools.DPIAwareImage dpiAwareImage3 = new
Syncfusion.Windows.Forms.Tools.DPIAwareImage();

dpiAwareImage1.DPI120Image =
((System.Drawing.Image)(resources.GetObject("dpiAwareImage1.DPI120Image")));
dpiAwareImage1.DPI144Image =
((System.Drawing.Image)(resources.GetObject("dpiAwareImage1.DPI144Image")));
dpiAwareImage1.DPI192Image =
((System.Drawing.Image)(resources.GetObject("dpiAwareImage1.DPI192Image")));
dpiAwareImage1.Index = 0;

dpiAwareImage2.DPI120Image =
((System.Drawing.Image)(resources.GetObject("dpiAwareImage2.DPI120Image")));
dpiAwareImage2.DPI144Image =
((System.Drawing.Image)(resources.GetObject("dpiAwareImage2.DPI144Image")));
dpiAwareImage2.DPI192Image =
((System.Drawing.Image)(resources.GetObject("dpiAwareImage2.DPI192Image")));
dpiAwareImage2.Index = 1;

dpiAwareImage3.DPI120Image = ((System.Drawing.Image)(resources.GetObject("dpiAwareImage3.DPI120Image")));
dpiAwareImage3.DPI144Image = ((System.Drawing.Image)(resources.GetObject("dpiAwareImage3.DPI144Image")));
dpiAwareImage3.DPI192Image = ((System.Drawing.Image)(resources.GetObject("dpiAwareImage3.DPI192Image")));
dpiAwareImage3.Index = 2;

this.imageListAdv1.DPIImages.AddRange(new
Syncfusion.Windows.Forms.Tools.DPIAwareImage[] {
dpiAwareImage1,
dpiAwareImage2,
dpiAwareImage3});

// Initialize cut, copy, and paste buttons.
private System.Windows.Forms.ToolStripButton cutButton = new
System.Windows.Forms.ToolStripButton();
private System.Windows.Forms.ToolStripButton copyButton = new
System.Windows.Forms.ToolStripButton();
private System.Windows.Forms.ToolStripButton pasteSplitButton = new System.Windows.Forms.ToolStripButton();

// Defining cut button.
this.cutButton.ImageTransparentColor = System.Drawing.Color.Magenta;
this.cutButton.Margin = new System.Windows.Forms.Padding(0, 1, 0, 0);
this.cutButton.Name = "cutButton";
this.cutButton.Size = new System.Drawing.Size(30, 24);
this.cutButton.Text = "Cut";
this.cutButton.Click += new System.EventHandler(this.cutButton_Click);

// Defining copy button.
this.copyButton.ImageTransparentColor = System.Drawing.Color.Magenta;
this.copyButton.Margin = new System.Windows.Forms.Padding(0, 1, 0, 0);
this.copyButton.Name = "copyButton";
this.copyButton.Size = new System.Drawing.Size(39, 24);
this.copyButton.Text = "Copy";
this.copyButton.Click += new System.EventHandler(this.copyButton_Click);

// Defining paste button.
this.pasteSplitButton.ImageTransparentColor = System.Drawing.Color.Magenta;
this.pasteSplitButton.Name = "pasteSplitButton";
this.pasteSplitButton.Size = new System.Drawing.Size(38, 76);
this.pasteSplitButton.Text = "Paste";
this.pasteSplitButton.TextAlign = System.Drawing.ContentAlignment.BottomCenter;
this.pasteSplitButton.TextImageRelation =
System.Windows.Forms.TextImageRelation.ImageAboveText;
this.pasteSplitButton.Click += new
System.EventHandler(this.pasteSplitButton_ButtonClick);

// Adding images to cut, copy, and paste buttons.
this.cutButton.Image = this.imageListAdv1.Images[0];
this.copyButton.Image = this.imageListAdv1.Images[1];
this.pasteSplitButton.Image = this.imageListAdv1.Images[2];

………
………
………

// Adding cut and copy buttons to a separate toolstrip panel.
this.toolStripPanelItem1.Items.AddRange(new System.Windows.Forms.ToolStripItem[] {
this.cutButton,
this.copyButton});

// Adding paste button along with cut and copy buttons to the main toolstrip panel.
this.clipBoardtoolStrip.Items.AddRange(new System.Windows.Forms.ToolStripItem[] {
this.pasteSplitButton,
this.toolStripPanelItem1});
After, executing the above code, we’ll get the output like in the following screenshot.

Resources
Sample link: https://github.com/SyncfusionExamples/winforms-high-dpi-aware-image-collection-example
Documentation link: https://help.syncfusion.com/windowsforms/highdpi-support#automatically-change-images-based-on-dpi-through-imagelistadv-component
Conclusion
I hope you now have a clear idea of how to work with images for different DPIs in WinForms UI controls. With this feature, you can make sure that no image is blurry in your application in any DPI it is deployed to. Try out this feature to feel the difference!
If you aren’t a customer yet, you can try our 30-day free trial to check out this feature. Also, try our other samples from this GitHub location.
If you wish to send us feedback or would like to submit any questions, please feel free to do so in the comments section below or contact us through our support forum, Direct-Trac, or feedback portal. We are always happy to assist you!
 No spam, just valuable updates.