When developing Flutter applications, the most prevalent requirement is the ability to access data from web services. The Syncfusion Flutter Calendar control provides all the common scheduling functionalities that allow users to load appointments on demand from web services as custom appointments.
In this blog post, we are going to discuss loading appointments on demand via web services in the Flutter Calendar. If you are new to the Calendar control, please read this Getting Started article before proceeding.
Let’s get started!
Load appointments on demand using web services
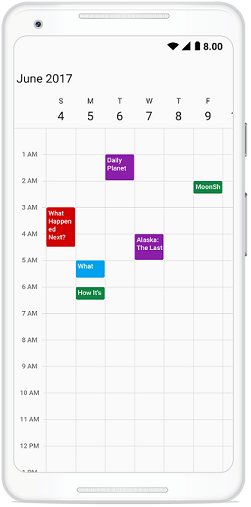
We are going to load and display custom meeting appointments on demand for June 2017.
Step #1: Create a web API service
Web services are server-side applications that are meant to serve data or logic to various client-side applications. REST and SOAP are the widely used industry-standard web service architectures.
Refer to this tutorial to create an ASP.NET Core web API service and host it for public access. For this demo, we are going to use this hosted service.
Step #2: Create a class
Create a class named Meeting with a data structure similar to the web API service, containing the appointment’s subject, time, and other related information.
Refer to the following code example.
class Meeting {
  Meeting(
      {this.eventName,
      this.from,
      this.to,
      this.background,
      this.allDay = false});

  String eventName;
  DateTime from;
  DateTime to;
  Color background;
  bool allDay;
}
Step #3: Fetch data from the web service
To fetch the data from ejservices using the http.get() method:
- Create an asynchronous method getDataFromWeb and consume the API service URI (Uniform Resource Identifier).
- Use the decode method to retrieve the web appointment data as JSON.
- Use the await option to consume the value.
- Modify the received JSON data into a list of appointments.
Refer to the following code example.
Future<List<Meeting>> getDataFromWeb() async {
  var data = await http.get(
      "https://js.syncfusion.com/demos/ejservices/api/Schedule/LoadData");
  var jsonData = json.decode(data.body);

  final List<Meeting> appointmentData = [];
  final Random random = new Random();
  for (var data in jsonData) {
    Meeting meetingData = Meeting(
        eventName: data['Subject'],
        from: _convertDateFromString(
          data['StartTime'],
        ),
        to: _convertDateFromString(data['EndTime']),
        background: _colorCollection[random.nextInt(9)],
        allDay: data['AllDay']);
    appointmentData.add(meetingData);
  }
  return appointmentData;
}

DateTime _convertDateFromString(String date) {
  return DateTime.parse(date);
}

void _initializeEventColor() {
  this._colorCollection = new List<Color>();
  _colorCollection.add(const Color(0xFF0F8644));
  _colorCollection.add(const Color(0xFF8B1FA9));
  _colorCollection.add(const Color(0xFFD20100));
  _colorCollection.add(const Color(0xFFFC571D));
  _colorCollection.add(const Color(0xFF36B37B));
  _colorCollection.add(const Color(0xFF01A1EF));
  _colorCollection.add(const Color(0xFF3D4FB5));
  _colorCollection.add(const Color(0xFFE47C73));
  _colorCollection.add(const Color(0xFF636363));
  _colorCollection.add(const Color(0xFF0A8043));
}
Step #4: Display the data
Use the FutureBuilder widget to display the web appointment data on screen. It is easy to work with asynchronous data sources with the FutureBuilder widget.
Refer to the following code example.
FutureBuilder(
  future: getDataFromWeb(),
  builder: (BuildContext context, AsyncSnapshot snapshot) {
    if (snapshot.data != null) {
      return SafeArea(
        child: Container(
            child: SfCalendar(
          view: CalendarView.week,
          initialDisplayDate: DateTime(2017, 6, 01, 9, 0, 0),
          dataSource: MeetingDataSource(snapshot.data),
        )),
      );
    } else {
      return Container(
        child: Center(
          child: Text('$_networkStatusMsg'),
        ),
      );
    }
  },
),
Now, the Flutter Calendar control is configured to load appointments on demand via a web API service.
Running the sample produced by the previous steps will render the Flutter Calendar with appointments like the one in the following screenshot.

via Web API Service
Additional reference
The following blog post covers the same topic but for the Syncfusion Xamarin.Forms Scheduler component: https://www.syncfusion.com/blogs/post/how-to-load-appointments-on-demand-via-web-services-in-xamarin-forms-scheduler.aspx
Conclusion
In this blog post, we’ve discussed loading appointments on demand via web services in the Flutter Calendar control. With this, we can load appointments in our calendar only when we need them, along with some custom features. You can also check out our project samples in this GitHub repository. Feel free to try out this sample and share your feedback or questions in the comments section below.
You can also contact us through our support forums, Direct-Trac, or feedback portal. We are here to help you succeed!


