

TL;DR: Learn how to integrate the Syncfusion React Data Grid into a React app and perform Redux CRUD operations with and without middleware. This guide covers setting up the React Data Grid, injecting modules for paging, sorting, filtering, and editing, and managing state with Redux for efficient data handling, including async operations using a JSON server.
The React Data Grid is one of the most useful controls, representing data simply and interactively. It allows you to display data in rows and columns. Each cell may contain text, images, or other controls. From simple contact lists to complex grids, Data Grid can handle it all.
Our Syncfusion React Data Grid is a feature-rich control for displaying data in a tabular format. Its functionalities include data binding, editing, Excel-like filtering, selection, and more. It also supports exporting data to Excel, CSV, and PDF formats.
In this blog, we will see how to connect your React application with the Syncfusion React Data Grid and perform CRUD operations using Redux with and without middleware.
The contents of this blog are as follows:
- Create a React app and integrate the Syncfusion React Data Grid.
- Module injection.
- Add Redux service.
- Update the app state without using middleware in Redux and perform CRUD.
- Update the app state using middleware in Redux and perform CRUD.
Create a React application and integrate the Syncfusion React Data Grid
Step 1: Create a new React application.
First, install the create-react-app npm package using the following command in the desired location.
npx create-react-app my-app
Note: Refer to the Getting Started with React Apps documentation to create a React app using the npm and yarn commands.
Step 2: Add the Syncfusion Packages.
All the available Essential JS 2 packages are published in the npmjs.com public registry. Use the following command to install the React Data Grid component.
npm install @syncfusion/ej2-react-grids --save
Step 3: Add the CSS reference for the React Data Grid component.
The following CSS files are available in the ../node_modules/@syncfusion package folder. Add them as references in the src/App.css file.
@import '../node_modules/@syncfusion/ej2-base/styles/material.css';
@import '../node_modules/@syncfusion/ej2-buttons/styles/material.css';
@import '../node_modules/@syncfusion/ej2-calendars/styles/material.css';
@import '../node_modules/@syncfusion/ej2-dropdowns/styles/material.css';
@import '../node_modules/@syncfusion/ej2-inputs/styles/material.css';
@import '../node_modules/@syncfusion/ej2-navigations/styles/material.css';
@import '../node_modules/@syncfusion/ej2-popups/styles/material.css';
@import '../node_modules/@syncfusion/ej2-splitbuttons/styles/material.css';
@import "../node_modules/@syncfusion/ej2-react-grids/styles/material.css";
Note: For more details, refer to the Getting started with React Data Grid documentation.
Step 4: Add the Syncfusion React Data Grid to your application.
Now, place the following code in the src/App.js file to add the Syncfusion React Data Grid component.
import * as React from 'react';
import './App.css';
import { ColumnDirective, ColumnsDirective, GridComponent, Inject} from '@syncfusion/ej2-react-grids';

class App extends React.Component {

    render() {
        // Render the EJ2 Grid component.
        return <GridComponent ref={grid => this.gridInstance = grid} >
            <ColumnsDirective>
                <ColumnDirective field='OrderID' headerText='Order ID' width='140' textAlign='Right' ></ColumnDirective>
                <ColumnDirective field='CustomerID' headerText='Customer Name' width='150' ></ColumnDirective>
                <ColumnDirective field='Freight' headerText='Freight' width='140' format='C2' textAlign='Right' ></ColumnDirective>
                <ColumnDirective field='ShipCountry' headerText='Ship Country' width='150' ></ColumnDirective>
            </ColumnsDirective>

        </GridComponent>
    }
};

export default App;
Note: The columns are automatically generated when the columns declaration is empty or undefined while initializing the grid. All the columns in the data source are bound to grid columns. At that same time, the data source should not be empty at the initial loading. Since columns are generated from the data source in the autogenerated column grid. So, we should define the columns and DataSource properties for grid rendering.
Module injection for React Data Grid Features
The React Data Grid’s features are segregated into individual modules by feature. To use a particular feature, you need to inject its feature service into the app.
Here, we are going to use the paging, sorting, filtering, editing, and toolbar features of the React Data Grid. The relevant features’ service names and descriptions are as follows:
- Page: For paging feature.
- Sort: For the sorting feature.
- Filter: For filtering feature.
- Edit: For editing feature.
- Toolbar: For the toolbar feature.
Note: For more details, refer to the Feature Modules in the React Data Grid documentation.
Now, let’s inject these modules into the grid using the Inject directive in the App.js file.
import * as React from 'react';
import './App.css';
import { ColumnDirective, Edit, ColumnsDirective, Filter, GridComponent, Inject, Page, Sort, Toolbar } from '@syncfusion/ej2-react-grids';

class App extends React.Component {
    pageSettings = { pageSize: 6 };
    validationRule = { required: true };
    orderidRules = { required: true, number: true };
    editOptions = { allowEditing: true, allowAdding: true, allowDeleting: true };
    toolbarOptions = ['Add', 'Edit', 'Delete', 'Update', 'Cancel'];
    render() {
        // Render the EJ2 Grid component.
        return <GridComponent ref={grid => this.gridInstance = grid} dataSource={this.props.data1.currentData} allowSorting={true} editSettings={this.editOptions} toolbar={this.toolbarOptions} allowFiltering={true} allowPaging={true}>
            <ColumnsDirective>
                <ColumnDirective field='OrderID' headerText='Order ID' width='140' textAlign='Right' validationRules={this.orderidRules} isPrimaryKey={true}></ColumnDirective>
                <ColumnDirective field='CustomerID' headerText='Customer Name' width='150' validationRules={this.validationRule}></ColumnDirective>
                <ColumnDirective field='Freight' headerText='Freight' width='140' format='C2' textAlign='Right' editType='numericedit' ></ColumnDirective>
                <ColumnDirective field='ShipCountry' headerText='Ship Country' width='150' ></ColumnDirective>
            </ColumnsDirective>
            <Inject services={[Page, Sort, Filter, Edit, Toolbar]} />
        </GridComponent>
    }
};

export default App;
Note: The editing feature requires a primary key column to perform CRUD operations. The primary key should be a unique value. To define the primary key, set the columns.isPrimaryKey to true in the required column.
Now, we have successfully integrated the Syncfusion React Data Grid into your app. Let’s learn how to fetch and bind data to the Data Grid, as well as perform CRUD operations using the Redux service.
Add Redux service to your application
Redux is a Javascript library for managing the global state of your application. It helps us to maintain the state of an entire application in a single immutable state object. We can’t change the state value directly. But we can update the state changes by using actions and reducers that return a new state object.
Install the Redux service in your application with the following command.
npm install redux
Then, add the redux package to your application using the following command.
npm install --save redux
Note: For more details, refer to the Redux Toolkit Installation documentation.
Now, we can update the application state by using the Redux service with or without using middleware.
Update the app state without using middleware in Redux
The following screenshot will explain the flow of updating an application state without using middleware in Redux.
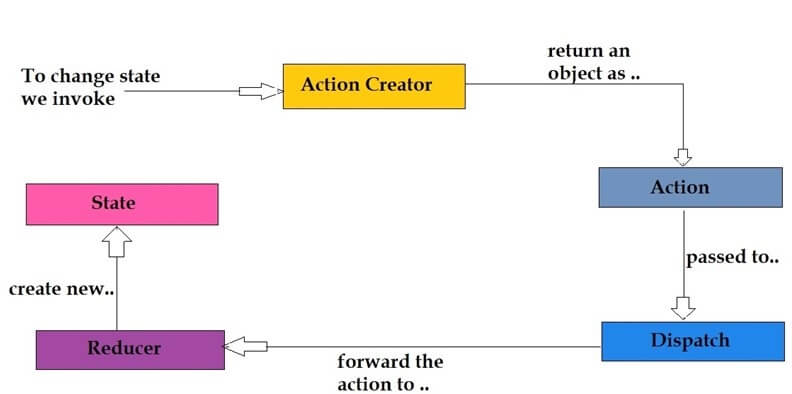
Integrating Redux service in your application
Redux has the following important principles:
- Single source of truth: Redux helps us create universal apps. The state of the application is stored in one object tree called the store. It means Redux has only one store, and that can have only one app.
- State is read-only (immutability): We can’t change the state object or its properties directly. Instead, we must make a new object, renew the app state, and update it with the newly created object. This is important because all the changes are happening in the same place, so everything needs to be done in sequential order.
- Changes are made with pure functions (reducers): Reducers are pure functions that will take the previous state and action (discuss later) and return the new state.
Redux traversing to update state
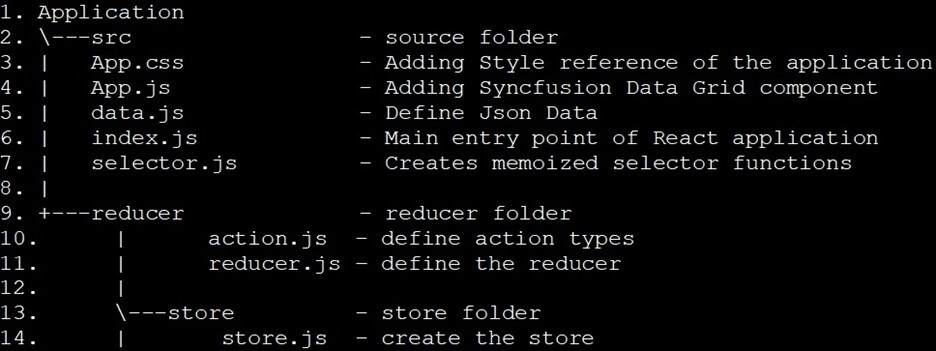
 Folder structure of the application
Action and its types
The Action is an event that will be indicated in your backend when you perform any action in your app. Using the action.type, we can determine which sort of action is triggered by the application.
The action.type defines the name of the action that will be performed from your application. The action.type should be defined as string constants.
Note: For further information, refer to the Designing Actions documentation.
In this demo, we have used the following action types, defined in the action.js file in the path location src/reducer/action.js.
[action.js]
export const Grid_Paging  ="Grid_Paging";
export const Grid_Sorting = "Grid_Sorting";
export const Grid_Filtering = "Grid_Filtering";
export const Grid_Add = "Grid_Add";
export const Grid_Editing = "Grid_Editing";
export const Grid_Delete = "Grid_Delete";
Reducer
Reducer is a pure function that takes your application’s current state and returns a new state for it.
For further information, refer to Writing Reducers documentation.
In this demo, we have defined the reducer in the reducer.js file in the path location src/reducer/reducer.js.
[reducer.js]
import {
    Grid_Paging,Grid_Sorting,Grid_Filtering,Grid_Add,
Grid_Editing,Grid_Delete} from './action';

const initialState = {
    error: false,
    result: [],
    count: 0,
    isUpdated: false
}
const reducer = (state = initialState, action) => {
. . .
    switch (action.type) {
        case Grid_Paging: {
            . . .
         return data
          . . .
    }
  }
}
Store
The Store holds the state of the entire application. Redux can have only a single store in an application. Whenever a store is created in Redux, you need to specify the reducer.
Let’s see how we can create a store using the createStore method from Redux. To do so, we need to import the createStore module from the redux library.
For further information, refer to the Redux Store documentation.
In this demo, we have created the store in the store.js file in the path location src/store/store.js.
[store.js]
import { createStore } from 'redux';
import reducer from "../reducer/reducer";// Import your reducer.
const store = new createStore(reducer);//Give name for your reducer.
export default store;
In this demo, we have defined the reducer name as reducer and specified it in the previous store.
Provider
The <Provider> component makes the Redux store available to any nested component that needs to access it. Refer to the Provider API for more details.
You can import the <Provider> component from the react-redux library by installing the redux in your application.
npm install --save redux react-redux
Then, add the <Provider> component in your application using the following code.
[index.js]
import { React } from 'react';
import { Provider } from 'react-redux'
import ReactDOM from 'react-dom';
import './index.css';
import App from './App';
import store from './store/store'

ReactDOM.render(

    <Provider store={store}>
        <App />
    </Provider>,

    document.getElementById('root')
);Connect
To connect the React Data Grid to the Redux store, use the Redux connect() method. We can use the mapStateToProps and mapDispatchToProps properties to dispatch the app action and get the updated value.
First, import connect from the redux library to use the connect() function in your application.
import { connect } from 'react-redux';Then, include the following code in the App.js file.
[App.js]
import { connect } from 'react-redux';
 . . .
render() {
    // Render the EJ2 Grid component.
    return <GridComponent ref={grid => this.gridInstance = grid} dataSource={this.props.data1.currentData} allowSorting={true} editSettings={this.editOptions} toolbar={this.toolbarOptions} allowFiltering={true} allowPaging={true}>
        <ColumnsDirective>
           . . .
    </GridComponent>
}
};
const mapStateToProps = (state, props) => {
// UpdateData is a reselect selector.
    return { data1: UpdateData(state) }
}

const mapDispatchToProps = dispatch => {
    return {
        dispatch
    }
}

export default connect(
    mapStateToProps,
    mapDispatchToProps
)(App);
CreateSelector
In this demo, we are going to use the CreateSelector method from the reselect library. The createSelector is a memorized selector. It only recalculates when a part of the state tree changes. The value of the selector doesn’t change when there is a change in other (unrelated) parts of the state tree.
Use the following command to install the reselect library in your application.
npm i reselect
In this demo, we have imported and defined the CreateSelector in the selector.js file in the path location src/selector.js.
import { createSelector } from 'reselect';
const gData = state => state;
const UpdateData = createSelector(
    [gData], (data1) => {
        return { currentData: data1.data, isUpdated: data1.isUpdated };
    }
)
export default UpdateData;
Fetch data through the Redux service
If you wish to get data through the Redux service, use the Custom DataBinding feature in the React Data Grid. With this feature, you can get data from your service on-demand. So, the Data Grid loads the records of only the current page (i.e., it does not load all the data at once). You should return the result (the records from the current page ) and count (the total number of records in your data source) when enabling Custom-DataBinding in your app.
The Data Grid uses the following events to invoke actions in Custom-DataBinding:
- dataStateChange: To handle the Data Grid operations like paging, sorting, and filtering.
- dataSourceChanged: To handle CRUD operations.
Note: During initial rendering, the dataStateChange event will not be triggered. You can perform the operation in the componentDidMount when you want to show a record in the grid.
Data fetching
We have already explained how to add the Syncfusion DataGrid component to your application. We are using the same code here.
Note: In this demo, we’ll use the Syncfusion DataManager library to run the grid query and get the results for all the grid operations. You may also apply your logic based on your database.
[App.js]
import * as React from 'react';
import './App.css';
import { ColumnDirective, Edit, ColumnsDirective, Filter, GridComponent, Inject, Page, Sort, Toolbar } from '@syncfusion/ej2-react-grids';

class App extends React.Component {
    pageSettings = { pageSize: 6 };
    render() {
        // Render the EJ2 Grid component.
        return <GridComponent ref={grid => this.gridInstance = grid} dataSource={this.props.data1.currentData} dataStateChange={this.dataStateChange.bind(this)} dataSourceChanged={this.dataSourceChanged.bind(this)} allowSorting={true} allowFiltering={true} allowPaging={true}>
            <ColumnsDirective>
                <ColumnDirective field='OrderID' headerText='Order ID' width='140' textAlign='Right' validationRules={this.orderidRules} isPrimaryKey={true}></ColumnDirective>
                <ColumnDirective field='CustomerID' headerText='Customer Name' width='150' validationRules={this.validationRule}></ColumnDirective>
                <ColumnDirective field='Freight' headerText='Freight' width='140' format='C2' textAlign='Right' editType='numericedit' ></ColumnDirective>
                <ColumnDirective field='ShipCountry' headerText='Ship Country' width='150' ></ColumnDirective>
            </ColumnsDirective>
            <Inject services={[Page, Sort, Filter]} />
        </GridComponent>
    }
};

export default App;
The dataStateChange event will not be triggered at initial loading. So, you need to set the initial parameter based on your pageSize and initial settings.
import { orderDetails } from '../data';
import { DataManager, Query } from '@syncfusion/ej2-data';
import {
    Grid_Paging, Grid_Sorting, Grid_Filtering,
    Grid_Add, Grid_Editing, Grid_Delete
} from './action';

// Initially the grid dataStateChange event is not triggered. Here, we set default pageSize as take…
//you can also set pageSize based on your application.
const initialPage = { skip: 0, take: 12 }
const initialState = {
    data: orderDetails,
    error: false,
    result: [],
    count: 0,
    isUpdated: false
}

const reducer = (state = initialState, action, gquery) => {
    const dataSource = [...initialState.data];
    let filter = [];
    const gData = new DataManager(dataSource);

    // we execute the Data Grid action and perform CRUD by using the DataManager.
    //You can execute a query based on your server.
    switch (action.type) {
        case Grid_Paging: {
        . . .
        }
        . . .
        default: {
            // We need to return the grid data as result and count with object type.
            const count1 = state.data.length;
            const data1 = { data: { result: state.data.slice(initialPage.skip, initialPage.take), count: count1 }, isUpdated: false }
            return data1;
        }
    }
}

export default reducer;
In the previous code, we set the skip and take values based on the Data Grid default pageSize value (12 is the default value). Also, we can fetch the current page records and the total number of records from your dataSource using the result and count formats, respectively.
Paging
The paging action will trigger the dataStateChange event and return the skip and take values of the next page. Let’s dispatch the paging action to the reducer using the following code.
[APP.js]
 . . .
dataStateChange(args) {
    // This event will be triggered when performing any grid action.

    const query = this.gridInstance.getDataModule().generateQuery(true); // Get the Grid query without pagination.

    // Dispatch  the page query.
    if (args.action.requestType == "paging" || args.action.requestType == "refresh" || args.action.requestType == "delete") {
        this.props.dispatch({
            type: Grid_Paging,
            payload: args,
            gQuery: query

        })
    }
...
Now, you will get the query string like in the following screenshot,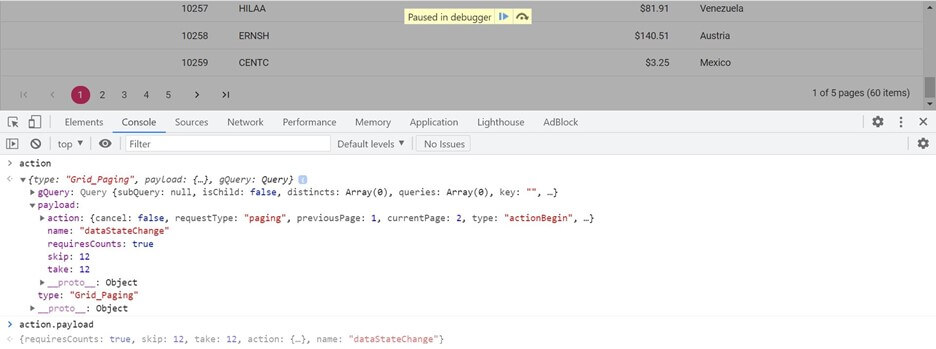 Here, we are going to use the Syncfusion DataManager library to run the Data Grid query and get the results. Also, you can apply your logic based on your database.
[reducer.js]
const reducer = (state = initialState, action, gquery) => {
    const dataSource = [...initialState.data];
    let filter = [];
    const gData = new DataManager(dataSource);
    if (action.gQuery !== undefined) {
        filter = action.gQuery.queries.filter((fn, i) => {
            return fn.fn == "onWhere"
        })
    }

    // We are going to execute the grid action and perform CRUD using the DataManager..
    //You can execute a query based on your server.
    switch (action.type) {
        case Grid_Paging: {

            // Here, we have executed the grid query by using DataManager.
            const cData = gData.executeLocal(new Query());
            // Execute the grid query except pagination....
            const gridData = action.gQuery !== undefined ? new DataManager(cData).executeLocal(action.gQuery) : cData;
            // Execute the Grid page query... based on your skip and take values.
            const currentPageData = new DataManager(gridData).executeLocal(new Query().skip(action.payload.skip).take(action.payload.take));

            // We need to return the Data Grid data as result and count with the object type.
            return ({

                data: { result: currentPageData, count: filter.length ? gridData.length : cData.length }, isUpdated: false
            })
        }
Then, we need to return the result and count formats.
Filtering and sorting
Similarly, the dataStateChange event is triggered when performing the sorting and filtering actions. It returns the query based on your actions.
Refer to the following code example to dispatch the Data Grid filtering and sorting actions to the reducer.
 . . .
dataStateChange(args) {
    // This event will be triggered when performing any grid action.

    const query = this.gridInstance.getDataModule().generateQuery(true); // Get the Grid query without pagination.

    // Dispatch the page query.
    if (args.action.requestType == "paging" || args.action.requestType == "refresh" || args.action.requestType == "delete") {
        this.props.dispatch({
            type: Grid_Paging,
            payload: args,
            gQuery: query

        })
    }
    // Dispatch the filtering query.
    if (args.action.requestType == 'filtering') {
        this.props.dispatch({
            type: Grid_Filtering,
            payload: args,
            gQuery: query
        })
    }
    // Dispatch the sorting query.
    if (args.action.requestType == 'sorting') {
        this.props.dispatch({
            type: Grid_Sorting,
            payload: args,
            gQuery: query
        })
    }
 . . .
[reducer.js]
const reducer = (state = initialState, action, gquery) => {
    const dataSource = [...initialState.data];
    let filter = [];
    const gData = new DataManager(dataSource);
    if (action.gQuery !== undefined) {
        filter = action.gQuery.queries.filter((fn, i) => {
            return fn.fn == "onWhere"
        })
    }

    // We are going to execute the grid action and perform CRUD action by using the DataManager..
    //You can execute a query based on your server.
    switch (action.type) {
        case Grid_Paging: {
              . . .

        case Grid_Filtering: {
            // Here, we have executed the grid query by using the DataManager.
            const flData = gData.executeLocal(action.gQuery);
            // Execute the grid page query... based on your skip and take values.
            const currentPageData = new DataManager(flData).executeLocal(new Query().skip(action.payload.skip).take(action.payload.take))
            return ({
                data: { result: currentPageData, count: flData.length }, isUpdated: false
            })
        }
        case Grid_Sorting: {
            // Execute the grid sort query... .
            const sortData = gData.executeLocal(action.gQuery);
            // Execute the grid page query... based on your skip and take values.
            const currentPageData = new DataManager(sortData).executeLocal(new Query().skip(action.payload.skip).take(action.payload.take));
            // We need to return the Grid data as result and count with object type.
            return ({
                data: { result: currentPageData, count: sortData.length }, isUpdated: false
            })
        }

. . .
    }
}

export default reducer;
Find the requests sent to your data service in the following screenshots.
Sorting request
Filtering request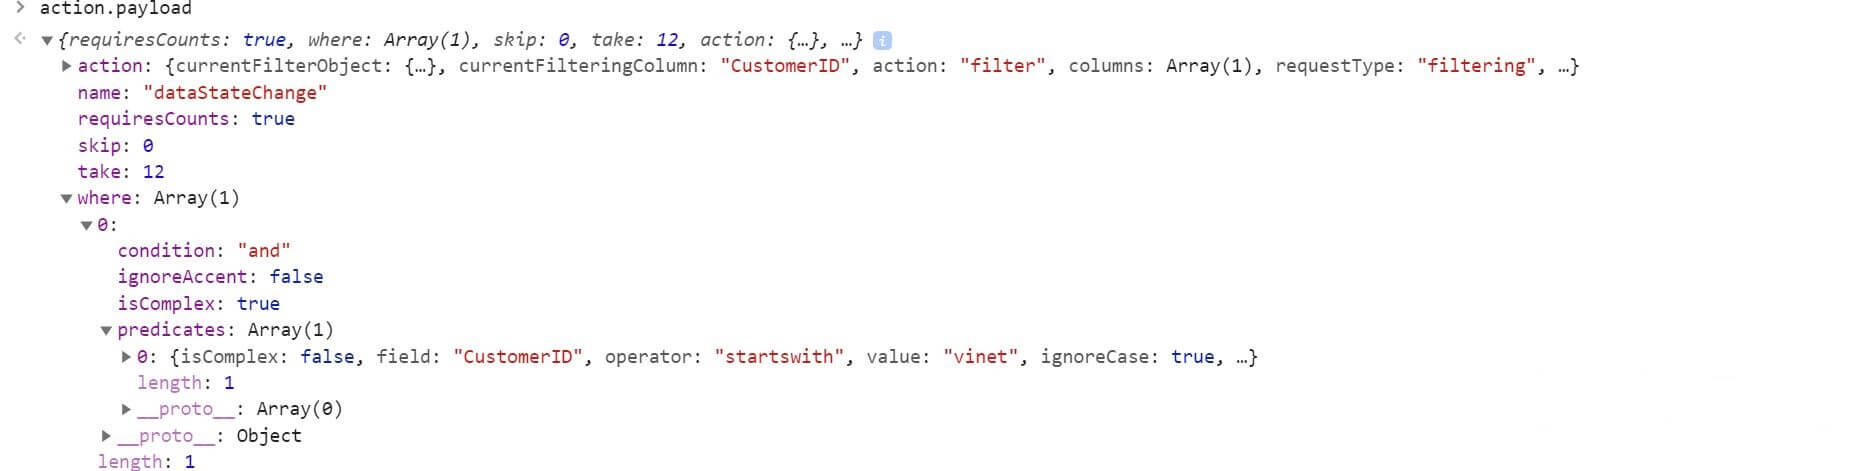
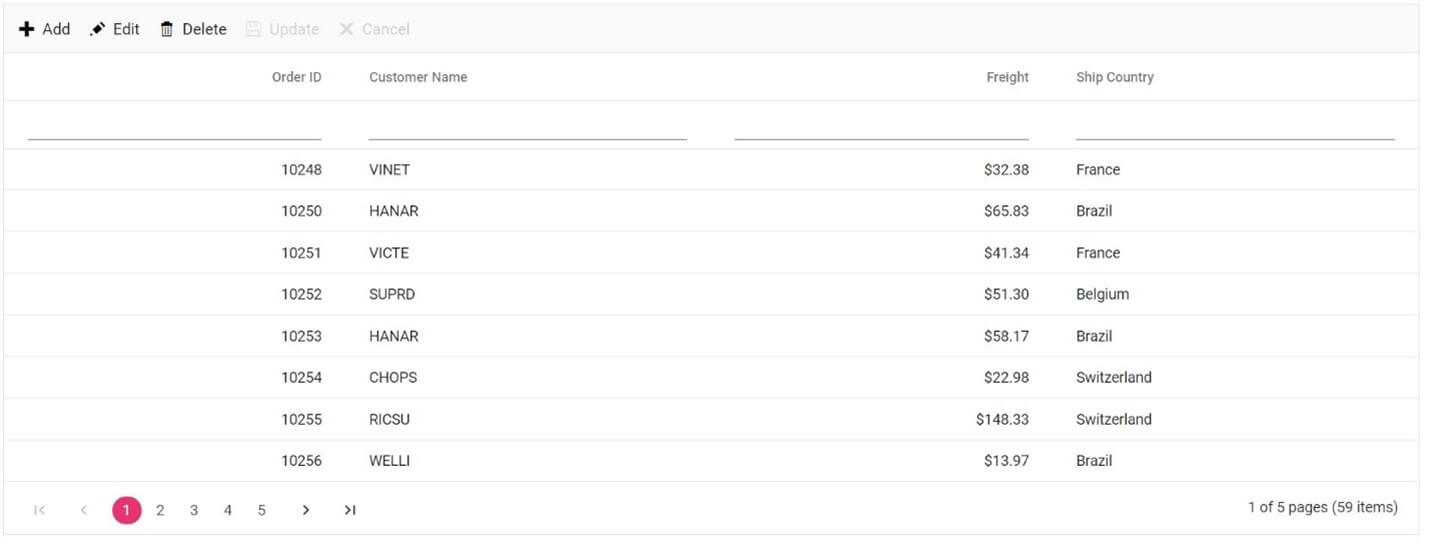
CRUD
The React Data Grid has options to dynamically insert, delete, and update records. The editing feature requires a primary key column to perform CRUD operations. To define the primary key, set the columns.isPrimaryKey to true in the required column.
You can start the edit action either by double-clicking the particular row or by selecting the required row and clicking on the Edit button in the toolbar. Similarly, you can add a new record to the grid by clicking either the Add button in the toolbar or on an external button bound to invoke the addRecord method of the grid. The save and cancel operations in the edit mode are possible using their toolbar icons in the grid. To delete a record, select the required record and click on the Delete button in the toolbar.
To perform CRUD operations, inject the Edit module in the React Data Grid. The dataSourceChanged event will be triggered when you perform any CRUD action. (This event will be triggered only when we use the custom-binding feature.)
import * as React from 'react';
import './App.css';
import { ColumnDirective, Edit, ColumnsDirective, Filter, GridComponent, Inject, Page, Sort, Toolbar } from '@syncfusion/ej2-react-grids';

class App extends React.Component {
    pageSettings = { pageSize: 6 };
    validationRule = { required: true };
    orderidRules = { required: true, number: true };
    editOptions = { allowEditing: true, allowAdding: true, allowDeleting: true };
    toolbarOptions = ['Add', 'Edit', 'Delete', 'Update', 'Cancel'];
    render() {
        // Render the EJ2 Grid component.
        return <GridComponent ref={grid => this.gridInstance = grid} dataSource={this.props.data1.currentData} dataStateChange={this.dataStateChange.bind(this)} dataSourceChanged={this.dataSourceChanged.bind(this)} allowSorting={true} editSettings={this.editOptions} toolbar={this.toolbarOptions} allowFiltering={true} allowPaging={true}>
            <ColumnsDirective>
                <ColumnDirective field='OrderID' headerText='Order ID' width='140' textAlign='Right' validationRules={this.orderidRules} isPrimaryKey={true}></ColumnDirective>
                <ColumnDirective field='CustomerID' headerText='Customer Name' width='150' validationRules={this.validationRule}></ColumnDirective>
                <ColumnDirective field='Freight' headerText='Freight' width='140' format='C2' textAlign='Right' editType='numericedit' ></ColumnDirective>
                <ColumnDirective field='ShipCountry' headerText='Ship Country' width='150' ></ColumnDirective>
            </ColumnsDirective>
            <Inject services={[Page, Sort, Filter, Edit, Toolbar]} />
        </GridComponent>
    }
};

export default App;
Update
Use the update method to modify a record in the data source. In custom data binding, the modified record will be sent along with the request to your data service. Refer to the following code for dispatching the update action to the reducer.
[App.js]
dataSourceChanged(state) {

    // This event will be triggered when we perform a CRUD action.

    this.gState = Object.assign(this.gState, state); // Store the Grid async process.

    const query = this.gridInstance.getDataModule().generateQuery(true); // Get the Grid query without pagination.

    // Dispatch the editing  action.
    if (state.action == 'edit') {
        this.props.dispatch({
            type: Grid_Editing,
            payload: state,
            gQuery: query
        })
    }
 . . .
[reducer.js]
We are going to use the isUpdated property to apply changes in your database and return this property from the reducer.
const reducer = (state = initialState, action, gquery) => {
. . .
switch (action.type) {
. . .
case Grid_Editing: {
// Here, we are going to perform insert action by using the DataManager.
gData.update('OrderID', action.payload.data);
const updatedData = gData.executeLocal(new Query());
initialState.data = [...updatedData];
const count = updatedData.length;
const gridData = new DataManager(updatedData).executeLocal(action.gQuery);
// Execute the grid page query... based on your skip and take values.
const currentPageData = new DataManager(gridData).executeLocal(new Query().skip(action.payload.state.skip).take(action.payload.state.take));
// We need to return the grid data as result and count with object type.
return ({
data: { result: currentPageData, count: filter.length ? gridData.length : count }, isUpdated: true,
})
}
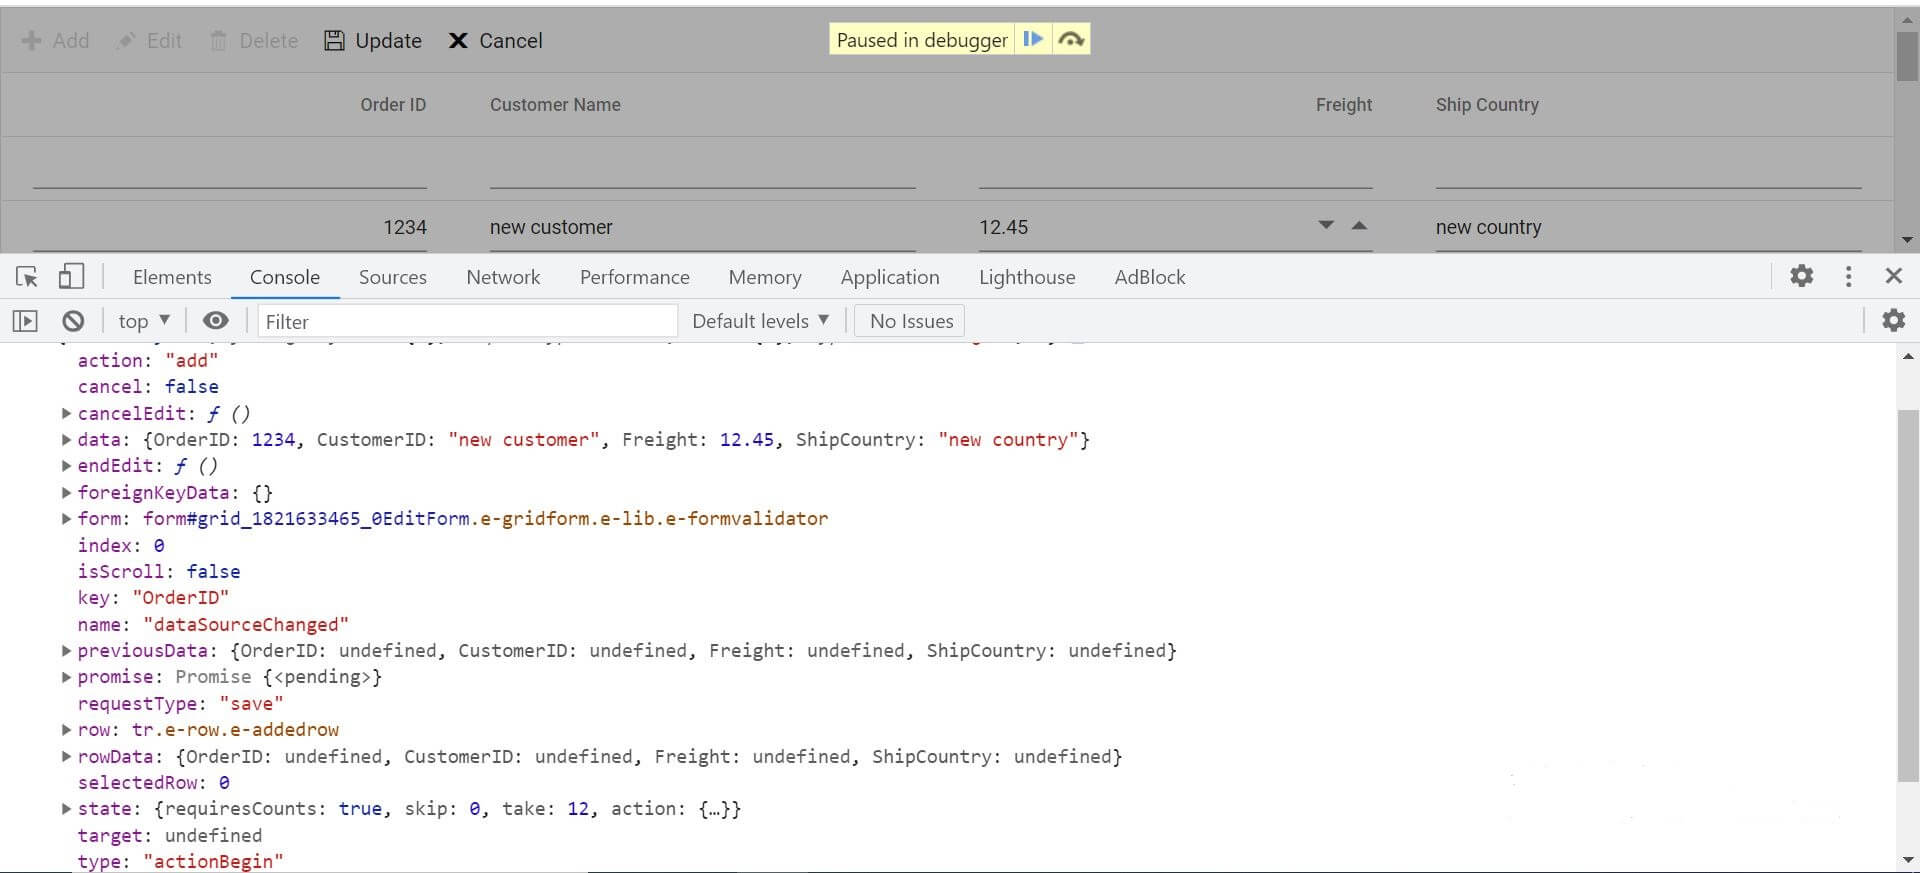
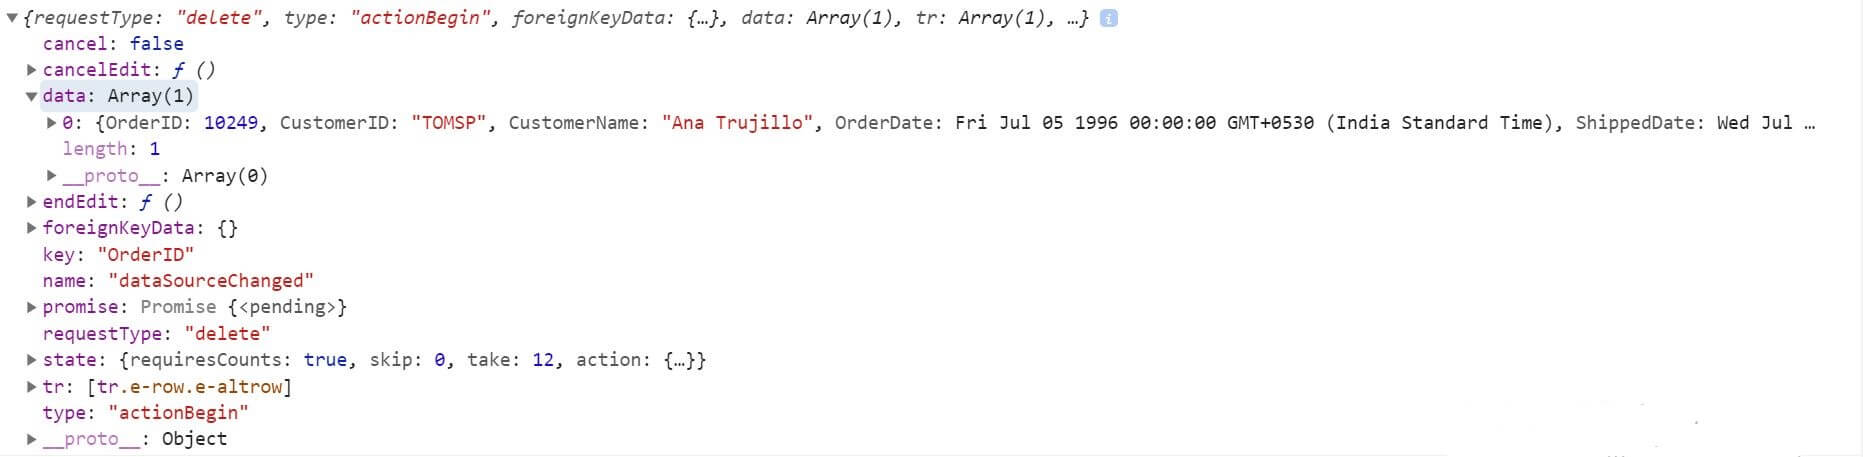
. . .You can get the modified data in the data parameters. Refer to the following screenshot for updating requests. The dataSourceChanged event is an asynchronous process. So, you need to call the following method to end the dataSourceChanged process and refresh the Data Grid.
Call the endEdit() method to complete the dataSourceChanged event process in the componentDidUpdate lifecycle method of React.
componentDidUpdate(prevProps, prevState, snapshot) {
    if (this.props.data1.isUpdated) {
        this.gState.endEdit(); // To complete the Grid CRUD - async process.

    }
}
Now, we have successfully applied the changes. Refer to the following screenshot.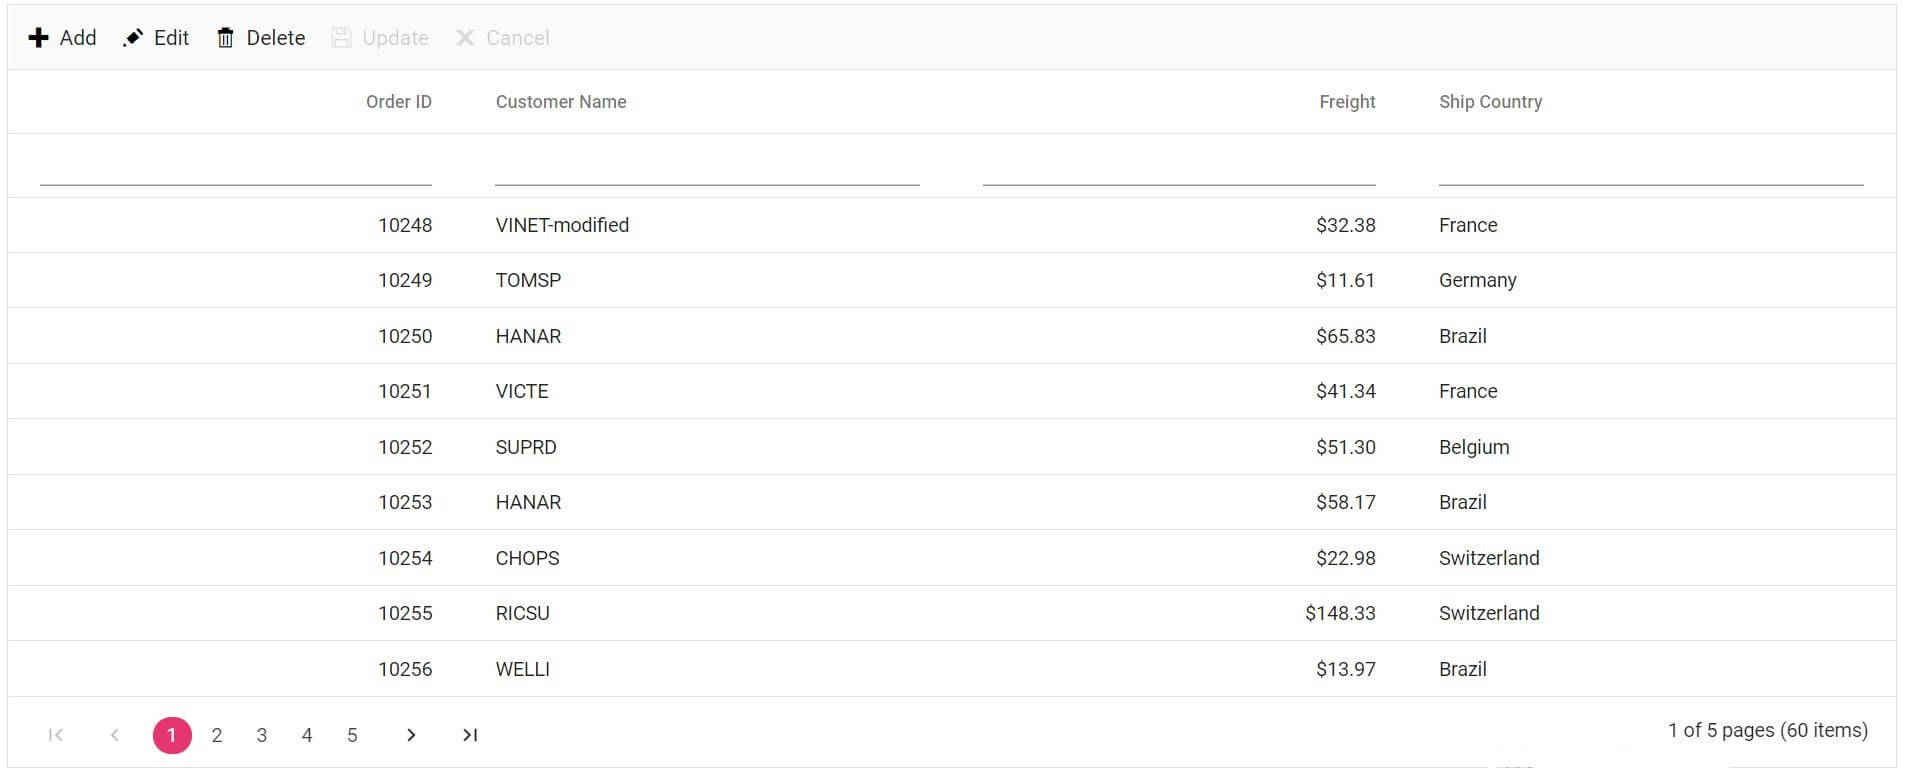
Insert
Use insert action to add new records to the data source. In the custom data binding, the new record will be sent along with the request to your data service. Refer to the following code to dispatch the insert action to the reducer.
[App.js]
dataSourceChanged(state) {

    // This event will be triggered when you perform any CRUD action.

    this.gState = Object.assign(this.gState, state); // Store the Data Grid async process.

    const query = this.gridInstance.getDataModule().generateQuery(true); // Get the Grid query without pagination.

. . .

    // Dispatch the insert action.
    else if (state.action == 'add') {
        this.props.dispatch({
            type: Grid_Add,
            payload: state,
            gQuery: query
        })
    }
    . . .
    }
}
[reducer.js]
We are going to return the isUpdated property from the reducer and use this property to apply changes in your database.
const reducer = (state = initialState, action, gquery) => {

    . . .

    // We are going to execute the grid action and perform CRUD by using the DataManager.
    //you can execute a query based on your server.
    switch (action.type) {
        . . .
        case Grid_Add: {
            // Here, we will perform the insert action using the DataManager.
            gData.insert(action.payload.data, '', null, 0);
            const addedData = gData.executeLocal(new Query());
            // Update the original state.
            initialState.data = [...addedData];
            const count = addedData.length;
            const gridData = new DataManager(addedData).executeLocal(action.gQuery);
            // Execute the grid page query... based on your skip and take values.
            const currentPageData = new DataManager(gridData).executeLocal(new Query().skip(action.payload.state.skip).take(action.payload.state.take));
            // We need to return the grid data as result and count with object type.
            return ({
                data: { result: currentPageData, count: filter.length ? gridData.length : count }, isUpdated: true,
            })
        }
 . . .
You can get the new data from the data parameters. Refer to the following screenshot for the inserting request.
 As I already said, the dataSourceChanged event is an asynchronous process. So, call the endEdit() method to end the dataSourceChanged process in the componentDidUpdate lifecycle method of React and refresh the Data Grid.
componentDidUpdate(prevProps, prevState, snapshot) {
    if (this.props.data1.isUpdated) {
        this.gState.endEdit(); // To complete Grid CRUD - async process.

    }
}
Now, we have successfully added the new record and updated the pager item, too.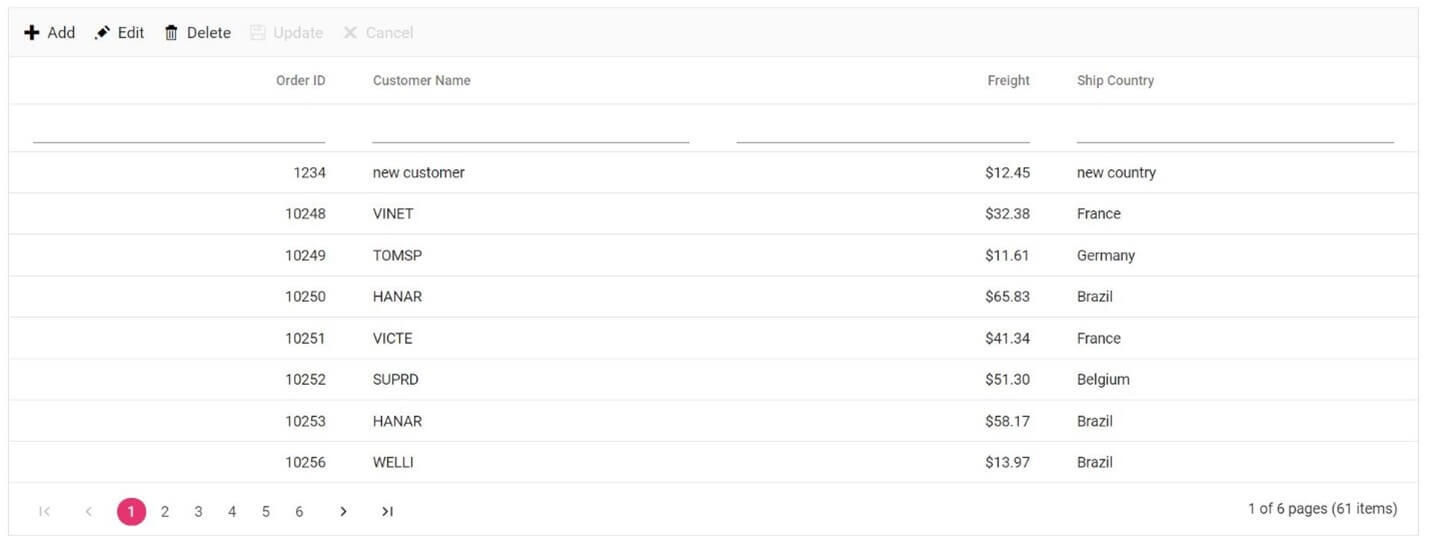
Delete
Use the remove method to remove a record from the data source. In the custom data binding, the record details, such as the primary key and data, will be sent along with the request to your data service. Refer to the following code to dispatch the delete action to the reducer.
[App.js]
dataSourceChanged(state) {

. . .

    // Dispatch the delete action.
    else if (state.requestType == 'delete') {
        this.props.dispatch({
            type: Grid_Delete,
            payload: state,
            gQuery: query
        })
    }
[reducer.js]
We are going to return the isUpdated property from the reducer and use this property to apply changes in your database.
const reducer = (state = initialState, action, gquery) => {
. . .

    // We are going to execute the grid action and perform CRUD by using the DataManager.
    //You can execute a query based on your server.
    switch (action.type) {
. . .
        case Grid_Delete: {
            // Here, we will perform the insert action by using DataManager.
            gData.remove('OrderID', { OrderID: action.payload.data[0]['OrderID'] });
            const updatedData = gData.executeLocal(new Query());
            initialState.data = [...updatedData];
            const count = updatedData.length;
            const gridData = new DataManager(updatedData).executeLocal(action.gQuery);
            // Execute the grid page query... based on your skip and take values.
            const currentPageData = new DataManager(gridData).executeLocal(new Query().skip(action.payload.state.skip).take(action.payload.state.take));
            // We need to return the grid data as result and count with object type.
            return ({
                data: { result: currentPageData, count: filter.length ? gridData.length : count }, isUpdated: true,
            })
        }
        . . .
}
Refer to the following screenshot for deleting requests.
 Finally, call the endEdit() to complete the dataSourceChanged event process in the componentDidUpdate lifecycle method of React.
componentDidUpdate(prevProps, prevState, snapshot) {
    if (this.props.data1.isUpdated) {
        this.gState.endEdit(); // To complete the grid CRUD - async process.

    }
}
Now, we have successfully removed and updated the pager item.
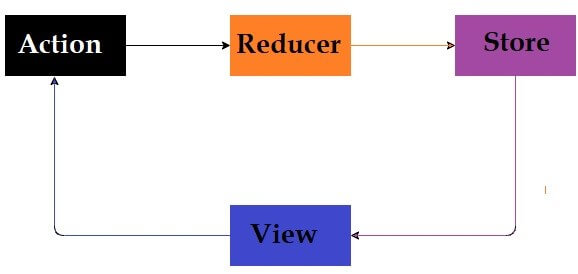
Update the application state using Redux with middleware
Redux middleware acts as a medium between dispatching an action and handing over the action to the reducer. It is mainly used to handle asynchronous actions in your application. Refer to the following flow chart about Redux middleware.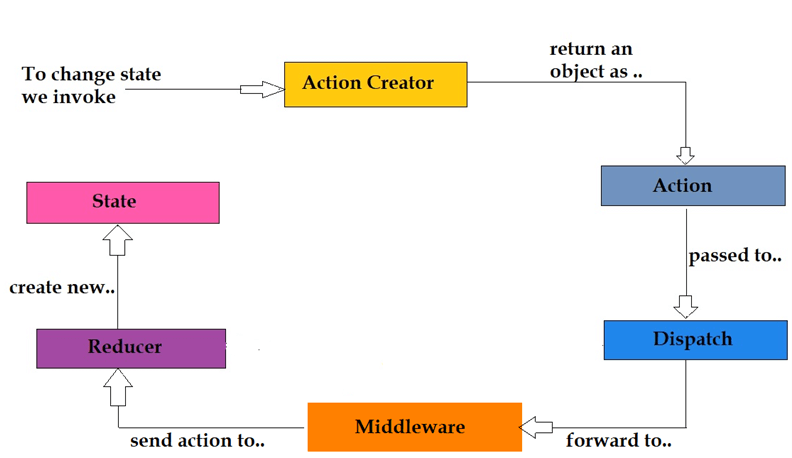
Create JSON server
Install the JSON server in your application to create a REST JSON API web service.
npm install -g json-server
Add JSON server to your application
Follow these steps to add a JSON server to your application:
- First, create a new folder in your application. Here, we have created a folder named DataAPI.

- Then, open the DataAPI folder and add the package.json file by using the following command.
npm init --yes
- Add the JSON server to your application using the following command.
npm install --save json-server
- Now, create a data.json file in your application.
"orderdetails": [ { "OrderID": 10248, "CustomerID": "VINET", "OrderDate": "1996-07-04T00:00:00.000Z", "ShippedDate": "1996-07-16T00:00:00.000Z", "Freight": 32.38, "ShipName": "Vins et alcools Chevalier", "ShipAddress": "59 rue de l\"Abbaye", "ShipCity": "Reims", "ShipRegion": null, "ShipCountry": "France" }, { "OrderID": 10249, "CustomerID": "TOMSP", "OrderDate": "1996-07-05T00:00:00.000Z", "ShippedDate": "1996-07-10T00:00:00.000Z", "Freight": 11.61, "ShipName": "Toms Spezialitäten", "ShipAddress": "Luisenstr. 48", "ShipCity": "Münster", "ShipRegion": null, "ShipCountry": "Germany" }, . . . ] - Then, set the portal number in the package.json file.
{
    "name": "DataAPI",
        "version": "1.0.0",
            "description": "",
                "main": "index.js",
                    "scripts": {
        "start": "json-server -p 3007 -w data.json"
    },
    "keywords": [],
        "author": "",
            "license": "ISC",
                "dependencies": {
        "json-server": "^0.16.3"
    }
}
Run the application
Now, run the application using the following command.
json - server--watch db.json--port 3007
If you have already configured and added the run command in the package.json, then run the app with this command.
npm start
Add Thunk middleware to your application
Redux-Thunk is a middleware that allows us to perform any asynchronous action. For more details, refer to the Redux middleware documentation.
- Use the following command to add the Thunk middleware to your application.
npm install --save redux-thunk
- Then, import the Thunk middle-ware module from the redux-thunk and use it in your application.
Axios
- Now, install the axios in your application to send the HTTP request through it.
npm install --save axios
Store
We explained the store action in the Integrating Redux service in your application section. Now, define your action in the store.js file.
[store.js]
import thunk from 'redux-thunk';

import { createStore, applyMiddleware } from 'redux';
import { composeWithDevTools } from "redux-devtools-extension";
import thunk from 'redux-thunk';
import reducer from "../reducer/reducer";// Import your reducer.
const initialState = {};

const middleware = [thunk];
const store = new createStore(reducer, initialState, applyMiddleware(...middleware));//Give the reducer name.
export default store;
Now, let’s add the DataService file under the service folder.
[serverapi.js]
import axios  from 'axios';
export default axios.create({
    baseURL: "http://localhost:3007",
    headers: {
        "Content-type": "application/json"
      }
})
[order.js]
import http from "../serverapi";

class orderDataService {
    getAll(gState) {
        debugger
        let cpage = (gState.skip / gState.take) + 1;
        let sortColumnName = ''
        let sortDirection = ''

        let params = {
            _page: cpage,
            _limit: gState.take
        }
        // Push the sorted columns.
        if (gState.sorted) {
            for (let i = gState.sorted.length; i > 0; i--) {
                let sortD = gState.sorted[i - 1].direction == "ascending" ? 'asc' : 'desc';
                let sortCol = gState.sorted[i - 1].name;
                sortColumnName = sortColumnName == '' ? sortCol : sortColumnName + ',' + sortCol;
                sortDirection = sortDirection == '' ? sortD : sortDirection + ',' + sortD;
            }
            params._sort = sortColumnName;
            params._order = sortDirection;
        }

        if (gState.where) {
            let filterCol = gState.where[0].predicates;
            for (let i = 0; i < filterCol.length; i++) {
                let optr = filterCol[i].operator == 'contains' ? '_like' : filterCol[i].operator == 'greaterthan' ? '_gte' : filterCol[i].operator == 'lessthan' ? '_lte' : '';
                params[filterCol[i].field + optr] = filterCol[i].value;
            }
        }
        return http.get("/orderdetails",
            {
                params
            });
    }


    create(data) {
        return http.post("/orderdetails", data);
    }

    update(id, data) {
        return http.put(`/orderdetails/${id}`, data);
    }

    delete(id) {
        return http.delete(`/orderdetails/${id}`);
    }

    deleteAll() {
        return http.delete(`/orderdetails`);
    }

    findByTitle(title) {
        return http.get(`/orderdetails?title=${title}`);
    }
}

export default new orderDataService();
Action
We explained the action types in the Integrating Redux service in your application section. Now, define your action in the action.js file.
import orderDataService from "../services/order"
export const Grid_Paging = "Grid_Paging";
export const Grid_Sorting = "Grid_Sorting";
export const Grid_Filtering = "Grid_Filtering";
export const Grid_Add = "Grid_Add";
export const Grid_Editing = "Grid_Editing";
export const Grid_Delete = "Grid_Delete";


export const getData = (gquery, gState) => async (dispatch) => {
    try {
        if (gState.action && gState.action == 'edit') {
            const updatedData = await orderDataService.update(gState.primaryKeyValue[0], gState.data)
            dispatch({
                type: Grid_Editing,
                payload: updatedData.data,
                gQuery: gquery,
                gState: gState,
                tCount: parseInt(updatedData.headers["x-total-count"]),
            })
        }
        if (gState.action && gState.action == 'add') {
            const addedData = await orderDataService.create(gState.data)
            dispatch({
                type: Grid_Add,
                payload: addedData.data,
                gQuery: gquery,
                gState: gState,
                tCount: parseInt(addedData.headers["x-total-count"]),
            })
        }
        if (gState.requestType && gState.requestType == 'delete') {
            const deletedData = await orderDataService.remove(gState.data[0]['id'])
            dispatch({
                type: Grid_Delete,
                payload: deletedData.data,
                gQuery: gquery,
                gState: gState,
                tCount: parseInt(deletedData.headers["x-total-count"]),
            })
        }
        else {
            const res = await orderDataService.getAll(gState);
            dispatch({
                type: Grid_Paging,
                payload: res.data,
                gQuery: gquery,
                gState: gState,
                tCount: parseInt(res.headers["x-total-count"]),
            })
        }
    } catch (error) {

    }
Note: Also, refer to the JSON server data operations demo on GitHub for more details.
Reducer
We explained the reducer in the Integrating Redux Service in your application section. Now, define your action in the reducer.js file, like in the following code example.
import { orderDetails } from '../data';
import { DataManager, Query } from '@syncfusion/ej2-data';
import {
    Grid_Paging, Grid_Sorting, Grid_Filtering,
    Grid_Add, Grid_Editing, Grid_Delete
} from './action';

// Initially the Grid dataStateChange event is not triggered. Here, we set the default pageSize as take..
//you can set the pageSize based on your application.
const initialPage = { skip: 0, take: 12 }
const initialState = {
    data: [],
    error: false,
    result: [],
    count: 0,
    isUpdated: false
}

const reducer = (state = initialState, action, gquery) => {

    switch (action.type) {
        case Grid_Paging: {
            return ({
                data: { result: action.payload, count: action.tCount }, isUpdated: false
            })
        }
        case Grid_Filtering: {
            return ({
                data: { result: action.payload, count: action.tCount }, isUpdated: false
            })
        }
        case Grid_Sorting: {
            return ({
                data: { result: action.payload, count: action.tCount }, isUpdated: false
            })
        }
        case Grid_Add: {
            return ({
                data: { result: action.payload, count: action.tCount }, isUpdated: true,
            })
        }
        case Grid_Editing: {
            return ({
                data: { result: action.payload, count: action.tCount }, isUpdated: true,
            })
        }
        case Grid_Delete: {
            return ({
                data: { result: action.payload, count: action.tCount }, isUpdated: true,
            })
        }
        default: {
            return ({ data: { result: [], count: 0 } })
        }
    }
}
export default reducer;
Note: You need to return the result and count format in your application and configure the Provider, Connect, and CreateSelector.
Adding Data Grid to your application
We explained how to add the Data Grid component to your application and handle the Data Grid actions. Please see the following Data Grid code example.
[App.js]
class App extends React.Component {
    constructor() {
        super();
        this.gState = {};
    }
    pageSettings = { pageSize: 6 };
    validationRule = { required: true };
    orderidRules = { required: true, number: true };
    editOptions = { allowEditing: true, allowAdding: true, allowDeleting: true };
    toolbarOptions = ['Add', 'Edit', 'Delete', 'Update', 'Cancel'];
    filterOptions = { operator: "contains" }

    componentDidMount() {
        const query = this.gridInstance.getDataModule().generateQuery()
        this.props.getData(query, { skip: 0, take: 12 })
    }

    componentDidUpdate(prevProps, prevState, snapshot) {
        this.gridInstance.hideSpinner();
        if (this.props.data1.isUpdated) {
            this.gState.endEdit(); // To complete grid CRUD - async process
            // this.gridInstance.freezeRefresh();
        }
    }


    render() {
        // Render the EJ2 Grid component.
        return <GridComponent ref={grid => this.gridInstance = grid} dataSource={this.props.data1.currentData} dataStateChange={this.dataStateChange.bind(this)} dataSourceChanged={this.dataSourceChanged.bind(this)} allowSorting={true} editSettings={this.editOptions} toolbar={this.toolbarOptions} allowFiltering={true} allowPaging={true}>
            <ColumnsDirective>
                <ColumnDirective field='id' headerText='Order ID' width='140' textAlign='Right' validationRules={this.orderidRules} isPrimaryKey={true}></ColumnDirective>
                <ColumnDirective field='CustomerID' headerText='Customer Name' filter={this.filterOptions} width='150' validationRules={this.validationRule}></ColumnDirective>
                <ColumnDirective field='Freight' headerText='Freight' width='140' format='C2' textAlign='Right' editType='numericedit' ></ColumnDirective>
                <ColumnDirective field='ShipCountry' headerText='Ship Country' filter={this.filterOptions} width='150' ></ColumnDirective>
            </ColumnsDirective>
            <Inject services={[Page, Sort, Filter, Edit, Toolbar]} />
        </GridComponent>
    }
};
const mapStateToProps = (state, props) => {
    // UpdateData is a reselect selector.
    return { data1: UpdateData(state) }
}

// const mapDispatchToProps = dispatch => {
//   return {
//     dispatch
//   }
// }

export default connect(
    mapStateToProps, { getData }


)(App);
Now, define the dataStateChange and dataSourceChange events in the App.js file.
    dataStateChange(args) {
        // This event will be triggered when performing any grid action.

        const query = this.gridInstance.getDataModule().generateQuery(true); // get the Grid query without pagination

        // Dispatch  the page query.
        if (args.action.requestType == "paging" || args.action.requestType == "refresh" || args.action.requestType == "delete") {
            this.props.getData(query, args);
        }
        // Dispatch  the filtering query.
        if (args.action.requestType == 'filtering') {
            this.props.getData(query, args);
        }
        // Dispatch  the sorting query.
        if (args.action.requestType == 'sorting') {
            this.props.getData(query, args);
        }
    }
    dataSourceChanged(state) {
        // This event will be triggered when we perform any CRUD action.

        this.gState = Object.assign(this.gState, state); // Store the grid async process.

        const query = this.gridInstance.getDataModule().generateQuery(true); // Get the Grid query without pagination.

        // Dispatch the editing  action.
        if (state.action == 'edit') {
            this.props.getData(query, state);
        }

        // Dispatch the insert action.
        else if (state.action == 'add') {
            this.props.getData(query, state);
        }

        // Dispatch the delete action.
        else if (state.requestType == 'delete') {
            this.props.getData(query, state);
        }
        else {
            this.props.getData(query, state);

        }
    }
Run the application
Finally, run the application using the following command.
npm start
GitHub reference
You can get the complete working example for the Syncfusion React Data Grid and preforming CRUD action using Redux.
Conclusion
Thanks for reading! In this blog post, we have seen how to perform CRUD operations in the Syncfusion React Data Grid using the Redux service in your application. Also, peruse our React Data Grid demos and documentation for more details. Try out this complete guide and leave your feedback in the comments section below.
Syncfusion Data Grid is also available in the Blazor, ASP.NET (Core, MVC, WebForms), JavaScript, Angular, React, Vue, Xamarin, Flutter, UWP, WinForms, WPF, and WinUI platforms.
For existing customers, the newest version is available for download from the license and downloads page. If you are not yet a Syncfusion customer, you can try our 30-day free trial to check out the available features. Also, check out our samples on GitHub.
You can contact us through our support forums, support portal, or feedback portal. We are always happy to assist you!
 No spam, just valuable updates.
Comments (1)
Have followed the tutorial but I can’t figure out how to handle errors from the backend API any assistance? My code is exactly the same