 Sumathi Uthayakumar
TL;DR: Need to verify signed PDFs long after signing? Learn how to digitally sign PDFs, add trusted timestamps, enable Long-Term Validation (LTV), and validate individual or multiple signatures using the Syncfusion JavaScript PDF Library.
A digital signature helps verify who signed a PDF and whether the document has changed since signing. But how can you validate that signature months or even years later, especially when the signing certificate has expired or revocation information is no longer available?
Trusted timestamps and Long-Term Validation (LTV) information help preserve the evidence needed for future signature verification.
With the 2026 Volume 3 release, Syncfusion® added digital signature validation and Long-Term Validation (LTV) capabilities in its JavaScript PDF Library.
In this guide, you’ll learn how to:
- Sign PDF documents using a digital certificate.
- Add a trusted timestamp from a Time Stamping Authority (TSA).
- Enable Long-Term Validation (LTV).
- Validate individual and multiple signatures.
- Interpret validation results correctly.
Important: A trusted timestamp and LTV information can help preserve the evidence needed to validate a PDF signature in the future. However, successful long-term validation still depends on the signature’s integrity, the available certificate and revocation evidence, the certificate chain, and the trust policies used by the validating application. LTV improves future validation readiness but does not guarantee indefinite validation under all circumstances.
What the new PDF validation capability enables
The new validation capabilities allow developers to:
- Verify whether a signed document has been altered after signing.
- Validate certificate chains used by signatures.
- Inspect trusted timestamp information.
- Check certificate revocation status using OCSP and CRL evidence.
- Validate a specific signature field.
- Validate multiple signatures in a single PDF document.
- Support processes that require long-term signature verification.
These capabilities are especially useful in document management, finance, legal, healthcare, government, and compliance-focused applications where document integrity must be preserved over time.
Digitally sign a PDF in JavaScript
Digital signatures help verify a PDF document’s authenticity, confirm the identity of the signer, and detect whether the document has been altered after signing. By applying a certificate-based digital signature, you can establish trust in electronic documents and support secure document processing.
Using the Syncfusion JavaScript PDF Library, you can digitally sign both newly created and existing PDF documents with industry-standard certificates.
Prerequisites
Before you begin, ensure you have the following:
- A valid digital certificate (.PFX or .P12) containing the private key.
- The certificate password.
- A PDF document to sign, or a new PDF document to create.
- The Syncfusion JavaScript PDF Library.
Security Consideration: Never hardcode PFX passwords, private keys, or certificate files in browser-delivered JavaScript. Private keys are sensitive cryptographic assets and should be protected appropriately. For high-security environments, consider server-side signing or a managed digital-signing service rather than exposing signing credentials to client applications.
Once your certificate and PDF document are ready, you can sign the document by creating a signature field, applying a digital signature, and saving the signed PDF.
Steps to digitally sign a PDF
Step 1: Create or load a PDF document
Create a new document or load an existing PDF, depending on your use case. The document acts as the container for the digital signature and related form fields.
Step 2: Create a signature field
Add a PdfSignatureField to the document. This field defines where the signature information will be stored and displayed within the PDF.
Step 3: Create and apply a digital signature
Load the PFX certificate and create a PdfSignature object using the certificate and password. You can also specify the cryptographic standard and hashing algorithm used to generate the signature.
Step 4: Add the signature field and save the document
After applying the signature, add the signature field to the PDF form and save the document. The resulting PDF contains a verifiable digital signature that can later be validated for integrity and authenticity.
The following example creates a new PDF document, adds a signature field, and applies a digital signature using a PFX certificate and the SHA-256 hashing algorithm:
// Create the document
var document = new ej.pdf.PdfDocument();
// Get the first page of the document
var page = document.addPage();
// Access the PDF form
var form = document.form;
// Create a new signature field
var field = new ej.pdf.PdfSignatureField(page, 'Signature', {x: 10, y: 10, width: 100, height: 50});
// Create a new signature using PFX data and private key
var sign = ej.pdf.PdfSignature.create(certData, password, {cryptographicStandard: ej.pdf.CryptographicStandard.cms, digestAlgorithm: ej.pdf.DigestAlgorithm.sha256});
// Set the signature to the field
field.setSignature(sign);
// Add the field to the PDF form
form.add(field);
// Save the document
document.save('output.pdf');
// Destroy the document
document.destroy();
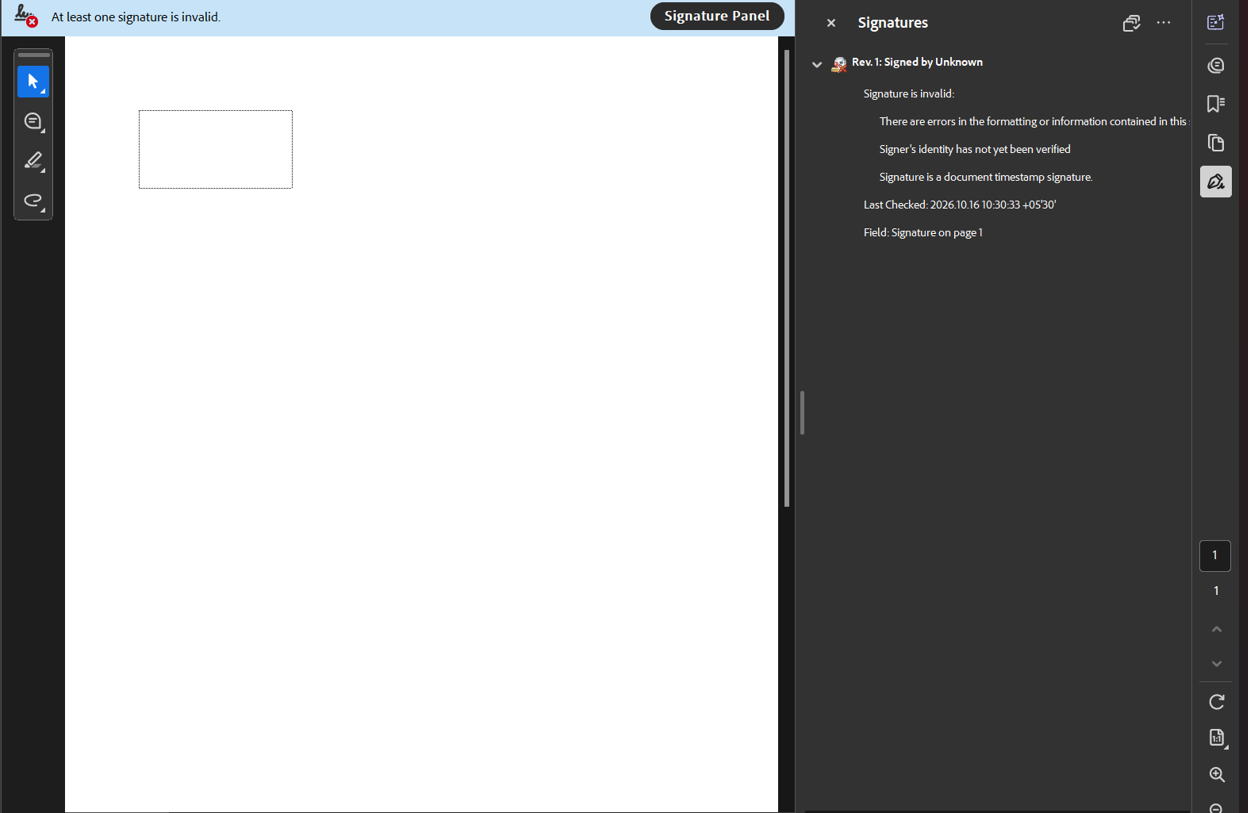
Note: In this example, certData represents the PFX certificate bytes and password is the certificate password. These values should be securely loaded through your application’s credential management process rather than embedded directly in source code.
For additional signing scenarios, including signing existing PDFs and advanced signature configuration options, explore the digital signature demo and refer to the API documentation.
Add a trusted timestamp to a PDF signature
A timestamp records when a document was signed through a trusted Time Stamping Authority (TSA). It provides evidence of the signing time and helps support future signature verification.
To add a timestamp, provide a timestamp callback when creating the digital signature. The callback returns the TSA response, which is embedded into the signature during the save operation.
The following example shows how to add a timestamp to a digitally signed PDF document.
// Create a timestamp callback
async function timestampCallback(request) {
    // Implement timestamp response logic here
    return { response: new Uint8Array() }; // Placeholder return
}
// Create a new signature using PFX data, private key and callback function for timestamp
const signature = ej.pdf.PdfSignature.create(certData, password, { cryptographicStandard: ej.pdf.CryptographicStandard.cms, digestAlgorithm: ej.pdf.DigestAlgorithm.sha256 }, timestampCallback);
field.setSignature(signature);
// Save the document
await document.saveAsync('output.pdf');
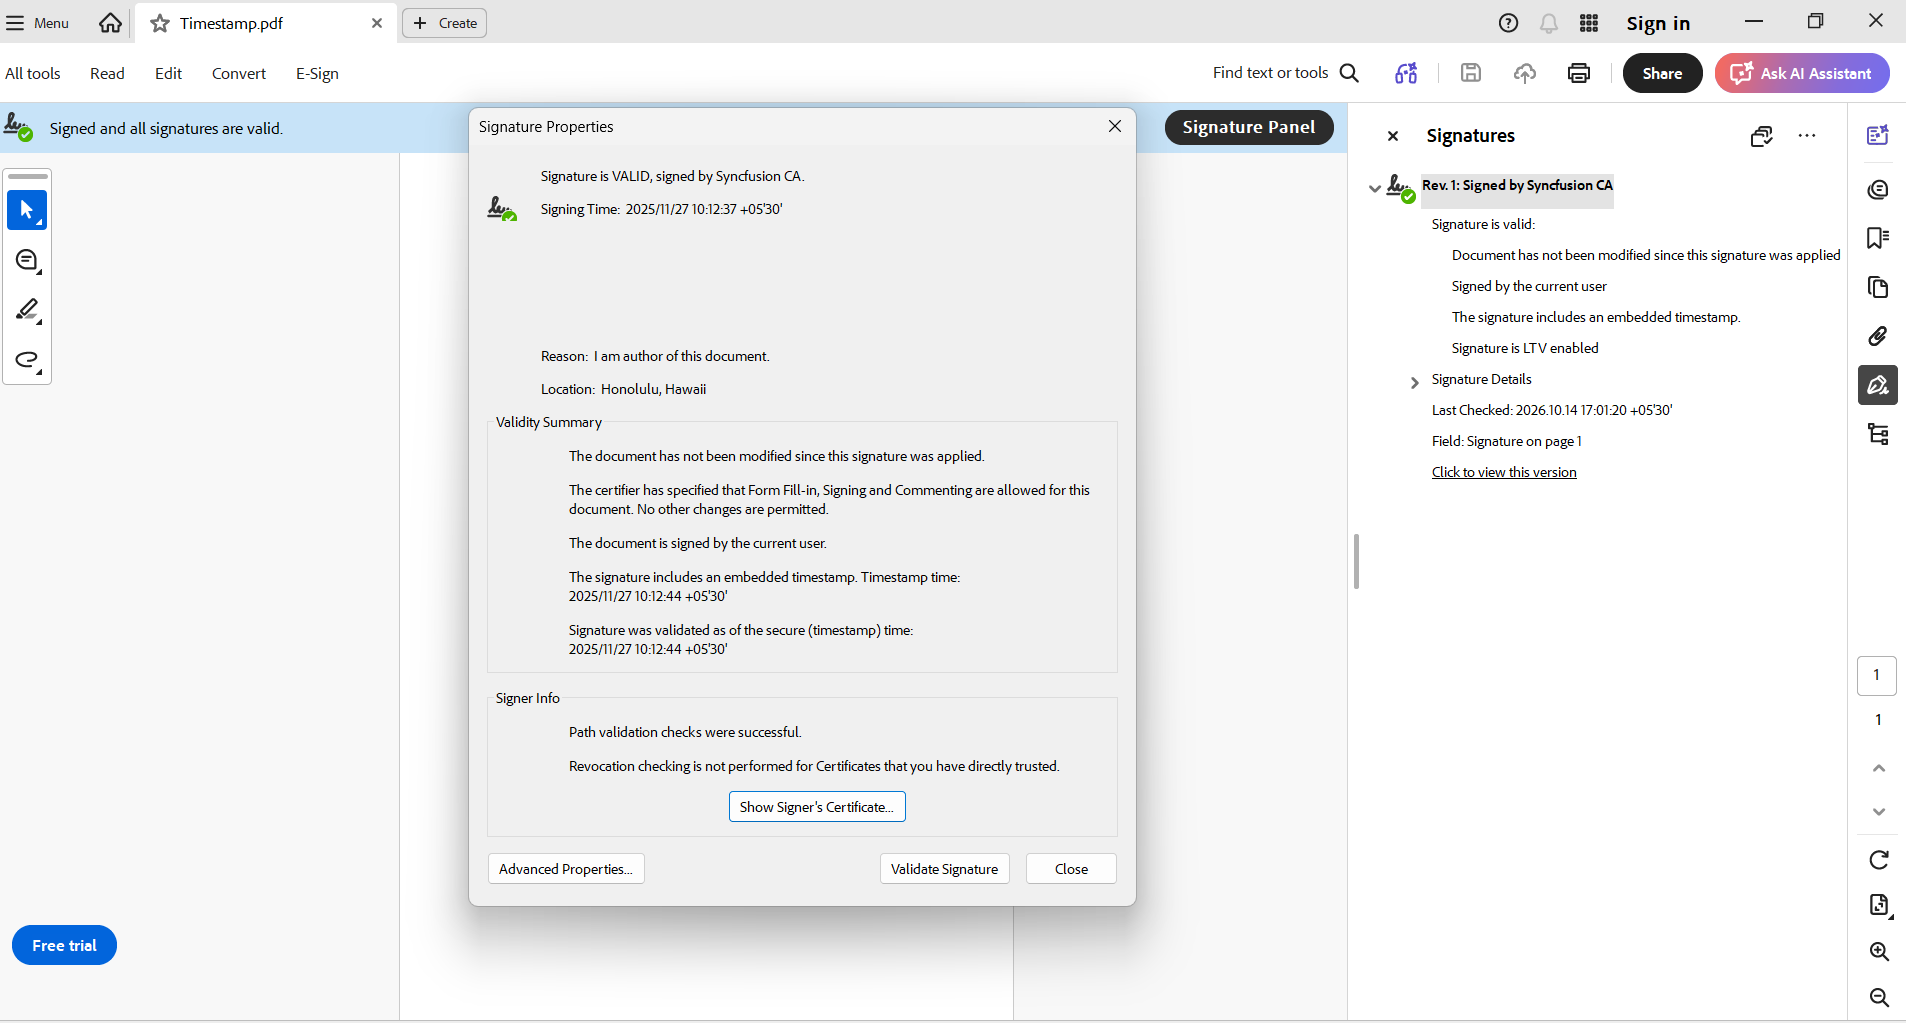
Note: This example demonstrates the callback contract only. Your application must send the timestamp request to a trusted Time Stamping Authority (TSA) and return the TSA response bytes.
Why use saveAsync()?
When timestamping is enabled, the library must communicate with an external TSA service. Because the operation is asynchronous, use await document.saveAsync() to ensure that the timestamp response is received and embedded before the PDF is generated.
For a complete timestamp integration example, refer to the digital signature documentation.
Enhance PDF signature validation with Long-Term Validation (LTV)
A trusted timestamp helps establish when a document was signed, but long-term verification often requires additional evidence. If certificate revocation services become unavailable, validators may not be able to retrieve the information needed to determine whether the signing certificate was trusted at the time of signing.
Long-Term Validation (LTV) helps address this challenge by embedding certificate and revocation information directly into the PDF.
To enable LTV:
- Sign and save the PDF.
- Reload the signed document.
- Retrieve the signature.
- Call the enableLTV() method and provide revocation responses through the callback.
The following code example demonstrates how to enable LTV for a signed PDF document.
// Load the signed PDF document
const document = new ej.pdf.PdfDocument(data);
// Get the signature field
const field = document.form.fieldAt(0);
// Retrieve the PDF signature
const signature = field.getSignature();
// Retrieve the OCSP or CRL response requested by the library
var longTermValidationCallback = async function (url, requestBytes) {
    // Send requestBytes to the approved URL and return the actual response bytes
    return { response: revocationResponse };
};
// Enable LTV for the created signature
var ltvEnabled = await signature.enableLTV(longTermValidationCallback);
// Save the LTV-enabled PDF document
document.save('output.pdf');
Note: This callback must return the actual OCSP or CRL response bytes requested by the library. Network communication, authentication, retry logic, and error handling should be implemented by your application.
After you enable LTV, the PDF contains additional validation information that can support future verification and archival processes.
For complete LTV examples and implementation guidance, refer to the LTV documentation.
Validate PDF signatures
Once a signed PDF contains timestamp and optional LTV information, the next step is validation. Validation helps determine whether the document has been modified after signing and whether the associated certificates, timestamps, and revocation information remain trustworthy.
The Syncfusion JavaScript PDF Library supports validation for both individual signatures and multiple signatures contained within a PDF document.
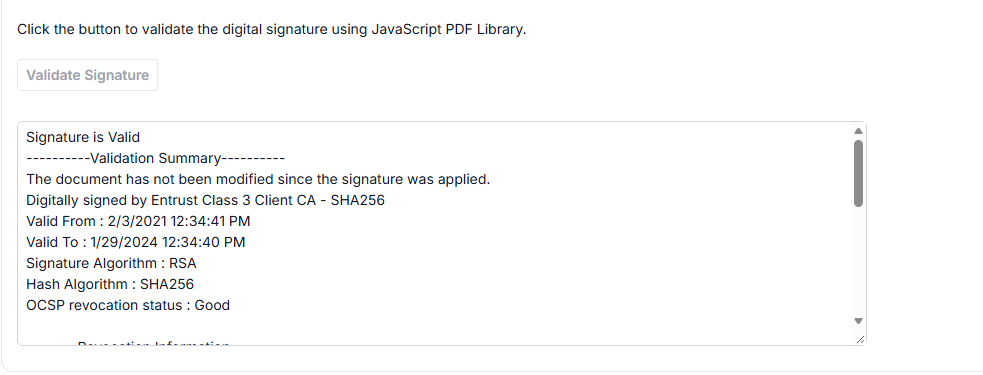
During validation, the library can verify document modifications, certificate chains, timestamp information, revocation status through OCSP or CRL data, and multiple signatures available in the document.
Validation prerequisites
Before validating signatures, prepare the following:
- documentData: The PDF document bytes to validate.
- certificateData: Trusted root or intermediate certificate data used to establish trust.
- passwords: Optional passwords used only when validating encrypted PDFs or password-protected processes.
Providing a certificate does not automatically establish trust. Validation depends on whether a complete and trusted certificate chain can be successfully built according to your organization’s trust requirements.
Validate a single signature
To validate an individual signature, retrieve the associated signature field and call the validate() method. The validation process checks whether the document has been modified after signing and evaluates certificate trust, timestamp validity, and revocation status based on the specified validation options.
The following example validates a single signature using trusted certificate information:
// Load the signed PDF document.
const document = new ej.pdf.PdfDocument(documentData);
// Get the first signature field from the form.
const field = document.form.fieldAt(0);
// Configure the signature validation options.
const options = {
    trustedCertificates: [certificateData],
    passwords: ['syncfusion']
};
// Validate the signature.
const validationResult = field.validateSignature(options);
// Check the validation result.
console.log('Signature name: ' + validationResult.signatureName);
console.log('Signature valid: ' + validationResult.isSignatureValid);
console.log('Signature status: ' + validationResult.signatureStatus);
console.log('Document modified: ' + validationResult.isDocumentModified);
console.log('Revocation result: ', validationResult.revocationResult);
// Destroy the document and release its resources.
document. Destroy();
The returned validation result contains details about signature validity, document integrity, certificate-chain validation, timestamp verification, and revocation checks.
Include the passwords option only when validating encrypted PDFs or processes that require password-protected content.
Note: Explore the digital signature validation demo to see the validation process in action and review the validation results returned by the API.
Validate multiple signatures in a PDF
When a PDF contains multiple signatures, validate them collectively using the validateSignatures() method. The method evaluates every signature field in the document and returns both overall and signature-specific validation results.
The following example validates all signatures in a PDF document:
// Load the PDF document that contains multiple signatures.
const document = new ej.pdf.PdfDocument(documentData);
// Configure the validation options.
const options = {
    trustedCertificates: [certificateData]
    passwords: ['syncfusion']
};
// Validate all signatures in the PDF document.
const validationResult = document.form.validateSignatures(options);
if (validationResult.results !== null &&
    validationResult.results !== undefined) {
    console.log(
        'Number of validated signatures: ' +
        validationResult.results.length
    );
    validationResult.results.forEach((result) => {
        console.log(
            `${result.signatureName}: ${result.isSignatureValid}`
        );
    });
}
// Determine whether all signatures are valid.
if (validationResult.isValid) {
    console.log('All signatures in the PDF document are valid.');
} else {
    console.log('One or more signatures in the PDF document are invalid.');
}
The validationResult.isValid property indicates the overall validation outcome for the document. Review the entries in validationResult.results to inspect the status of each individual signature.
Note: For additional validation scenarios, review the digital signature validation demo and documentation. They include examples covering certificate validation, revocation checking, timestamp verification, and multi-signature validation processes.
Understanding validation results
The validationResult.isValid property represents the overall validation outcome based on the validation options you supplied.
However, developers should also review the individual entries in validationResult.results, since each signature may have different validation outcomes for:
- Certificate trust.
- Timestamp verification.
- Revocation status.
- Certificate-chain validation.
- Document integrity.
Reviewing individual validation results provides a more complete assessment than relying only on a single Boolean value. It also helps you make more informed trust decisions when processing signed PDF documents.
Build a trusted PDF signing and validation process
Now that we’ve covered signing, timestamping, LTV, and validation individually, let’s see how they fit together in a complete process.
Creating a trusted PDF process involves more than simply applying a digital signature. To ensure long-term document reliability, follow this recommended sequence:
- Sign the PDF to establish document authenticity and integrity.
- Add a trusted timestamp to record when the document was signed.
- Enable LTV to embed revocation information required for future verification.
- Validate the signature before accepting, sharing, or archiving the document.
Following this process helps preserve the evidence needed to validate signed PDF documents after certificate expiration or when external revocation services are unavailable.
Recommended process
- Step 1: Sign the PDF using PdfSignature.create().
- Step 2: Add a timestamp using a TSA callback and saveAsync().
- Step 3: Reload the signed document and enable LTV using enableLTV().
- Step 4: Validate the signature using validate() or validateSignatures().
In production environments, these four stages represent the complete trust lifecycle of a signed PDF document. Each stage adds verification evidence that helps preserve trust beyond the initial signing event.
By combining these stages, you can build secure and reliable PDF signing processes for contracts, compliance documents, business records, and other long-term digital documents.
Frequently Asked Questions
Why is a basic digital signature not enough for long-term PDF trust?
Certificates can expire, and revocation information may not always be available in the future. Without a trusted timestamp and Long-Term Validation (LTV), signature validation may lack the evidence required to verify the document over time.
What does a signature timestamp prove?
A trusted Time Stamping Authority (TSA) provides evidence of when a document was signed. This timestamp can help establish that the signature existed at a particular time and support verification against the signing certificate’s validity period.
What is LTV in PDF digital signatures?
Long-Term Validation (LTV) embeds revocation information, such as OCSP and CRL responses, directly into the PDF. This helps support signature validation even when external revocation services are unavailable.
Does the JavaScript PDF Library support PDF digital signing?
Yes. The Syncfusion JavaScript PDF Library supports certificate-based digital signatures for both new and existing PDF documents through the PdfSignature and PdfSignatureField classes.
Can LTV and timestamps be used together?
Yes. You can add a timestamp when creating the digital signature and then enable Long-Term Validation (LTV) after signing to support long-term signature verification.
How are signatures validated with the library?
Use signature.validate() to validate an individual signature and document.form.validateSignatures() to validate all signatures in a PDF document.

Conclusion
Digital signatures help verify the authenticity and integrity of PDF documents, but trusted timestamps, Long-Term Validation (LTV), and signature validation are essential for maintaining trust over time.
In this blog, we explored how to sign PDFs in JavaScript, add trusted timestamps, enable LTV, and validate digital signatures using the Syncfusion JavaScript PDF Library. By combining these capabilities, you can build secure PDF processes that remain verifiable long after documents are signed.
Ready to get started? Explore the Syncfusion JavaScript PDF Library and add digital signing and validation capabilities to your applications.
If you’re an existing Syncfusion user, download the latest version from the license and downloads page. New users can start with a free 30-day trial.
For questions or assistance, reach out through the support forum, support portal, or feedback portal.




Be the first to get updates