
 Manikanda Akash Munisamy
TL;DR: Skip building scheduler logic from scratch. Syncfusion’s ASP.NET Core Scheduler delivers production-ready appointment management with recurring events, multi-timezone support, CRUD operations, flexible views, and multiple resources. All configured in hours, not weeks.
Building a scheduling application sounds straightforward until you start dealing with recurring meetings, timezone differences, resource allocation, and appointment management. What begins as a simple calendar requirement can quickly become a complex project with countless edge cases.
Instead of building scheduling functionality from scratch, you can leverage the Syncfusion ASP.NET Core Scheduler to handle these challenges out of the box. From managing recurring appointments to coordinating resources across teams, it provides the essential capabilities needed for modern scheduling applications.
In this article, we’ll explore five core Scheduler features that help developers build robust scheduling solutions faster:
- Appointments
- CRUD operations
- Timezone support
- Flexible views
- Multiple resources
1. Appointments: The foundation of every scheduling application
Appointments are at the heart of any scheduling system. Whether you’re building a meeting planner, appointment booking platform, or resource management solution, the ability to create and organize events efficiently is essential.
Support for different event types
Not every event behaves the same way. Some occupy a specific time slot, while others span an entire day or repeat on a regular schedule.
The Scheduler supports:
Standard appointmentsfor time-bound activitiesAll-day eventsfor holidays, conferences, or milestonesRecurring eventsfor meetings that occur on a predictable scheduleMulti-day eventsthat span several dates
For example, instead of creating a weekly team meeting dozens of times, you can define a recurrence rule once and let the Scheduler generate future occurrences automatically.
var appointment = new AppointmentData
{
    Subject = "Weekly Standup",
    StartTime = new DateTime(2024, 1, 15, 10, 0, 0),
    EndTime = new DateTime(2024, 1, 15, 10, 30, 0),
    RecurrenceRule = "FREQ=WEEKLY;INTERVAL=1;BYDAY=MO,WE,FR;COUNT=52"
};
The RecurrenceRule property follows iCalendar (RFC 5545) specification. You can set occurrences to end after N times (COUNT=52), on a specific date (UNTIL=20241231), or never end.
Spanned Events (duration > 24 hours) display in the all-day row by default. Configure SpannedEventPlacement to render them inside time slots instead, which is useful for multi-day projects visible in the working area.
Custom fields and validation
Enforce data integrity by adding validation rules to each field. You can define validation rules directly in the Razor template using the validationRules attribute.
You can also define reusable validation rule objects in your controller and reference them across multiple fields:
var validationRules = new Dictionary<string, object> { { "required", true } };
var locationRules = new Dictionary<string, object>
{
    { "required", true },
    { "regex", new string[] { "^[a-zA-Z0-9- ]*$", "Special characters not allowed" } }
};
This approach allows you to centralize validation logic and reuse the same rules across multiple scheduler instances when needed.
Prevention features
Prevent overlapping events by setting allowOverlap="false". The scheduler blocks conflicting event creation with an alert. This is critical for resource-constrained scenarios (meeting rooms, equipment).
Block specific time ranges (unavailable slots, maintenance windows) using events with isBlock="true". These appear visually distinct and prevent new appointments during those times.
2. CRUD operations: Managing the complete appointment lifecycle
A scheduling application is only useful if users can create, update, and remove appointments effortlessly.
Our Scheduler includes built-in support for the entire appointment lifecycle.
Creating events
Users can create appointments directly within the interface by selecting a date or time slot and entering event details such as:
- Subject
- Location
- Start time
- End time
- Recurrence settings
Developers can also create appointments programmatically when business workflows require automated scheduling.
var scheduleObj = document.getElementById('schedule').ej2_instances[0];
var updatedEvent = {
    Id: 5,
    Subject: 'Updated Team Meeting',
    StartTime: new Date(2026, 6, 20, 15, 0, 0),
    EndTime: new Date(2026, 6, 20, 15, 30, 0)
};

scheduleObj.addEvent(updatedEvent);
Server-side insert logic
When appointments are created, the scheduler sends an insert action request. Your backend processes this:
if (param.action == "insert")
{
    var value = param.value;
    DateTime startTime = Convert.ToDateTime(value.StartTime);
    DateTime endTime = Convert.ToDateTime(value.EndTime);

    var appointment = new ScheduleEventData()
    {
        Id = db.ScheduleEventDatas.Max(p => p.Id) + 1,
        Subject = value.Subject,
        StartTime = startTime,
        EndTime = endTime,
        IsAllDay = value.IsAllDay,
        RecurrenceRule = value.RecurrenceRule
    };

    db.ScheduleEventDatas.InsertOnSubmit(appointment);
    db.SubmitChanges();
}
Editing Appointments
Schedules change constantly. Meetings get rescheduled, durations are adjusted, and locations change.
The Scheduler makes it easy to edit existing appointments while preserving important metadata. You can edit appointments in 3 ways.
- Normal events: Double-click to edit, then save changes.
- Recurring events: Events can be modified either as a single occurrence or as part of the entire series.
- Method: You can edit appointments programmatically using the
saveEventmethod.
var scheduleObj = document.getElementById('schedule').ej2_instances[0];
var updatedEvent = {
    Id: 5,
    Subject: 'Updated Team Meeting',
    StartTime: new Date(2026, 6, 20, 16, 0, 0),
    EndTime: new Date(2026, 6, 20, 16, 30, 0)
};
scheduleObj.saveEvent(updatedEvent);
Deleting Appointments
Appointments can be removed individually or deleted as part of a recurring series. This flexibility helps maintain accurate schedules while reducing the complexity of managing event history.
By handling these operations automatically, developers can spend less time building infrastructure and more time delivering business value.
For more information, see how CRUD operations in the Scheduler support full appointment lifecycle management through multiple approaches.
3. Timezone support: Scheduling across location boundaries
Timezone and localization support ensures accurate scheduling across regions. Syncfusion manages the time zone conversions automatically.
Scheduler-level timezones
Organizations that operate from a central office often need all events displayed according to a single timezone.
The Scheduler allows you to define a default timezone so every user sees appointments consistently, regardless of their local device settings.
<ejs-schedule id="schedule" timezone="America/New_York" selectedDate="new DateTime(2024, 1, 15)">
    <e-schedule-eventsettings dataSource="@ViewBag.appointments"></e-schedule-eventsettings>
</ejs-schedule>
Now, every user sees appointments in Eastern Time, regardless of their local timezone. Useful for centralized operations like trading, broadcasts, or corporate headquarters scheduling.
Event-level timezone
Some applications require appointments to be tied to different geographic locations.
For example:
- A meeting in New York
- A training session in London
- A conference in Singapore
Each event can maintain its own timezone while the Scheduler automatically converts and displays the correct local time for every user.
<e-schedule-eventsettings dataSource="@ViewBag.appointments">
    <e-eventsettings-fields id="Id">
        <e-field-starttime name="StartTime"></e-field-starttime>
        <e-field-starttimezone name="StartTimeZone"></e-field-starttimezone>
        <e-field-endtimezone name="EndTimeZone"></e-field-endtimezone>
    </e-eventsettings-fields>
</e-schedule-eventsettings>
An appointment at 9:00 AM in “America/Los_Angeles” displays as 12:00 PM for a “America/New_York” user (3-hour difference). The scheduler handles all conversion math automatically.
UTC-based scheduling
For global systems, storing and displaying events using UTC provides an additional layer of consistency and helps eliminate timezone-related errors.
This approach is particularly useful for enterprise applications serving distributed teams.
In your Startup.cs, ensure JSON serialization uses UTC:
.AddJsonOptions(opt => opt.SerializerSettings.DateTimeZoneHandling =
    DateTimeZoneHandling.Utc)
This ensures server and client agree on time representation, preventing off-by-hour surprises.
Localization: Supporting multiple languages and cultures
The Scheduler integrates localization (globalization and language translation) to function globally. You can adapt the Scheduler to various languages and regions using the locale property.
<ejs-schedule id="schedule" width="100%" height="550px" locale="fr-CH">
    <e-schedule-eventsettings dataSource="@ViewBag.appointments"></e-schedule-eventsettings>
</ejs-schedule>
Customize date format
By default, Scheduler follows "MM/dd/yyyy" format based on the locale. Customize using the dateFormat property:
<ejs-schedule id="schedule" width="100%" height="550px" dateFormat="yyyy/MM/dd">
    <e-schedule-eventsettings dataSource="@ViewBag.appointments"></e-schedule-eventsettings>
</ejs-schedule>
Set time format
Control 12-hour or 24-hour format using timeFormat:
<ejs-schedule id="schedule" width="100%" height="550px" timeFormat="HH:mm">
    <e-schedule-eventsettings dataSource="@ViewBag.appointments"></e-schedule-eventsettings>
</ejs-schedule>
Enable Right-to-Left (RTL) mode
For languages like Arabic or Hebrew, set enableRtl="true" to display the Scheduler layout from right to left:
<ejs-schedule id="schedule" width="100%" height="550px" enableRtl="true">
    <e-schedule-eventsettings dataSource="@ViewBag.appointments"></e-schedule-eventsettings>
</ejs-schedule>
Localize static text
Translate UI text (buttons, labels, messages) using the L10n class:
var L10n = ej.base.L10n;
L10n.load({
    "hu": {
        "schedule": {
            "day": "Nap",
            "week": "Hét",
            "month": "Hónap",
            "today": "Ma",
            "noEvents": "Nincs esemény"
        }
    }
});
Localization enables teams across regions to work seamlessly in their preferred languages and timezone representations.
4. Flexible views: Presenting data the way users need it
The way users consume scheduling information varies depending on their role and workflow.
A customer service team may need an hourly view of the day, while a project manager might prefer a broader monthly overview. The scheduler supports 12 view modes. Choosing the right view dramatically impacts user experience.
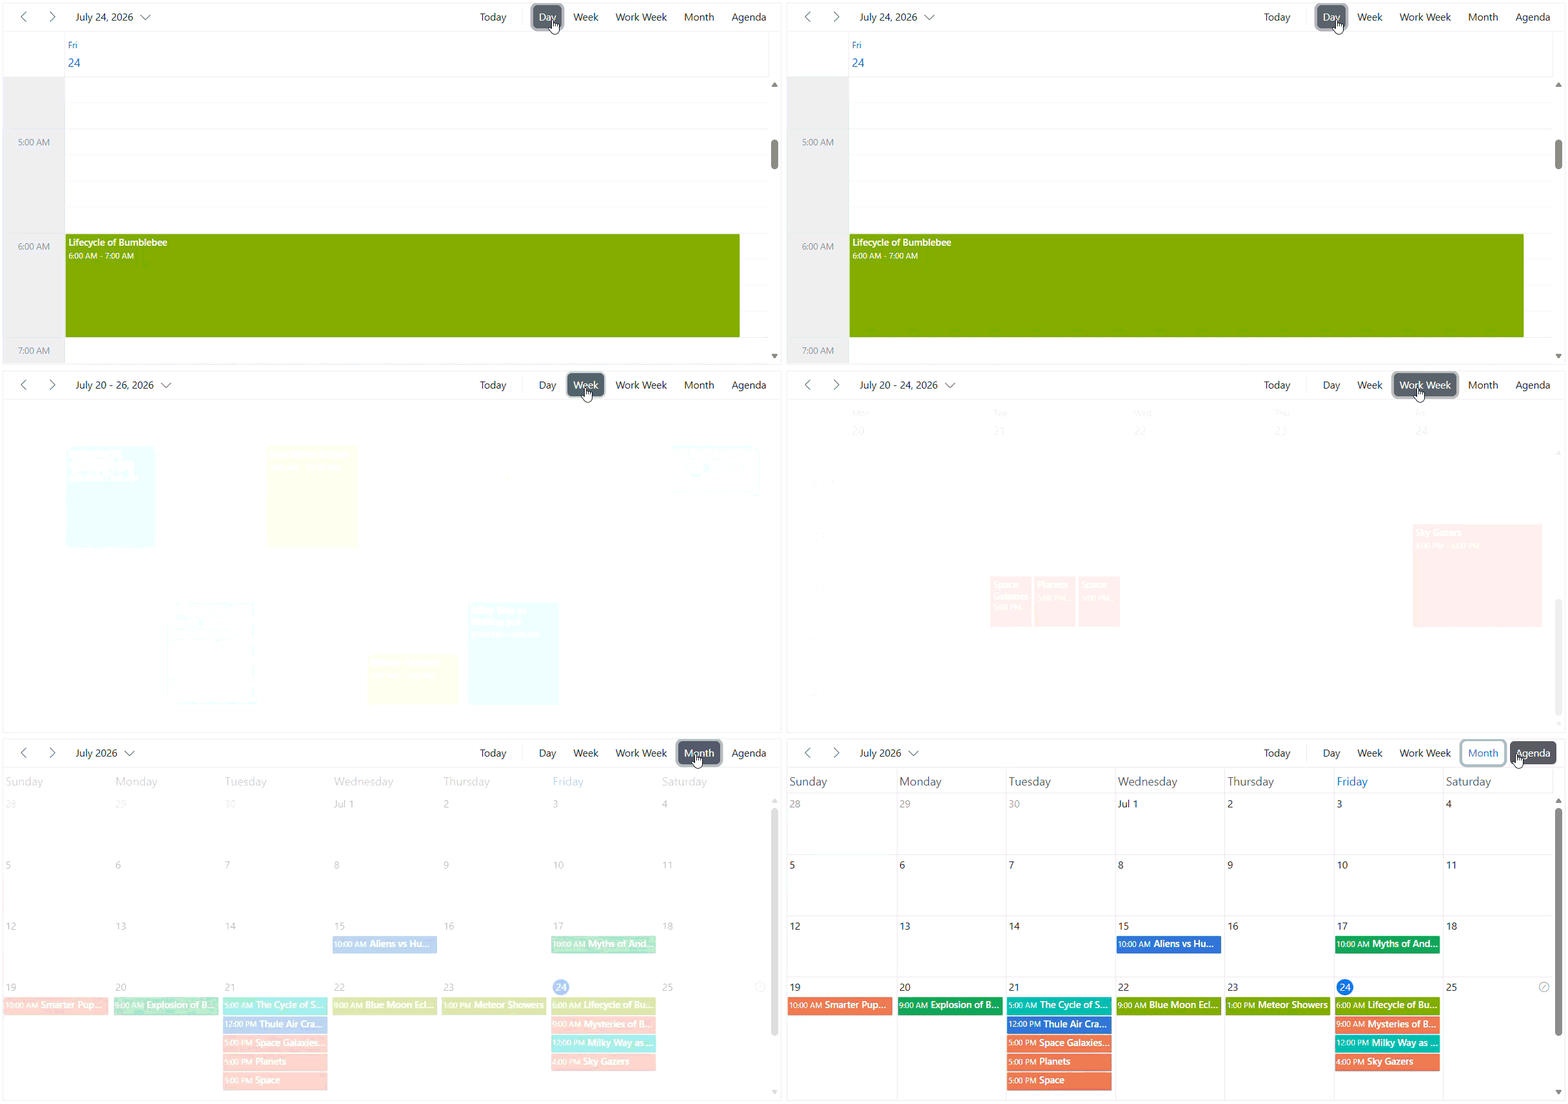
Day view
Ideal for detailed planning and time-sensitive tasks.
Users can:
- View hourly schedules
- Track appointments precisely
- Focus on a single day
This view works particularly well for healthcare, consulting, and support teams.
Week and work week views
- Weekly views provide a broader perspective while still maintaining sufficient detail.
- The Work Week view removes weekend days, making it easier for businesses to focus on operational schedules.
<ejs-schedule id="schedule">
    <e-schedule-views>
        <e-schedule-view option="WorkWeek" workDays="new int[] { 1, 2, 3, 4, 5 }"></e-schedule-view>
    </e-schedule-views>
</ejs-schedule>
Month view
A monthly calendar offers a high-level overview of appointments, deadlines, and upcoming events. This format is useful for planning activities over longer periods.
Agenda View
You can configure the next 7 days (via agendaDaysCount) as a list. Useful for “my upcoming schedule” widgets. Supports virtual scrolling for performance with large datasets.
Timeline Views
Timeline layouts display time horizontally rather than vertically.
These views are especially useful when working with:
- Meeting rooms
- Equipment reservations
- Shared resources
- Project schedules
They provide a clear picture of resource utilization and availability.
Custom views
Different views can be configured independently to match business requirements.
For example:
- Restrict visible hours
- Hide weekends
- Create read-only views
- Customize date formats
This flexibility helps tailor the scheduling experience to specific user needs.
<e-schedule-view option="Day" startHour="08:00" endHour="20:00"
    dateFormat="dd-MMM-yyyy"></e-schedule-view>
<e-schedule-view option="Month" showWeekend="false" readonly="true"></e-schedule-view>
This example shows the Day view with custom hours and date format, and a read-only Month view that hides weekends. Useful for multi-role schedulers.
5. Multiple resources: Coordinating people, rooms, and assets
Many scheduling applications involve more than just dates and times. They also need to manage resource availability.
A resource might represent:
- Employees
- Meeting rooms
- Classrooms
- Vehicles
- Equipment
- Service technicians
Multiple Resources allow you to manage appointments across different team members, meeting rooms, or assets. This feature enables resource-based scheduling and conflict prevention.
Resource-based scheduling
The Scheduler allows appointments to be assigned directly to resources, making it easier to track availability and prevent conflicts.
For example, a meeting room can display all booked appointments, allowing users to identify open time slots quickly.
Resources represent any entity that can be scheduled (people, rooms, equipment). Define resources with these key fields: field (resource ID binding), title (display name), name (grouping identifier), textField (display text), idField (unique ID), colorField (appointment color), and allowMultiple (multi-selection).
ViewBag.Owners = new List<object> {
    new { id = 1, text = "Nancy", color = "#FF6E40" },
    new { id = 2, text = "Michael", color = "#009BE0" }
};<ejs-schedule id="schedule" width="100%" height="550px">
<e-schedule-resources>
<e-schedule-resource dataSource="@ViewBag.Owners" field="OwnerId" title="Owner"
name="Owners" textField="text" idField="id" colorField="color"
allowMultiple="true"></e-schedule-resource>
</e-schedule-resources>
<e-schedule-eventsettings dataSource="@ViewBag.appointments"></e-schedule-eventsettings>
</ejs-schedule>Resources can be bound from local JSON or remote services via DataManager.
Resources grouping
Resources can be organized into logical groups to improve usability.
Common examples include:
- Departments and employees
- Buildings and rooms
- Regions and field staff
Grouping helps users navigate complex schedules without becoming overwhelmed.
Single-level grouping
You can display all resources in a flat structure with each resource as a row:
<e-schedule-group resources="@ViewBag.Resources"></e-schedule-group>Each resource gets its own row with appointments displayed underneath.
Multi-level grouping
You can organize resources hierarchically (e.g., Rooms with multiple Owners). Use groupIDField to establish parent-child relationships:
<ejs-schedule id="schedule">
    <e-schedule-resources>
    <e-schedule-resource dataSource="@ViewBag.Rooms" field="RoomId" idField="Id"
        name="Rooms" textField="text"></e-schedule-resource>
    <e-schedule-resource dataSource="@ViewBag.Owners" field="OwnerId" idFIeld="OwnerId"
        name="Owners" groupIDField="OwnerGroupId" textField="text" colorField="color" ></e-schedule-resource>
    </e-schedule-resources>
    <e-schedule-group resources="@ViewBag.Resources"></e-schedule-group>
    <e-schedule-eventsettings dataSource="@ViewBag.datasource"></e-schedule-eventsettings>
</ejs-schedule>
Controller setup example
Populate your controller with this data structure:
ViewBag.Rooms = new List<object>
{
    new { Id = 1, text = "Conference Room A" },
    new { Id = 2, text = "Conference Room B" }
};

ViewBag.Owners = new List<object>
{
    new { OwnerId = 1, text = "Nancy", OwnerGroupId = 1, color = "#FF6E40" },
    new { OwnerId = 2, text = "Michael", OwnerGroupId = 1, color = "#009BE0" },
    new { OwnerId = 3, text = "Robert", OwnerGroupId = 2, color = "#50C878" },
    new { OwnerId = 4, text = "Jennifer", OwnerGroupId = 2, color = "#FFD700" }
};
This creates a two-level hierarchy where owners are grouped under rooms. Nancy and Michael appear under Conference Room A (OwnerGroupId=1), while Robert and Jennifer appear under Conference Room B (OwnerGroupId=2). Each owner’s appointments display in their respective room row.
Shared events
Enable allowGroupEdit to share single appointments across multiple resources. Editing one instance updates all shared copies simultaneously:
<e-schedule-group allowGroupEdit="true" resources="@ViewBag.Resources"></e-schedule-group>This is ideal for team events, company-wide meetings, or shared project timelines where changes affect all participants.
Best practices & tips
- Load events on demand for better performance with large datasets.
- Prevent double booking using
allowOverlap="false"when needed. - Test time zone and DST scenarios for recurring events.
- Validate scheduling rules on the server to ensure data integrity.
- Use read-only mode for shared calendars to avoid accidental edits.
Frequently Asked Questions
Can I create, edit, and delete appointments programmatically?
Yes. The Scheduler provides APIs such as addEvent(), saveEvent(), and deleteEvent() for managing appointments programmatically.
Does the Scheduler support recurring events?
Yes. You can create recurring appointments using recurrence rules and handle exceptions when needed.
Can I prevent overlapping appointments?
Yes. Set allowOverlap="false" to prevent users from scheduling conflicting appointments.
How does the Scheduler handle different time zones?
The Scheduler automatically manages time zone conversions, ensuring accurate scheduling across regions.
Is the Scheduler suitable for large datasets?
Yes. For optimal performance, load events only for the visible date range and use server-side data operations where appropriate.
Conclusion
The most challenging part of building a scheduling application isn’t displaying a calendar. It’s handling the real-world complexities that come with recurring events, timezone differences, multiple resources, and ongoing appointment management.
Syncfusion ASP.NET Core Scheduler addresses these challenges with built-in capabilities that help developers deliver production-ready scheduling experiences faster. With support for flexible appointments, complete CRUD operations, timezone awareness, multiple calendar views, and resource-based scheduling, it provides the foundation needed for a wide range of business applications.
Whether you’re developing an appointment booking system, employee scheduler, resource planner, or team calendar, these five core features can significantly reduce development effort while providing a polished user experience from day one.
If you’re a Syncfusion user, you can download the setup from the license and downloads page. Otherwise, you can download a free 30-day trial.
You can also contact us via our support forum, support portal, or feedback portal with any questions. We are always happy to assist you!




 No spam, just valuable updates.