
TL;DR: Learn how to implement reliable event reminders in a .NET MAUI Scheduler using SMTP-based email notifications and cross-platform toast alerts. This guide shows how to design reminder workflows that improve user experience, ensure timely notifications, and work consistently across devices, ideal for calendar, booking, and productivity apps.
Ever missed a critical meeting because your calendar didn’t remind you? It happens to all of us, especially when we’re juggling multiple tasks in a packed schedule. Adding an appointment is simple, but remembering at the right time is the real challenge.
That’s where event reminders and email notifications make all the difference. They deliver timely alerts and follow-ups, helping you stay organized, productive, and stress-free.
In this blog, we’ll walk through the essential steps to integrate appointment scheduling with system notifications and email reminders using the Syncfusion® .NET MAUI Scheduler. This approach ensures your users stay informed, organized, and never miss an important event.
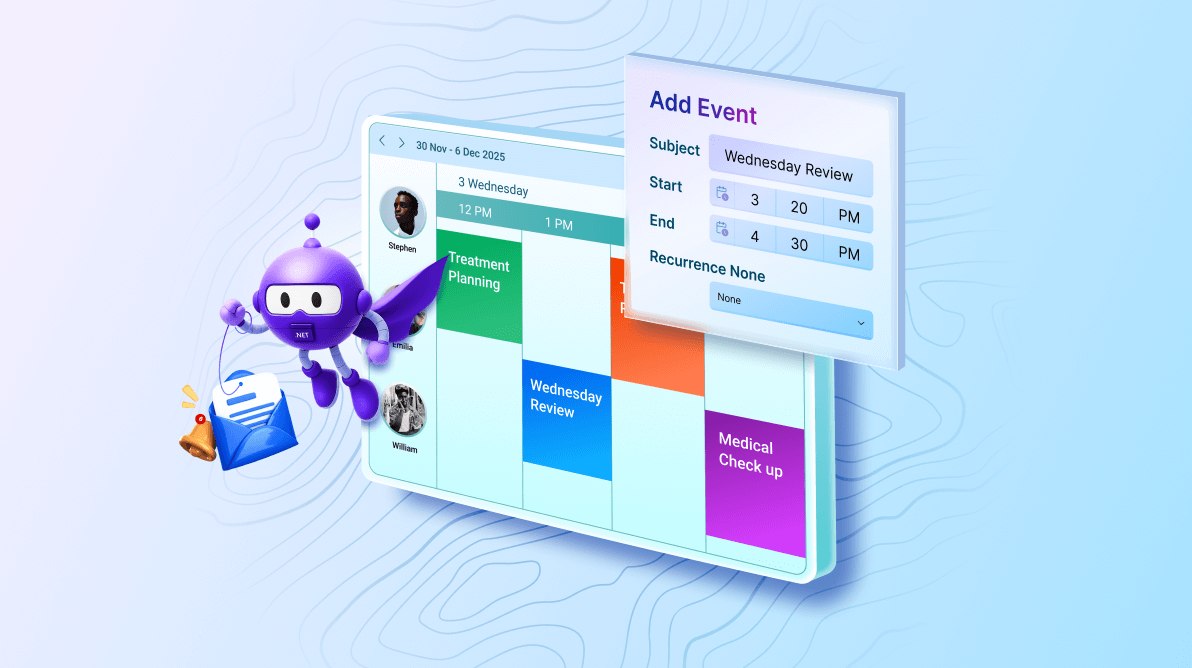
Now that we understand the value of reminders, let’s initialize the Scheduler and start adding reminders. Add interactive calendars to your .NET MAUI apps with Syncfusion .NET MAUI Scheduler. Manage events, appointments, recurring schedules, multiple calendar views, and drag-and-drop rescheduling with a polished, customizable UI.
Step 1: Initializing Syncfusion .NET MAUI Scheduler
To begin, add the Scheduler control to your XAML page and bind its AppointmentsSource property to an ObservableCollection<SchedulerAppointment> in your ViewModel. This collection stores all your events and keeps the UI in sync with your data.
Here’s how you can do it in code:
<?xml version="1.0" encoding="utf-8" ?>
<ContentPage xmlns="http://schemas.microsoft.com/dotnet/2021/maui"
             xmlns:x="http://schemas.microsoft.com/winfx/2009/xaml"
             xmlns:scheduler="clr-namespace:Syncfusion.Maui.Scheduler;assembly=Syncfusion.Maui.Scheduler"
             x:Class="Event_Reminder.MainPage">
<scheduler:SfScheduler x:Name="Scheduler"
                       View="Week"
                       AllowedViews="Day, Week, WorkWeek, Month"
                       EnableReminder="True"
                       AppointmentsSource="{Binding Appointments}">
</scheduler:SfScheduler>
</ContentPage>
Note: For more details, check out the Getting Started with the .NET MAUI Scheduler documentation.
Step 2: Adding appointments to the Scheduler via popup
You can collect event details through a popup that includes fields for Subject, Start Time, End Time, Recurrence Rule, and Save/Cancel buttons. When a user taps a Scheduler cell, the popup opens, allowing them to enter event information.
When the Save button is clicked, the appointment details are collected and added to the appointment list in the .NET MAUI Scheduler.
Here’s the XAML code example for the appointment popup UI:
<ContentView x:Name="AddPopup"
             IsVisible="{Binding IsAddPopupVisible}"
             BackgroundColor="#80000000">
  <Grid VerticalOptions="Center" HorizontalOptions="Center" Padding="16">
    <Border BackgroundColor="White" Stroke="LightGray" StrokeThickness="1.5"
            StrokeShape="RoundRectangle 12" Padding="16" WidthRequest="300">
      <Grid RowDefinitions="Auto,Auto,Auto,Auto" ColumnDefinitions="Auto,*" RowSpacing="8" ColumnSpacing="12">

        <!-- Title -->
        <Label Text="Add Event" Grid.ColumnSpan="2" FontAttributes="Bold" FontSize="18"/>

        <!-- Subject -->
        <Label Grid.Row="1" Text="Subject"/>
        <Entry Grid.Row="1" Grid.Column="1" Text="{Binding NewSubject}"/>

        <!-- Start Date & Time -->
        <Label Grid.Row="2" Text="Start"/>
        <Grid Grid.Row="2" Grid.Column="1" ColumnDefinitions="*,Auto">
          <DatePicker Date="{Binding NewStartDate}"/>
          <TimePicker Grid.Column="1" Time="{Binding NewStartTime}"/>
        </Grid>

        <!-- End Date & Time -->
        <Label Grid.Row="3" Text="End"/>
        <Grid Grid.Row="3" Grid.Column="1" ColumnDefinitions="*,Auto">
          <DatePicker Date="{Binding NewEndDate}"/>
          <TimePicker Grid.Column="1" Time="{Binding NewEndTime}"/>
        </Grid>

        <!-- Buttons -->
        <Grid Grid.Row="4" Grid.ColumnSpan="2" ColumnDefinitions="*,Auto,Auto" ColumnSpacing="8" Margin="0,8,0,0">
          <Label Grid.Column="0"/>
          <Button Grid.Column="1" Text="Cancel" Command="{Binding CancelAddCommand}"/>
          <Button Grid.Column="<Button Grid.Column="2" Text="Save" Command="{Binding SaveAddCommand}"/>
        </Grid>
      </Grid>
    </Border>
  </Grid>
When a Scheduler cell is tapped, you can capture the date and time, pre‑populate the fields, and display the popup using the code example below:
private void OnSchedulerTapped(object sender, SchedulerTappedEventArgs e)
{
    if (e.Element == SchedulerElement.SchedulerCell && e.Date.HasValue)
    {
        VM.NewStartDate = e.Date.Value.Date;
        VM.NewStartTime = e.Date.Value.TimeOfDay;
        VM.NewEndDate = e.Date.Value.Date;
        VM.NewEndTime = e.Date.Value.TimeOfDay.Add(TimeSpan.FromMinutes(30));
        VM.NewSubject = string.Empty;
        VM.SelectedRecurrence = RecurrenceType.None;
        VM.IsAddPopupVisible = true;
    }
}
Now, we save the new appointment to the existing appointment list:
private void SaveAppointment()
{
    var start = NewStartDate.Date + NewStartTime;
    var end = NewEndDate.Date + NewEndTime;
    var appt = new SchedulerAppointment
    {
        Subject = string.IsNullOrWhiteSpace(NewSubject) ? "New Event" : NewSubject,
        StartTime = start,
        EndTime = end,
    };

    //
    appt.Reminders = new ObservableCollection<SchedulerReminder>
    {
        new SchedulerReminder { TimeBeforeStart = TimeSpan.FromMinutes(5) }
    };

    Appointments.Add(appt);
    IsAddPopupVisible = false;
}
Step 3: Set appointment reminders in the .NET MAUI Scheduler
To trigger a reminder before an event starts, set the SchedulerReminder.TimeBeforeStart property when saving the appointment.
For example, setting it to 15 minutes ensures the ReminderAlertOpening event fires exactly 15 minutes before the scheduled start time, as shown below.
// Add a 5-minute reminder (will trigger ReminderAlertOpening)

appt.Reminders = new ObservableCollection<SchedulerReminder>
{
    new SchedulerReminder { TimeBeforeStart = TimeSpan.FromMinutes(15) }
};

Appointments.Add(appt);
Step 4: Send an event reminder email using Gmail SMTP
You can deliver reminder emails by configuring Gmail’s SMTP server. This requires enabling Gmail’s security features, generating an app password, and authenticating securely before sending the message.
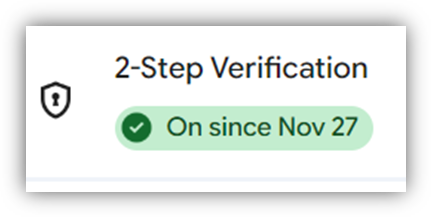
Step 4.1: Enable two-step verification in Gmail
- Sign in to your Gmail account.
- Go to Google account settings → security.
- Turn on 2-step verification and complete the verification steps.
Refer to the following image.
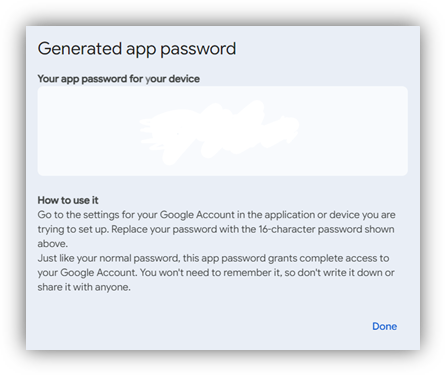
Step 4.2: Generate an app password
- After enabling 2-step verification, return to Security.
- Under Signing in to Google, click App Passwords.
- Select the app type (e.g., Mail) and device (e.g., Windows Computer).
- Click Generate.
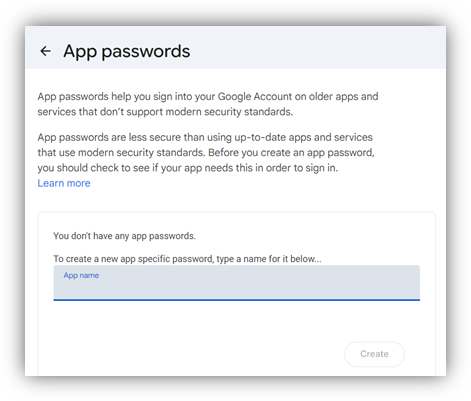
- Copy the 16-character app password shown in the popup. This password replaces your regular Gmail password for SMTP authentication.
Step 4.3: Add SMTP credentials and send the email
Define your Gmail address as SmtpUser and use the generated app password for authentication. Then implement the SendEmail method to:
- Connect securely to Gmail’s SMTP server (smtp.gmail.com on port 587) with TLS enabled.
- Authenticate using the Gmail address and app password.
- Create a MailMessage with From, To, Subject, and Body.
- Attempt to send the email and catche any exceptions to log an error message if sending fails.
Here’s how you can do it in code.
using System.Net;
using System.Net.Mail;

// Replace with your Gmail and app password
const string SmtpUser = "[email protected]";
const string SmtpAppPassword = "your_app_password";

void SendEmail(string to, string subject, string body)
{
    using var smtp = new SmtpClient("smtp.gmail.com", 587)
    {
       EnableSsl = true,
       Credentials = new NetworkCredential(SmtpUser, SmtpAppPassword)
    };
    using var msg = new MailMessage(SmtpUser, to, subject, body)
    {
       IsBodyHtml = false
    };
    try
        {
            smtp.Send(msg);
            Console.WriteLine("Email sent successfully!");
        }
        catch (Exception ex)
        {
            Console.WriteLine($"Error sending email: {ex.Message}");
        }
}
Step 4.4: Send the email when the reminder is triggered
Invoke the SendEmail method when the reminder event is triggered. Pass the recipient’s email address, the event subject, and a message that includes the event’s start time as shown in the code example below.
// Send email notification
private async void OnReminderAlertOpening(object? sender, ReminderAlertOpeningEventArgs e)
    {
        var appt = e.Reminders[0].Appointment;

        SendEmail("[email protected]", $"Reminder: {appt.Subject}", $"Your event starts at {appt.StartTime:t}");
    }
Show reminders with toast notifications
When an event reminder becomes due, you can display a native toast notification on the user’s device. This is handled by listening to the Scheduler’s ReminderAlertOpening event and invoking a cross-platform notification service (INotificationService) that abstracts platform-specific logic. The interface keeps your UI code clean, and platform-specific implementations handle their own toast notification using native APIs.
Step 1: Listen to the reminder event
When the reminder event triggers, retrieve the appointment details from the event arguments, create a notification message with the subject and start time, and call the notification service.
Try this in your code:
private async void OnReminderAlertOpening(object? sender, ReminderAlertOpeningEventArgs e)
    {
        var appt = e.Reminders[0].Appointment;

        _notifier.ShowNotification("Reminder", $"Upcoming: {appt.Subject}\nStarts at {appt.StartTime:t}");
    }
Step 2: Define a cross-platform notification interface
Next, create an interface that allows your pages to call a single method, while each platform provides its own implementation for showing notifications.
namespace Event_Reminder.Services
{
    public interface INotificationService
    {
        void ShowNotification(string title, string message);
    }
}
Step 2.1: Windows toast notification implementation
On Windows, the notification service (WindowsNotificationService) converts the interface call into a native Windows toast notification. It uses AppNotificationBuilder to build the notification and AppNotificationManager to display it. Your page simply calls ShowNotification while the service creates the banner and places it in the Action Center using the Windows notification APIs.
Implementation example:
#if WINDOWS
using Microsoft.Windows.AppNotifications;
using Microsoft.Windows.AppNotifications.Builder;

namespace Event_Reminder.Services;

public class WindowsNotificationService : INotificationService
{
    public void ShowNotification(string title, string message)
    {
        var builder = new AppNotificationBuilder()
            .AddText(title)
            .AddText(message)
            .SetDuration(AppNotificationDuration.Short);

        AppNotificationManager.Default.Show(builder.Build());
    }
}
#endif
Then, register the Windows notification service in MauiProgram.cs using Dependency Injection:
#if WINDOWS
builder.Services.AddSingleton<INotificationService, WindowsNotificationService>();
#endif
Step 2.2: Android toast notification implementation
The AndroidNotificationService displays native Android notifications by:
- Ensuring a notification channel is available on Android 8+ (Oreo).
- Building the notification with a title and expanded message text.
- Setting priority and enabling sound/vibration defaults.
- Wiring a PendingIntent to open your MainActivity when the user taps the banner.
- Finally, displaying the notification using
NotificationManagerCompat.
Here’s the complete code block:
using Android.App;
using Android.Content;
using AndroidX.Core.App;

namespace Scheduler_Event_Reminder.Services;

public class AndroidNotificationService : INotificationService
{
    public void ShowNotification(string title, string message)
    {
        var context = Android.App.Application.Context;
        var channelId = "reminder_channel";

        // Ensure channel exists
        if (Android.OS.Build.VERSION.SdkInt >= Android.OS.BuildVersionCodes.O)
        {
            var manager = (NotificationManager)context.GetSystemService(Context.NotificationService);
            var channel = manager.GetNotificationChannel(channelId);
            if (channel == null)
            {
                channel = new NotificationChannel(channelId, "Reminders", NotificationImportance.High)
                {
                    Description = "Reminder notifications"
                };
                manager.CreateNotificationChannel(channel);
            }
        }

        // Intent for actions
        var intent = new Intent(context, typeof(MainActivity));
        intent.AddFlags(ActivityFlags.ClearTop | ActivityFlags.SingleTop);
        var pendingIntent = PendingIntent.GetActivity(context, 0, intent, PendingIntentFlags.Immutable);

        // Action buttons
        var replyIntent = new Intent(context, typeof(MainActivity)); // Replace with actual reply handling
        var replyPendingIntent = PendingIntent.GetActivity(context, 1, replyIntent, PendingIntentFlags.Immutable);
        var archiveIntent = new Intent(context, typeof(MainActivity)); // Replace with actual archive handling
        var archivePendingIntent = PendingIntent.GetActivity(context, 2, archiveIntent, PendingIntentFlags.Immutable);

        // Build notification with MessagingStyle
        var builder = new NotificationCompat.Builder(context, channelId)
            .SetSmallIcon(Android.Resource.Drawable.IcDialogInfo)
            .SetContentTitle(title)
            .SetContentText(message)
            .SetStyle(new NotificationCompat.BigTextStyle().BigText(message)) // Expanded text
            .SetPriority(NotificationCompat.PriorityHigh)
            .SetDefaults((int)NotificationDefaults.All)
            .SetCategory(NotificationCompat.CategoryMessage)
            .SetAutoCancel(true)
            .SetContentIntent(pendingIntent);

        NotificationManagerCompat.From(context).Notify(1001, builder.Build());
    }
}
Note: Android 13+ requires POST_NOTIFICATIONS permission while Android 8+ requires a notification channel.
Then register the Android notification service in MauiProgram.cs through Dependency Injection:
#if ANDROID
builder.Services.AddSingleton<INotificationService, AndroidNotificationService>();
#endif
AndroidManifest.xml: Request notifications permission (Android 13+)
Add the following permission to your AndroidManifest.xml file:
<uses-permission android:name="android.permission.POST_NOTIFICATIONS"/>MainActivity.cs: Request permission and create the channel
Android 8+ requires a notification channel, and setting its importance to High enables heads-up banners. In MainActivity.cs, request the POST_NOTIFICATIONS permission for Android 13+ and create the notification channel for Android 8+, as shown in the code snippet below:
using Android;
using Android.App;
using Android.Content.PM;
using Android.OS;

namespace Scheduler_Event_Reminder;

[Activity(
    Theme = "@style/Maui.SplashTheme",
    MainLauncher = true,
    LaunchMode = LaunchMode.SingleTop,
    ConfigurationChanges = ConfigChanges.ScreenSize | ConfigChanges.Orientation | ConfigChanges.UiMode |
                           ConfigChanges.ScreenLayout | ConfigChanges.SmallestScreenSize | ConfigChanges.Density)]
public class MainActivity : MauiAppCompatActivity
{
    protected override void OnCreate(Bundle? savedInstanceState)
    {
        base.OnCreate(savedInstanceState);

        // Request POST_NOTIFICATIONS permission for Android 13+
        if (Build.VERSION.SdkInt >= BuildVersionCodes.Tiramisu)
        {
            if (CheckSelfPermission(Manifest.Permission.PostNotifications) != Permission.Granted)
            {
                RequestPermissions(new[] { Manifest.Permission.PostNotifications }, 0);
            }
        }

        // Create notification channel for heads-up notifications (Android 8+)
        if (Build.VERSION.SdkInt >= BuildVersionCodes.O)
        {
            var channelId = "reminder_channel";
            var channelName = "Reminders";

            var channel = new NotificationChannel(channelId, channelName, NotificationImportance.High)
            {
                Description = "Reminder notifications"
            };

            var manager = (NotificationManager)GetSystemService(NotificationService);
            manager.CreateNotificationChannel(channel);
        }
    }
}
Step 2.3: IOS local notification implementation
You can schedule a local notification by:
- Building
UNMutableNotificationContent(title, body, sound). - Creating a one-second
UNTimeIntervalNotificationTrigger(Apple requires triggers > 0). - Wrapping it in a
UNNotificationRequest. - Lastly, adding it via
UNUserNotificationCenter.
Note: You must request notification authorization once at app startup.
Add this to your project:
using System;
using UserNotifications;

namespace Scheduler_Event_Reminder.Services
{
    public sealed class iOSNotificationService : INotificationService
    {
        public void ShowNotification(string title, string message)
        {
            var content = new UNMutableNotificationContent
            {
                Title = title ?? string.Empty,
                Body  = message ?? string.Empty,
                Sound = UNNotificationSound.Default,
            };

           var trigger = UNTimeIntervalNotificationTrigger.CreateTrigger(1, false);

            var request = UNNotificationRequest.FromIdentifier(
                Guid.NewGuid().ToString(),
                content,
                trigger);

            UNUserNotificationCenter.Current.AddNotificationRequest(request, (err) =>
            {
                if (err != null)
                    System.Diagnostics.Debug.WriteLine($"[iOS] Notification error: {err}");
                else
                    System.Diagnostics.Debug.WriteLine("[iOS] Notification scheduled.");
            });
        }
    }
}
Also, register the iOS notification service in MauiProgram.cs via dependency injection, shown in the code snippet below.
#if IOS
builder.Services.AddSingleton<INotificationService, iOSNotificationService>();
#endif
Step 2.4: Mac Catalyst local notification implementation
On Mac Catalyst, local notifications follow the same pattern as iOS. Schedule a local notification on Mac Catalyst by creating UNMutableNotificationContent using a one-second UNTimeIntervalNotificationTrigger, then wrapping it in a UNUserNotificationCenter.
Code example for quick integration:
using UserNotifications;

namespace Scheduler_Event_Reminder.Services
{
    public sealed class MacNotificationService : INotificationService
    {
        public void ShowNotification(string title, string message)
        {
            var content = new UNMutableNotificationContent
            {
                Title = title ?? string.Empty,
                Body  = message ?? string.Empty,
                Sound = UNNotificationSound.Default
            };

            var trigger = UNTimeIntervalNotificationTrigger.CreateTrigger(1, false);

            var request = UNNotificationRequest.FromIdentifier(
                Guid.NewGuid().ToString(),
                content,
                trigger);

            UNUserNotificationCenter.Current.AddNotificationRequest(request, err =>
            {
                if (err != null)
                    System.Diagnostics.Debug.WriteLine($"[Mac Catalyst] Notification error: {err}");
            });
        }
    }
}
Then register the Mac Catalyst notification service in MauiProgram.cs via Dependency Injection:
#if MACCATALYST
builder.Services.AddSingleton<INotificationService, MacNotificationService>();
#endif
Below is a quick preview of the event reminder feature in action.
GitHub reference
For more details on implementing event reminders with the .NET MAUI Scheduler, refer to the GitHub demo.
Frequently Asked Questions
Why use Syncfusion .NET MAUI Scheduler for reminders?
It supports built-in reminders (EnableReminder=True) and fires ReminderAlertOpening so you can trigger emails/toast notifications cross-platform.
How do I bind and display appointments?
Bind the SfScheduler.AppointmentsSource to an ObservableCollection in your ViewModel and set the AllowedViews and View properties as needed.
Can I send reminder emails (SMTP) when alerts fire?
Yes, in ReminderAlertOpening, call SendEmail using SmtpClient to smtp.gmail.com:587 with TLS and Gmail app password authentication.
How do I display native notifications when a reminder fires?
To do this, handle the ReminderAlertOpening event and call an INotificationService. Implement platform-specific services using AppNotificationManager for Windows, NotificationCompat for Android, and UNUserNotificationCenter for iOS and macOS via Dependency Injection.
What permissions/config are needed for notifications?
For Android 13 and above, the POST_NOTIFICATIONS permission is needed; for Android 8 and above, create a high-importance notification channel. For iOS and macOS, request user notification authorization once. For Windows, no extra permission is required, just register the service.
How do I prevent missed reminders when the app is backgrounded?
Use native notifications per platform, they display even if the app is not foregrounded.
How do I handle recurrence and multiple reminders?
Capture recurrence input in your UI and store with the appointment; for multiple alerts, add multiple SchedulerReminder entries to the appointment’s Reminders collection.
How do I navigate the user when they tap an Android notification?
Create an Intent to MainActivity with ActivityFlags.ClearTop | ActivityFlags.SingleTop, wrap it using PendingIntent.GetActivity(..., PendingIntentFlags.Immutable), then set it on NotificationCompat.Builder via SetContentIntent(pendingIntent) so tapping the notification opens your app.
How do I manage time zones and all‑day events?
Normalize appointment start and end to the user’s local time zone; for all‑day items, choose a consistent local start (e.g., 9 AM) for reminders to avoid midnight alerts.

Conclusion
Thank you for reading! Building an event reminder calendar with Syncfusion .NET MAUI Scheduler is a powerful way to combine simple event creation with reliable alerts. By adding events through a clean popup, setting reminder lead times, and triggering both native toast notifications and optional SMTP emails, you deliver a smooth, responsive experience across Android, iOS, Windows, and macOS.
And it doesn’t stop at personal reminders; this same approach works for team calendars, task tracking, and resource planning with custom templates and recurrence. With .NET MAUI’s flexibility and the Scheduler’s rich features, scaling your solution is straightforward.
If you’re a Syncfusion user, you can download the setup from the license and downloads page. Otherwise, you can download a free 30-day trial.
You can also contact us through our support forum, support portal, or feedback portal for queries. We are always happy to assist you!


 No spam, just valuable updates.