
TL;DR: Master localization with this step-by-step guide. Learn how to implement multilingual support in Blazor Scheduler, dynamic culture switching, and globalization settings using resource files and Blazor Web App features for a seamless user experience.
Building global-ready applications is no longer optional, it’s essential. In 2026, users expect apps to adapt seamlessly to their language and cultural preferences. This means implementing globalization (G11N) and localization (L10N) correctly. Globalization ensures date, time, and number formats match the user’s culture, while localization translates UI text into the user’s language.
The Syncfusion® Blazor Scheduler component simplifies this process, enabling developers to deliver a fully localized experience without reinventing the wheel. In this guide, you’ll learn how to:
- Implement multilingual support in a Blazor Web App
- Add a dynamic culture switcher
- Configure the Scheduler to reflect the selected language and culture at runtime
By the end, your app will support localized UI text, culture-aware formatting, and dynamic language switching, all without a page reload.
Prerequisites
Before enabling multilingual support in the Blazor Scheduler, ensure the following:
- A Blazor Web App project using .NET 8 or later.
- Required NuGet packages: Install Syncfusion.Blazor.Schedule and Syncfusion.Blazor.Themes.
- Valid Syncfusion License: Register the license in the application’s
program.csfile. - Configure Syncfusion Services: In
Program.cs, add the Syncfusion Blazor service usingbuilder.Services.AddSyncfusionBlazor();.
Step 1: Add the Blazor Scheduler
Start by adding a simple Blazor Scheduler component to your page. For detailed instructions, refer to the Blazor Scheduler official documentation.
Here is an example.
<SfSchedule TValue=AppointmentData>
    <ScheduleViews>
        <ScheduleView Option="View.Day"></ScheduleView>
        <ScheduleView Option="View.Week"></ScheduleView>
        <ScheduleView Option="View.WorkWeek"></ScheduleView>
        <ScheduleView Option="View.Month"></ScheduleView>
        <ScheduleView Option="View.Agenda"></ScheduleView>
    </ScheduleViews>
</SfSchedule>
@code {
    public class AppointmentData
    {
        public int Id { get; set; }
        public string Subject { get; set; }
        public string Location { get; set; }
        public DateTime StartTime { get; set; }
        public DateTime EndTime { get; set; }
        public string Description { get; set; }
        public bool IsAllDay { get; set; }
        public string RecurrenceRule { get; set; }
        public string RecurrenceException { get; set; }
        public Nullable<int> RecurrenceID { get; set; }
    }
}Syncfusion Blazor Scheduler helps you create intuitive booking, event, and calendar experiences with built-in views, recurring appointments, editing, rescheduling, localization, and flexible customization.
See Blazor Scheduler in ActionStep 2: Preparing localization resources
Next, add the necessary localization resource (.resx) files to the project. These files contain the key-value pairs that map default text to its translated equivalent for each culture.
For this step, follow these actions:
1. Download resource files
Start by downloading the official Syncfusion resource file. Clone or download them from the GitHub repository.
2. Add files to your project
Next, create a Resources folder in your main project and copy the default SfResources.resx (default) and culture-specific files like SfResources.de.resx (German) or SfResources.fr.resx (French).
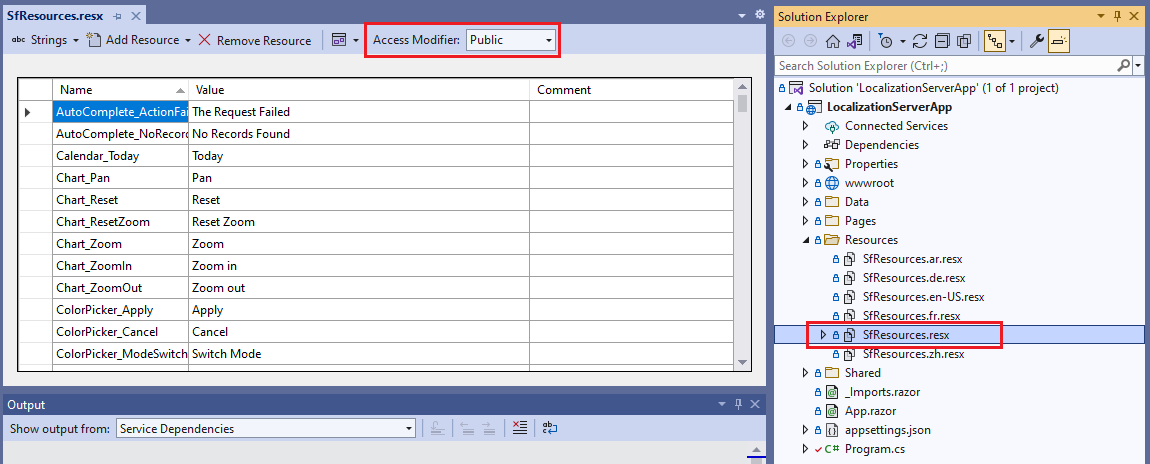
3. Set access modifier
Finally, open the SfResources.resx file in Visual Studio and change the Access Modifier in the toolbar from Internal to Public. This is crucial for the localization service to access the resources.
The following image illustrates how to change the access modifier:
Step 3: Creating and registering the localization service
Now that the resource files are ready, the next step is to create a custom localization service. Syncfusion Blazor components use the ISyncfusionStringLocalizer interface to retrieve localized strings. You will implement this interface to connect the component to your .resx files.
Create the service class
Create a new class named SyncfusionLocalizer.cs and implement the ISyncfusionStringLocalizer interface. This class directs the components to use your resource files.
Here’s the Implementation in SyncfusionLocalizer.cs file.
using Syncfusion.Blazor;

// Replace "BlazorWebApp" with your application's root namespace.
using BlazorWebApp.Resources;

public class SyncfusionLocalizer : ISyncfusionStringLocalizer
{
    public string GetText(string key)
    {
        return this.ResourceManager.GetString(key);
    }

    public System.Resources.ResourceManager ResourceManager
    {
        get
        {
            // Replace "BlazorWebApp" with your application's root namespace.
            return BlazorWebApp.Resources.ResourceManager;
        }
    }
}
Register the service
Register SyncfusionLocalizer as a singleton service wherever the Syncfusion Blazor service is registered. For Auto or WebAssembly render modes, ensure that you register it in both the server and client Program.cs files.
Try this in your Program.cs (both server and client projects if applicable).
// ... other services
builder.Services.AddSyncfusionBlazor();

// Register the custom localizer.
builder.Services.AddSingleton(typeof(ISyncfusionStringLocalizer), typeof(SyncfusionLocalizer));
// ...
Step 4: Set the culture statically
In Blazor Web App, you can configure the culture statically in two main ways: using Blazor’s start option in JavaScript or in C# code.
Let’s explore both approaches.
Option 1: Setting the culture using Blazor’s start option
If you prefer to configure the culture on the client side, you can do so by setting applicationCulture in Blazor’s start options. Here’s how:
- Prevent Blazor from Auto-Starting: For .NET 8 and .NET 9 Blazor Web Apps, whether using Server, WebAssembly, or Auto render modes, add the
autostart="false"attribute to the Blazor<script>tag in the~/Components/App.razorfile. For Blazor WebAssembly Standalone Apps, add the same attribute to the Blazor<script>tag in thewwwroot/index.htmlfile. - Start Blazor with a Specified Culture: After disabling auto-start, insert the following script block below Blazor’s
<script>tag and before the closing</body>tag:<body> ... <script src="_framework/blazor.web.js" autostart="false"></script> <script> Blazor.start({ webAssembly: { applicationCulture: 'de' } }); </script> ... </body>
This approach ensures that Blazor initializes with the desired culture right from the start.
Option 2: Setting the culture in C# code
Alternatively, for Blazor Web App and Blazor WASM App, you can configure the culture in C# code instead of JavaScript. To do this, set the CultureInfo.DefaultThreadCurrentCulture and CultureInfo.DefaultThreadCurrentUICulture in Program.cs to the desired culture before the line that builds and runs the WebAssemblyHostBuilder (await builder.Build().RunAsync();).
Add this to your project:
using System.Globalization;
CultureInfo.DefaultThreadCurrentCulture = new CultureInfo("de-DE");
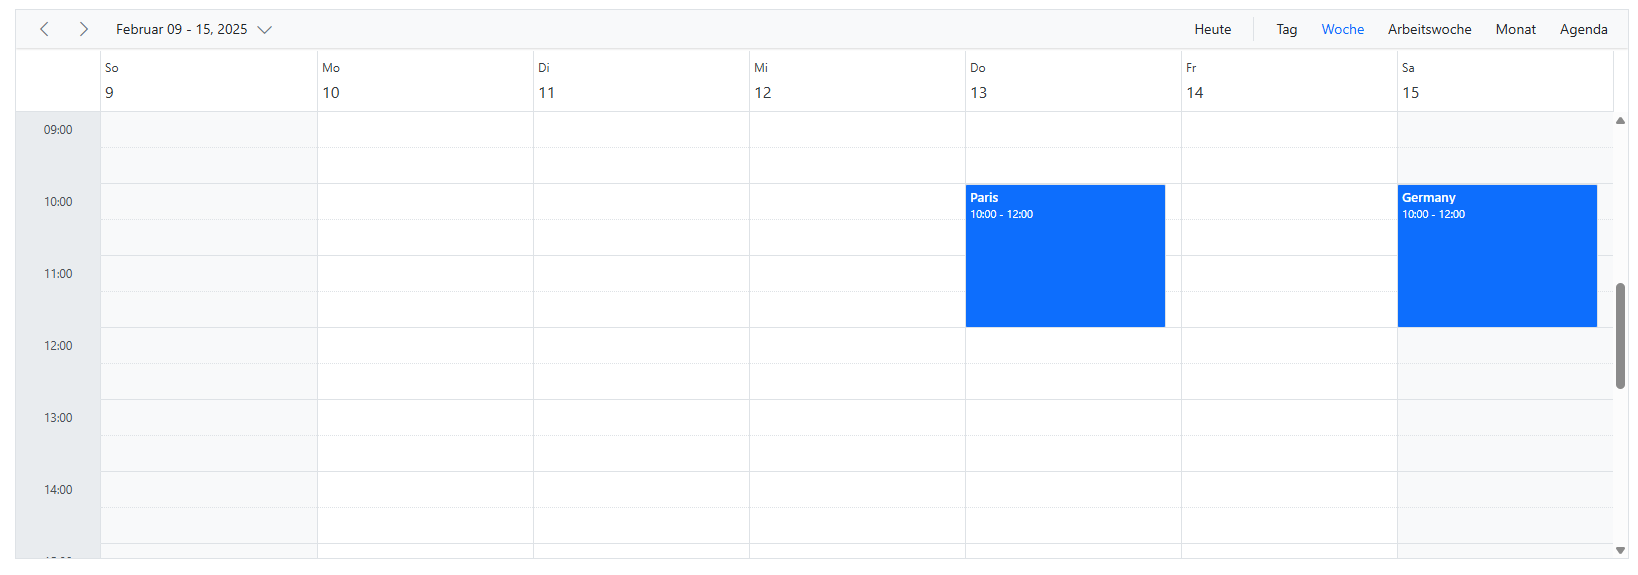
CultureInfo.DefaultThreadCurrentUICulture = new CultureInfo("de-DE");
After running the code, you’ll see this:
Step 5: Enabling dynamic culture switching
Static culture settings are useful, but many applications need to let users switch languages dynamically. To achieve this, you’ll implement a culture switcher that stores the user’s preference and re-renders the UI with the selected culture. Let’s break this down into clear steps.
1. Enable Globalization Data
First, ensure your project can handle multiple cultures by loading all globalization data for WebAssembly-based interactivity. In your client project’s .csproj file, add the following property:
<PropertyGroup>

    <BlazorWebAssemblyLoadAllGlobalizationData>
        true
    </BlazorWebAssemblyLoadAllGlobalizationData>
</PropertyGroup>
This step ensures that all necessary culture-specific data is available for formatting dates, numbers, and text.
2. Add a Browser Interop script
Next, you need a way to persist the user’s language selection across sessions. To do this, add a small script to Components/App.razor that uses the browser’s local storage. Place it immediately after the <script> tag for blazor.web.js.
Add this to your Components/App.razor:
...
<script src="_framework/blazor.web.js"></script>
<script>
  window.cultureInfo = {
    get: () => window.localStorage['BlazorCulture'],
    set: (value) => window.localStorage['BlazorCulture'] = value
  };
</script>
3. Set the culture on startup
Now, configure the application to read the saved culture when it starts. In the client project’s Program.cs file, use JS interop to retrieve the stored culture and apply it:
using Microsoft.JSInterop;
using System.Globalization;

// ... (service registrations)
var builder = WebAssemblyHostBuilder.CreateDefault(args);
builder.Services.AddSyncfusionBlazor();

// Register your custom localizer for the client-side application
builder.Services.AddSingleton<ISyncfusionStringLocalizer, SyncfusionLocalizer>();

var host = builder.Build();

// Set the application's culture.
var jsInterop = host.Services.GetRequiredService<IJSRuntime>();
var result = await jsInterop.InvokeAsync<string>("cultureInfo.get");

CultureInfo culture;
if (result != null)
{
    culture = new CultureInfo(result);
}
else
{
    // Default to English if no culture is set.
    culture = new CultureInfo("en-US");
    await jsInterop.InvokeVoidAsync("cultureInfo.set", "en-US");
}

CultureInfo.DefaultThreadCurrentCulture = culture;
CultureInfo.DefaultThreadCurrentUICulture = culture;

await host.RunAsync();
4. Create the cultureswitcher component
This component provides a dropdown for the user to select a language. When a new language is chosen, it saves the selection to local storage and forces a page reload to apply the change.
Create a new component CultureSwitcher.razor, as shown in the code example below.
@using  System.Globalization
@inject IJSRuntime JSRuntime
@inject NavigationManager NavigationManager

<select @bind="Culture">
    @foreach (var culture in supportedCultures)
    {
        <option value="@culture">@culture.DisplayName</option>
    }
</select>

@code {
    private CultureInfo[] supportedCultures = new[]
    {
        new CultureInfo("en-US"),
        new CultureInfo("de-DE"),
        new CultureInfo("fr-FR"),
        new CultureInfo("ar-AE"),
        new CultureInfo("zh-HK")
    };

    private CultureInfo Culture
    {
        get => CultureInfo.CurrentCulture;
        set
        {
            if (CultureInfo.CurrentCulture != value)
            {
                var js = (IJSInProcessRuntime)JSRuntime;
                js.InvokeVoid("cultureInfo.set", value.Name);

                NavigationManager.NavigateTo(NavigationManager.Uri, forceLoad: true);
            }
        }
    }
}
5. Add the component to the layout
Finally, add the <CultureSwitcher> component to your app’s main layout file, so it appears on all pages. Since this component requires interactivity to function, assign it a render mode.
Here’s the complete code block of the MainLayout.razor file.
<main>
    <div class="top-row px-4">
        <CultureSwitcher></CultureSwitcher>
        <a href="https://learn.microsoft.com/aspnet/core/" target="_blank">About</a>
    </div>

    <article class="content px-4">
        @Body
    </article>
</main>
These changes fully localize the Blazor Scheduler component, as shown below.
When an end-user selects a language from the culture switcher, the Scheduler’s UI, including buttons, view names, and editor fields, will instantly translate to the selected language. Additionally, Blazor formats all dates and times according to the active culture.
GitHub reference
You can find the complete code for Scheduler localization in the official GitHub repository.

FAQ’s
1. What exactly gets localized in the Scheduler?
The Scheduler supports localization for:
- Built‑in static strings such as Today, Month, Week, Save, and editor dialog labels.
- Date, time, and number formats, which are automatically culture‑aware and driven by
CultureInfo.
2. Which render modes are supported, and does registration differ?
Localization works in Server, WebAssembly (WASM), and Auto render modes.
- For Server render mode, registering the custom localizer in
Program.cson the server side is sufficient. - For Auto or WebAssembly render modes, the custom localizer must be registered in both the server and client
Program.csfiles to ensure localized strings are available in each runtime environment.
3. Do I need to restart the app to see language changes?
No. When using a dynamic culture switcher, selecting a language:
- Updates the culture value (for example, in local storage).
- Triggers a forced page reload.
- Applies the new culture immediately without requiring a server restart
4. Where do I get the official localized resources?
You can download official localization resources from Syncfusion’s blazor-locale repository.
- Clone or download the repository.
- Copy the required
.resxfiles into your project’s Resources folder.
5. How do I verify that localization is working correctly?
You can validate localization in the following ways:
- Start the application with a static culture (for example,
de-DE) and confirm that the Scheduler UI text appears in German. - Switch cultures at runtime using the Culture Switcher and verify that:
- UI labels update immediately.
- Date and time formats reflect the selected culture.
6. Can I mix static and dynamic localization approaches?
Yes. A hybrid approach is fully supported:
- Define a default culture statically (via C# or JavaScript).
- Provide a dynamic culture switcher that allows users to override the default language at runtime.
Conclusion
Thank you for reading. In this guide, you learned how to enable multilingual support in the Blazor Scheduler using Syncfusion components. This approach streamlines the creation of globally aware scheduling applications, offering an intuitive and seamless experience for users worldwide.
For detailed information, refer to the Syncfusion Blazor localization or Microsoft Blazor globalization and localization documentation.
If you’re a Syncfusion user, you can download the setup from the license and downloads page. Otherwise, you can download a free 30-day trial.
You can also contact us through our support forum, support portal, or feedback portal for queries. We are always happy to assist you!


 No spam, just valuable updates.