
 Sastha Prathap
TL;DR: Excel still powers countless business processes, but working with cloud-hosted files often means juggling downloads, edits, and uploads. See how to integrate React Spreadsheet with Azure Blob Storage to let users work with Excel files directly in the browser while keeping everything centralized in the cloud.
Imagine you’re building a reporting dashboard that stores monthly sales reports in the cloud.
A user spots an issue in an Excel file, downloads it, makes a quick update, and uploads it again. No big deal, right?
Now imagine that same process repeated across multiple teams, hundreds of files, and dozens of updates every day. Suddenly, a simple edit turns into a cycle of downloads, uploads, version conflicts, and extra maintenance.
The bigger question is: why are users still leaving your application just to update a spreadsheet?
This is a common challenge in reporting platforms, financial systems, and internal business applications where Excel remains a critical part of daily operations. Without built-in spreadsheet integration, developers often end up creating custom file-handling processes just to manage files stored in the cloud.
In this article, we’ll explore how to integrate Azure Blob Storage with the Syncfusion React Spreadsheet component, allowing users to open, edit, and save Excel files directly in the browser. The result is a faster, more streamlined experience for users and a simpler file management process for developers.
Why does this approach work well for cloud-based Excel file management?
When working with cloud-hosted spreadsheets, the challenge isn’t simply rendering Excel files.
The real challenge is handling file transfers, serialization, conversion, and storage efficiently while maintaining an experience that users already understand.
Instead of building custom file-processing layers yourself, it’s worth looking at how the Syncfusion React Spreadsheet component handles these common challenges out of the box.
It provides built-in APIs for opening and saving workbooks while supporting server-side processing through Syncfusion Document Processing Libraries.
Open Excel files from multiple sources
- Multi-source file loading: Open files from local uploads, external URLs, blob data, Base64 strings, or server endpoints.
- User-friendly access: Open files through the built-in ribbon menu or programmatically through APIs.
- Deserialization: Use the openFromJson method to restore a workbook from JSON while preserving data, formatting, and structure.
- Lifecycle events: Use the beforeOpen and openComplete events to implement custom logic and validations.
- Optimized loading: Improve large-workbook loading performance through efficient processing techniques.
- Secure access: Pass custom headers such as authentication tokens when accessing protected resources.
- Format compatibility: Supports .xlsx, .xls, .xlsm, .xlsb, and .csv formats.
Save changes back to cloud storage
- Flexible save targets: Save files locally or send workbook data to backend services using JSON or Blob formats.
- Intuitive access: Save files through the ribbon interface or programmatically through the API.
- Serialization: Use the saveAsJson method to serialize workbook data for storage or server-side processing.
- Server-side conversion: Convert serialized workbook data back to Excel using Syncfusion Document Processing Libraries.
- Event hooks: Customize the save operations with the beforeSave and saveComplete events, perfect for logging, validation, or triggering additional actions.
- PDF export options: Export spreadsheets as PDF documents while preserving layout and formatting.
These capabilities simplify spreadsheet file handling by reducing the amount of custom code required to load, process, and save Excel files in cloud-based apps.
Prerequisites
To get started, make sure both the frontend and backend pieces are in place. Setting these up first will make the integration steps much easier to follow.
Frontend setup
Step 1: Create the React application
Create a React project created using your preferred setup tool, such as Create React App or Vite.
Step 2: Install the Syncfusion React Spreadsheet component
Next, install the React Spreadsheet component:
npm install @syncfusion/ej2-react-spreadsheetFor additional configuration details, refer to the Syncfusion React Spreadsheet documentation.
Step 3: Render the Spreadsheet component
Once the package is installed, add the React Spreadsheet to your app and verify it renders correctly. At this stage, the toolbar and ribbon should be enabled so users can access built-in spreadsheet actions.
Backend setup
With the frontend ready, the next step is to configure a backend service that can communicate with Azure Blob Storage and handle Spreadsheet open and save operations.
Step 1: Create an ASP.NET Core Web API project
Create a new ASP.NET Core Web API project. This service acts as a bridge between the React Spreadsheet component and Azure Blob Storage, handling file retrieval and storage.
Step 2: Install required NuGet packages
Add the following packages to support Azure Blob Storage integration and Spreadsheet processing:
Install-Package Azure.Storage.Blobs
Install-Package Syncfusion.EJ2.Spreadsheet.AspNet.Core
Step 3: Configure Azure Blob Storage settings
Azure Blob Storage supports multiple authentication methods, including:
- Storage account connection strings,
- Shared Access Signatures (SAS), and
- Managed identities.
In our blog, the BlobServiceClient is configured using a storage account connection string, while SAS tokens and Managed identities can be used in environments that require more granular or credential-free access control.
Next, add your Azure Blob Storage configuration to the appsettings.json file. The backend uses these settings to access and manage Excel files stored in your Azure container.
"connectionString": "your-azure-storage-connection-string",
"containerName": "your-container-name"
Note: Ensure that the Azure Blob Storage container exists, the required Excel files are uploaded, and the configured connection string has sufficient permissions to access the container. Also, verify storage account networking and access settings to avoid authorization or file access errors. Failure to meet these requirements may result in errors such as 403 AuthorizationFailure or File not found during open and save operations.
Note: If you need guidance on setting up the open and save services locally, see our detailed blog: Hosting open and save services for a Spreadsheet with ASP.NET Core and Docker.
What happens behind the scenes when users open and save files?
Before diving into the implementation, let’s take a quick look at how spreadsheet data moves between the React app, the ASP.NET Core service, and Azure Blob Storage during open and save operations.
At a high level, the React Spreadsheet component handles the editing experience, while the ASP.NET Core service manages file processing and communication with Azure Blob Storage. This keeps the browser focused on user interaction while the server handles Excel-specific operations.
Understanding this flow makes it easier to see how files are retrieved, processed, and stored throughout the application.
How Excel files move from Azure Storage to the browser
When a user opens a spreadsheet, the file is retrieved from cloud storage, processed by the backend, and then loaded into the Spreadsheet component for editing.
The process typically follows these steps:
- Client request: The React app initiates a request to open an Excel file stored in Azure Blob Storage.
- File retrieval: The ASP.NET Core Web API backend uses the Azure SDK (Azure.Storage.Blobs) to fetch the Excel file from the specified blob container.
- Workbook processing: The backend wraps the downloaded stream in an OpenRequest object and passes it to the Workbook.Open method. This converts the Excel file into a JSON object containing all sheets, formatting, formulas, and styles.
- Load in the Spreadsheet: The generated JSON is returned to the frontend, where it is loaded into the React Spreadsheet component using the openFromJson method.
Refer to the following image.

How Excel files are saved back to Azure Blob Storage
After users finish editing, the updated workbook can be saved back to cloud storage through the backend service.
The saving process works as follows:
- Workbook serialization: The React app calls the saveAsJson method to serialize the current workbook state.
- Request preparation: The serialized data is packaged into a
FormDataobject along with details such as the file name, save type, and any optional export settings. - Workbook generation: The ASP.NET Core Web API receives the JSON and uses the Workbook.Save method to convert it into an Excel stream.
- Upload to Azure Blob Storage: The backend uploads the Excel stream using the Azure SDK (
BlobClient.UploadAsync), storing it in the specified container with the specified file name and extension.
The following diagram illustrates the save process.
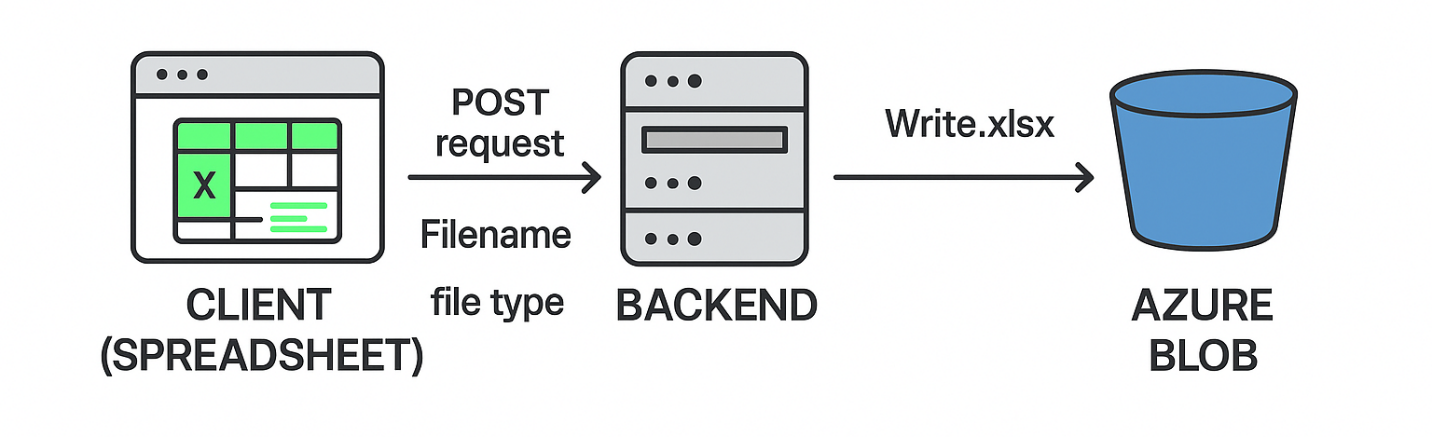
By handling file conversion and storage operations on the server, this approach simplifies Excel file management while keeping the client lightweight. Users can make updates directly within the app without relying on manual download-and-upload steps.
Open cloud-stored Excel files directly in your React app
Now that the architecture is clear, let’s implement the file-open process.
Step 1: Create an API endpoint to retrieve files from Azure Blob Storage
On the backend, fetch the Excel file from Azure Blob Storage, convert it to Spreadsheet-compatible JSON by passing the OpenRequest into the Open method, and then return it to the React Spreadsheet component:
using System;
using System.IO;
using System.Threading.Tasks;
using Azure.Storage.Blobs;
using Azure.Storage.Blobs.Specialized;
using Microsoft.AspNetCore.Http;
using Microsoft.AspNetCore.Mvc;
using Microsoft.Extensions.Configuration;
using Microsoft.Extensions.Logging;
using Syncfusion.EJ2.Spreadsheet;

namespace WebAPI.Controllers
{
    [Route("api/[controller]")]
    [ApiController]
    public class SpreadsheetController : ControllerBase
    {
        //Read Azure Blob Storage settings from configuration
        private readonly BlobServiceClient _blobServiceClient;
        private readonly string _storageContainerName;
        private readonly ILogger<SpreadsheetController> _logger;

        // Constructor for spreadsheetController
        public SpreadsheetController(IConfiguration configuration, BlobServiceClient blobServiceClient, ILogger<SpreadsheetController> logger)
        {
            // Store the Blob Service client used to access Azure Blob Storage.
            _blobServiceClient = blobServiceClient;

            // Store the logger for error tracking and diagnostics.
            _logger = logger;

            // Retrieve the target container name from application configuration.
            _storageContainerName = configuration.GetValue<string>("containerName");

            // Validate that a container name has been configured.
            if (string.IsNullOrEmpty(_storageContainerName))
            {
                throw new InvalidOperationException("Configuration 'containerName' is missing or empty.");
            }
        }

        [HttpPost]
        [Route("OpenFromAzure")]
        public async Task<IActionResult> OpenFromAzure([FromBody] FileOptions options)
        {
            try
            {
                using (MemoryStream stream = new MemoryStream())
                {
                    string fileName = options.FileName + options.Extension;
                    // Get a reference to the configured Azure Blob Storage container
                    BlobContainerClient containerClient = _blobServiceClient.GetBlobContainerClient(_storageContainerName);

                    // Get a reference to the target Excel file (blob) within the container.
                    BlockBlobClient blockBlobClient = containerClient.GetBlockBlobClient(fileName);

                    // Validate file existence
                    if (!await blockBlobClient.ExistsAsync())
                    {
                        return NotFound("File not found.");
                    }

                    // Download file from Azure Blob Storage
                    await blockBlobClient.DownloadToAsync(stream);
                    stream.Position = 0;

                    // Wrap stream as FormFile
                    OpenRequest open = new OpenRequest
                    {
                        File = new FormFile(stream, 0, stream.Length, options.FileName, fileName)
                    };

                    // Convert Excel file to JSON
                    var result = Workbook.Open(open);

                    return Content(result, "application/json");
                }
            }
            catch (Exception ex)
            {
                // Log the exception
                _logger.LogError(ex, "Failed to load spreadsheet from Azure Blob Storage.");

                // Return an error response with the exception message.
                return StatusCode(StatusCodes.Status500InternalServerError, "Error occurred while processing the file.");
            }
        }

        // Receives file details from client
        public class FileOptions
        {
            public string FileName { get; set; } = string.Empty;
            public string Extension { get; set; } = string.Empty;
        }
}
}
Step 2: Load the workbook into the React Spreadsheet
With the API endpoint in place, call it from your React app and load the returned JSON using the openFromJson method.
// Function to open a spreadsheet file from Azure Blob Storage via an API call
  const openFromAzure = () => {
    spreadsheet.showSpinner();

    // Make a POST request to the backend API to fetch the file from Azure Blob Storage. Replace the URL with your local or hosted endpoint URL.
    fetch('http://localhost: your_port_number/api/spreadsheet/OpenFromAzure', {
      method: 'POST',
      headers: {
        'Content-Type': 'application/json',
      },
      body: JSON.stringify({
        FileName: fileInfo.name, // Name of the file to open
        Extension: fileInfo.extension, // File extension
      }),
    })
      .then((response) => response.json()) // Parse the response as JSON
      .then((data) => {
        spreadsheet.hideSpinner();

        // Load the spreadsheet data into the UI
        spreadsheet.openFromJson({ file: data, triggerEvent: true });
        showSuccessLoad();
      })
      .catch((error) => {
        spreadsheet.hideSpinner();
        showErrorToast(error);
      });
  };
Save updates directly to Azure Blob Storage
Once a workbook is loaded into the Spreadsheet component, users can edit it directly in the browser. The next step is to save those updates back to Azure Blob Storage, so the latest version remains available to everyone using the app.
Step 1: Serialize and send workbook data to the cloud
Use the saveAsJson method to serialize the current workbook data and send it to the backend for processing.
// Function to save the current spreadsheet to Azure Blob Storage via an API call
const saveToAzure = () => {
  // Convert the current spreadsheet to JSON format
  spreadsheet.saveAsJson().then((json) => {
    const formData = new FormData();

    // Append necessary data to the form for the API request
    formData.append('FileName', loadedFileInfo.fileName); // Name of the file to save
    formData.append('saveType', loadedFileInfo.saveType); // Save type
    formData.append(
      'JSONData',
      JSON.stringify(json.jsonObject.Workbook)
    ); // Spreadsheet data
    formData.append(
      'PdfLayoutSettings',
      JSON.stringify({ FitSheetOnOnePage: false }) // PDF layout settings
    );

    // Make a POST request to the backend API to save the file to Azure Blob Storage. Replace the URL with your local or hosted endpoint URL.
    fetch('http://localhost:your_port_number/api/spreadsheet/SaveToAzure', {
      method: 'POST',
      body: formData,
    })
      .then((response) => {
        if (!response.ok) {
          throw new Error(
            `Save request failed with status ${response.status}`
          );
        }
        showSuccessToast();
      })
      .catch((error) => {
        showErrorToast(error);
      });
  });
};
Step 2: Save Excel files to Azure Blob Storage through an API controller
At the backend, receive the serialized workbook data, convert it into an Excel file using the Workbook.Save method, and upload the generated stream to Azure Blob Storage.
[HttpPost]
[Route("SaveToAzure")]
public async Task<IActionResult> SaveToAzure([FromForm] SaveSettings saveSettings)
{
    try
    {
        // Convert spreadsheet JSON to Excel file stream
        Stream fileStream = Workbook.Save<Stream>(saveSettings);
        fileStream.Position = 0; // Reset stream for upload

        // Get the target Blob Storage container.
        BlobContainerClient containerClient =
            _blobServiceClient.GetBlobContainerClient(_storageContainerName);

        // Create the output file name.
        string blobName =
            saveSettings.FileName + "." + saveSettings.SaveType.ToString().ToLower();

        // Get a reference to the destination blob.
        BlobClient blobClient = containerClient.GetBlobClient(blobName);

        // Upload the Excel file stream to Azure Blob Storage
        await blobClient.UploadAsync(fileStream, overwrite: true);

        // Return success message
        return Ok("Excel file successfully saved to Azure Blob Storage.");
    }
    catch (Exception ex)
    {
        // Log the exception
        _logger.LogError(
            ex,
            "Failed to save spreadsheet to Azure Blob Storage."
        );

        // Return an error response with the exception message.
        return BadRequest(
            "Error saving file to Azure Blob Storage: " + ex.Message
        );
    }
}
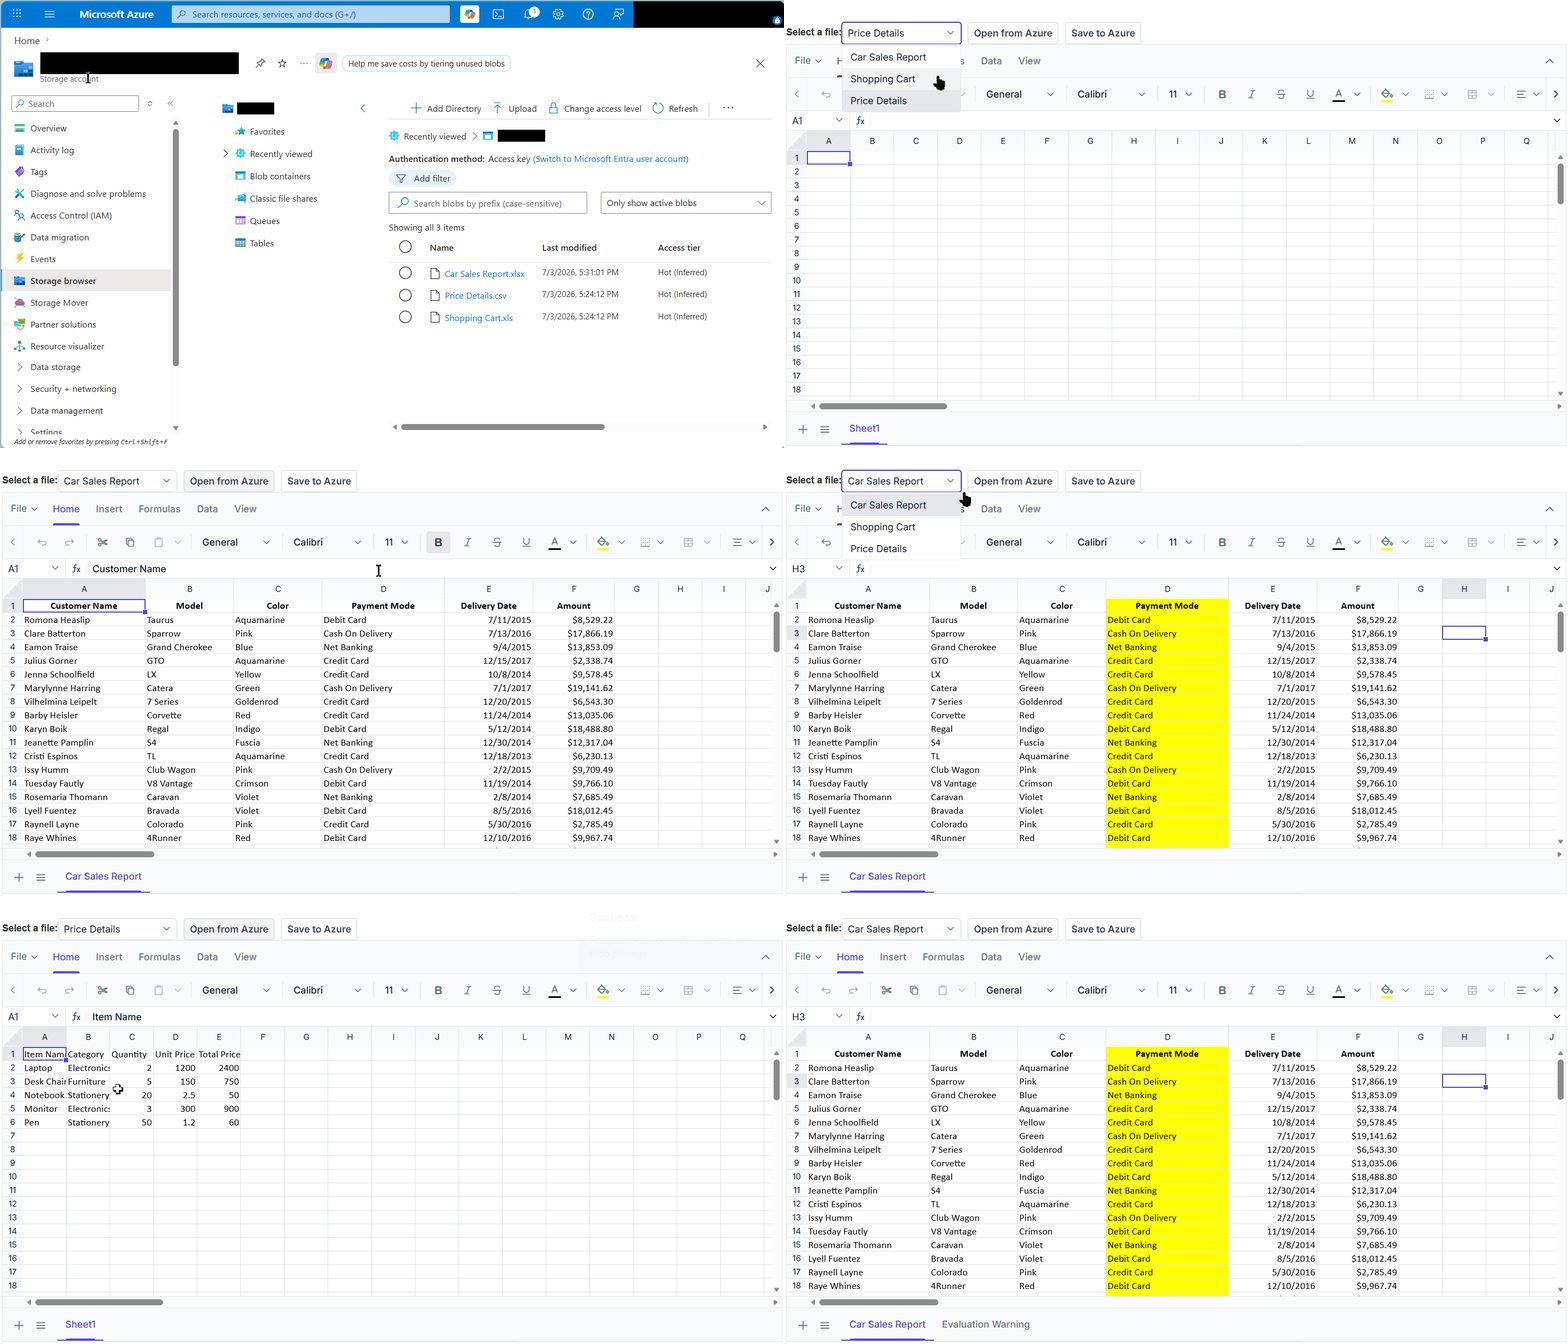
After executing the above code examples, the output will resemble the following image.
Explore the complete example application
If you’d like to follow along with a working implementation, we’ve published both the React frontend and ASP.NET Core backend samples on GitHub.
The repository demonstrates the complete process, including:
- Opening Excel files from Azure Blob Storage.
- Editing workbooks in the browser.
- Saving modified files back to Azure.
- Backend processing using ASP.NET Core and Syncfusion libraries.
This allows you to quickly adapt the sample to your own storage architecture and application requirements.
Where this approach is useful
This integration works especially well in apps where Excel files remain part of daily operations:
- Financial planning systems where analysts regularly update budgeting spreadsheets.
- Inventory and supply-chain portals that store operational spreadsheets in cloud storage.
- Internal reporting applications where multiple teams review and revise shared Excel documents.
- Compliance and audit systems that require centralized workbook storage and version control.
Frequently Asked Questions
Can I open a spreadsheet from Azure Blob Storage without exposing the Blob Storage connection string to the client?
Yes. The recommended approach is to keep Azure Blob Storage credentials in the backend service and allow the Syncfusion Spreadsheet to communicate only with backend APIs. This prevents sensitive storage information from being exposed to browser users.
Will formulas, formatting, and multiple worksheets be preserved when files are loaded from Azure Blob Storage?
Yes. The workbook conversion process preserves spreadsheet content such as worksheets, formulas, cell formatting, styles, and other workbook structures when opening and saving files through the integration process.
Can the same Spreadsheet integration pattern be used for other cloud storage providers?
Yes. The Spreadsheet open and save workflow remains largely the same. Only the storage access layer changes. Similar architectures can be implemented with storage providers such as AWS S3 and Google Drive while continuing to use the same Spreadsheet processing capabilities.
Can I use the same Azure Blob Storage integration approach in Angular or Vue Spreadsheet applications?
Yes. Since Azure Blob Storage is handled through backend APIs, the same storage approach can be reused across other Syncfusion Spreadsheet platforms while maintaining similar open and save operations.
Can I rename files before saving them to Azure Blob Storage?
Yes. The backend can apply custom naming conventions before uploading the workbook. For example, you can append usernames, version numbers, or business identifiers to the file name. This is useful for maintaining document history and preventing accidental file replacement.
Create Excel-style data experiences in React with built-in formula support, cell formatting, workbook editing, large dataset handling, and seamless spreadsheet viewing.
Build React SpreadsheetIt’s time to move beyond download-and-upload cycles
Most applications still rely on downloading spreadsheets, making changes, and uploading them again. While functional, that approach often introduces unnecessary file-handling complexity and disrupts the user experience.
In this article, we explored how to integrate Azure Blob Storage with the Syncfusion React Spreadsheet component to open Excel files from the cloud, edit them in the browser, and save changes back to centralized storage.
By combining browser-based editing with server-side workbook processing, developers can:
- Reduce custom file-handling code.
- Keep workbook storage centralized in the cloud.
- Eliminate manual download-and-upload steps.
- Allow users to work with Excel files without leaving the application.
If you’d like to implement a similar solution, explore the sample application and resources below:
- New to Syncfusion? Start your 30-day free trial and discover the full capabilities of the React Spreadsheet component.
- Already a Syncfusion customer? Download the latest version from the License and Downloads page.
- Need assistance? Reach out through the support forum, support portal, or feedback portal.




 No spam, just valuable updates.