
Mobile Web Wrappers with .NET MAUI Succinctly®

CHAPTER 8
Implementing a Navigation Bar
When wrapping a website into a mobile application, the goal is not merely to replicate the web experience, because this would not even be accepted by the stores. The goal is to elevate the experience. One of the most common ways to achieve this is by incorporating a navigation bar built with .NET MAUI components. By implementing a navigation bar, you simplify the user experience by providing shortcuts to relevant pages of the website.
This chapter explains how to implement a navigation bar in .NET MAUI, and how to take advantage of it for improved interaction between the target website and the mobile app.
Defining the user interface
The navigation bar for the sample application will include shortcuts to the Home, Brochure, Geolocation, and My Profile pages of the website. You will need a .png icon for each shortcut, each representing the target page in a meaningful way.
Tip: For simplicity, you can use the .png icons included in the companion solution. They are named home.png, document.png, profile.png, and location.png, and they are located under the Resources\Images folder of the project. When you add image files, do not forget to set the Build Action property as MauiImage.
Having said that, open the MainPage.xaml file and extend its code as shown in Code Listing 16, focusing on the Grid with x:Name="NavigationBar" that is being added under the ActivityIndicator declaration.
Code Listing 16
<?xml version="1.0" encoding="utf-8" ?> <ContentPage xmlns="http://schemas.microsoft.com/dotnet/2021/maui" xmlns:x="http://schemas.microsoft.com/winfx/2009/xaml" xmlns:views="clr-namespace:MobileAppWrapper.Views" x:Class="MobileAppWrapper.MainPage">
<Grid> <Grid x:Name="LayoutRoot"> <Grid.RowDefinitions> <RowDefinition /> <RowDefinition Height="40"/> </Grid.RowDefinitions> <views:CustomWebView BindingContext="{Binding}" Source="{Binding Source}" x:Name="RootWebView" WebNavigated="RootWebView_Navigated" WebNavigating="RootWebView_Navigating" Navigated="RootWebView_Navigated" Navigating="RootWebView_Navigating"/> <ActivityIndicator Color="Blue" x:Name="SpinnerGrid" IsVisible="False" IsRunning="True" WidthRequest="60" HeightRequest="60"/>
<Grid x:Name="NavigationBar" Grid.Row="1" IsVisible="False" BackgroundColor="White"> <Grid.ColumnDefinitions> <ColumnDefinition Width="*" /> <ColumnDefinition Width="*" /> <ColumnDefinition Width="*" /> <ColumnDefinition Width="*" /> </Grid.ColumnDefinitions>
<!-- Home --> <VerticalStackLayout Grid.Column="0" Spacing="2" HorizontalOptions="Center"> <Image Source="home.png" HeightRequest="24" WidthRequest="24"/> <Label Text="Home" FontSize="12" HorizontalTextAlignment="Center"/> <VerticalStackLayout.GestureRecognizers> <TapGestureRecognizer Tapped="OnHomeTapped"/> </VerticalStackLayout.GestureRecognizers> </VerticalStackLayout>
<!-- Brochure --> <VerticalStackLayout Grid.Column="1" Spacing="2" HorizontalOptions="Center"> <Image Source="document.png" HeightRequest="24" WidthRequest="24"/> <Label Text="Brochure" FontSize="12" HorizontalTextAlignment="Center"/> <VerticalStackLayout.GestureRecognizers> <TapGestureRecognizer Tapped="OnBrochureTapped"/> </VerticalStackLayout.GestureRecognizers> </VerticalStackLayout>
<!-- My Profile --> <VerticalStackLayout Grid.Column="2" Spacing="2" HorizontalOptions="Center"> <Image Source="profile.png" HeightRequest="24" WidthRequest="24"/> <Label Text="My Profile" FontSize="12" HorizontalTextAlignment="Center"/> <VerticalStackLayout.GestureRecognizers> <TapGestureRecognizer Tapped="OnMyProfileTapped"/> </VerticalStackLayout.GestureRecognizers> </VerticalStackLayout>
<!-- Geolocation --> <VerticalStackLayout Grid.Column="3" Spacing="2" HorizontalOptions="Center"> <Image Source="location.png" HeightRequest="24" WidthRequest="24"/> <Label Text="Location" FontSize="12" HorizontalTextAlignment="Center"/> <VerticalStackLayout.GestureRecognizers> <TapGestureRecognizer Tapped="OnGeolocationTapped"/> </VerticalStackLayout.GestureRecognizers> </VerticalStackLayout> </Grid> </Grid> </Grid> </ContentPage> |
The navigation bar is anchored at the bottom of the screen by assigning it to Grid.Row="1" within the layout structure. Its visibility is set as false for startup, and will be changed to true at runtime once the user has logged in. Each navigation item is built using a vertically stacked layout that combines an Image and a Label within a VerticalStackLayout. These elements are centered and spaced evenly to maintain a clean, intuitive design. To handle user actions, each button includes a TapGestureRecognizer, which triggers a corresponding event handler in the code-behind. Event handlers are defined as follows:
private void OnHomeTapped(object sender, TappedEventArgs e)
{
RootWebView.Source = baseUrl;
#if IOS
((WebKit.WKWebView)RootWebView.Handler.PlatformView).LoadRequest(new Foundation.NSUrlRequest(new Foundation.NSUrl(baseUrl)));
#endif
}
private void OnBrochureTapped(object sender, TappedEventArgs e)
{
string url = $"{baseUrl}brochure";
RootWebView.Source = url;
#if IOS
((WebKit.WKWebView)RootWebView.Handler.PlatformView).LoadRequest(new Foundation.NSUrlRequest(new Foundation.NSUrl(url)));
#endif
}
private void OnMyProfileTapped(object sender, TappedEventArgs e)
{
string url = $"{baseUrl}myprofile";
RootWebView.Source = url;
#if IOS
((WebKit.WKWebView)RootWebView.Handler.PlatformView).LoadRequest(new Foundation.NSUrlRequest(new Foundation.NSUrl(url)));
#endif
}
The event handlers update the Source property of the CustomWebView to redirect to the desired page of the website. However, on iOS, the native WKWebView that powers the WebView needs to explicitly fire the WebNavigating and WebNavigated events that you defined in the previous chapter, and this is accomplished by invoking the LoadRequest method pointing to the page URL.
Controlling the navigation bar visibility
Most of the pages of the target website are available only to authenticated users, so it makes sense to display them only after the user has logged in. In real-world scenarios, you will need to implement robust logic to understand if the user has successfully logged in (for example, handling responses from the website), but for demonstration purposes in the sample application it is sufficient to determine the current URL. In fact, the application loads the login page at startup, and this has a specific URL (see the constructor of the main page), but when the user has logged in, the target URL is different.
To control the visibility, edit the RootWebView_Navigated event handler as follows:
private async void RootWebView_Navigated(object sender,
WebNavigatedEventArgs e)
{
RootWebView.Opacity = 1; // full page visibility
SpinnerGrid.IsVisible = false;
if (e.Url.ToLower() ==
"https://your-domain-name.azurewebsites.net/")
{
// Navbar visible
NavigationBar.IsVisible = true;
}
}
Obviously, replace your-domain-name with the domain name of your target website. For now, you have everything you need to test a first version of the mobile app wrapper with the basic mobile experience. In the next chapters, you will extend the implementation with additional features.
Running the application
After much work, you are finally ready to run the sample application. Choose a target device of choice and press F5. At startup, the application will show the login page of the external website, as shown in Figure 19 (figures representing the app are based on both Android and iOS).
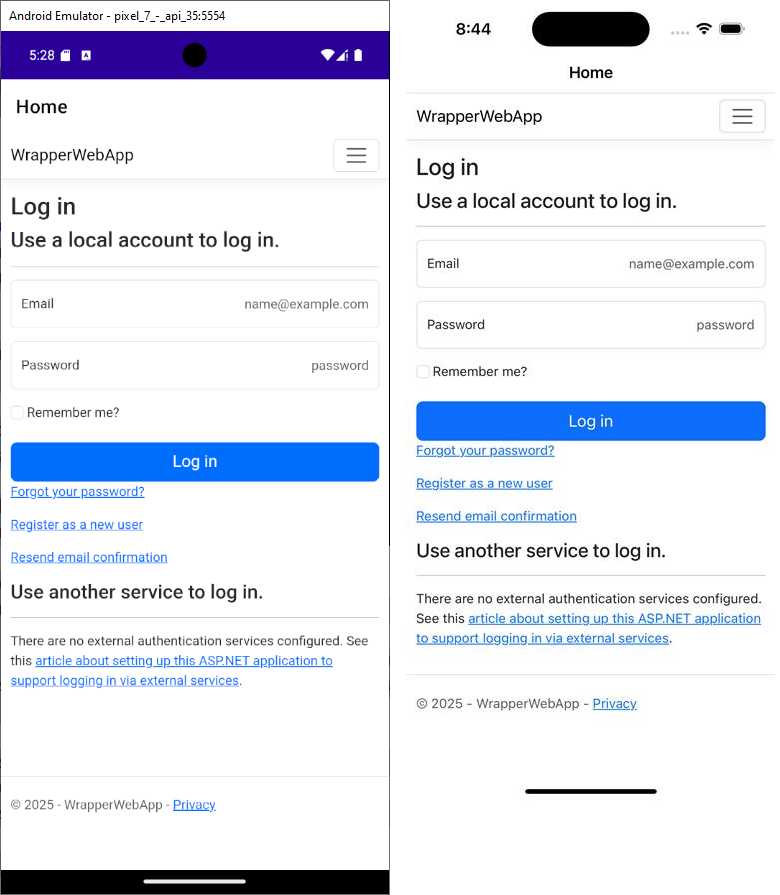
Figure 19: The application showing the login page of the external website
Tip: Though unlikely, it might happen that the webpage displays an error from SQL, saying that the database is not accessible. This can happen on development cloud configurations. If you get this message, simply restart the application. The database service will “wake up” automatically.
If you have not already registered, this is the moment to do it. Remember that the registration you made while debugging the web application locally does not work once it has been deployed to Azure. Take Figure 8 as a reference for a new registration. Once registered, you will be automatically logged into the website from the mobile app, and the navigation bar will appear (see Figure 20).
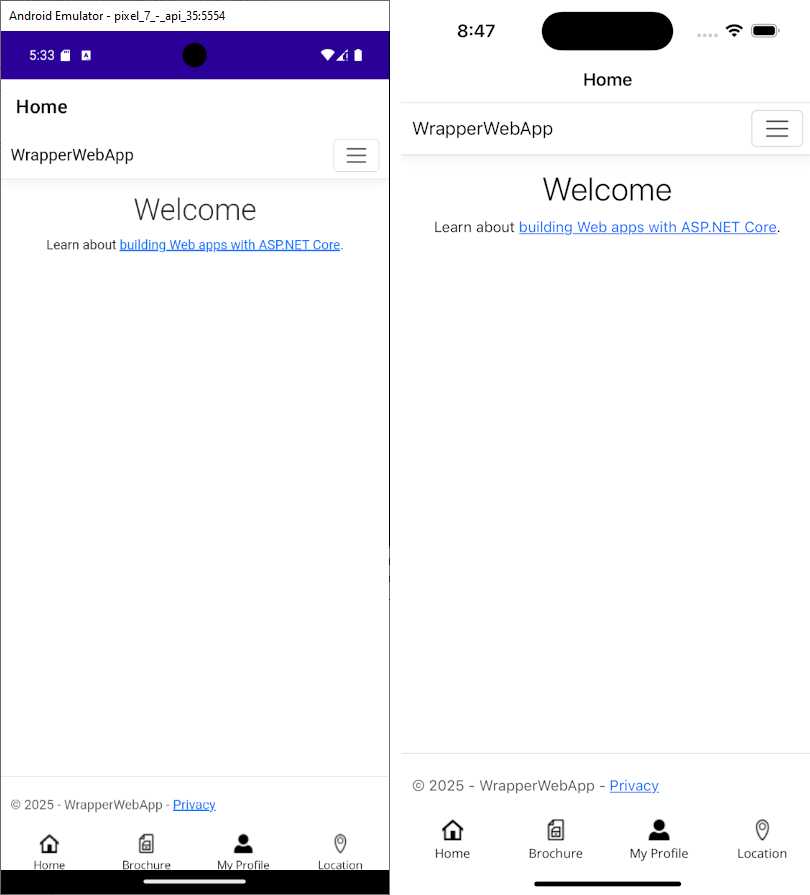
Figure 20: The navigation bar appears after successful login
You can click the navigation bar buttons to explore the linked pages on the website, and you can browse the website by using the hyperlinks in the webpages. You can now understand why a navigation bar is an important addition to the user experience when wrapping websites into a mobile app: it makes it more device-friendly to browse the target content.
Chapter summary
Adding a navigation bar to your mobile wrapper not only addresses one of the requirements from Google Play and the Apple App Store, but it also improves the usability of the app. It enables quick access to pages in the external website without relying on in-page links, aligning the user interface with mobile app standards.
In this chapter, you have implemented a navigation bar using .NET MAUI components, providing additional logic that is required for iOS by using the native WKWebView.LoadRequest method to ensure that navigation works reliably—especially when reloading identical URLs.
In the next chapter, you will implement a key feature from the mobile experience point of view: biometric authentication.


- An ever-growing .NET MAUI control suite with rich feature sets.
- DataGrid, Charts, ListView, Scheduler, and more.
- Active community and dedicated support.
- Phone, tablet, and desktop support.