
Mobile Web Wrappers with .NET MAUI Succinctly®

CHAPTER 10
Handling Mobile Input Properly
The most modern mobile browsers and the most recent versions of the native Android WebView and iOS WKWebView components automatically detect the data type assigned to an input box inside a website, and they automatically show the appropriate keyboard. For example, if an input box is designed to enter a numeric value, the system will show the numeric keypad when the input box gets focus. However, if you plan to distribute your mobile wrappers to older devices and to ensure a consistent behavior across platforms, it is best practice to explicitly enforce the assignment of the proper keypad, depending on the target data type. This chapter explains how to accomplish this, based on the My Profile page of the website that includes a phone number field.
Tip: The concepts described in this chapter apply to all the data types for which the device should display a specific keypad or component, such as the numeric keypad for numbers, the email keypad for email addresses, and the calendar for date/time fields.
Defining the scripts
The My Profile page in the target website has a field called PhoneNumber, and the goal is to make sure that the telephone keyboard is displayed when the user enters text into this field. When the My Profile page is displayed, a JavaScript script must be injected into the page to retrieve the instance of the input box and explicitly assign the target keyboard to it.
For Android, add the following variable to the AndroidScripts class:
public static string AndroidReinforceTelephoneScript = @"var interval = setInterval(() => {
var phoneInput = document.getElementById('user-phone-number');
if (phoneInput) {
clearInterval(interval);
phoneInput.type = 'tel';
phoneInput.setAttribute('inputmode', 'tel');
}
}, 500);";
For iOS, the script is the same, but it goes on one line and must be added to the IOSScripts class as follows:
public static string iOSReinforceTelephoneScript = @"var interval = setInterval(() => {
var phoneInput = document.getElementById('user-phone-number');
if (phoneInput) {
clearInterval(interval);
phoneInput.type = 'tel';
phoneInput.setAttribute('inputmode', 'tel');
}
}, 500);";
This script uses setInterval to check every 500 milliseconds whether an input field with the ID user-phone-number has loaded in the DOM. This is to ensure that the assignment happens only if the element is available. Once it appears, the interval is cleared to stop further checking, and the input field is configured by setting its type to tel and its inputmode to tel, so that the native component will display a telephone keypad.
The next step is adding an extension method to the ExtensionMethods class, to extend the CustomWebView as follows:
public async static Task InjectTelephoneKeyboardAsync(this
CustomWebView webView)
{
#if ANDROID
await webView.EvaluateJavaScriptAsync(AndroidReinforceTelephoneScript);
#elif IOS
await webView.EvaluateJavaScriptAsync(
iOSReinforceTelephoneScript);
#endif
}
Tip: Differently from what you did for the biometric authentication, in this case, there is no need to invoke the code execution on the main UI thread, because you are not interacting with .NET MAUI visual elements, but only with elements in the HTML page.
Now you can conditionally invoke this method if the displayed page is My Profile.
Injecting the scripts
The scripts must be injected if the CustomWebView leads to the My Profile page of the website. This is accomplished by appending the following code to the if block of the RootWebView_Navigated event handler:
else if (e.Url.ToLower().Contains("/myprofile"))
await RootWebView.InjectTelephoneKeyboardAsync();
There is nothing else you have to do, and you are ready to test your work.
Running the application
Press F5 to start the application in debug mode inside the target device of choice. Log in and open the My Profile page. If you go to enter a value in the PhoneNumber field, you will now see the telephone keypad appear, as shown in Figure 24.
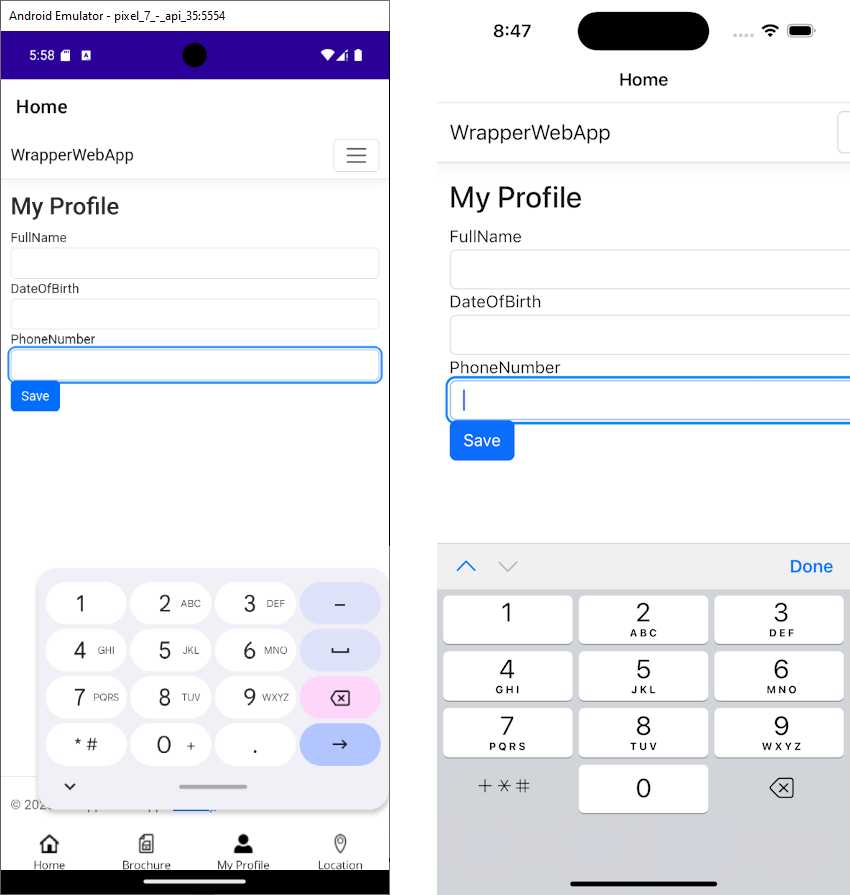
Figure 24: The application showing the specialized keypad
It is best practice to follow this approach to ensure a consistent behavior across platforms and devices, especially older ones. If you plan to distribute your app only to the most modern systems, you can always check if this step can be avoided.
Chapter summary
This chapter explained how to make sure that specialized keypads are displayed depending on the data type of the target input field. This requires a one-way JavaScript injection and no interaction with the bridge classes, so it is a very simple step.
In the next chapter, you will work on something more complex: implementing printing features in a mobile-oriented way.


- An ever-growing .NET MAUI control suite with rich feature sets.
- DataGrid, Charts, ListView, Scheduler, and more.
- Active community and dedicated support.
- Phone, tablet, and desktop support.