
Intelligent Mobile Apps with .NET MAUI Succinctly®

CHAPTER 3
Implementing Image Analysis
The Computer Vision API allows you to analyze images, identify objects in them, and extract text from them using OCR. In this chapter, you will set up the Azure AI Vision service for a .NET MAUI app, implement image analysis capabilities, and create a user interface for selecting and analyzing images to perform OCR and generate descriptions about them.
Setting up Azure AI Vision
Before diving into the code, you need to set up the Azure AI Vision service in the Azure Portal:
- Go to the Azure Portal and sign in with your Azure account credentials.
- Click Azure AI services. Figure 9 shows where you can find both the Computer Vision and Face API services. Remember that the Face API will not be used in this ebook.
- Click Create in the Computer vision card.
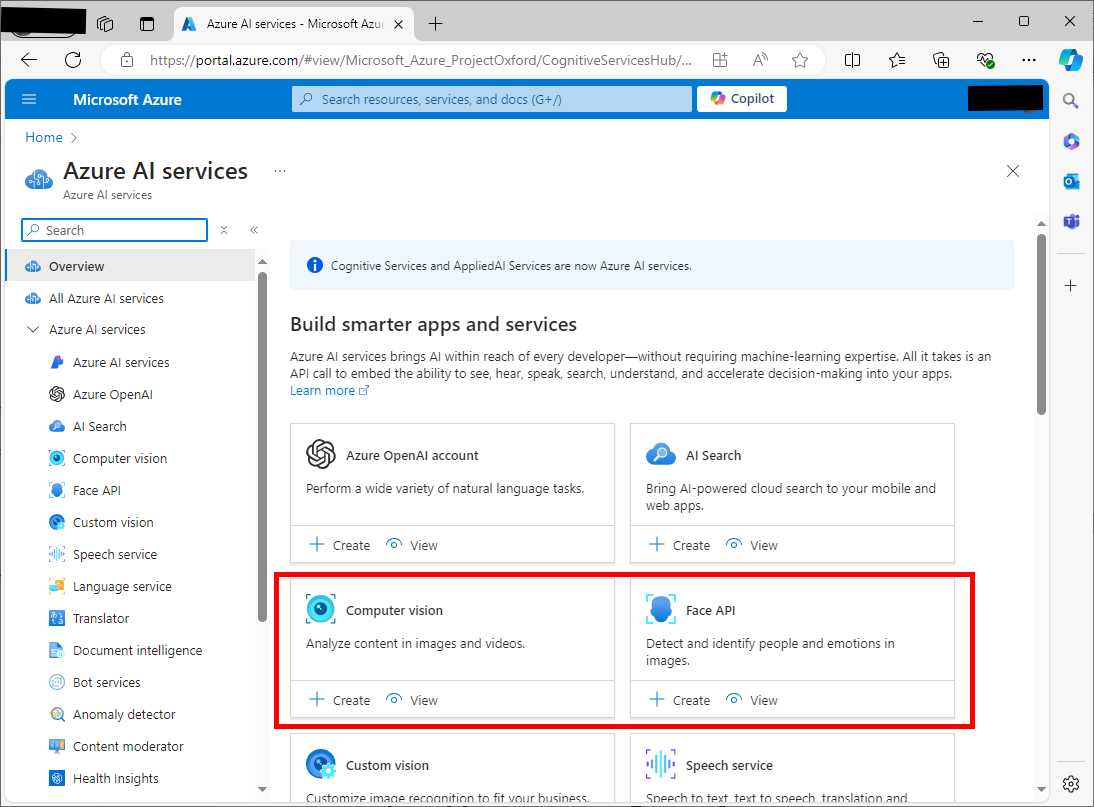
Figure 9: Locating the Computer Vision services
- In the Create Computer Vision page, choose your Azure subscription in the Subscription dropdown and select the resource group you created previously in the Resource group dropdown.
- For Region, choose the region closest to your location and enter a unique name for your Computer Vision instance in the Name field. For this example, I use the name vision-succinctly (see Figure 10).
- In the Pricing tier dropdown, select Free F0.
- Carefully read the responsible usage of AI notice and then select the acknowledgement checkbox.
- Click Review + Create and finally, click Create.
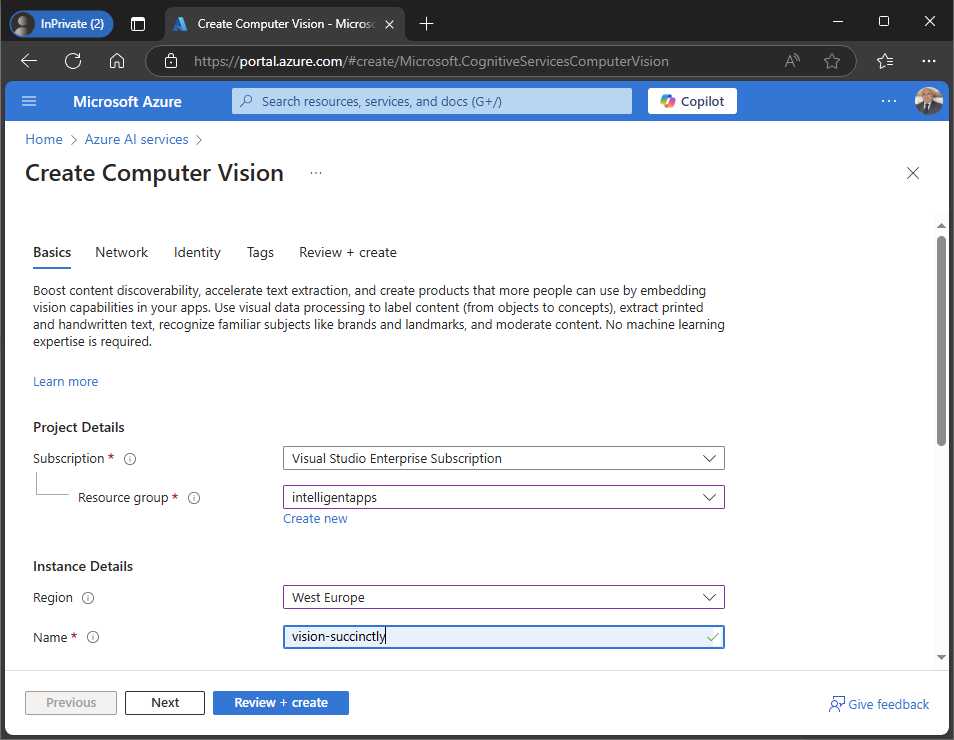
Figure 10: Creating a new Computer Vision service
When the summary page appears, click Go to resource. The new service will appear in the list of services within the current resource group, so click on it. A webpage for the new service will appear. Here you will find a Click here to manage keys hyperlink, which brings you to the page shown in Figure 11 where you will be able to retrieve the API key and the service endpoint URL that you will need to access the service from C# code.
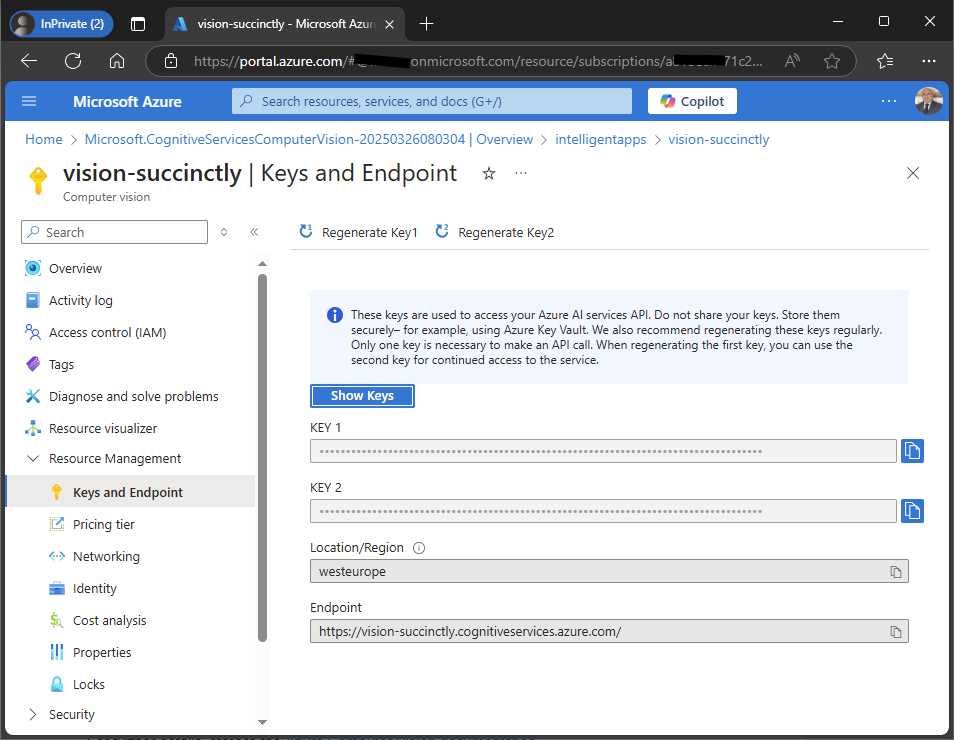
Figure 11: Retrieving API keys and service endpoint
By default, Azure generates two API keys, primary and secondary, but for development you only need one. They are hidden by default for security reasons. Click the Copy button next to the primary (KEY 1) API key text box and securely store the API key for later use in your application’s code. For example, you could consider pasting the copied keys into a text editor, such as Notepad, and save the file locally or in the cloud.
Tip: The preceding steps are common to each Azure AI service added to the sample app in this ebook, so keep them in mind.
Implementing image analysis in .NET MAUI
It is time to write code to implement image analysis in the sample application. This is composed of two steps: installing the necessary NuGet packages and writing the appropriate code.
Installing the AI Vision NuGet packages
As mentioned previously, Azure AI services can be queried via HTTP REST calls. However, Microsoft also offers client libraries for .NET that simplify the way you access services based on an object-oriented approach. With that in mind, open the TravelCompanion sample solution you created previously. In Solution Explorer, right-click the project name and select Manage NuGet Packages. When the NuGet user interface appears, search for the Azure.AI.Vision.ImageAnalysis library (see Figure 12) and install it.
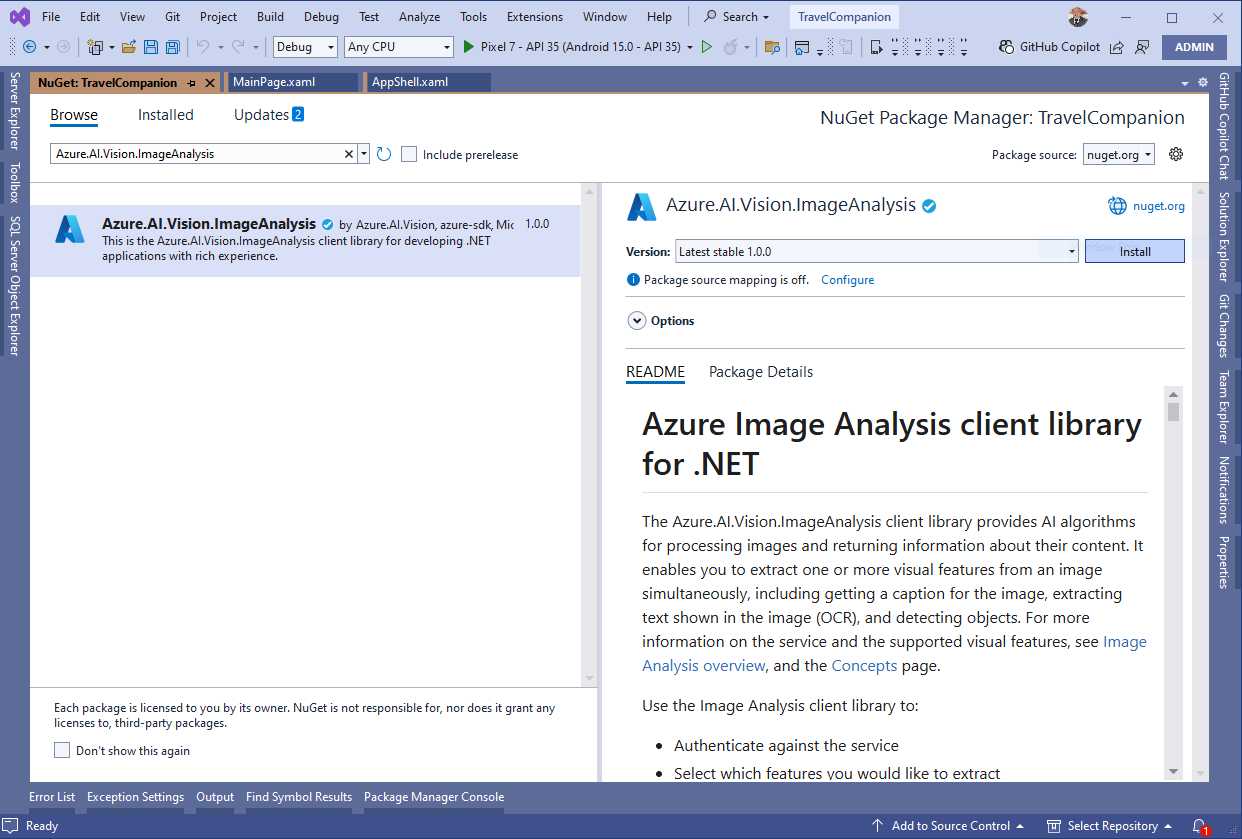
Figure 12: Installing the AI Vision client library
You will need to accept the license agreement, as usual. When the installation is complete, you can start writing code.
Specifying permissions
The sample application will need to access the photo library of the device it’s deployed on so that it can select an existing picture. For this reason, you need to specify the appropriate access permissions in each platform’s manifest file. For Android, double-click the AndroidManifest.xml file located in the Platforms\Android subfolder. When the manifest editor appears, select the READ_MEDIA_IMAGES permission as shown in Figure 13.
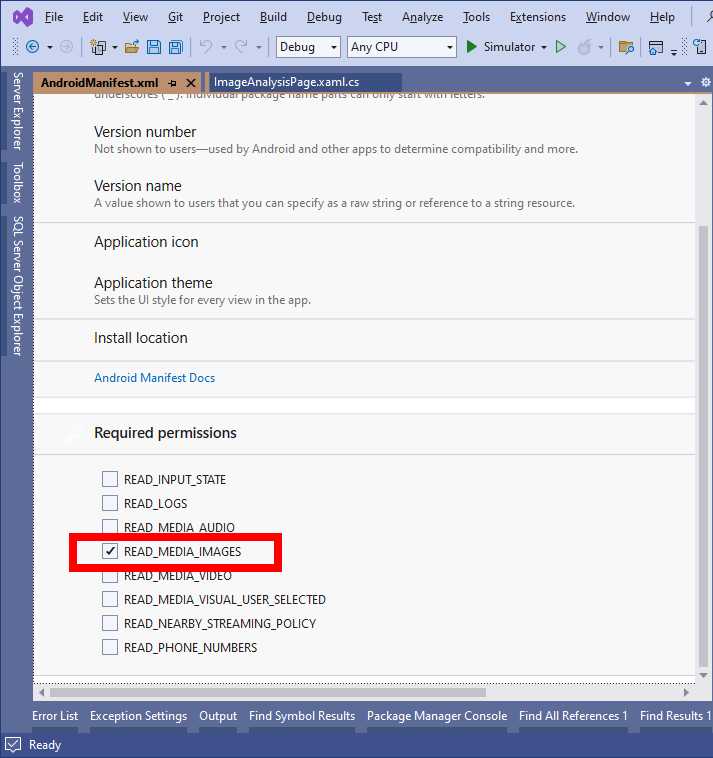
Figure 13: Assigning permissions in the Android manifest
If you plan to target older versions of Android, such as 6.0, you might want to add the READ_EXTERNAL_STORAGE permission.
To edit the iOS permissions, right-click the Info.plist file under Platforms\iOS and select Open With. In the dialog, select XML (Text) Editor and add the following code to the Info.plist:
<key>NSPhotoLibraryUsageDescription</key>
<string>App requires access to your photo library to analyze images.</string>
Info.plist stands for information property list. Replace the permission description with text that better fits your needs.
Tip: Visual Studio includes an Info.plist editor with a convenient user interface, but it does not allow specifying additional permissions. This is why you have to edit the Info.plist file manually.
Specifically for iOS, the application should already have built-in permissions to access the internet. If you experience problems connecting to Azure AI services, try adding the following lines to the Info.plist file:
<key>NSAppTransportSecurity</key>
<dict>
<key>NSExceptionDomains</key>
<dict>
<key>cognitiveservices.azure.com</key>
<dict>
<key>NSExceptionAllowsInsecureHTTPLoads</key>
<false/>
<key>NSIncludesSubdomains</key>
<true/>
<key>NSExceptionRequiresForwardSecrecy</key>
<false/>
</dict>
</dict>
</dict>
This will ensure that the application will be able to reach the Azure AI services endpoints. Specifying permissions in the manifest is not enough; these need to be handled by the user interface, as you will see shortly in the code.
Defining the user interface
You will create a new page for each AI service, and pages will be opened through a navigation bar in the app shell. That said, you will now add a new page for the image analysis. Right-click the project name in Solution Explorer and then click Add > New Item. In the Add New Item window, in the left margin, click .NET MAUI. Then click the .NET MAUI ContentPage (XAML) item, as shown in Figure 14.
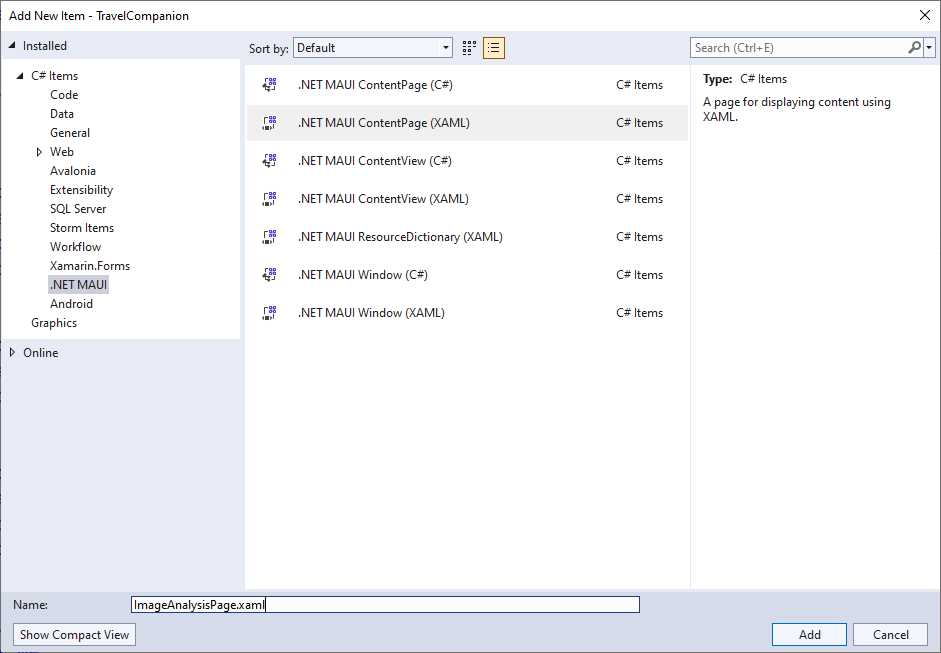
Figure 14: Adding a new ContentPage object
Assign ImageAnalysisPage.xaml as the page name and click Add. The purpose of the new page is to give users the option to pick an image from the device and analyze its content via AI Vision. There are two buttons: one for the image analysis and one for the OCR processing. The simple user interface for the new page is shown in Code Listing 1.
Code Listing 1
<?xml version="1.0" encoding="utf-8" ?> <ContentPage xmlns="http://schemas.microsoft.com/dotnet/2021/maui" xmlns:x="http://schemas.microsoft.com/winfx/2009/xaml" x:Class="TravelCompanion.ImageAnalysisPage" Title="ImageAnalysisPage"> <Grid Padding="20" VerticalOptions="Fill"> <Grid.RowDefinitions> <RowDefinition Height="Auto" /> <RowDefinition Height="300"/> <RowDefinition Height="Auto" /> </Grid.RowDefinitions> <Button Text="Pick an Image" Clicked="OnPickImageClicked" Margin="5" /> <Image x:Name="SelectedImage" Aspect="AspectFit" Grid.Row="1" /> <HorizontalStackLayout Grid.Row="2" HorizontalOptions="Fill"> <Button Text="Analyze Image" Margin="5" Clicked="OnAnalyzeImageClicked" /> <Button Text="OCR Recognition" Margin="5" Clicked="OnOcrAnalyzeImageClicked" /> </HorizontalStackLayout> </Grid> </ContentPage> |
The explanation is very easy: a Button allows users to pick an image, the Image displays the selected picture, the second Button triggers image analysis, and the Label shows the analysis results. Finally, the third Button starts OCR processing for the selected image, and the result is shown inside the same Label.
Exception handling
Generally speaking, all the Azure AI services throw a RequestFailedException when the invocation to the service fails. This object also exposes the ErrorCode property, of type nullable string, which contains the details of the failure. In all the examples in this ebook, you will see how the code implements try...catch blocks to handle this exception, plus a generic Exception object as a best practice.
Performing image analysis in C#
The purpose of the code is to make the application analyze an image and generate a description and a list of tags and detected objects. For instance, uploading an image of a car might result in the description "A red car on the road," tags such as "car" and "road," and object detection for the car itself. Code Listing 2 demonstrates how to accomplish this, with code that you need to write into the ImageAnalysisPage.xaml.cs file (explanations will be provided after the code).
Code Listing 2
using Azure; using Azure.AI.Vision.ImageAnalysis; using System.Text; using System.Threading.Tasks;
namespace TravelCompanion;
public partial class ImageAnalysisPage : ContentPage { private const string SubscriptionKey = "your-ai-vision-api-key"; private const string Endpoint = "your-ai-vision-endpoint"; public ImageAnalysisPage() { InitializeComponent(); }
private async Task<bool> RequestPhotoPermissionsAsync() { var mediaStatus = await Permissions. CheckStatusAsync<Permissions.Photos>(); if (mediaStatus != PermissionStatus.Granted) { mediaStatus = await Permissions. RequestAsync<Permissions.Photos>(); }
return mediaStatus == PermissionStatus.Granted; }
private async void OnPickImageClicked(object sender, EventArgs e) { bool permissionCheck = await RequestPhotoPermissionsAsync(); if (!permissionCheck) { await DisplayAlert("Error", "You do not have permissions to access the photo gallery", "OK"); return; }
var result = await FilePicker.PickAsync( new PickOptions { FileTypes = FilePickerFileType.Images });
if (result != null && !string. IsNullOrEmpty(result.FullPath)) { SelectedImage.Source = ImageSource. FromFile(result.FullPath); ((Button)sender).IsEnabled = true; } } private async void OnAnalyzeImageClicked(object sender, EventArgs e) { try { if (SelectedImage.Source == null) return;
var imagePath = ((FileImageSource)SelectedImage.Source).File; var imageBytes = File.ReadAllBytes(imagePath);
var credential = new AzureKeyCredential(SubscriptionKey); var client = new ImageAnalysisClient( new Uri(Endpoint), credential);
using var imageStream = new MemoryStream(imageBytes); var binaryData = BinaryData.FromStream(imageStream); var result = await client.AnalyzeAsync(binaryData, VisualFeatures.Caption | VisualFeatures.Tags | VisualFeatures.Objects, new ImageAnalysisOptions { Language = "en" });
string descriptionResult = $"Description: " + $"{result.Value.Caption.Text}\n"; descriptionResult += "Tags: " + string.Join(", ", result.Value.Tags.Values.Select(tag => tag.Name)) + "\n"; descriptionResult += "Objects:\n";
AnalysisResult.Text = descriptionResult ?? "No description available."; } catch (RequestFailedException ex) { await DisplayAlert("Error", ex.ErrorCode, "OK"); } catch (Exception ex) { await DisplayAlert("Error", ex.Message, "OK"); } } } |
The code first asks for user permissions when a user tries to upload a picture. This is accomplished by invoking the CheckStatusAsync and RequestAsync static methods from the Permissions class. In this case, the code checks for the Permissions.Media permission required to access the device’s media library. In the next chapters, you will learn about other permission types. Moving to code that is relevant to Azure AI Vision, the ImageAnalysisClient is the class designed to interact with the service. It offers methods such as AnalyzeAsync, which accepts a BinaryData image, a set of VisualFeatures, and optional ImageAnalysisOptions. This method sends the image to the service and retrieves the analysis results. The ImageAnalysisClient also has properties like Endpoint, which specifies the Azure service endpoint. Access to the service is granted via an instance of the AzureKeyCredential class, whose constructor receives the API key.
The VisualFeatures enumeration defines various features available for image analysis. Among its values are Caption, which generates a human-readable caption for the image, and Tags, which identifies and lists objects found within the image. Additionally, the Text property extracts textual content from an image using OCR.
The ImageAnalysisOptions class provides configuration options for analyzing an image. It includes properties such as Language, which specifies the language for textual analysis (e.g., "en" for English), and GenderNeutralCaption, which, when set to true, ensures captions avoid gender-specific terms.
Finally, the AnalysisResult class holds the output of the image analysis operation. Its properties include Value, which acts as the container for the analysis results; Caption, which contains the generated textual description of the image; and Tags, which provides a list of identified objects and concepts present in the image. Additional information can be found in the Image Analysis SDK documentation, where you can find examples for .NET and for other languages.
Tip: The implementation has been simplified to display only text from the image. However, the AnalyzeAsync method can also detect the physical position and confidence level of every word. An example of this is available on the image analysis NuGet package repository page.
Performing OCR
OCR is the process of extracting text from images and printed documents. The Azure AI Vision service makes this process very easy, and it can be very useful. In the context of the current sample app, imagine how this could help a person with low vision at a restaurant: they take a picture of the menu, get the text from it, and, using text-to-speech (see the next chapter), make the app speak the text aloud. To implement this functionality, add the following C# code, given that you already have a button for this:
private async void OnOcrAnalyzeImageClicked(object sender,
EventArgs e)
{
try
{
if (SelectedImage.Source == null)
return;
var imagePath =
((FileImageSource)SelectedImage.Source).File;
var imageBytes = File.ReadAllBytes(imagePath);
var credential =
new AzureKeyCredential(SubscriptionKey);
var client = new ImageAnalysisClient(
new Uri(Endpoint), credential);
using var imageStream = new MemoryStream(imageBytes);
var binaryData = BinaryData.FromStream(imageStream);
ImageAnalysisResult result = await client.AnalyzeAsync(
binaryData,
VisualFeatures.Read);
var resultStringBuilder = new StringBuilder();
foreach (DetectedTextBlock block in result.Read.Blocks)
{
foreach (DetectedTextLine line in block.Lines)
{
// Only include the text of the line
resultStringBuilder.AppendLine(line.Text);
// Optionally, you can append each word here if needed
// foreach (DetectedTextWord word in line.Words)
// {
// resultStringBuilder.
// AppendLine($"Word: '{word.Text}'");
// }
}
}
string ocrResult = resultStringBuilder.ToString();
AnalysisResult.Text = ocrResult ??
"No description available.";
}
catch (RequestFailedException ex)
{
await DisplayAlert("Error", ex.ErrorCode, "OK");
}
catch (Exception ex)
{
await DisplayAlert("Error", ex.Message, "OK");
}
}
You still invoke AnalyzeAsync, but this time you apply the Read value from the VisualFeatures enumeration. The return type is still ImageAnalysisResult, which contains the following relevant objects, exposed by the Read property:
· DetectedTextBlock: Represents a block of text in the image (a paragraph or section).
· DetectedTextLine: Represents an individual line of text within a block.
· DetectedTextWord: Represents an individual word within a line.
These objects are returned in the OCR result and are structured hierarchically to represent how the text appears in the image. The code loops through the blocks of text, then the lines within each block, and extracts the text from each line. The extracted text is then added to a StringBuilder, which is used to construct the output string. The OCR engine in Azure AI Vision supports a variety of languages, and a full reference of its powerful features is available in the official documentation.
Adding the page to the shell
In .NET MAUI, the Shell object provides a common infrastructure for navigation between pages, including a flyout menu. This is a convenient and low-cost approach when you have multiple pages and you want to implement navigation quickly. Before running the application, you need to add the newly created page to the AppShell.xaml file. Replace the original code with the following:
<?xml version="1.0" encoding="UTF-8" ?>
<Shell
x:Class="TravelCompanion.AppShell"
xmlns="http://schemas.microsoft.com/dotnet/2021/maui"
xmlns:x="http://schemas.microsoft.com/winfx/2009/xaml"
xmlns:local="clr-namespace:TravelCompanion"
Shell.FlyoutBehavior="Disabled"
Shell.NavBarIsVisible="False"
Title="TravelCompanion">
<TabBar x:Name="RootBar">
<ShellContent Title="Image" Icon="camera_solid"
ContentTemplate="{DataTemplate
local:ImageAnalysisPage}" />
</TabBar>
</Shell>
The TabBar object allows you to implement a navigation bar at the bottom of the page, and each ShellContent object represents a shortcut to the specified page. Notice how the Title and Icon properties are assigned with the text and icon that visually represent the shortcut. The target page is represented by the ContentTemplate property, which uses a DataTemplate binding expression that ensures the page instance is instantiated and rendered only when necessary. These steps will be repeated in most of the next chapters, every time you add a new page.
Running the application
In the Visual Studio toolbar, select the target device, such as an Android or iOS simulator or a physical device. When ready, press F5 to start debugging. When the application is running, click Pick an image to select a picture from your device. Make sure you have a picture with some details relevant to the AI-powered analysis capabilities of the Computer Vision service. When ready, click Analyze image and wait for the results. Figure 15 shows an example based on both Android and iOS.
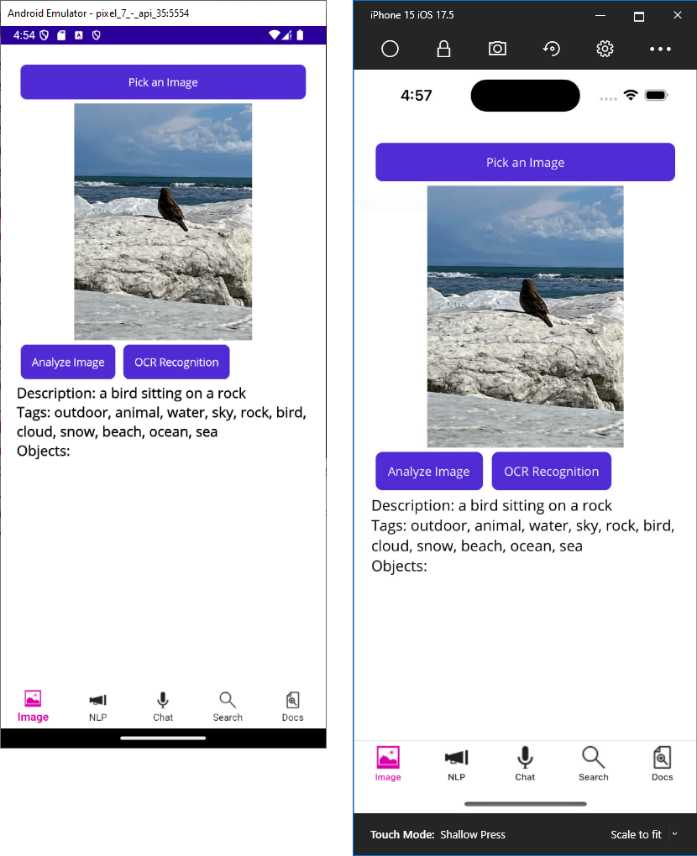
Figure 15: The result of AI-powered image analysis
As you can see, the application is able to display an accurate description and a list of tags that can help categorize the content—in this case, a bird sitting on a rock—with all the related tags. You can now choose a different image that contains text and launch the OCR processing. Figure 16 shows an example based on a picture of a restaurant menu in Italian, which means that the OCR engine can work across a variety of languages.
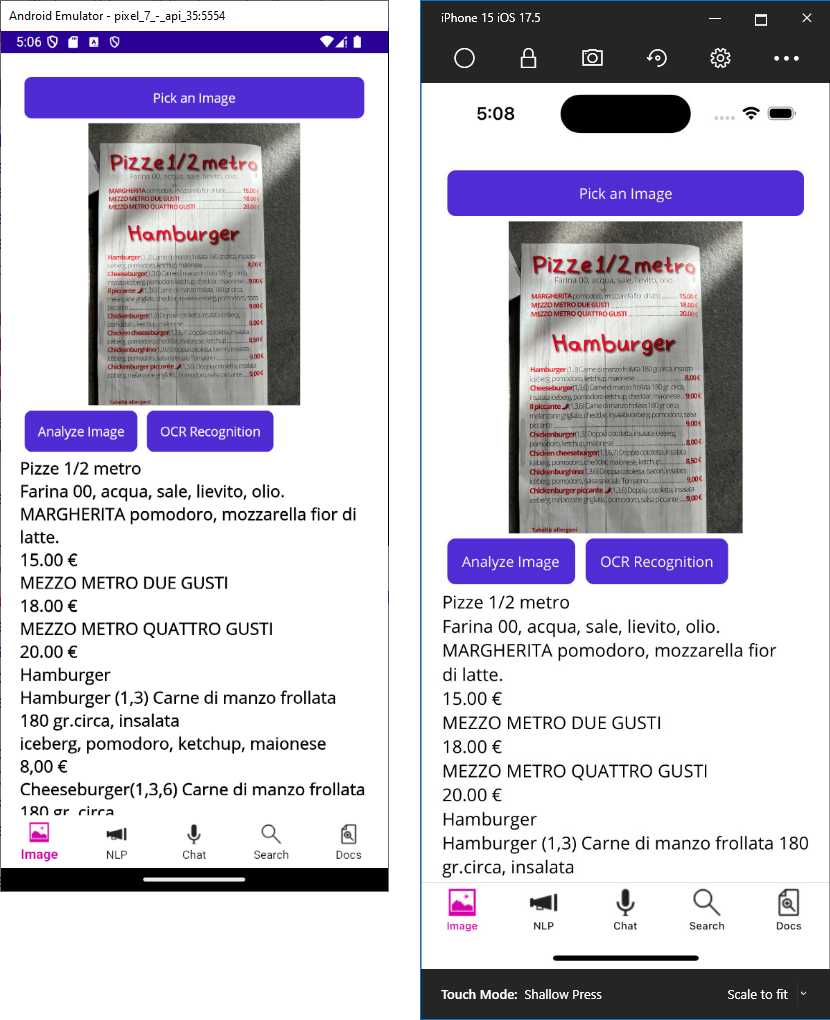
Figure 16: OCR processing of a restaurant menu
Notice how OCR detects individual lines in all the content. As you can imagine, the possible scenarios to which AI-powered image analysis can be applied are infinite. You can dramatically enhance the user’s mobile experience by combining Azure AI Vision with other Azure AI services, as you will learn in the next chapter, where you will use the Speech services to make the app speak aloud the results displayed so far.
Chapter summary
In this chapter, you have seen how to integrate Azure AI Vision into the travel companion sample mobile app. You performed many steps that will be common to the next chapters, such as setting up the Azure service, retrieving API keys, installing the necessary NuGet package, and creating a functional user interface. The AI Vision client library provides the ImageAnalysisClient class with the AnalyzeAsync method that quickly runs AI-powered analysis over images, returning a detailed description and tags to categorize the content. The same class and method support OCR processing of text contained in images and printed documents. In the next chapter, you will implement speech recognition and text-to-speech capabilities.


- An ever-growing .NET MAUI control suite with rich feature sets.
- DataGrid, Charts, ListView, Scheduler, and more.
- Active community and dedicated support.
- Phone, tablet, and desktop support.