
Azure AI Services Succinctly®

CHAPTER 2
Setting Up the Development Environment
This chapter explains how to set up the development environment to build .NET applications that use Microsoft Azure AI services, regardless of the computer type and operating system you use. In fact, .NET runs on Windows, macOS, and Linux systems, so the steps described in this chapter apply to all systems. Figures in the ebook are based on Windows, but you will get the same results on other operating systems.
Note: If you work with Microsoft Visual Studio 2022 on Windows and prefer to use this environment rather than VS Code, you are totally free to do so. The choice of Visual Studio Code in this ebook aims to reach the widest audience possible.
Registering for an Azure subscription
To set up a development environment for Microsoft Azure AI services using Visual Studio Code, the first requirement is having a Microsoft Azure subscription. If you do not have one, you can register for a 30-day trial. You will need to register using a Microsoft account.
Complete the registration process by providing your details, verifying your identity with a credit card (you will not be charged unless you upgrade your subscription), and accepting the terms. Once you register, you will receive $200 in free credit, which can be used for various Azure services, including Azure AI services. This is a perfect start to walk through the examples described in this ebook. If you create a free Azure subscription for the purposes of following along in this ebook, it’s relatively easy to cancel the subscription.
For now, nothing else is required on the Azure platform. All the required configurations and service generations through the Azure Portal user interface will be discussed where appropriate in the next chapters.
Locating the Azure AI services
Once you have created an Azure subscription, you need to log in to the Azure Portal, which is the place where you manage all the available Azure services, not just AI services. The main page of the Azure Portal is a dashboard where you find shortcuts to the most popular Azure services. You will find a shortcut called AI Services. If you click on this shortcut, you will access a page that contains the full list of available Azure AI services, as shown in Figure 1.
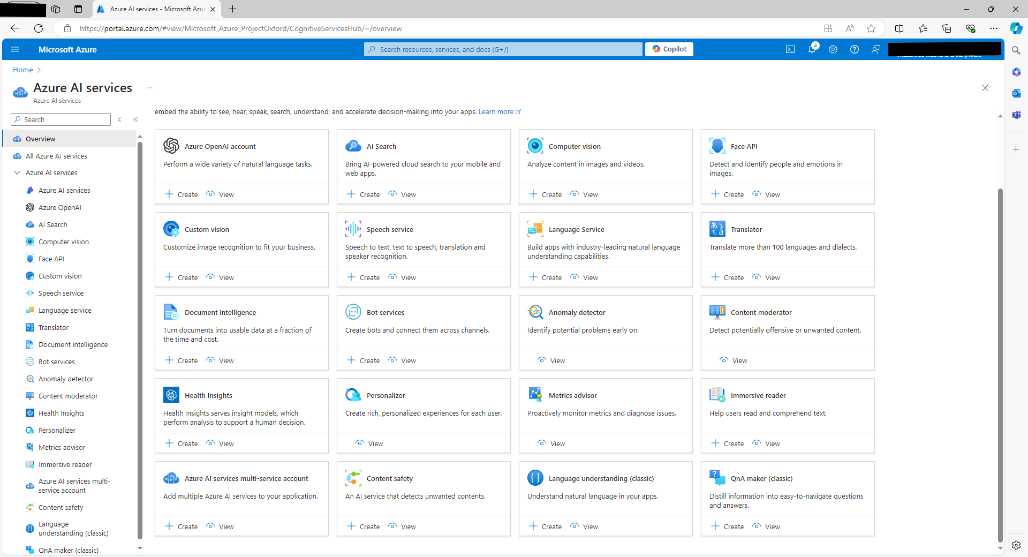
Figure 1: Full list of Azure AI Services
In the next chapters, you will be asked to create new service instances for the AI service targeted by each chapter. Keep Figure 1 as a reference to find the discussed service quickly and remember that you can access this page by clicking AI Services in the Azure Portal home page.
Creating a resource group
As the name implies, an Azure resource group is a container for cloud services. It provisions all the resources common to the services it contains. A resource group is also needed to complete the code examples discussed in this ebook.
To accomplish this, once you have logged in to the Azure Portal, type Resource Group in the search bar and click the Resource Groups item that appears. This will open the Resource groups page, as shown in Figure 2.
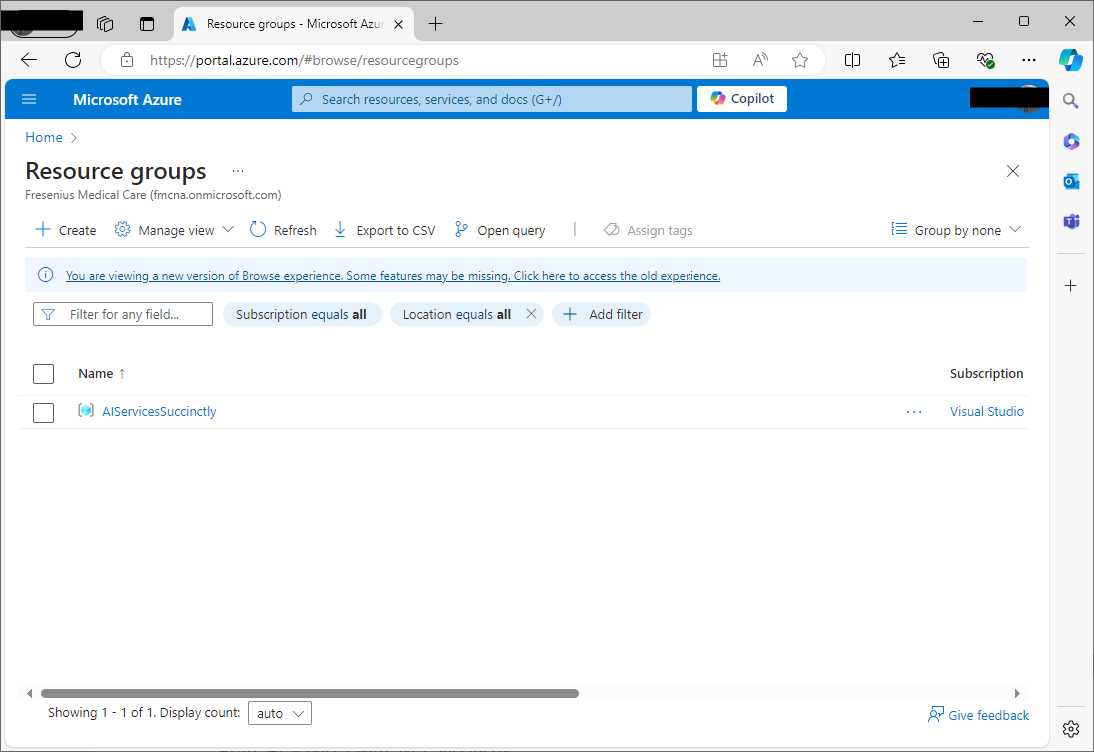
Figure 2: Locating resource groups
Next, click Create. In the Create a resource group page, select your Azure subscription, then enter a name for the resource group, such as aiservicessuccinctly, keeping the name lowercase.
Note: Every time you specify a name for an Azure resource, it must be lowercase. Optionally, you can append the -rg literal to the resource group names to distinguish them from other Azure resources.
Figure 3 demonstrates this.
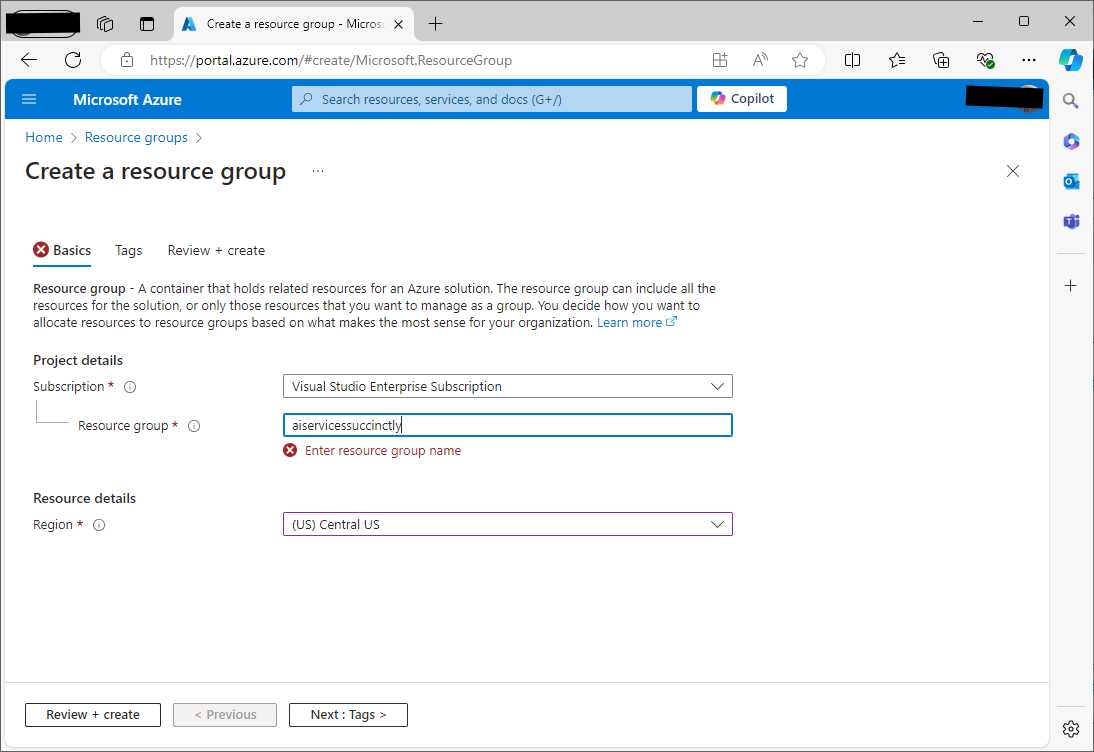
Figure 3: Creating a resource group
In the Region dropdown, select the closest region to your location. When ready, click Review + Create > Create, and wait for the resource group to be deployed.
Note: To avoid extra costs or credit consumption, remember to completely delete the Azure resources that you no longer use.
Installing .NET and .NET SDK
Note: If you have already installed .NET 8 on your machine, you can skip this step.
In Chapter 1, you learned that Azure AI services are available as RESTful APIs and that Microsoft provides the Azure SDK to work against such services with convenient .NET client libraries. The goal of this ebook is leveraging the Azure AI services in C# and .NET, so before taking advantage of the Azure SDK, you need to set up your development machine to have all the necessary .NET tools.
The next step is installing the latest stable release of .NET and the .NET software development kit (SDK) on your development machine. The SDK also includes the .NET command line interface (CLI), which is required to launch command lines from a command prompt. At the time of writing this, the current stable release is .NET 8. You can download the installer from the official download page, obviously making sure you select the installer that targets your system.
Launch the installer and follow the on-screen instructions. When the installation is complete, you can open a command prompt (or Terminal, on macOS and Linux) and type the following command line:
> dotnet --version
If the installation was successful, this line will display the current .NET version number.
Installing and configuring Visual Studio Code
Visual Studio Code (often shortened to VS Code or Code) is a very popular, open-source, cross-platform evolved code editor that works well with Azure services, as well as with others. If you have not installed VS Code already, go to the official download page and download the appropriate installer for your operating system (Windows, macOS, or Linux). Launch the installer and follow the on-screen instructions. When you’re ready, launch VS Code.
Note: It is not possible to summarize all the powerful features of Visual Studio Code in this publication, which has a different focus. For this reason, we’ll only discuss the features that are required to set up the environment and understand the examples. For further information, you can read Visual Studio Code Succinctly.
The final step is installing an extension for Visual Studio Code called C# DevKit, which extends the development environment with a rich C# development experience and a debugger for .NET. Open the Extensions view, and search for the C# DevKit extension, as shown in Figure 4.
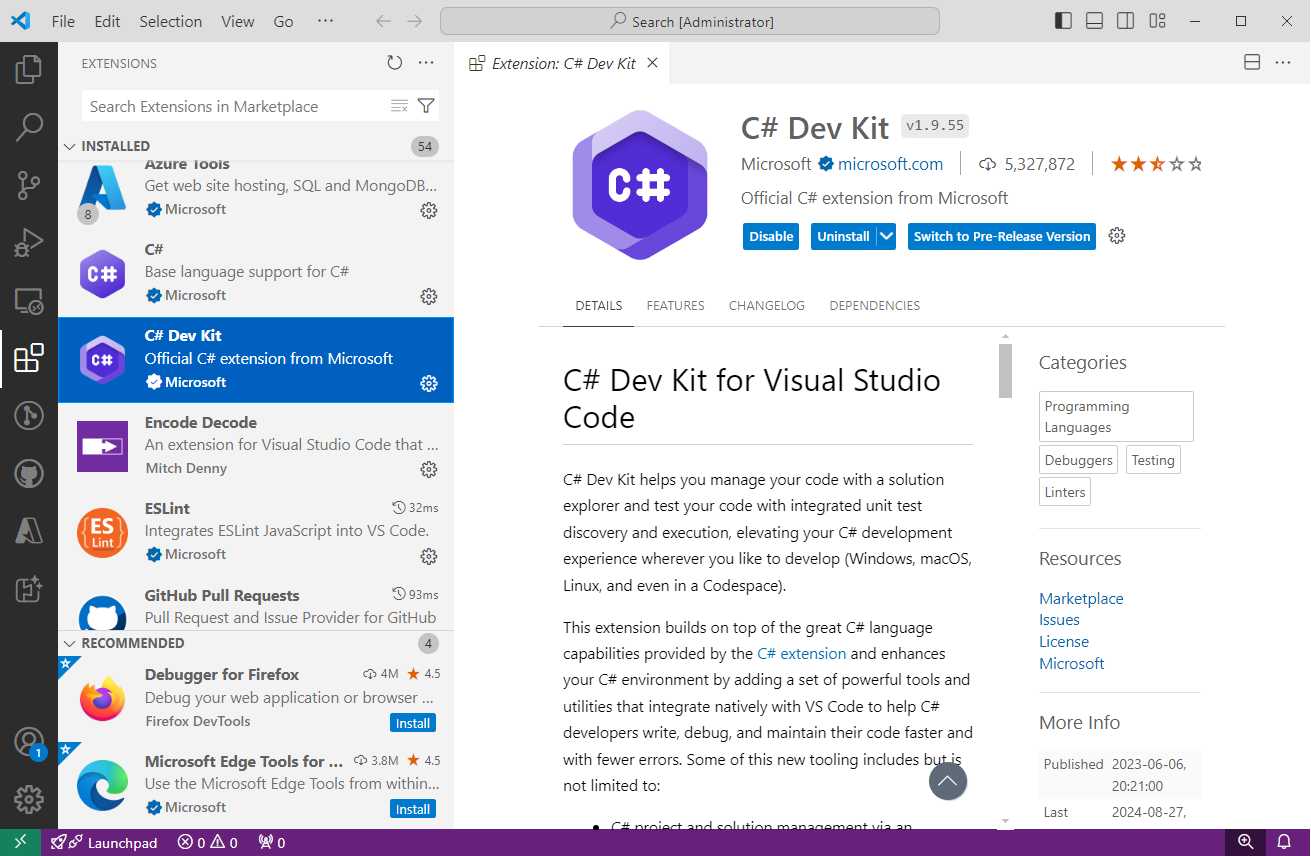
Figure 4: Installing the C# DevKit extension for VS Code
Click Install and close the Extensions view when you’re ready.
Note: Microsoft has published many Visual Studio Code extensions that make it easier to work against Azure resources from within the development environment. However, these extensions do not currently target Azure AI services, which is why we aren’t discussing them here.
Additional configuration
The last step of your local configuration involves creating a new folder that will contain all the code examples. If you want to be consistent with this ebook, you can name the folder AIServices, but you are free to choose a different name. Using a command prompt or a Terminal instance in VS Code, you can simply create the new folder as follows:
> md c:\AIServices
Now you are ready to start writing intelligent apps with .NET.
Creating applications with the .NET CLI
The .NET command line interface (CLI) provides a system-agnostic way to create and manage .NET applications. In the next chapters, you will create two types of .NET apps: console apps and WPF apps. The following command line generates a new C# project for a console app:
> dotnet new console
The generated project takes the name from the current folder. The following command line, instead, generates a new C# project for a WPF app:
> dotnet new wpf
Note: When you create a C# project with the .NET command line, the tool also generates a Visual Studio solution (.sln) file whose name consists of the project name, plus the .generated literal. This allows you to also open the project in Visual Studio 2022. If you instead work with VS 2022, the solution name and main project name are the same.
The steps you will follow to create sample projects are the following:
- Create a new subfolder for the new project inside the AIServices folder created previously.
- Make the new subfolder the current folder.
- Generate a new project.
- Install the necessary libraries from the Azure SDK in the form of NuGet packages.
For example, the following sequence of commands is used in Chapter 3 to create a sample WPF project:
> md c:\AIServices\AppSearchWpfApp
> cd c:\AIServices\AppSearchWpfApp
> dotnet new wpf
> dotnet add package Azure.Search.Documents
> dotnet add package Newtonsoft.Json
The dotnet add package command is used to install NuGet packages in the project. More specifically, the command installs the latest version available. If you need to install a specific version, you can use the following command:
> dotnet add package PackageName -v 1.0.0
PackageName is the name of the NuGet package, and 1.0.0 will be replaced with the version number you need.
Opening projects in Visual Studio Code
Once you have created a project, open Visual Studio Code and then select File > Open Folder or click Open Folder in the Start page. Select the folder that contains the project you just created and wait for it to be available in VS Code.
Remember that VS Code is folder-based, not project-based. So, you do not open a C# project file (.csproj) or Visual Studio solution file (.sln) directly; instead, you open the folder that contains the project. Visual Studio Code will then set up the environment accordingly. We’ll cover more details later in this book.
Common errors and exceptions
When you work with Azure AI services from .NET, you can receive exceptions and error messages if something goes wrong. Some exceptions are common to all the services, and others are specific. Table 1 describes exceptions that are common to all the services.
Table 1: Common AI Services .NET exceptions
AuthenticationFailedException | This occurs when the provided API keys or tokens are invalid, expired, or missing. The service will not be able to authenticate your request, and you'll receive this error in response. |
ServiceRequestException | This occurs when there’s an issue with the request to the Azure service, such as malformed payloads or incorrect endpoint usage. It's a general exception thrown for request validation errors. |
RequestFailedException | This is a general exception class used across Azure SDKs when a request to the server fails for any reason (e.g., network failure, server issues, or client misconfiguration). |
TimeoutException | If the service takes too long to respond or the network request times out, this exception is thrown. This can be caused by network issues or server-side delays. |
You can surround the code that interacts with Azure AI services with a try..catch block and catch and handle the most appropriate exceptions. Other exceptions that are specific to each service will be discussed where appropriate.
Chapter summary
In this chapter, you have seen how to configure the development environment to work with .NET, Visual Studio Code, and the Microsoft Azure AI services. On the Azure side, you have seen how to access the Azure Portal, where to locate the Azure AI services, and how to create resource groups. On the desktop side, you have seen how to set up Visual Studio Code as the development environment and how to leverage the .NET CLI to create Console and WPF applications.
Now you have everything you need, and you are ready to start building intelligent applications.


- 1800+ high-performance UI components.
- Includes popular controls such as Grid, Chart, Scheduler, and more.
- 24x5 unlimited support by developers.