
 Sabari Anand S
TL;DR: Build schema-driven forms in Angular with Syncfusion Form Builder and Form Renderer. Design forms visually, export their configuration as a JSON schema, and render interactive forms with configured fields and validation rules. This approach separates the form definition from rendering logic and simplifies form maintenance.
Have you ever needed to update the same form across multiple applications whenever a field, label, or validation rule changes? Maintaining separate form definitions can lead to duplicated code and inconsistent behavior.
What if you could define a form once and reuse its schema wherever needed? Syncfusion® Form Builder and Form Renderer provide a schema-first approach to form development. Form Builder lets you design forms visually and export a JSON-based schema, while Form Renderer uses that schema to generate an interactive form with the defined fields, layout, and validation rules.
In this blog, you’ll explore how these components work together, understand the form schema, and learn how to render a form and handle its submission.
What Is Syncfusion Form Builder?
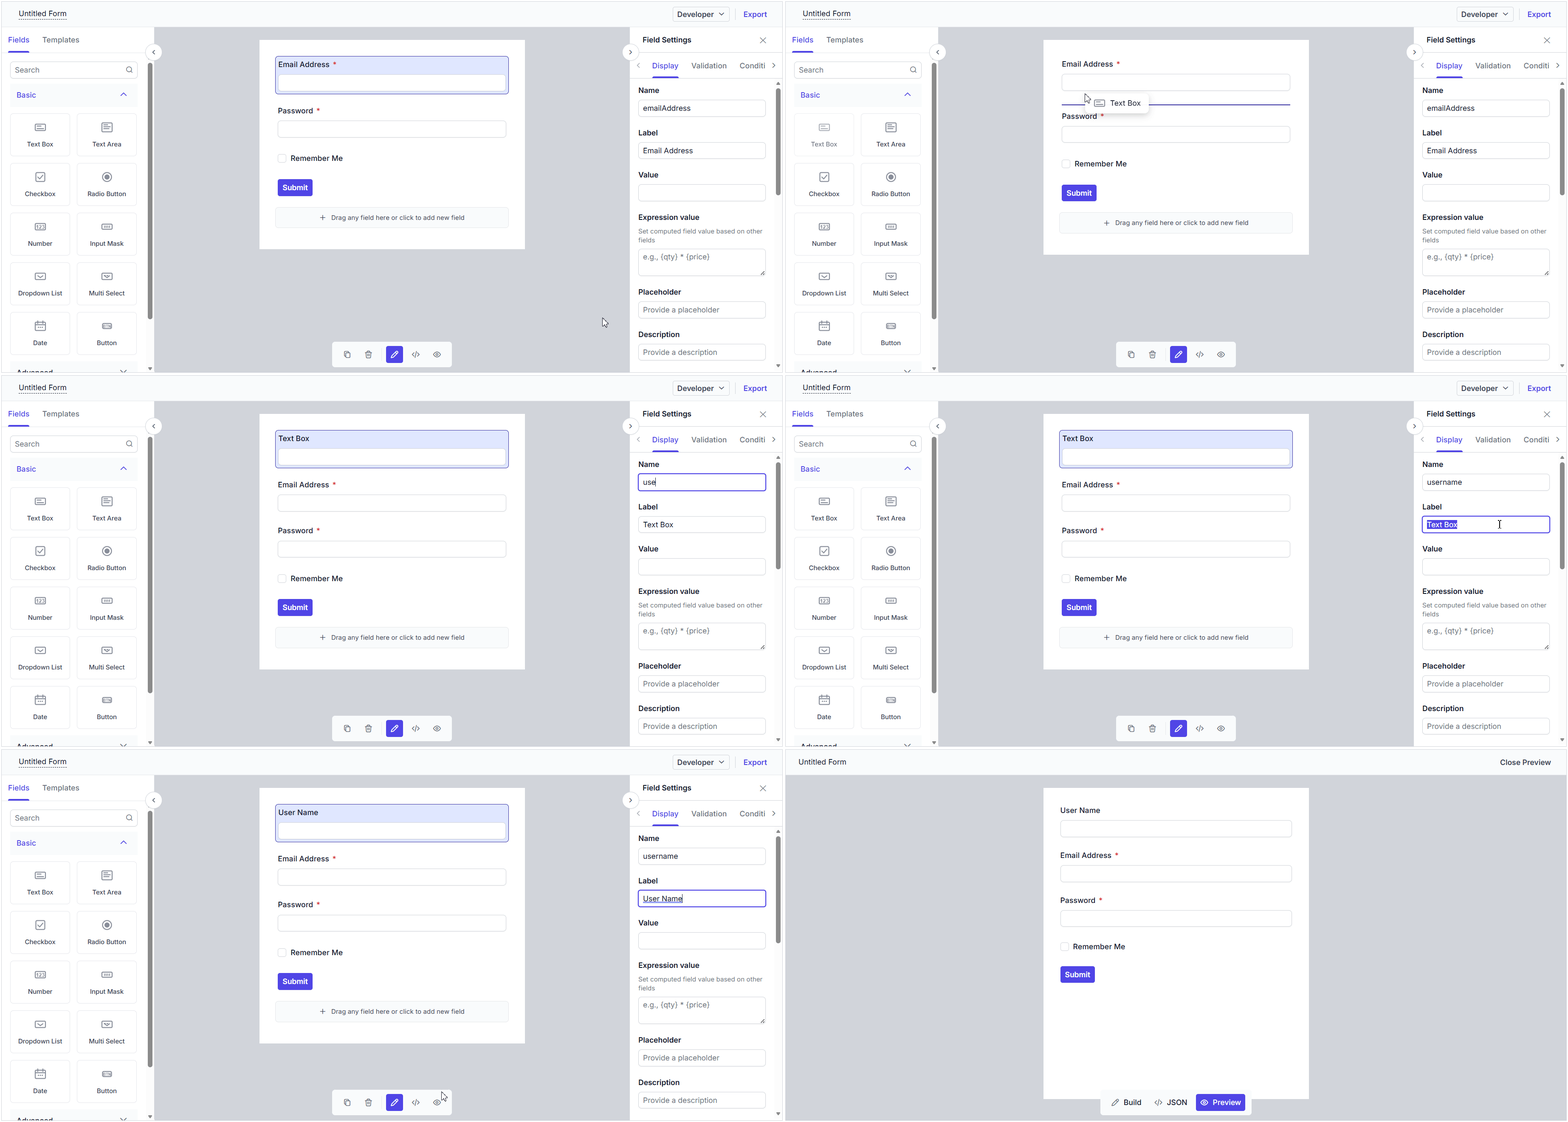
Syncfusion Form Builder is a visual form designer that lets you create forms by dragging and dropping fields onto a design canvas. Instead of manually defining every field in code, you can configure the form through the designer and inspect the generated JSON schema.
The Form Builder interface has five main areas:
- Toolbox: Displays the available form fields you can add to the form.
- Design canvas: Provides the workspace for adding and arranging fields.
- Properties pane: Lets you configure the form and selected fields.
- Code view: Displays the generated form schema as you make changes.
- Form preview: Shows how the form will appear and behave.
You can drag a field from the toolbox onto the design canvas or use the canvas’s add button to insert one through the context menu. After adding a field, configure its properties, such as its label and validation rules, through the properties pane.
As you make changes, Form Builder updates the schema to reflect the form configuration. You can inspect the schema in the code view, preview the form, and export the definition for use with Form Renderer.
For setup instructions, refer to the Angular Form Builder getting-started guide.
How does the schema-first approach work?
A form schema describes the structure and configuration of a form, including its fields, layout, validation rules, and settings. Form Builder creates this definition, and Form Renderer uses it to generate the form at runtime.
The process consists of four steps:
- Design: Add fields and configure their properties in Form Builder.
- Export: Generate the JSON schema containing the form definition.
- Render: Pass the schema to Form Renderer through its schema property.
- Handle submission: Use the renderer’s submit event to access the submitted data and validation status.
This separation keeps the form definition independent of the application code that displays and processes it. When a form needs to change, you can update the schema and ensure that the relevant applications load the updated version.
What is Syncfusion Form Renderer?
Syncfusion Form Renderer is a schema-driven component that converts a structured form definition into an interactive form at runtime. It uses the supplied schema to determine which fields to display, how to arrange them, and which validation rules to apply.
Let’s look at an Angular example that defines a login form with an email field, a password field, a Remember Me checkbox, and a submit button.
Define the Form Schema in Angular
The following example defines the form schema and passes it to the Form Renderer component.
import { Component, ViewEncapsulation } from '@angular/core';
import { FormRendererModule, Schema } from '@syncfusion/ej2-angular-form-renderer';

@Component({
    selector: 'app-root',
    template: `<div>
                  <div
                    id="form-renderer-control"
                    ejs-form-renderer
                    [schema]="formSchema"
                    (submit)="onSubmit($event)">
                  </div>
               </div>`,
    styleUrls: ['app.component.css'],
    encapsulation: ViewEncapsulation.None,
    standalone: true,
    imports: [FormRendererModule]
})
export class AppComponent {
    formSchema: Schema = {
        "version": "0.1.0",
        "properties": {
            "emailAddress": {
                "id": "textbox_1785491685456_167",
                "name": "emailAddress",
                "type": "string",
                "label": "Email Address",
                "textboxType": "email",
                "required": true,
                "widget": "textbox"
            },
            "password": {
                "id": "textbox_1785491685456_537",
                "name": "password",
                "type": "string",
                "label": "Password",
                "textboxType": "password",
                "required": true,
                "minLength": 6,
                "widget": "textbox"
            },
            "rememberMe": {
                "id": "checkbox_1785491685456_262",
                "name": "rememberMe",
                "type": "boolean",
                "label": "Remember Me",
                "widget": "checkbox"
            },
            "submit": {
                "id": "submit_button_initial",
                "name": "defaultFormsubmit",
                "type": "button",
                "label": "Submit",
                "buttonType": "submit",
                "widget": "button",
                "style": "primary",
                "disabled": false
            }
        },
        "layout": [
            { "type": "field", "propertyId": "emailAddress" },
            { "type": "field", "propertyId": "password" },
            { "type": "field", "propertyId": "rememberMe" },
            { "type": "field", "propertyId": "submit" }
        ],
        "settings": {
            "name": "Untitled Form"
        }
    };

    public onSubmit(args: any): void {
        console.log('Is Valid:', args.isValid);
        console.log('Submitted Data:', args.data);

        if (args.isValid) {
            console.log('Processing form submission...');
        }
    }
}
The rendered result appears as follows.
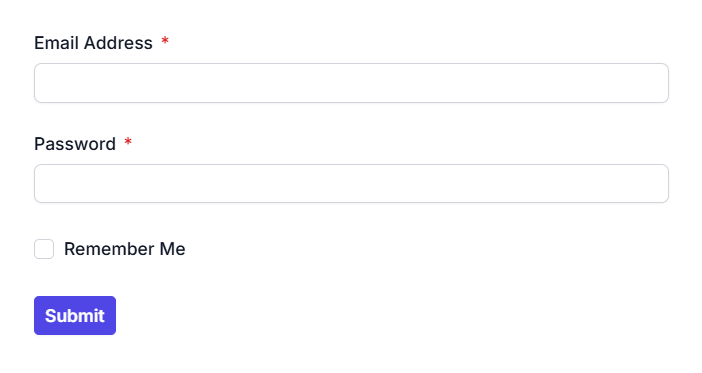
Form Renderer uses the schema property to build the form and the submit event to invoke the onSubmit() method.
The schema includes three input fields and a submit button. It marks the email and password fields as required and applies a minimum length of six characters to the password. This rule illustrates schema-based validation and should not be treated as a production password policy.
Understand the Form Schema
The schema organizes the form configuration into three main sections:
- properties: Defines the form fields, including their names, labels, data types, widgets, and validation rules.
- layout: Specifies the order in which fields appear. Each entry references a field through its propertyId.
- settings: Stores form-level configuration, such as the form name.
The widget property determines the type of control used to render a field. This example uses textbox, checkbox, and button widgets.
Validation rules are defined alongside their corresponding fields. The email and password fields use required, while the password field also uses minLength. Other supported schema rules include maxLength and pattern, depending on the field configuration.
Note: Client-side validation helps identify input errors, but it does not replace server-side validation or authorization. Always validate submitted data on the server before processing it or allowing access to protected resources.
For setup details and additional schema examples, refer to the Angular Form Renderer getting-started guide.
How form submission works
Once the form is rendered, users can enter their details and select the Submit button. Because the button uses "buttonType": "submit", Form Renderer validates the form and raises its submit event.
The event provides the submitted form data through args.data and the validation status through args.isValid.
In the Angular example, the onSubmit() method logs both values:
public onSubmit(args: any): void {
    console.log('Is Valid:', args.isValid);
    console.log('Submitted Data:', args.data);

    if (args.isValid) {
        console.log('Processing form submission...');
    }
}
The submitted data is keyed by the field names defined in the schema. For this example, it can contain values associated with:
emailAddresspasswordrememberMe
The submit button is not included as an input value in the submitted data object.
Checking args.isValid lets the application determine whether the form passed validation before proceeding. In a real application, that step might involve sending the validated data to a server for further validation and processing.
You can also explore the Form Renderer StackBlitz sample to see the control in action.
Form Builder vs. Form Renderer
Form Builder and Form Renderer work together, but each has a distinct responsibility.
| Form Builder | Form Renderer |
| Provides a visual form-design interface | Generates an interactive form from a schema |
| Lets you add, arrange, and configure fields | Maps field definitions to supported widgets |
| Lets you configure field properties and validation rules | Applies the configured layout and validation rules |
| Provides a preview and schema export | Handles form interactions and raises form-action events |
| Produces the form schema | Provides submitted form data to the application |
This separation means that an application does not need to recreate the form structure manually. It can use a supported schema and pass it to Form Renderer.
Why shared schemas simplify form development
A schema-first approach is useful when form definitions need to be reused or updated regularly. Here are three practical benefits.
Avoid maintaining separate form definitions
When multiple applications use the same form, maintaining separate markup and validation logic makes updates repetitive. A shared schema brings field definitions, layout, and validation rules together, reducing duplicated form configuration.
Keep validation rules close to field definitions
Rules such as required and minLength can be defined alongside their corresponding fields. When validation requirements change, you can update the schema instead of modifying separate validation logic. Applications must load the updated schema for the changes to take effect.
Simplify form updates across applications
Consider a customer onboarding form used in a self-service portal, an administrator dashboard, and an internal support application. Instead of updating three separate form definitions, you can maintain one shared schema for applications that support it. Each application must load the appropriate schema version to reflect the changes.
Where can these components be useful?
Form Builder and Form Renderer are useful for applications that need configurable or frequently updated forms, including:
- Customer onboarding forms
- Surveys and feedback forms
- Support and service-request forms
- Internal approval forms
- Configurable intake forms
- SaaS applications that allow users to design forms
- Low-code and no-code development platforms
For example, a service team may need to add a field to a support-request form when its process changes. A shared schema can reduce the work involved in maintaining that form across multiple applications, provided each application loads the updated definition.
The approach is particularly useful when form definitions change more frequently than the application code responsible for displaying them.
Getting started with Form Builder and Form Renderer
Ready to try schema-driven forms in your app? Use the following resources to explore the components and their configuration options.
| Resource | Link |
| Angular Form Builder | Getting Started |
| Angular Form Renderer | Getting Started |
| Form Renderer schema reference | Form Schema |
| Form Renderer examples | Angular demos |
Working with another framework? Check the corresponding Syncfusion documentation to ensure both packages fit your application setup.

Start building schema-driven Forms
Maintaining forms across applications does not have to mean maintaining separate definitions for every instance. Syncfusion Form Builder and Form Renderer separate form design from rendering, allowing you to create a form visually, export its JSON schema, and generate interactive forms with preconfigured fields and validation rules.
By keeping the form definition in one reusable schema and ensuring that applications load the appropriate version, you can reduce duplicated definitions and simplify future updates.
Design the form, reuse its schema, and make form maintenance easier.
Explore the complete Essential Studio Volume 3 What’s New and Release Notes documentation to find the features relevant to your project.
Existing Syncfusion customers can download the latest version from the license and downloads page, while new users can get started with a free 30-day trial.
Have questions or feedback? Connect with us through the Syncfusion support and feedback channels.




 No spam, just valuable updates.