

TL;DR: Struggling with lost data after refreshes, messy component communication, or unexpected state leaks in your Blazor app? The problem usually isn’t Blazor; it’s how state is managed. This guide breaks down the most effective state management patterns in Blazor, from component state and dependency injection to browser storage and persistent state, helping you build scalable, reliable apps that behave predictably across every user interaction.
Your Blazor app works perfectly… until it suddenly doesn’t. Everything feels stable, until:
- You refresh, and your form data disappears.
- A small change breaks the state across components.
- Or worse, one user sees another user’s data.
This isn’t rare. It’s one of the most common problems in real-world Blazor apps and it makes your app feel unreliable fast.
Here’s the hard truth: your app isn’t broken. Your state management is.
Blazor gives you a lot of flexibility, but without clear boundaries for where state should live, that flexibility quickly turns into confusion.
Fix that, and everything changes:
- No more lost data on refresh,
- No more property drilling chaos,
- No more cross-user bugs, and
- No more guessing where the state belongs.
In this guide, you’ll learn the practical state management patterns in Blazor (.NET 10 / ASP.NET Core 10), with real examples, so your apps stay stable, predictable, and easy to scale.
What is state management?
The web is inherently stateless. Anything you don’t deliberately store is gone when:
- User refreshes (F5),
- Tab closes,
- User navigates away,
- Server circuit reconnects (Blazor Server),
- App switches from prerendered HTML to interactive mode (Blazor Web App).
The state management is simply about deciding where data should live so it persists across these events without leaking between users or making the app difficult to maintain.
How does state management work in Blazor ?
Blazor gives you the same component model across three hosting approaches, but where and how long the state lives change dramatically.
Blazor WebAssembly (Pure client-side):
The entire .NET runtime and your app run inside the browser. Here, the state lives entirely in the browser’s memory:
- Values of fields and properties in component instances.
- The component hierarchy and its latest render output.
- Data is held in DI services (usually registered as singletons, since the app runs in the browser).
- Values set through JavaScript interop and browser storage (localStorage or sessionStorage).
Blazor Server (Server-side with SignalR):
Your components and logic execute on the server. State is tied to a live SignalR circuit:
- Component instances and their in-memory fields are created on the server.
- Scoped DI services that live for the duration of the user’s circuit.
- Any server-side object that survive only while the connection is active.
Blazor Web App (Unified .NET 8+ model):
You get static server-side rendering (SSR) + optional interactivity (Server or WebAssembly per component).
- State can flow seamlessly between server prerendering and client using PersistentComponentState, with Protected Browser Storage for secure persistence and automatic hydration across render modes.
In short, effective state management in Blazor means selecting the right technique based on state lifetime, scope, and hosting model, so user data remains consistent and reliable.
Which state managemnt tool should I use?
The following are the state management types you can implement in Blazor.
Use this as a first pass:
- Bookmarkable/shareable state: URL route/query parameters.
- UI-only state inside one component: Local component fields.
- Direct parent ↔ child coordination: Parameters + EventCallback.
- Deep subtree configuration/context: Cascading values/parameters.
- Cross-page or unrelated components: DI service (scoped/singleton carefully).
- Reactive shared state: State container with change notifications.
- Prerender → interactive continuity: [PersistentState] or PersistentComponentState.
- Secure persistence in browser (Server only): ProtectedLocalStorage / ProtectedSessionStorage.
URL/query string parameters
For a state that needs to be bookmarkable, shareable via URL, or directly controls what is displayed on a page, encoding it in the URL is a robust approach.
Blazor’s routing mechanism allows you to define parameters directly in the URL path or extract them from the query string.
Use cases:
- Product ID: /products/123
- Category filter: /products?category=electronics
- Search terms: /search?q=blazor+state
- Pagination state (/items?page=2&pageSize=10).
Pros:
- State is part of the URL, making it bookmarkable and shareable.
- Naturally handles browser navigation (back/forward buttons).
- Stateless from the server’s perspective (good for SEO and caching if server-side rendered).
Cons:
- Limited to simple data types (strings, numbers, dates).
- Not suitable for large or complex objects.
- Can make URLs long and less readable if too many parameters are used.
Refer to the GitHub example demonstrating URL-based state management using route parameters and query strings.
Here, the {Category} route parameter, combined with [SupplyParameterFromQuery(Name = “searchTerm”)], automatically binds values from both the URL path and query string into component properties. Using the NavManager.NavigateTo() method, along with manual URI construction in ApplySearch(), ensures that any filter change updates the browser URL.
As a result, refreshing the page, bookmarking the link, or using browser navigation restores the exact filtered view without relying on additional storage, services, or state containers.
Local component state
The local component state is the simplest form of state management. Any private field or property in a @code block is local state, where state is contained entirely within a single Blazor component. This is fast, zero-overhead, and perfect for UI-only concerns (toggle flags, temporary form drafts, and animation states).
Use cases:
- State for UI elements like a toggle button’s IsActive status.
- Temporary input values in a form that haven’t been submitted yet.
- Any state that is only relevant to the component itself and doesn’t need to be shared.
Pros:
- Extremely simple and straightforward.
- Highly encapsulated and isolated, reducing side effects.
Cons:
- Cannot be directly accessed or shared by other components.
For more details, refer to the code example on the GitHub repository.
Improvement tip: If the same state needs to be shared across sibling components, this approach no longer works; that’s your cue to move to a higher-level state management pattern.
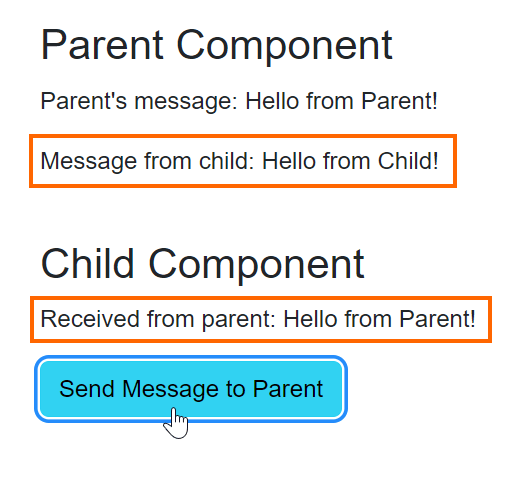
Parent-child communication (Parameters & EventCallbacks)
This is the standard way to manage state flow between directly related components in a hierarchical structure.
- Parameters ([Parameter]): Used by a parent component to pass data to a child component.
- EventCallbacks ([Parameter] EventCallback<TValue>): Used by a child component to send notifications or data to its parent.
Use cases:
- Displaying a list of items where each item is rendered by a child component.
- A child component triggering an action in its parent (e.g., a “Save” button in a child form).
- Any scenario where components have a clear parent-child relationship and need to exchange data.
Pros:
- Clear and explicit data flow, easy to trace.
- Strongly typed, enhancing code safety.
- Supports two-way binding using Parameter and EventCallback pairs (e.g., Value and ValueChanged).
Cons:
- Prop drilling: If data needs to go through many intermediate components that don’t use it, it can lead to verbose and difficult-to-maintain code.
Find the code example on GitHub and see the output image below for a better understanding.
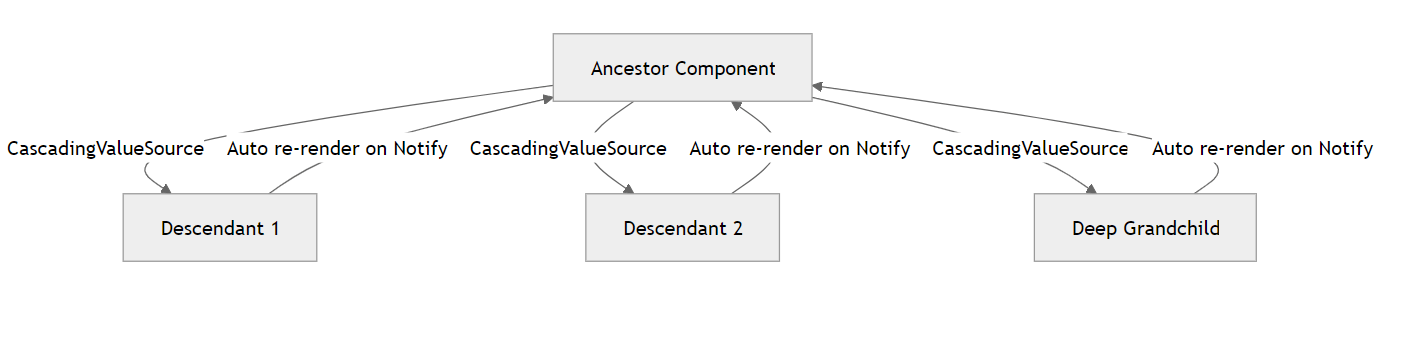
Sharing state down the tree: Cascading parameters and values
The cascading parameters provide an elegant solution for passing data down a component hierarchy without the need for explicit parameter declarations at every level.
A component wraps a portion of the UI and makes a value available to all components within that subtree. The child components consume this value using [CascadingParameter].
For dynamic updates, use the CascadingValueSource<T>(newer, notification-capable pattern).
The following component hierarchy diagram with arrows showcases the cascading parameter flow from root to leaves, highlighting reduced prop drilling.
Use cases:
- Providing color schemes, fonts, or UI densities.
- Making the current user’s identity or permissions available.
- Sharing user preferences across many components.
- Avoiding prop drilling for common, deeply nested data.
Pros:
- Eliminates prop drilling for deeply nested components.
- Cleaner component signatures as parameters aren’t explicitly listed.
Cons:
- Less explicit data flow; it can be harder to see where a value originates from.
- Can be misused for non-hierarchical data, leading to less maintainable code.
Also, check out the demo on the GitHub repository and see the output below.
Global state with dependency injection services
When a state needs to be shared across unrelated components or pages, using a dependency injection service is the most practical approach. A shared service allows the state to persist for the lifetime of a user session (Blazor Server) or browser tab (Blazor WebAssembly).
This is implemented by registering a plain C# class in Blazor’s dependency injection container. The service holds the shared data and typically exposes methods to update it. If needed, it can also notify components about changes.
Registration scopes:
Choosing the correct lifetime is critical:
- AddScoped<TService>():
- Blazor Server: A new instance per user circuit/session. Ideal for per-user state (e.g., shopping cart, user preferences).
- Blazor WebAssembly: A new instance per browser tab. Ideal for per-tab state.
- AddSingleton<TService>():
- Blazor Server: A single instance for the entire app. Use with caution, as all users will share the same instance.
- Blazor WebAssembly: A single instance for the entire app running in the browser tab.
Use cases:
- Shopping cart accessible from product pages, header, and checkout.
- User profile data that is shared across various authenticated pages.
- Global notifications (toasts, alerts).
- Any complex state that doesn’t fit a parent-child relationship.
Pros:
- Centralized state management, keeping components lean.
- Decoupled components from state implementation details.
- Highly testable.
- Supports various scopes to match state longevity needs.
Cons:
- Requires manual implementation of change notification (e.g., event, Action delegates, StateHasChanged()).
- Can become complex for very large apps without additional patterns (such as implementing a more structured, centralized state management solution like the Flux or Redux patterns using libraries like Fluxor, which enforce a unidirectional data flow and make state changes more predictable and manageable).
Example:
public class CounterState
{
    public int Count { get; private set; }

    public void Increment() => Count++;
    public void Reset() => Count = 0;
}
The registration differs by hosting model, see the following code example for more details.
// Blazor WebAssembly – Program.cs
builder.Services.AddSingleton<CounterState>();

// Blazor Server – Program.cs (.NET 6+)
builder.Services.AddScoped<CounterState>();
Scoped services in Blazor Server live per user circuit, while singletons in WebAssembly live for the browser tab. Using the wrong scope can lead to memory issues or shared data across users.
Note: In a Blazor Web App, when the CounterState class is added to the WebAssembly project, and you are using server-side prerendering, you need to register CounterState in the Server project as well, along with the WebAssembly project. Also, you can avoid prerendering at the server side by setting @rendermode @(new InteractiveWebAssemblyRenderMode(prerender: false)) and avoid registering the CounterState at the Server project.
Consumption:
@inject CounterState CounterState

<p>Count: @CounterState.Count</p>
<button @onclick="() => CounterState.Increment()">+</button>
Reactive state containers
Plain services like the above example don’t notify consumers of changes. A lightweight container fixes that.
public class ReactiveStateContainer
{
    private string? _savedString;

    public string Property
    {
        get => _savedString ?? string.Empty;
        set
        {
            _savedString = value;
            NotifyStateChanged();
        }
    }

    public event Action? OnChange;

    private void NotifyStateChanged() => OnChange?.Invoke();
}
Component usage (important: always unsubscribe):
@page "/reactive-state-container"
@rendermode InteractiveWebAssembly
@implements IDisposable
@inject ReactiveStateContainer ReactiveStateContainer

<h2>Reactive State Container Demo</h2>
<p>Property: <strong>@ReactiveStateContainer.Property</strong></p>
<button class="btn btn-info" @onclick="UpdateValue">Update from Parent</button>

<NestedComponent />

@code {
    protected override void OnInitialized()
    {
        ReactiveStateContainer.OnChange += StateHasChanged;
    }

    private void UpdateValue()
    {
        ReactiveStateContainer.Property = $"Updated at {DateTime.Now}";
    }

    public void Dispose()
    {
        ReactiveStateContainer.OnChange -= StateHasChanged;  // Prevent memory leak
    }
}
NestedComponent.razor:
@implements IDisposable
@inject ReactiveStateContainer ReactiveStateContainer
<div class="border p-4 mt-4 bg-light shadow-sm rounded"
style="max-width: 580px;">
<p>
<strong>Nested component:</strong>
Property = <em>@ReactiveStateContainer.Property</em>
</p>
<button class="btn btn-secondary" @onclick="UpdateFromNested">
Update from Nested
</button>
</div>
@code {
protected override void OnInitialized()
{
// Subscribe so nested component re-renders on changes
ReactiveStateContainer.OnChange += StateHasChanged;
}
private void UpdateFromNested()
{
ReactiveStateContainer.Property = $"Updated by Nested at {DateTime.Now:HH:mm:ss}";
}
public void Dispose()
{
// Unsubscribe on disposal
ReactiveStateContainer.OnChange -= StateHasChanged;
}
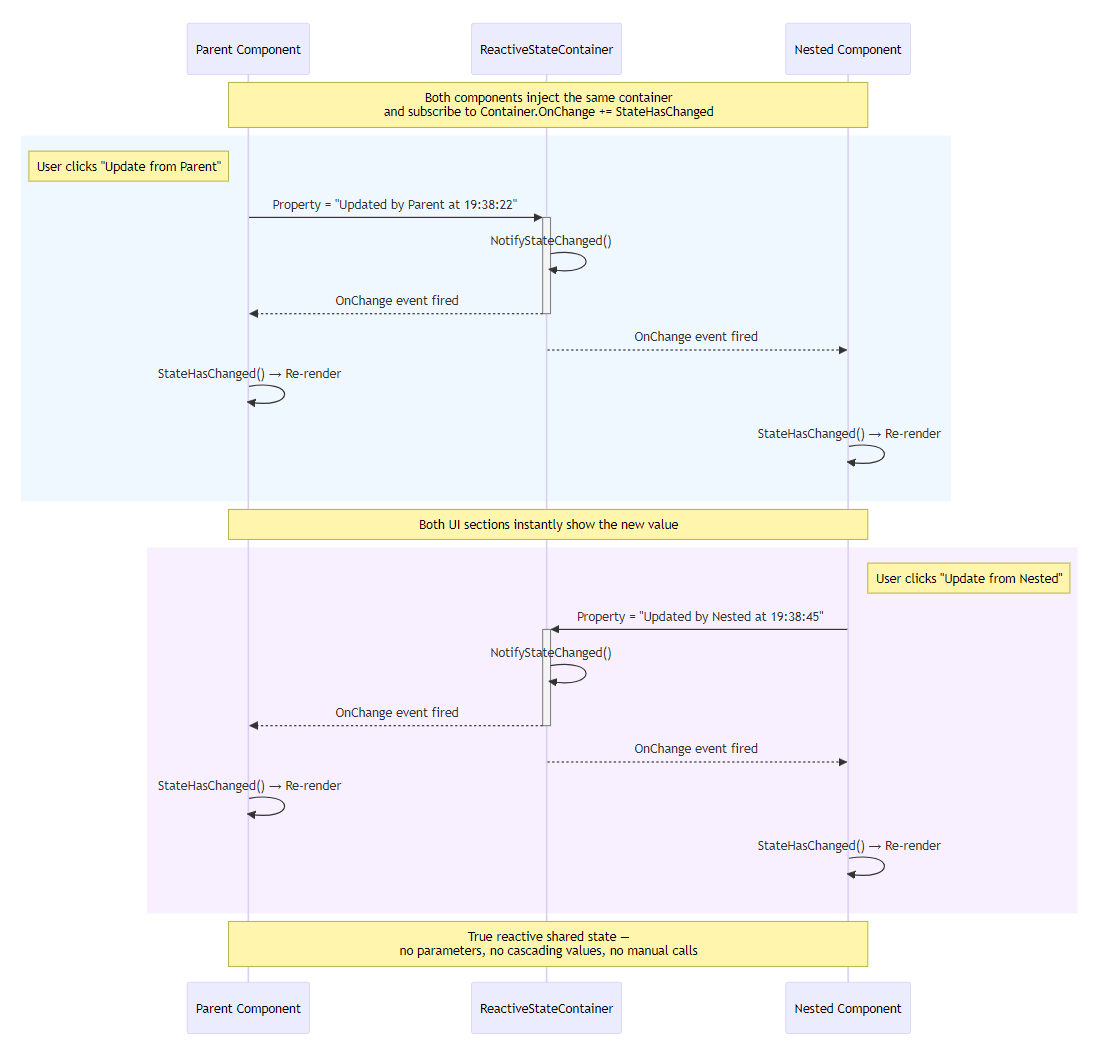
}After executing the above code examples, the output will resemble the following image.
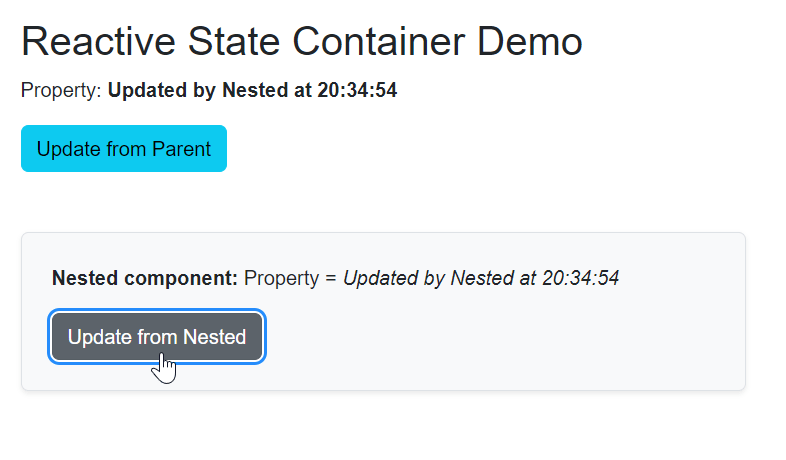
After clicking the nested component, the property is updated with a formatted date value.
Prerendered state persistence
The prerendered state persistence in Blazor means saving the UI state created during server prerendering so the client can continue seamlessly without re-running components.
- In Blazor Server, this prevents the UI from resetting when the SignalR connection is established, giving a smooth transition from prerendered HTML to interactive components.
- In Blazor WebAssembly, it lets the WASM runtime pick up the prerendered state immediately after downloading, avoiding flicker and improving perceived load performance.
You can persist the prerendered state in the following ways:
- [PersistentState] attribute (Declarative)
- PersistentComponentState service (Manual / imperative)
- Custom serializer PersistentComponentStateSerializer<T>
- Protected browser storage
Let’s explore them in detail!
[PersistentState] attribute (Declarative)
Properties that are public, annotated with the [PersistentState] attribute, are serialized during prerendering. This is the simplest declarative approach and recommended for most cases.
Use cases:
- Simple read-only or slowly changing data (weather forecasts, user preferences, catch lists).
- Avoiding UI flicker on first load / F5.
- Data that should survive prerender → interactive handover.
Pros:
- Extremely clean (one line).
- Automatic registration, cleanup, and restoration.
- New in .NET 10 – officially recommended way.
Cons:
- Only works on public properties.
- Default JSON serialization (no easy way to encrypt property data without a custom serializer).
- Limited control over timing.
In the GitHub example code, the Forecasts property is declared as public and marked with the [PersistentState] attribute, which will serialize all the four properties of WeatherForecast items.
- If your data is mostly read‑only and doesn’t change often, you can still enable AllowUpdates = true on the [PersistentState] attribute so that any occasional updates get stored during enhanced navigation.
- This is helpful for scenarios where the data is cached and expensive to retrieve, allowing the app to keep the latest snapshot without refetching or rerunning initialization logic.
To prevent the state from being restored when the app is prerendered, set RestoreBehavior to SkipInitialValue. If you want the state to refresh after a reconnection instead of using the last saved snapshot, set RestoreBehavior to SkipLastSnapshot.
[PersistentState(AllowUpdates = true)]
public WeatherForecast[]? Forecasts { get; set; }

[PersistentState(RestoreBehavior = RestoreBehavior.SkipInitialValue)]
public string NoPrerenderedData { get; set; }

[PersistentState(RestoreBehavior = RestoreBehavior.SkipLastSnapshot)]
public int CounterNotRestoredOnReconnect { get; set; }
To persist private property or a field, you need to use the PersistentComponentState class manually. Let’s see how to use it.
PersistentComponentState service (Manual / Imperative)
To persist private properties or fields from base classes, you can use the imperative style of implementation.
Use cases:
- Private fields or fields in base classes.
- Conditional persistence.
- Complex initialization logic with [StreamRendering].
- When you need full control over when data has persisted.
Pros:
- Works in private fields.
- Full control over timing and conditions.
- Can combine with custom serializers easily.
Cons:
- More boilerplate (IDisposable, registration in OnInitialized).
In the GitHub example, the forecasts attribute is of type nullable WeatherForecast[], but it is a private field; this cannot be persisted using the previous [PersistentState] attribute.
Hence, imperative implementation is needed using the PersistentComponentState class.
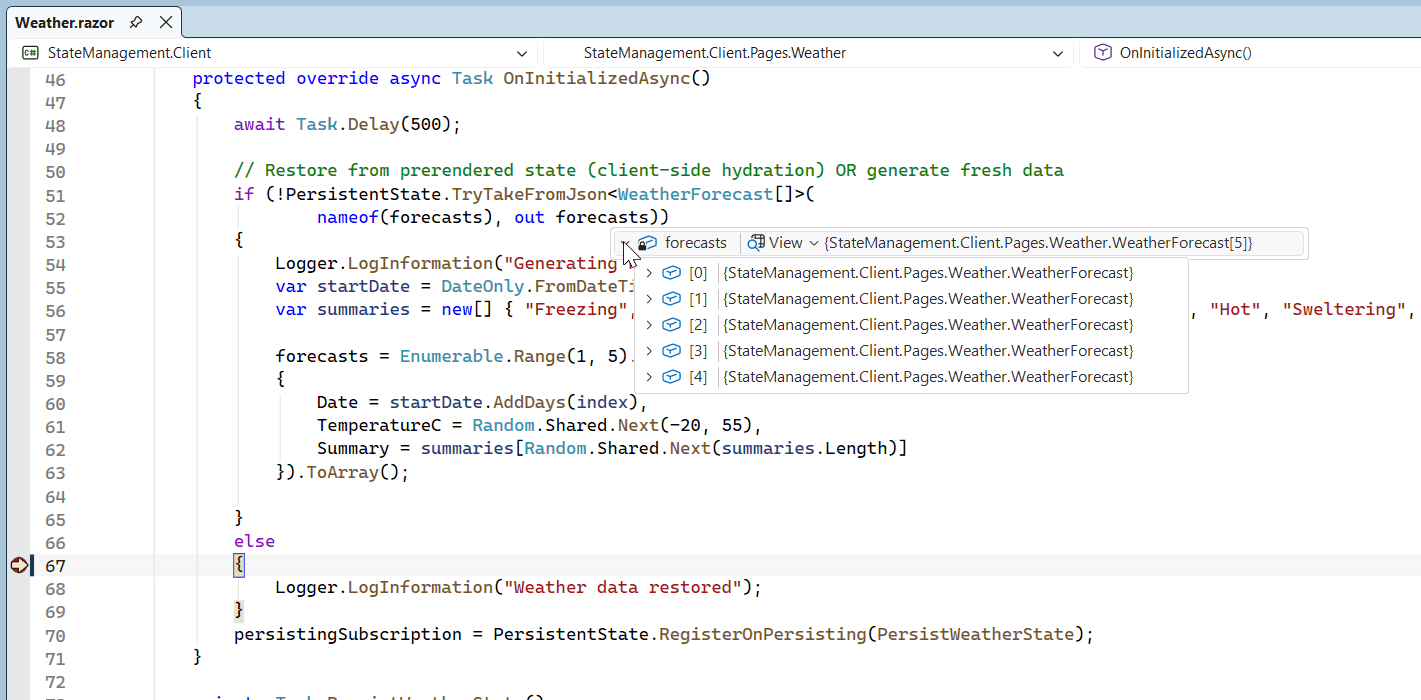
Breakpoint hits in the else part, where the forecast data is retrieved from the PersistentState, avoiding the regeneration of data.
To ignore the TemperatureF property (which is the computed one) from serialization, you can use the [JsonIgnore] attribute, but that won’t be perfect if you have many properties or complex logic.
private class WeatherForecast
{
    public DateOnly Date { get; set; }
    public int TemperatureC { get; set; }
    public string? Summary { get; set; }

    [JsonIgnore]     // This works with [PersistentState]
     public int TemperatureF => 32 + (int)(TemperatureC / 0.5556);
}
So, to take advantage of custom serialization, you can use the PersistentComponentStateSerializer<T> class.
Custom serializer PersistentComponentStateSerializer<T>
The PersistentComponentStateSerializer<T> allows you to customize the serialization, including which bytes are written to the HTML.
You can:
- Completely omit TemperatureF.
- Use a smaller DTO.
- Reduce payload size dramatically.
- Add encryption, compression, or Protobuf if you want.
- Works perfectly with both [PersistentState] and the manual PersistentComponentState service.
Even when you use the declarative [PersistentState] attribute, you can register a custom serializer; the framework will automatically use it.
Use cases:
- Exclude fields (TemperatureF never sent to client).
- Smaller payload, encryption, Protobuf, custom formats.
- When the default JSON is too big or insecure.
Pros:
- Complete control over bytes sent in HTML.
- Can dramatically reduce payload size.
Cons:
- Extra class + DI registration.
- Must implement both Persist and Restore.
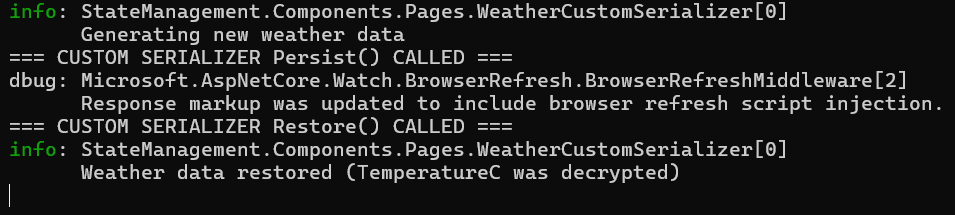
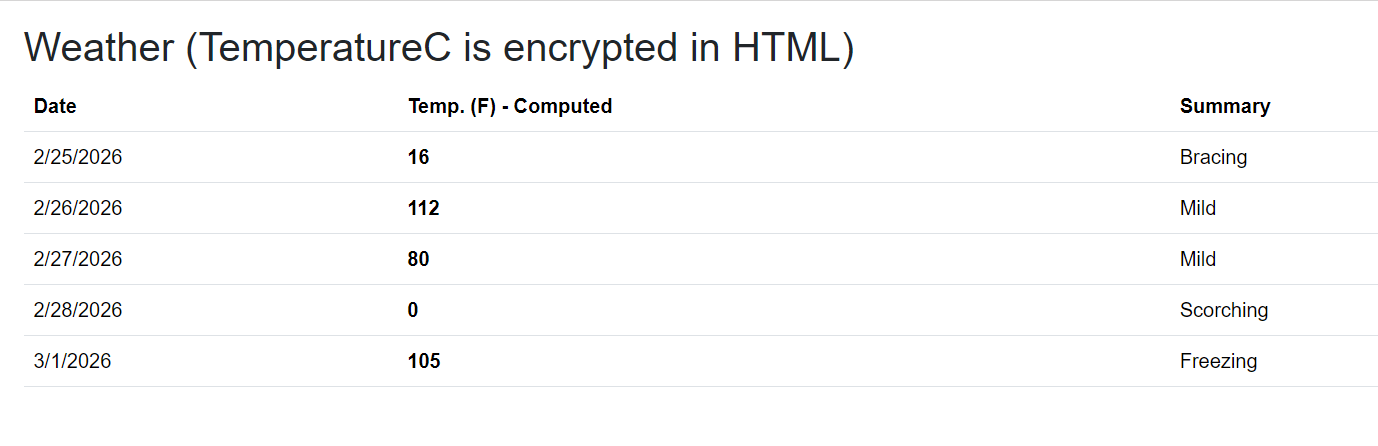
Examine the GitHub example demonstrating why PersistentComponentStateSerializer is so powerful. Here, we’ll:
- Use [PersistentState] (clean declarative approach).
- Completely excludeTemperatureF.
- Encrypt only TemperatureC (so it never appears in plain text in the HTML).
- Keep the payload small and secure.
Refer to the following images.
Protected browser storage
For data that must survive refresh but remain secure, use the built-in protected storage.
Protected Browser Storage (ProtectedLocalStorage / ProtectedSessionStorage) uses ASP.NET Core data protection to encrypt data before saving it to the browser’s localStorage or sessionStorage.
However, this encryption relies on server-side data protection keys and services, which is why it only works when the component runs on the server. This makes it much safer than using raw localStorage or sessionStorage.
Use cases:
- Saving user preferences (theme, language, layout settings, dashboard filters).
- Storing non-critical but sensitive user choices (e.g., “Show advanced options”, last selected tab, etc.)
- Any data you want to persist across sessions, but don’t want the user to easily tamper with via DevTools.
Pros:
- Secure: Data is encrypted before being saved in the browser and is very difficult to read or modify via browser DevTools.
- Easy to use: Simple SetAsync / GetAsync / DeleteAsync methods.
- Official & supported: Part of Blazor framework, works seamlessly with server-side Blazor apps.
- Automatic protection: No need to manually encrypt/decrypt.
- Good performance: Suitable for small to medium-sized data, non-critical user data in server-side Blazor.
Cons:
- Only works in InteractiveServer (not in WebAssembly).
- Not suitable for pure Blazor WebAssembly apps.
- Cannot be used during prerendering (you often need OnAfterRenderAsync).
- Data is still visible in DevTools (though encrypted).
- Slightly slower than raw localStorage due to encryption/decryption.
- Still limited by browser storage quota (~5–10 MB).
- Data is tied to the current user’s browser (not shared across devices unless you sync it yourself).
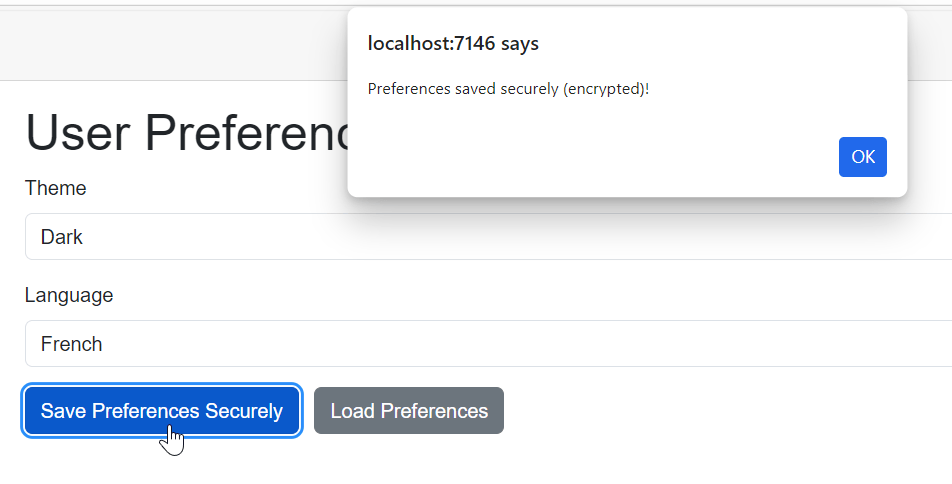
For hands-on experience, see the GitHub example that securely stores user preferences in protected local storage, along with the output image.
Pro tips: For Blazor WebAssembly, never store tokens or Personally Identifiable Information (PII) without additional encryption.
You can also use ProtectedSessionStorage similarly, but only if you want the data cleared when the user closes the tab. For a nicer API + JSON serialization + typed helpers, install the Blazored.LocalStorage (most popular community package).
Blazor state management patterns: Quick comparison
| State tool | Best use case | Lifetime & scope | When to use |
| URL / Query Parameters | Filters, search, pagination | URL (persists across refresh/navigation) | Use when state should be shareable via link |
| Local Component State | UI-only (toggles, temp input) | Component instance | Use for single-component UI state |
| Parameters + EventCallback | Parent–child communication | Direct component hierarchy | Use for parent-child interactions |
| Cascading Values / Parameters | Shared config (theme, user) | Component subtree | Use for deeply nested shared state |
| DI Services (Scoped / Singleton) | Cross-page/global state | App-wide (depends on lifetime) | Use for app-level shared state |
| PersistentComponentState / [PersistentState] | Prerender → interactive continuity | SSR to client hydration | Use in Blazor Web App (SSR scenarios) |
| Protected Browser Storage | Secure persistence (preferences) | Browser storage (encrypted) | Use when data must persist securely |
Performance and security considerations
- Every StateHasChanged() method can trigger a full subtree render. In large apps, it causes CPU spikes due to over-notifications.
- Always wrap external events (timers, SignalR) in the InvokeAsync(StateHasChanged) method.
- Protected storage uses the Data Protection API – keys are tied to the server’s key ring. Rotate keys on schedule.
- Never store JWTs or personal data in plain localStorage on WebAssembly; XSS = game over.
GitHub reference
For more details, check out the complete code examples for state management in Blazor on GitHub.
Frequently Asked Questions
How do I choose a state strategy when my Blazor app uses multiple rendering modes (SSR + WASM)?
Use a hybrid approach: persist the critical state during prerendering and move the interactive or frequently updated state to client-side services. This avoids re-fetching data while ensuring smooth hydration. Combining persistence with DI-based state gives the best continuity.
When should I avoid using a shared DI service for a state in Blazor?
Avoid it when the data is short-lived, UI-specific, or tightly scoped to a single component. Overusing shared services can make the state harder to trace and increase unintended coupling. It’s especially risky in server scenarios if the scope is chosen incorrectly.
What are the trade-offs between reactive state containers and traditional services in Blazor state management?
Reactive containers in Blazor simplify UI updates by automatically notifying subscribers, reducing the need for manual refresh logic. However, they introduce lifecycle concerns, such as subscription management and potential memory leaks. For simple scenarios, a plain service is often easier to maintain.
Is URL-based state management sufficient for real-world Blazor apps?
It works well for navigation-driven states like filters, paging, or search. However, once the state becomes complex, sensitive, or large, it becomes impractical. In those cases, combine URL state with other persistence mechanisms.
How does hosting model choice impact the scalability of state management in Blazor?
Server-side hosting scales with the complexity of connections because state is tied to active circuits. Client-side (WASM) shifts state to the browser, reducing server load but increasing client responsibility. Your state strategy should align with where computation and storage are intended to reside.
When should I introduce a structured state management library like Fluxor?
Introduce it when your Blazor app has complex interactions, frequent updates, or difficult-to-track state transitions. It enforces predictable patterns and debugging benefits but adds architectural overhead. Smaller apps often don’t need this level of structure.
How do I decide between browser storage and prerendered state persistence in Blazor?
Use prerender persistence for fast initial load and seamless transitions. Use browser storage when data must survive refreshes or longer sessions. The key difference is lifecycle: one bridges rendering phases, the other extends user sessions.
What are the hidden risks of improper state design in Blazor apps?
Poor state design can lead to data leakage across users, excessive re-rendering, or inconsistent UI updates. It also increases debugging complexity as state flows become unclear. Choosing the wrong pattern early often creates long-term maintenance issues.

Take control of your Blazor state, no more breaks on refresh
Effective state management in Blazor isn’t about complex libraries; it’s about choosing the right approach for the right scope and lifetime.
In this guide, you’ve seen how to:
- Choose where the state should live for refreshes, navigation, and reconnects.
- Avoid common pitfalls (like singleton misuse in Blazor Server).
- Pick the right pattern for each scenario.
- Design states correctly across WebAssembly, Server, and Blazor Web apps.
Applied well, these patterns turn fragile, difficult-to-maintain apps into clean and predictable systems. Many teams move from “everything in a singleton” chaos to structured, scalable solutions simply by getting these fundamentals right.
If you’re facing a specific state management challenge, feel free to share it in the comments; there’s often a simpler fix than it first appears.
If you’re building rich UI experiences, tools like Syncfusion® Blazor components can complement these patterns nicely, helping you focus on state design while delivering polished, production-ready features.
You can explore the latest updates or try them out with a free trial if you’re getting started.
Need help or want to go further? Connect with us anytime through the support forum, support portal, or feedback portal. We are always here to help you build better experiences.


 No spam, just valuable updates.