

TL;DR: Learn to build an engaging feedback form using Syncfusion® .NET MAUI’s ListView. This guide walks you through defining a feedback model, populating questions in the ViewModel, designing the UI with SfListView, and handling form submission. Enhance user experience with dynamic, interactive elements.
Creating an interactive feedback form is essential for gathering valuable user insights and continuously improving your application’s user experience. In an increasingly user-centric digital environment, understanding how users interact with your app and what they think about it can drive meaningful enhancements.
Using .NET MAUI, developers can efficiently build cross-platform applications that run seamlessly on multiple devices and incorporate dynamic UI components such as ListView. This enables the creation of responsive, intuitive feedback forms that engage users and encourage them to share their thoughts in real time.
In this blog post, we’ll guide you through creating an engaging feedback form using ListView in .NET MAUI. This form is ideal for leveraging user feedback to enhance your app.
This post covers the following sections:
- Defining the feedback class.
- Populating feedback questions in the ViewModel.
- Designing the UI.
- Handling the submit action.
Note: Before proceeding, refer to the Syncfusion® .NET MAUI documentation.
Follow these steps to create an interactive feedback form using the .NET MAUI ListView control.
Step 1: Define the feedback form interface
Create a Feedback class to represent each feedback item, including Question and Answer properties. This class implements INotifyPropertyChanged for data binding, as shown in the code example below.
public class Feedback : INotifyPropertyChanged
{
  private int qNo;
  private string question;
  private string answer;

  public int QNo
  {
    get { return qNo; }
    set
    {
      qNo = value;
      OnPropertyChanged("QNo");
    }
  }
  public string Question
  {
   get
   {
     return question;
   }
  set
  {
    question = value;
    OnPropertyChanged("Question");
    }
  }
  public string Answer
  {
    get { return answer;}
    set
    {
     answer = value;
     OnPropertyChanged("Answer");
      }
    }
    public ObservableCollection<AnswerModel>Answers { get; set; }
    public bool IsDetailedFeedback
    {
      get
      {
      if (Answers == null)
          return true;
      if (Answers.Count > 1)
          return false;

        return false;
     }
   }
   private string? selectedValue;
   public string? SelectedValue
   {
     get { return selectedValue; }
     set
     {
      selectedValue = value;
      OnPropertyChanged("SelectedValue");
    }
  }
  public event PropertyChangedEventHandler? PropertyChanged;
  public void OnPropertyChanged(string name)
  {
    if (this.PropertyChanged != null)
        this.PropertyChanged(this, new PropertyChangedEventArgs(name));
  }
}
The Answers property is used to provide options such as Yes, No, or Excellent for radio button values. The SelectedValue property captures the selected option from the Radio button. Additionally, the IsDetailedFeedback property enables the entry box to receive explanatory answers in the feedback.
Step 2: Populate feedback questions in the ViewModel
The FeedbackViewModel manages the feedback questions and their corresponding answers (with empty values). The ViewModel will be used to bind the ItemsSource property and handle the submit button command.
Below is the definition of the ItemsSource property.
public class FeedbackViewModel : INotifyPropertyChanged
{
 private ObservableCollection<Feedback>feedbacks;
 public ObservableCollection<Feedback>Feedbacks
 {
   get
   {
    return feedbacks;
   }
   set
   {
    feedbacks = value;
    OnPropertyChanged("Feedbacks");
   }
  }
}
To populate the answers with default options and empty values, refer to the code example below.
public class FeedbackViewModel : INotifyPropertyChanged
{
  ...
 public FeedbackViewModel()
    {
     GenerateFeedbacks();
    }
    private void GenerateFeedbacks()
    {
     for (int i = 0; i < Questions.Length; i++)
     {
       Feedbacks.Add(new Feedback
       {
         QNo = i + 1,
         Question = Questions[i],
         Answer = Answers[i],
         });
        }
        for(int i = 0; i < Feedbacks.Count; i++)
        {
         var feedback = Feedbacks[i];
         if(feedback.Answer.Contains("Yes") || feedback.Answer.Contains("No"))
            {
              feedback.Answers = new ObservableCollection<AnswerModel>();
              feedback.Answers.Add(new AnswerModel { Answer = "Yes"});
              feedback.Answers.Add(new AnswerModel { Answer = "No"});
            }
            ...
       }
    }
    ...
}
Step 3: Design the feedback form UI
Create the layout using SfListView to display the questions and the appropriate answer types as ListView items. Below is a sample implementation of SfListView, demonstrating how to bind data and define the ItemTemplate.
<syncfusion:SfListView x:Name="feedbackList"
                        SelectionMode="None"
                        ItemsSource="{Binding Feedbacks}"
                        ItemSpacing="20"
                        AutoFitMode="DynamicHeight">
    <syncfusion:SfListView.ItemTemplate>
        <DataTemplate>
            <Grid x:Name="Feedback">

                ...
                <Label Text="{Binding Question}"Grid.Row="0" FontSize="16"/>
                <Entry Text="{Binding Answer}"IsVisible="{Binding IsDetailedFeedback}"
Grid.Row="1" />
                <buttons:SfRadioGroup x:Name="radioGroup" Grid.Row="1"
SelectedValue="{Binding SelectedValue}"
BindableLayout.ItemsSource="{Binding Answers}">
         <BindableLayout.ItemTemplate>
          <DataTemplate>
            <buttons:SfRadioButton
Text="{Binding Answer}" IsChecked="{Binding IsChecked}" />
               </DataTemplate>
              </BindableLayout.ItemTemplate>
            </buttons:SfRadioGroup>
                ...
            </Grid>
        </DataTemplate>
    </syncfusion:SfListView.ItemTemplate>
</syncfusion:SfListView>
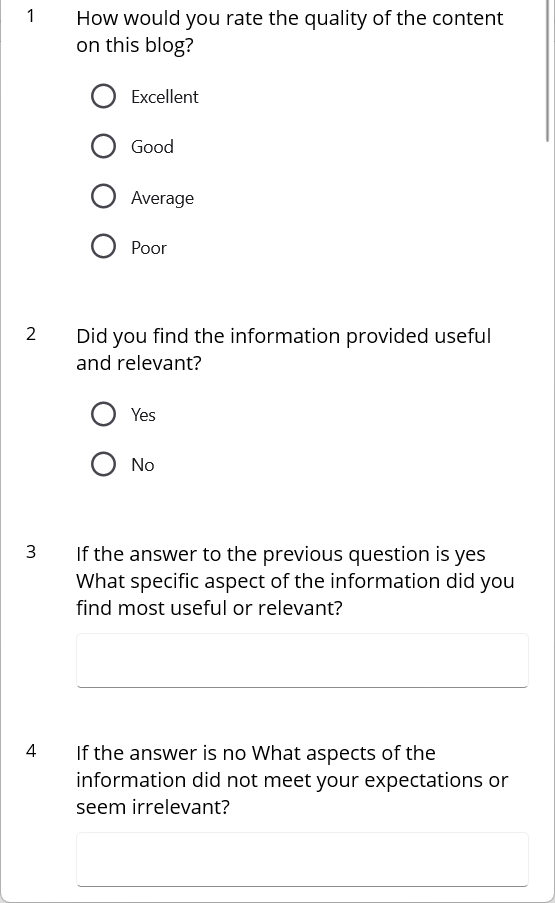
In the above code snippet, the ViewModel properties are bound to the SfListView. When you run the sample, you will get the following output.
Step 4. Handle the submit action
A command is added to the submit button and defined in the ViewModel. Clicking submit will maintain the submitted feedback in a separate collection and clear it in the ListView.
private void OnSubmit(object obj)
{
  var responseList = Feedbacks.Select(feedback =>
  {
    var selectedAnswer = feedback.Answers?.FirstOrDefault(o => o.IsChecked !=
null)?.Answer ?? feedback.Answer;
     return new Response
     {
       Question = feedback.Question,
       Answer = selectedAnswer,
        };
      }).ToList();
      var response = new ResponseModel
     {
        QNO = responseCount++.ToString(),
        ResponseList = responseList
    };
    Responses.Add(response);
    ResetFeedbacks();
}
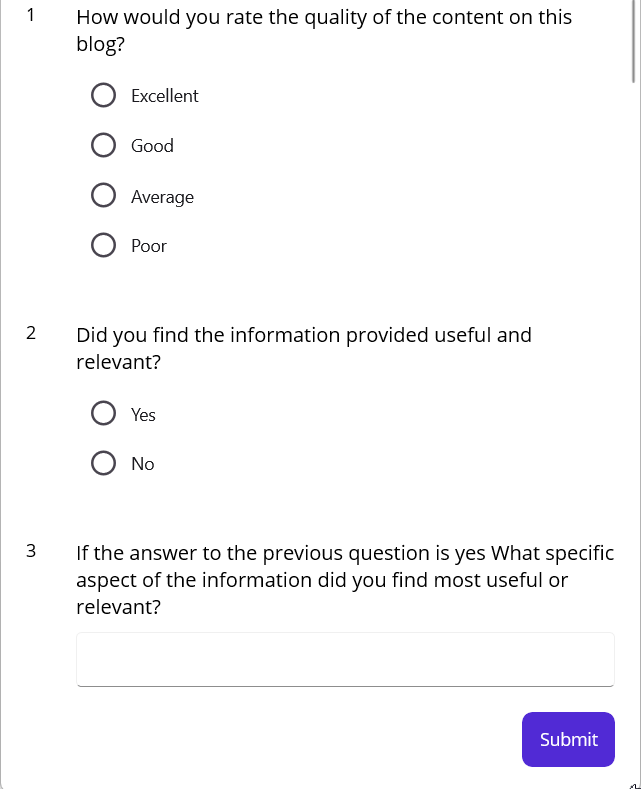
The following output is generated when you click the submit button.
GitHub reference
For more details, refer to the GitHub demo.

FAQs
Q1: What is SfListView in .NET MAUI?
SfListView is a Syncfusion® control for displaying dynamic, customizable lists in .NET MAUI apps. It is ideal for feedback forms or data-driven UIs.
Q2: How do I add Syncfusion® controls to my .NET MAUI project?
Install the Syncfusion.Maui.ListView and Syncfusion.Maui.Buttons NuGet packages are available via the NuGet Package Manager.
Q3: Can I use .NET MAUI’s default ListView instead of SfListView?
Yes, but SfListView offers enhanced performance and customization for complex forms.
Q4: How do I handle large feedback datasets in SfListView?
Use SfListView’s virtualization to optimize performance for large datasets.
Q5: Is this feedback form compatible with .NET 9?
Yes, the code is compatible with .NET 9, ensuring modern cross-platform support.
Conclusion
Thanks for reading! In this blog post, we’ve provided a simple guide for developers who want to integrate feedback collection into their cross-platform apps using .NET MAUI ListView. With this approach, you can design sleek, interactive feedback forms that enhance user engagement and deliver valuable insights. Embedding these forms into your app helps establish a continuous feedback loop, ensuring you stay aligned with user needs and expectations. Try it out and leave your feedback in the comments section below!
For existing Syncfusion® customers, the newest version of Essential Studio® is available from the license and downloads page. If you are not a customer, try our 30-day free trial to check out these new features or contact us through our support forums, support portal, or feedback portal. As always, we are happy to assist you!


 No spam, just valuable updates.