This is a follow-up to our previous blog, Using JavaScript Gantt Chart in SharePoint Web Part for Effective Project Management: Part 1, where we explained integrating the Syncfusion JavaScript Gantt Chart in a SharePoint web part.
Now, in this blog, we’ll see how to bind SharePoint list data to the JavaScript Gantt Chart and save the data changes made in the Gantt Chart back to the SharePoint list.
There are only two steps to do this:
- Data binding: Read and bind the SharePoint list data to the JavaScript Gantt Chart.
- Edit operation: Update the edited data from the Gantt Chart to the SharePoint list.
Let’s get started!
Data binding
A list is a collection of data displayed in rows and columns. SharePoint stores and displays information in the form of a list. These are like databases that we use to store information and build reports.
Step 1: Prepare SharePoint list data
You can bind an existing list from your SharePoint page or create a new list and bind it to the JavaScript Gantt Chart. To do so, follow these steps:
- Create the list data with a unique field through which the Syncfusion JavaScript Gantt Chart can identify child and parent records. For instance, let’s use the data in the following code example where the TaskID field is a unique field and ParentID in some records denotes that they are child records to the TaskID value that equals the ParentID field value.
var projectData = [
    { 'TaskID': 1, 'TaskName': 'Planning', 'StartDate': new Date('02/23/2017'), 'Duration': 5 },

    { 'TaskID': 2, 'TaskName': 'Plan timeline', 'StartDate': new Date('02/23/2017'), 'Duration': 5,  'parentID': 1 },

    { 'TaskID': 3, 'TaskName': 'Plan budget', 'StartDate': new Date('02/23/2017'), 'Duration': 0,  'parentID': 1,  },

    { 'TaskID':4, 'TaskName': 'Design', 'StartDate': new Date('02/10/2017'), 'Duration': 3 },

    { 'TaskID':5, 'TaskName': 'Software Specification','StartDate': new Date('02/10/2017'), 'Duration': 3, 'parentID': 4 }
]
The field names TaskID and ParentID can be whatever we choose, but we have to map those field names in the taskFields property of the JavaScript Gantt Chart. We will see this later in the blog.
- Add the Gantt Chart with empty data from the SharePoint web part. For empty data binding, we can pass an empty array to the dataSource property of Gantt Chart in the render method of the web part file (GanttChartWebPart.ts).
Refer to the following code example.public render(): void { <section class="${styles.ganttChart} ${!!this.context.sdks.microsoftTeams ? styles.teams : ''}"> <div id="Gantt-${this.instanceId}"></div> </section>`; this.ganttInstance = new Gantt({ editSettings: {allowEditing: this.properties.allowEditing, allowTaskbarEditing: this.properties.allowEditing}, taskFields: { id: this.properties.taskID, name: this.properties.taskName, startDate: this.properties.startDate, duration: this.properties.duration, progress: this.properties.progress, parentID: this.properties.parentID }, dataSource: this.properties.dataSource, .. } this.ganttInstance.appendTo('#Gantt-'+this.instanceId); protected async onInit(): Promise<void> { this.properties.dataSource = []; }
Step 2: Design properties panel to read SharePoint list data
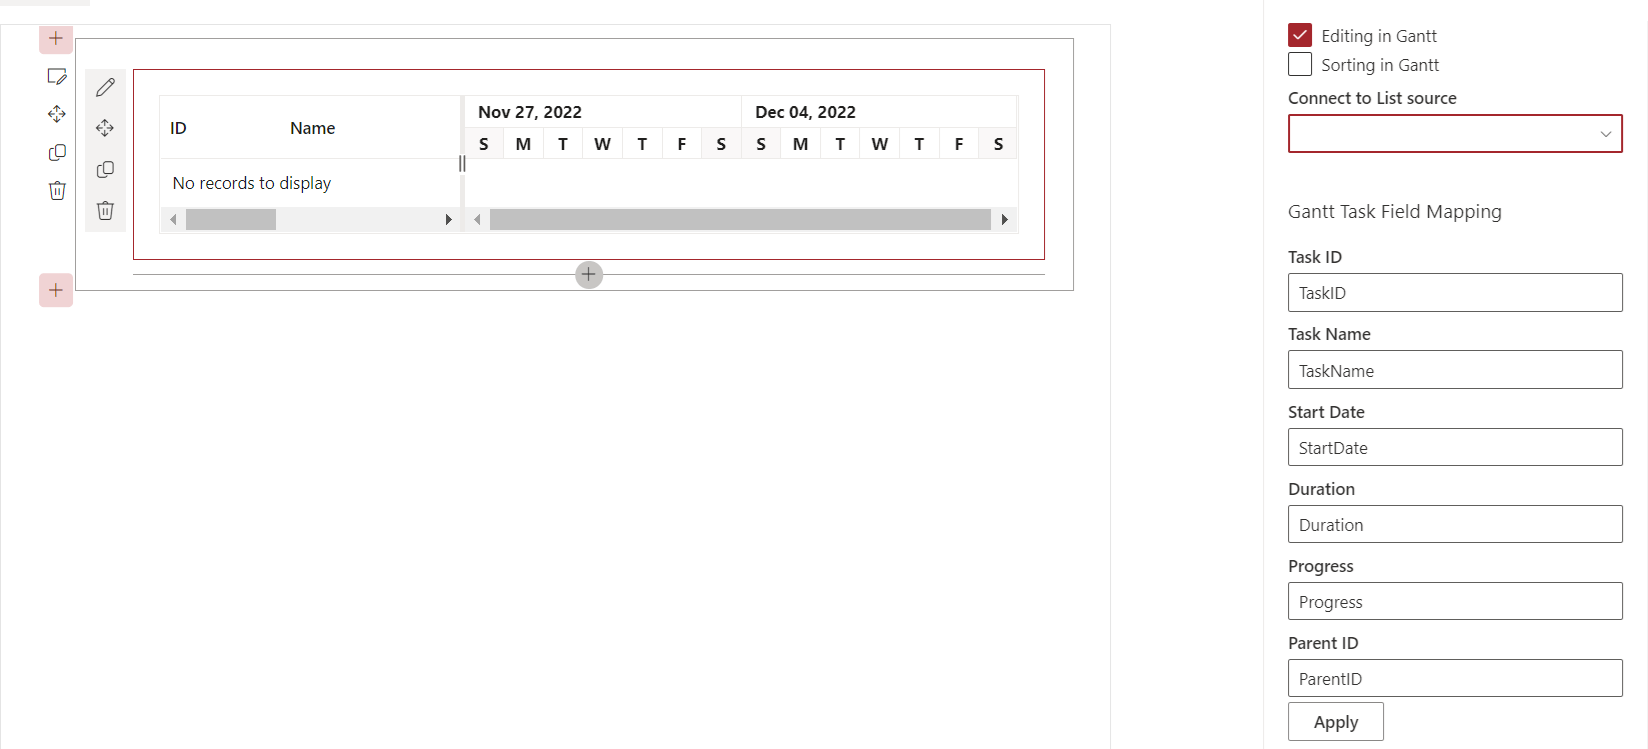
Now, let’s design the properties panel to choose the SharePoint list data source and other input values needed for the Gantt Chart’s taskFields property to map the parent and child data from the list data source.
- In the getPropertyPaneConfiguration method, create a dropdown with values of list names available in SharePoint.
protected getPropertyPaneConfiguration(): IPropertyPaneConfiguration { return { … groups: [ { groupName: strings.BasicGroupName, groupFields: [ PropertyPaneDropdown('selectedList', { label: 'Connect to List Source', options: this._siteLists.map((list: string) => { return <IPropertyPaneDropdownOption>{ key: list, text: list } }), } ] }] } } - Fetch the dropdown values using the SharePoint API service. I have used the SPHttpClient API to fetch the list names in SharePoint.
protected async onInit(): Promise<void> { this._siteLists = await this._getSiteLists(); … } public async _getSiteLists(): Promise<string[]> { const endpoint: string = `${this.context.pageContext.web.absoluteUrl}/_api/web/lists?$select=Title&$filter=Hidden eq false&$orderby=Title&$top=10`; const rawResponse: SPHttpClientResponse = await this.context.spHttpClient.get( endpoint, SPHttpClient.configurations.v1); return (await rawResponse.json()).value.map( (list: {Title: string}) => { return list.Title; } ); } - Then, add other input fields in the properties panel to map the taskFields property of the Gantt Chart instance in the render method. Refer to the following code example.
groupFields: [
   PropertyPaneTextField('taskID', {
      value: this.properties.taskID,
      label: "Task ID"
   }),
   PropertyPaneTextField('taskName', {
      value: this.properties.taskName,
      label: "Task Name"
   }),
   PropertyPaneTextField('startDate', {
      value: this.properties.startDate,
      label: "Start Date"
   }),
   …
]

public render(): void {
<section class="${styles.ganttChart} ${!!this.context.sdks.microsoftTeams ? styles.teams : ''}">
   <div id="Gantt-${this.instanceId}"></div>
</section>`;
…
this.ganttInstance = new Gantt({
   editSettings: {allowEditing: this.properties.allowEditing,    allowTaskbarEditing: this.properties.allowEditing},
   taskFields: {
     id: this.properties.taskID,
     name: this.properties.taskName,
     startDate: this.properties.startDate,
     duration: this.properties.duration,
     progress: this.properties.progress,
     parentID: this.properties.parentID
  },
  …
})
After doing so, the look and appearance of the properties panel will be like the following image.

Step 3: Bind SharePoint list data to the JavaScript Gantt Chart
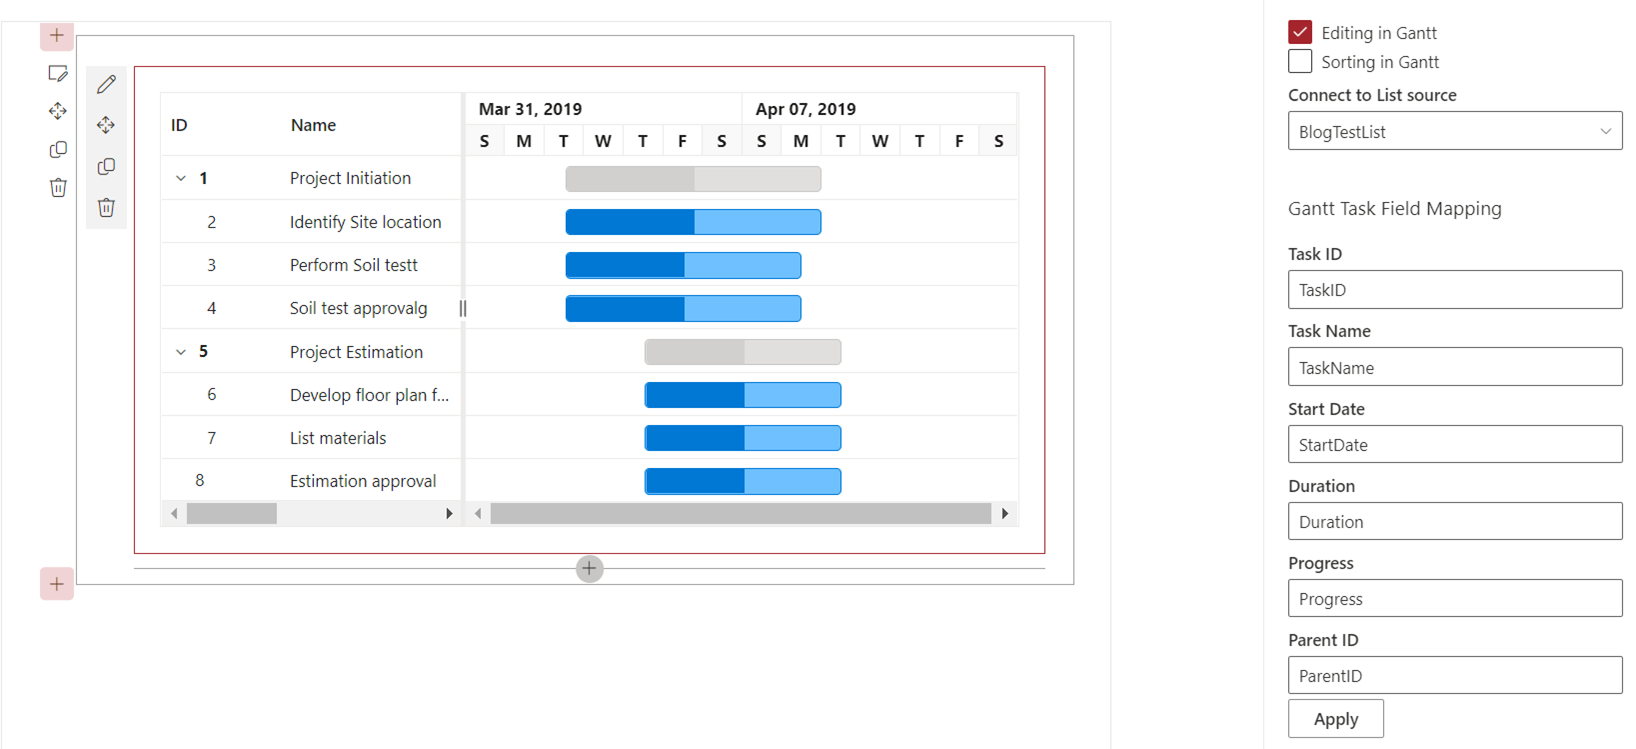
Finally, let’s bind data from the chosen list in the dropdown of the properties panel to the Gantt Chart. Here, we will retrieve the selected list data and bind it to the Gantt Chart with the help of the click event of the Apply button in the properties panel. Using the SPHttpClient API, get data from the SharePoint list.
Refer to the following code example.
PropertyPaneButton("", {
    text: "Apply",
    onClick: () => {
        this._getSiteListItems();
    }
})
…

public async _getSiteListItems(): Promise<void> {
  const endpoint: string = `${this.context.pageContext.web.absoluteUrl}/_api/web/lists/${this.properties.selectedList}List/items`;

  const rawResponse: SPHttpClientResponse = await this.context.spHttpClient.get(
    endpoint,
    SPHttpClient.configurations.v1);
  var response = await rawResponse.json();
  this.properties.dataSource = response.value.map(
    (list: {Id: number, TaskID: number, TaskName: string, StartDate: DateTime, Duration: number, Progress: number, ParentID: number}) => {
      return {Id: list.Id, TaskID: list.TaskID, TaskName: list.TaskName, StartDate: list.StartDate, Duration: list.Duration, Progress: list.Progress, ParentID: list.ParentID}
    }
  );
}
Refer to the following output image.

Editing operation
To allow users to edit the data in the JavaScript Gantt Chart, refer to editing tasks in JavaScript Gantt Chart documentation.
When a user edits data in the Gantt Chart, update the data changes back to the SharePoint list. Do this by using the actionComplete event of the Gantt Chart and sending post requests to the SharePoint list using the SPHttpClient API.
Refer to the following code example.
this.ganttInstance = new Gantt({
   dataSource: this.properties.dataSource,
   actionComplete: (args: ActionCompleteArgs) => {
     if (args.requestType == 'save'){
       for (var i = 0; i < args.modifiedTaskData.length; i++) {
         var url = this.context.pageContext.web.absoluteUrl + '/_api/web/lists/' + this.properties.selectedList + 'List/items(' + args.modifiedTaskData[i]['Id'] + ')';
         this.context.spHttpClient.post(url, SPHttpClient.configurations.v1,  {
           headers: {
             'Accept': 'application/json;odata=nometadata',
             'Content-type': 'application/json;odata=nometadata',
             'odata-version': '',
             'IF-MATCH': '*',
             'X-HTTP-Method': 'MERGE'
           },
           body:  JSON.stringify(args.modifiedTaskData[i])
         })
       }
     }
   }
})
Now the edited data in the JavaScript Gantt Chart will be updated on the SharePoint page.
GitHub reference
For more details, check out the complete code example for integrating the Syncfusion JavaScript Gantt Chart in a SharePoint web part on GitHub.
Conclusion
Thanks for reading! In this blog, we have seen how to bind SharePoint list data to the Syncfusion JavaScript Gantt Chart and save the data changes made in the Gantt Chart back to the SharePoint list. Try the steps in the part 1 and 2 blogs to effectively manage your projects.
In addition to the Gannt Chart, there are more than 80 JavaScript UI controls, such as Grid, Scheduler, Charts, and others that can also be integrated with SharePoint web parts. Try them out and leave your feedback in the comments section below.
If you want to try Syncfusion components, you can download our free trial. Also, check out our demos and documentation for detailed explanations and the facts you need to proceed further.
You can also reach us through our support forums, support portal, or feedback portal. We are always happy to assist you!
