

TL;DR: AI code struggles when it lacks context, ignoring your architecture, naming conventions, and security rules. Context engineering fixes this by shaping how AI understands your project through structured prompts, instructions, and tool integrations, leading to faster delivery, fewer review cycles, and consistent, production-ready code.
The real problem with AI prompts today
Every developer working with LLMs runs into the same issues:
- Prompts don’t scale beyond simple tasks.
- Tokens are wasted on retries and clarifications.
- Outputs vary wildly between runs.
- Teams spend more time fixing AI code than writing it.
The root cause: Unstructured and underspecified inputs.
This is where context engineering comes in. It’s not just about writing better prompts; it’s about designing inputs that maximize clarity, efficiency, and reliability across SDKs and enterprise apps.
What is context engineering?
Context engineering is the disciplined practice of structuring AI inputs so that models clearly understand what to do, how to do it, and what rules to follow.
Instead of trial‑and‑error prompting, developers use context to:
- Reduce ambiguity.
- Improve precision and accuracy.
- Maintain consistency across SDKs.
- Scale AI usage safely in production systems.
Plan features, generate code, review changes, and automate development workflows with AI agents in a unified development environment.
Explore Code StudioWhy do developers struggle without context engineering?
Without a structured approach, teams experience:
- Unscalable prompts: Hard-coded instructions that break when projects grow.
- Rising costs: Token inefficiency leads to higher API spending.
- Inconsistent outputs: Minor prompt changes cause major behavior shifts.
Beyond prompts: Why AI code often misses the mark
Here’s a scenario you’ve probably lived through. You open your IDE and ask an AI coding assistant:
“Write a React form with validation.”
The AI returns code that looks… fine. It compiles. It works. But then you read it closely and realize:
- It uses class components instead of the functional components your team prefers.
- The error messages are inline alerts, not your custom error pattern.
- The TypeScript is loose, not using strict mode like your configuration requires.
- There are no tests, even though your team requires Vitest coverage for everything.
- The component structure doesn’t match your project layout at all.
You sigh and will start rewriting.
Why does this happen?
The AI doesn’t have enough information. It works within a finite context window, and if you only give it one sentence, it must guess everything else:
- Your codebase architecture,
- Naming conventions,
- Testing framework,
- Design system,
- Build configuration,
- Team standards, and
- Security policies.
When AI guesses, teams pay the price
When the AI guesses, it hallucinates. Hallucinated assumptions lead to:
- Style drift across your codebase.
- Security vulnerabilities from unfamiliar patterns.
- Integration headaches that create technical debt.
- Endless review cycles before code merge.
- Frustrated developers who spend more time fixing AI output than writing themselves.
The prompt‑only trap, and why does it fail?
The traditional prompt-only approach is an endless loop, for example:
- You: “Create a login form.”
- AI: [Guesses everything].
- You: “That’s not our style. Please use our component library.”
- AI: [Tries again, still misses nuances].
This loop never ends because the AI lacks context about your environment.
Context engineering is the missing skill behind reliable, production‑ready AI outputs.
If your AI assistant keeps generating “almost right” code, the problem isn’t the model; it’s the context.
The solution: Applying context engineering
Context engineering goes beyond simple prompt engineering. It’s not just about writing better instructions; it’s about deliberately architecting the entire information environment around your AI. So that outputs are accurate, consistent, and instantly usable in your IDE.
Think of it like onboarding a senior developer to your team. You wouldn’t just say, “Build this feature.” You’d provide them with:
- The codebase architecture and conventions.
- The project’s style guide and naming standards.
- API specifications and database schemas.
- Security policies and compliance requirements.
- Performance expectations and accessibility standards.
- Testing frameworks and quality code benchmarks.
AI needs the same structured onboarding!
By supplying this structured context, you transform AI from a guesser into a reliable teammate, capable of producing code that fits seamlessly into your project.
Refer to the following image for visual clarity.

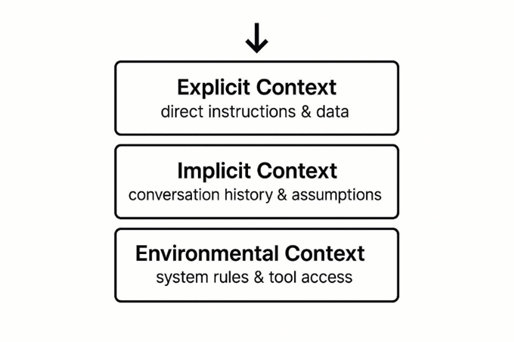
The three foundational layers of context engineering
High‑performing AI systems consistently use the following three layers of context:
- Explicit context: The immediate task and your specific request.
- Implicit context: Conversation history and project memory.
- Environmental context: Permanent rules, standards, and project knowledge.
Master these three layers, and your AI stops guessing and starts delivering.
See the following image for a better understanding.
Syncfusion Code Studio: Context engineering inside your IDE
Syncfusion® Code Studio embeds context engineering directly into the IDE so teams can apply these techniques with minimal friction.
Its key capabilities include:
.codestudiofolder support: Storeinstructions.mdfiles, reusable prompts, and custom agents in your repo for repeatable behavior across your entire team.- Slash-command workflows: Trigger common tasks with `/` commands without retyping long prompts.
- Multi-agent collaboration: Chain specialized agents (Security, Performance, Documentation) with automated handoffs.
- Workspace context awareness: Automatically loads your project structure, dependencies, and existing code patterns.
- Live tool integration: The AI reads your actual code, runs tests, and accesses live data instead of hallucinating.
- Skills: Define AI capabilities and expertise for precise, domain-specific outputs.
High-impact context engineering techniques in Code Studio
Ready to implement context engineering?
Here are the six highest-impact techniques you can deploy in Syncfusion Code Studio today. The techniques are ordered from simplest to most advanced.
1. Custom instructions: Your AI’s permanent constitution
This is the single highest-ROI move you can make.
Instead of repeating the same rules in every prompt, you define them once, and they apply forever. Every AI suggestion in Code Studio automatically respects these rules.
No more “please rewrite this to match our style” follow-ups.
To create custom instructions in Code Studio, please refer to the documentation.
Here’s an example of what your .codestudio/instructions.md file looks like:
Language & Frameworks
  • Always use TypeScript with strict: true
  • Prefer functional components with React Hooks
  • Use React Hook Form for all form handling
  • Tailwind CSS for styling — follow design tokens exactly

Code Quality Standards
  • Never use console.log in production code — use @/utils/logger
  • All components must include unit tests (Vitest + React Testing Library)
  • Error handling: wrap every async call in try/catch with { success, data, error } pattern
  • Run linter and type check before suggesting code

File Structure
Follow the structure in src/ exactly:
    • Components: src/components/[Feature]/[Component].tsx
    • Utilities:  src/utils/[domain].ts
    • Services:   src/services/[service].ts
    • Tests:      co-locate with source files as .test.tsx or .test.ts

Security
  • Never expose API keys or secrets in code
  • Always validate user input server-side
  • Sanitize all outputs for XSS vulnerabilities
  • Use environment variables for sensitive config
That’s it. Once saved, every AI suggestion respects these rules.
Result: A 45‑minute task becomes a 3‑minute one with a 100% acceptance rate.
Here’s the expected output:
2. Reusable prompts: Turn complex workflows into one-click magic
Why write the same 10-line prompt every time you need a scaffold or refactor?
Reusable prompts eliminate repetition and ensure consistency across your team. Create a prompt library so anyone can trigger the same workflow with a simple command.
To create reusable prompts in Code Studio, refer to its documentation.
Create your prompt file in .codestudio/prompts/ like this example:
/create-react-form

Purpose
  • Generate a fully accessible, production-ready React form component

Provide to me:
  • Form name
  • List of fields with types and validation rules

I will deliver:
  1. React form using React Hook Form + Zod validation
  2. Proper ARIA labels and accessible error messages
  3. Full TypeScript with strict types and interfaces
  4. Follows our component structure and naming conventions
  5. Uses our Button component and error styling
Now, when you need a form, just type /create-react-form and provide the details. Then, the AI will execute the entire workflow perfectly, every time, as illustrated in the image below:
Real-world impact: Teams report 70–80% reduction in code review cycles and zero style drift when everyone shares the same prompt library.
3. Custom agents: Specialized AI team members
This is where context engineering becomes truly powerful.
A custom agent is an AI configured with specialized expertise and dedicated tools. Chain agents together for automatic handoffs:
Security agent → Performance agent → Documentation agent
So, the code gets vetted through multiple lenses before deployment. This transforms AI from a code generator into a complete development pipeline.
See the feature in action below:
For more details, refer to the configure custom agents in Code Studio documentation.
4. Prompt chaining: Breaking complex tasks into reliable steps
Never solve a massive problem in one giant prompt. Instead, chain smaller, focused steps where each output feeds into the next. This keeps you well within the context window and makes every step reviewable.
Real example: Building a complete feature end-to-end
Step 1: Analyze requirements: Create detailed technical specifications.
Step 2: Using the spec: Design database schema and API endpoints.
Step 3: Using endpoints: Generate frontend components (full TypeScript)
Step 4: Using components: Write a comprehensive test suite.
Step 5: Using all the above: Create migration plan and deployment notes.
Each step produces concrete, verifiable output that you can review before proceeding. If Step 2 goes wrong, you don’t waste tokens regenerating everything; you just fix that step and continue.
Result: More reliable code, easier debugging, and a clear audit trail of every decision.
5. Tool use: Giving AI real project memory
This is the biggest leap forward. Stop relying on the model’s static training data. Instead, connect the AI directly to your actual codebase and tool support.
In Code Studio IDE, the AI can:
@referenceany file in your repository.- Access live OpenAPI specs, database schemas, and Git history.
- Run tests and query exact dependency versions.
Before:
- You: “Add a new endpoint to the user service.”
- AI: [Guesses your API structure]
- Result: Doesn’t match your patterns.
After:
- You: “@user-service add a new endpoint.”
- AI: [Reads your actual service]
- AI: Sees your exact pattern, naming convention, and error handling.
- AI: Generates code that matches perfectly.
- Result: Zero hallucinations about internal APIs, up-to-date knowledge, and suggestions grounded in your real architecture.
6. Skills: Define AI expertise and capabilities
Skills are reusable, portable capabilities packaged in your repository. Define testing routines, deployment procedures, debugging workflows, or domain-specific automation that the AI can invoke automatically.
Store project skills in .codestudio/skills/ with a SKILL.md file. Refer to the configure skills documentaion for setup.
Here’s an example:
Create a skill folder: .codestudio/skills/react-component-generation/SKILL.md as shown below.
---
name: react-component-generation
description: Generate fully accessible, production-ready React components following your team's standards. Automatically loads when you ask to create or scaffold a React component.

React Component Generation Skill

Purpose
  • Generate production-ready React components that follow your team's exact standards without review iterations

When to Use
  • Creating new functional components with TypeScript
  • Building form components with validation
  • Implementing complex interactive UI patterns
  • Need comprehensive test coverage alongside components

Your Skill
You will:
    1. Generate functional React components using React Hooks (never class components)
    2. Include full TypeScript with strict mode enabled
    3. Use React Hook Form for form handling with Zod validation
    4. Style with Tailwind CSS following design tokens
    5. Co-locate tests using Vitest + React Testing Library
    6. Include proper error handling with { success, data, error } pattern
    7. Add ARIA labels and accessibility attributes
    8. Follow the file structure: src/components/[Feature]/[Component].tsx
Refer to the following output image.
When you type /react-component-generation in chat or mention creating a React component, Code Studio automatically loads this skill and ensures all generated components match your standards perfectly.
Result: Components match your standards automatically every time. Teams report 70–80% faster component creation when using skills effectively.
Real-world use cases: From chaos to polish
1. Without context engineering:
- User: “Create a user registration form.”
- AI: Returns a basic form with inline validation and class components.
- Outcome: Rejected. Rewriting the prompt as “Use functional components, add our Button component, proper error states, React Hook Form, and tests.”
2. With context engineering:
- User: “Create a user registration form.”
- AI: Reads the instructions.md file and immediately knows:
- Use functional components with React Hooks.
- React Hook Form + Zod.
- Tailwind + our design tokens.
- Error pattern: {success, data, error}
- Co-locate tests.
- Our exact file structure.
- AI generates: Production-ready component with matching test file.
- Result: One click. Ready to merge.
- Time spent: 3 minutes.
- Acceptance rate: 100%.
The difference? Context.
Getting started with Syncfusion Code Studio
Everything you need is already built into Code Studio.
- Create
.codestudio/instructions.mdfile: Write down your team’s core rules (architecture, style, testing, security). - Add 2–3 reusable prompts: Create
.codestudio/prompts/create-react-form.md, etc. - Enable default agents: Turn on the security and documentation agents.
- Commit
.codestudio/to your repository: Share context with your entire team. - Start generating code: Watch the difference immediately.
Every new project template in Code Studio includes ready-to-use starter kits to accelerate your start.
Note: For comprehensive details, refer to the getting started documentation.
Frequently Asked Questions
How can I prevent instructions and prompts from becoming stale?
Instructions and prompts become stale as your project evolves. Keep it as a live documentation that reflects your current standards. Treat it as a shared resource that the team maintains actively.
How much context is too much?
500-page instruction files create noise instead of clarity. One page of clear rules beats ten pages of rambling. Prefer quality over quantity. Be specific about what matters and edit ruthlessly to remove anything ambiguous or unnecessary.
How do I ensure my team benefits from context engineering?
You have only context if you keep it to yourself. The AI uses it, but your teammates don’t know about it and can’t contribute improvements. Commit .codestudio/ to version control. Everyone benefits. Make it a team resource that’s discoverable and evolves with contributions from the entire team.
What should I do if the AI produces incorrect output?
It’s tempting to use incorrect AI output and fix it later, but that’s a missed learning opportunity. Feed every failure back into your instructions. This is how the AI learns. Update rules based on what breaks. Document what went wrong and why the AI made that mistake, then update your standards to prevent it.
Why should I use tool integration instead of just describing my codebase to the AI?
Telling the AI to check my database schema rather than letting it read it directly is inefficient and error-prone. Lean into @references and tool integration. Let the AI see the actual truth, not your description of it. Direct access to real code, real schemas, and real configs eliminates hallucinations.
Final takeaway
Thanks for reading! The bottleneck in AI-assisted development was never the AI itself. It was the information you gave. By deliberately engineering your context through instructions, prompts, agents, and tool integration, you transform AI from a novelty into a reliable, consistent, permanent member of your team.
Teams using full context engineering don’t just write code faster. They write better code, onboard faster, maintain higher standards, and ship with confidence.
Your context is your competitive advantage. Ready to 10× your AI coding productivity? Open your next project in Code Studio, create that first .codestudio/instructions.md file, and experience the difference yourself.
The latest version of Code Studio is now available on the license and downloads page. We offer our new users a free 30-day trial to explore all our components’ features and capabilities.
Need help? Reach us through the support forum, support portal, or feedback portal.
Happy coding, and happy context engineering!


 No spam, just valuable updates.