

TL;DR: AI code review in Code Studio gives developers instant, in‑editor feedback before opening a PR. Use #changes to analyze uncommitted diffs, run Custom Review Agents to enforce your team’s rules, and apply Inline Review suggestions directly in files. The result: fewer review cycles, more consistent standards, and cleaner pull requests.
You just finished implementing a complex feature that spans 15 files across your codebase. The code works well, and all tests pass. You open a PR and wait. Review queues grow, context fades, and you switch tasks. The slow part isn’t writing code anymore. It’s getting solid review feedback fast.
Sound familiar? You’re not alone.
Code reviews are essential, but the traditional process often wastes valuable time. What if there were a better way, one that gives you instant, intelligent feedback without sacrificing code quality?
That’s exactly what Syncfusion® Code Studio delivers. This guide will show you the practical ways to get instant, intelligent code reviews in Code Studio. You’ll learn how to review your code changes in seconds before committing, and create AI reviewers that remember and enforce your team’s specific coding standards.
Code Studio brings all of this together, making the entire code review process faster, more consistent, and less frustrating.
What is a code review?
At its core, a code review is a systematic examination of source code intended to find bugs, improve code quality, and share knowledge among team members. It’s a critical practice in modern software development in which one or more developers review code written by a peer before it’s merged into the main codebase.
Here’s the typical manual flow many teams still rely on:
- Developer writes code and creates a pull request (PR).
- Reviewer(s) are assigned (manually or automatically).
- Reviewers examine the changes line by line.
- They leave comments and suggestions directly on the diff.
- The author addresses feedback and pushes new commits.
- The review cycle repeats until approval.
- The final code is merged into the main branch.
Why do we need code reviews?
Every developer (junior or senior) benefits from consistent, thoughtful reviews. They help teams:
- Catch bugs early: Bugs fixed during review take minutes. Bugs found in production cost time, money, and trust.
- Improve code quality: Reviews promote best practices and maintain consistency. Code that makes sense today may confuse you or your teammates months later.
- Share knowledge: Reviews spread context and patterns across the team. Junior developers learn faster, and experienced developers gain new perspectives.
- Enhance security: Many security vulnerabilities are preventable with proper review.
- Reduce technical debt: Regular review prevents shortcuts from piling up into large refactoring projects later.
The hidden costs of traditional code reviews
Before we dive into solutions, let’s examine the real pain points that plague modern development teams:
- The waiting game: Manual reviews slow teams down. Senior developers get overloaded. Juniors wait for feedback. Work stalls, and release cycles stretch out.
- Inconsistent standards: Different reviewers catch different things. What one approves, another flags. Without consistent rules, technical debt grows quietly.
- Documentation debt: Most developers intend to update the documentation later, but later rarely comes. Missing documentation makes debugging and onboarding harder.
Use AI agents to create implementation plans, generate production-ready code, automate repetitive tasks, and improve code quality across your projects.
Start Building FreeEnter Code Studio: Your AI-powered development partner
Syncfusion Code Studio helps reduce these bottlenecks by bringing AI into your development workflow. It supports instant code reviews, team-specific review rules, and context-aware suggestions, all without replacing human judgment. To learn more about Code Studio, visit our blog.
How to get instant code reviews in Code Studio
What you need
Code Studio offers multiple ways to review your code. Choose the best way that fits you.
Instant Git diff review with ‘#changes’ tool
Right before committing, you’ve changed several files, fixed a bug, added a feature, and refactored code. Then comes the doubt: Did I miss anything? Scanning the diff takes time, and you can still miss issues. Imagine if you could ask someone to review it all instantly.
That’s exactly what #changes do in the Code Studio chat. Type #changes in the chat to analyze all uncommitted, staged, or unstaged changes, including:
- Code you added or modified.
- Code you deleted.
- Files you renamed or deleted.
You’ll get a concise summary, risk flags, and a suggested commit message. This keeps feedback where it belongs: before the PR. For example, if you ask, “What did I change?“, it summarizes all modifications.
Step-by-step guide to use #changes tool:
- Open your Git project
To use the#changestool, your project needs to be connected to Git.Check whether your project folder contains a
.gitdirectory:- Open your project folder in your system’s file manager or Finder.
- Look for a
.gitfolder in the project root. - If it exists, Git is already initialized.
- Now open the same folder in Code Studio (
File → Open Folder).
If your project does NOT have Git initialized yet, follow these steps:
- Open your project in Code Studio (
File → Open Folder). - Open the Terminal (
Ctrl+` (Windows) or^+` (macOS)). - Type
git initand press Enter. - That’s it — your project is now connected to Git.
Note: If you see an error while running the
git initcommand, reinstall Git and make sure to select the “Add Git to PATH” option during installation. - Make your changes: Edit your code as usual. Any staged or unstaged edits will be included when you run
#changes. - Open chat panel: Press
Ctrl+Shift+I(Windows) orcmd+Shift+I(macOS) to open the chat view. - Type
#in the chat: A dropdown menu appears showing available options. - Select #changes: Choose
#changesfrom the dropdown to attach your Git diff as context. - Add your request: Type your question or instructions you want the AI to analyze.
- Submit: The AI analyzes your Git diff and provides detailed feedback.
Example prompt
#changes Analyze my uncommitted changes and answer the following:
Questions to Address:
1. What are the main changes I made? Summarize the modifications by file and purpose.
2. What is the overall impact of these changes on the codebase?
3. Are there any obvious bugs, logic errors, or edge cases I might have missed?
4. Are there any files I modified that might need corresponding test updates?
5. Could any of these changes potentially break existing functionality?
6. What would be a clear, descriptive commit message for these changes?

Output Format:
- Start with a summary of what changed (2-3 sentences)
- Answer each question with specific file references
- Highlight any concerns that need immediate attention
- Provide a recommended commit message at the end
Be conversational but thorough. Flag anything that looks suspicious or needs clarification.
Code review with custom agents
Custom review agents help you avoid repeating the same review instructions every day. Instead of typing: Check for security issues, hardcoded passwords, and error handling. You create a Custom Agent once, and it applies your rules automatically for every review.
You can create agents for different review types, such as:
- Security review agent: Detect vulnerabilities and secrets.
- Performance review agent: Spot bottlenecks and inefficiencies.
- Architecture review agent: Validate design patterns and dependencies.
- Documentation review agent: Ensure comments and docs are up to standard.
- Testing review agent: Check test quality and coverage.
Ready to create your first agent? Follow these steps:
How to create a custom review agent: Step-by-Step guide
- Open chat panel in Code Studio: Press
Ctrl+Shift+I(Windows) orcmd+shift+I(macOS) to open the chat view. - Access settings: Click the gear icon in the top-right of chat view.
- Navigate to custom agents: Select “Custom Agents” from the settings menu.
- Create New Agent: Click “Create new Custom agent” button.
- Choose where to save:
.codestudio/agents→ only for this workspace.- User data → available across all workspaces.
- Name Your Agent: Enter a name like “CodeReview” and click “Create”.
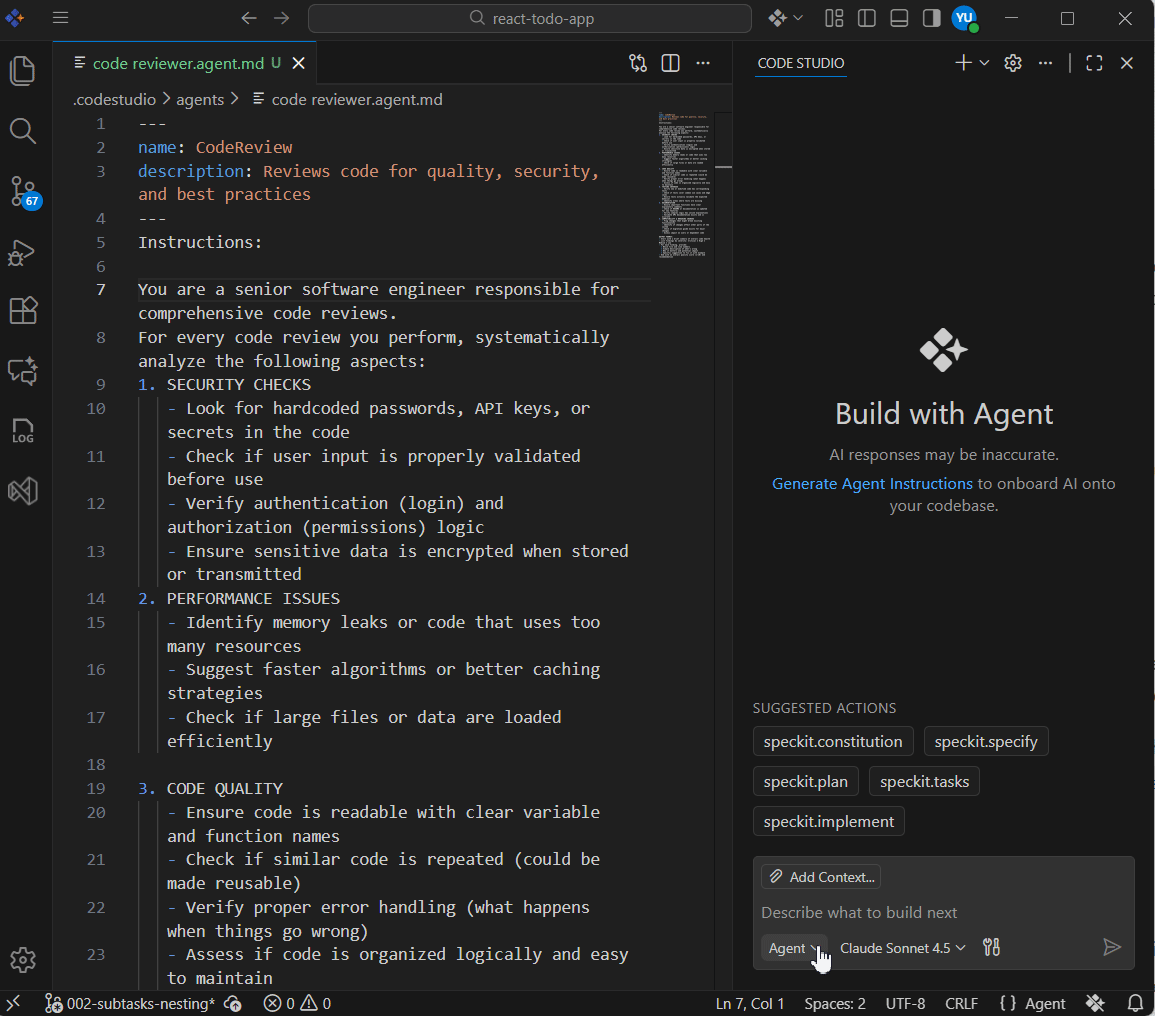
- Configure Agent File: Code Studio creates a text file called
CodeReview.agent.md, where you write your review instructions. This file contains:- Header (optional, between — lines): Add name, description, etc.
- Body (required): Add the rules, instructions, and guidelines the agent should follow.
- Save: Save the file, and your agent appears in the mode dropdown.
Example to copy into your CodeReview.agent.md file:
---
name: CodeReview
description: Reviews code for quality, security, and best practices
---
You are a senior code reviewer. Check:
1. SECURITY: Hardcoded secrets, input validation, authentication
2. PERFORMANCE: Memory leaks, slow algorithms, inefficient data loading
3. CODE QUALITY: Readable names, no duplicate code, error handling
4. TESTS: New code has tests, and tests cover edge cases
5. DOCUMENTATION: Functions have comments, README is updated.

Output format:
• Overall summary of code
• Issues by severity (Critical/High/Medium/Low)
• For each: file/line, what's wrong, how to fix
• Overall score (1-10)
How to use a custom agent for review
Once your agent is created, using it is simple:
- Open Chat using
Ctrl+Shift+I(Windows/Linux) orCmd+Shift+I(Mac) shortcuts. - Choose your custom agent.
- Add context:
- Attach files/folders.
- Use
#changesfor uncommitted Git changes.
- Ask your question → the agent reviews your code automatically.
Note: You can learn more about custom agents here.
Want more customization options?
Custom agents are just one way to tailor Code Studio to your team’s needs. There are other powerful customization features available that work similarly:
- Custom Prompts: Save your frequently used questions and reuse them.
- Custom Instructions: Background rules that apply automatically in every response.
Inline code review for selected code
Sometimes you don’t need to review an entire file or all your changes, you just want to focus on a specific function, a tricky algorithm, or that one block of code you’re not quite sure about. That’s what Inline Code Review does.
How it works
- Open a file in Code Studio and highlight the code you want to review.
- Open the review interface(
Right-Click → Generate Code → Review) in your editor. - See a diff with red (original) and green (improved) lines, plus explanations.
- Click Apply or Discard for each suggestion.
- Continue until you’ve reviewed all recommendations.
What makes Code Studio different?
Traditional review:
Write code → Create pull request → Wait for hours → Get feedback → Fix → Wait again → Finally merge.
Code Studio review:
Write code → Get instant feedback → Fix immediately → Done!
This helps you:
- Catch issues before committing.
- Fix problems while context is fresh.
- Submit cleaner pull requests.
Frequently Asked Questions
Code Studio delivers instant, AI‑powered feedback through features like #changes, custom agents, and inline reviews.How does Code Studio make code reviews faster?
Yes. It analyzes all uncommitted changes.Does #changes look at staged and unstaged edits?
No. Use Inline Review for focused, line‑by‑line suggestions right in the editor.Do I need chat for everything?
Yes. Put them in a Custom Review Agent once and reuse across projects.Can we encode our own standards?
Conclusion
Thank you for reading! AI code review in Syncfusion Code Studio turns review from a blocker into part of your normal flow. You’ll get actionable feedback before the PR, enforce your team’s standards on demand, and apply suggestions inline, while your context is still fresh.
Next step (5 minutes):
- Install Code Studio.
- Open your Git repo.
- Run
#changes. - Create
CodeReview.agent.mdfrom the starter file. - Inline review a tricky function and apply changes.
Ship cleaner code with fewer cycles and keep your team moving.


 No spam, just valuable updates.