
TL;DR: Streamline database interactions in your ASP.NET Core CRUD web API with Dapper and PostgreSQL. Learn to simplify CRUD operations for a more efficient development experience.
PostgreSQL is a robust, open-source, easy-to-use object-relational database system. Dapper is a popular high-performance micro-ORM among .NET developers. This blog will demonstrate how to create an ASP.NET Core CRUD web API using Dapper and PostgreSQL databases. Here, we will be using the ASP.NET Core Web API template in .NET 6.
I explained using Dapper and PostgreSQL with a Blazor application in my last article.
Creating the ASP.NET Core CRUD web API
Prerequisites
Before creating the application, you need to have the following tools installed:
1. Create the database
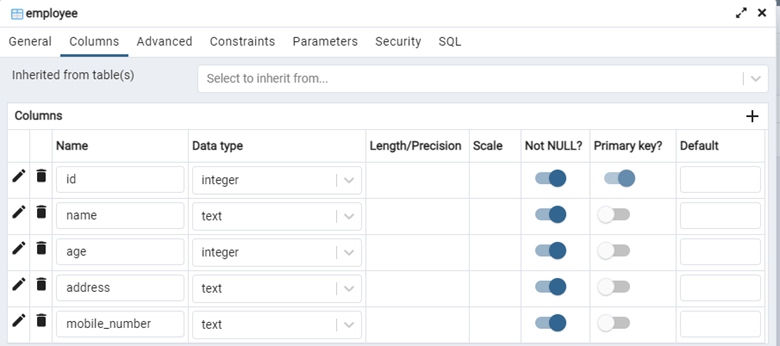
First, create a database using PostgreSQL and create a table named Employee. I have used pgAdmin to create a database and table for this demonstration. pgAdmin is a web-based graphical user interface (GUI) tool for interacting with a PostgreSQL database.
2. Create the ASP.NET Core web API application
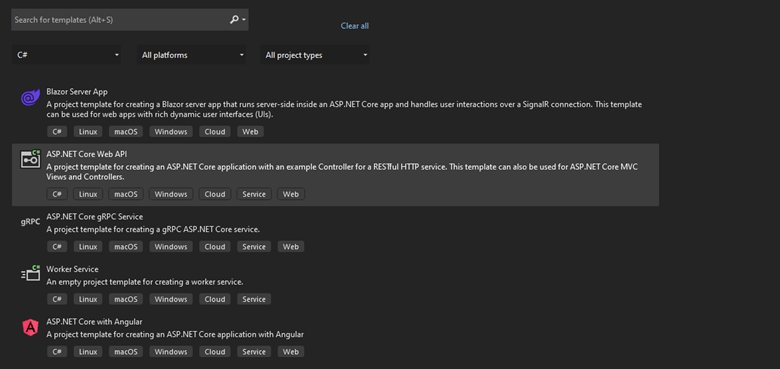
Now, open Visual Studio 2022 and create a new project. Then, select the ASP.NET Core Web API project template as shown in the following figure.
 Provide the solution’s project name and click the Next button. Then, select .NET 6.0 as the framework for this project and None as the authentication type.
3. Add the PostgreSQL package and configure the project
Before writing the services, add PostgreSQL and Dapper to the project. To do that, open the NuGet package manager and select and install the PostgreSQL package as shown in the figure below. In this example, I install Npgsql version 6.0.4.
 In the .NET environment, this package is used to access and communicate with the PostgreSQL server.
We should provide the connection string for the project to connect to the PostgreSQL server. You can use the appsettings.json file to add a connection string like the following code example.
{
  "Logging": {
    "LogLevel": {
      "Default": "Information",
      "Microsoft.AspNetCore": "Warning"
    }
  },
  "AllowedHosts": "*",
  "ConnectionStrings": {
    "Employeedb" : "Server=localhost;Database=*****;User Id=postgres;Password=*****;"
  }
}
4. Add the Dapper package to the project
After that, install the Dapper NuGet package to the project. To do so, open the NuGet package manager, go to the Browse tab, search for Dapper, and select and install the package as shown in the following screenshot. In this example, I install Dapper version 2.0.123.
 When using table column names with underscores in the database, add the following configuration in the Program.cs file for mapping the table data with the model class.
DefaultTypeMap.MatchNamesWithUnderscores = true;
5. Create the database service
First, create a model class to communicate with the database using Dapper. In the table we are creating for demonstration purposes, create an Employee model class. Create the Models folder in the root directory and then create the Employee model class inside the Models folder.
public class Employee
{
    public int Id { get; set; }
    public string Name { get; set; }
    public int Age { get; set; }
    public string Address { get; set; }
    public string MobileNumber { get; set; }
}
Then, create the database service class which can perform CRUD operations as a generic service. Create a folder named Services in the root directory and create an interface named IDbService inside the Services directory.
public interface IDbService
{
    Task<T> GetAsync<T>(string command, object parms);
    Task<List<T>> GetAll<T>(string command, object parms );
    Task<int> EditData(string command, object parms);
}
Here, T is a generic type parameter. We also use the T type parameter as the method’s return type. There are two parameters in the DB operations. The command parameter is the query command, and the object parameter is used for the database operations with PostgreSQL and Dapper.
Now, create a DbService class inside the Services folder that inherits the IDbService interface like the code example below.
public class DbService : IDbService
{
    private readonly IDbConnection _db;

    public DbService(IConfiguration configuration)
    {
        _db = new NpgsqlConnection(configuration.GetConnectionString("Employeedb"));
    }

    public async Task<T> GetAsync<T>(string command, object parms)
    {
        T result;

        result = (await _db.QueryAsync<T>(command, parms).ConfigureAwait(false)).FirstOrDefault();

        return result;

    }

    public async Task<List<T>> GetAll<T>(string command, object parms)
    {

        List<T> result = new List<T>();

        result = (await _db.QueryAsync<T>(command, parms)).ToList();

        return result;
    }

    public async Task<int> EditData(string command, object parms)
    {
        int result;

        result = await _db.ExecuteAsync(command, parms);

        return result;
    }
}
In the above code, IConfiguration accesses the appsettings.json file and reads the connection string. Then, we use the connection string NpgsqlConnection to connect with the PostgreSQL server.
Also, we implemented QueryAsync and ExecuteAsync operations. These are Dapper-based functions, and the difference between them is that the query method is used for executing a SELECT statement internally, and the execute method is used for executing DML statements like INSERT, UPDATE, and DELETE.
This service is used as a generic database service to avoid writing database operations inside the services.
6. Create the Employee service
Now let’s create a service for the Employee. In that case, create the IEmployeeService interface inside the Services folder as shown in the following code example.
public interface IEmployeeService
{
    Task<bool> CreateEmployee(Employee employee);
    Task<List<Employee>> GetEmployeeList();
    Task<Employee> UpdateEmployee(Employee employee);
    Task<bool> DeleteEmployee(int key);
}
Now, create the EmployeeService class, which inherits IEmployeeService. Refer to the following code example.
public class EmployeeService : IEmployeeService
{
    private readonly IDbService _dbService;

    public EmployeeService(IDbService dbService)
    {
        _dbService = dbService;
    }

    public async Task<bool> CreateEmployee(Employee employee)
    {
        var result =
            await _dbService.EditData(
                "INSERT INTO public.employee (id,name, age, address, mobile_number) VALUES (@Id, @Name, @Age, @Address, @MobileNumber)",
                employee);
        return true;
    }

    public async Task<List<Employee>> GetEmployeeList()
    {
        var employeeList = await _dbService.GetAll<Employee>("SELECT * FROM public.employee", new { });
        return employeeList;
    }


    public async Task<Employee> GetEmployee(int id)
    {
        var employeeList = await _dbService.GetAsync<Employee>("SELECT * FROM public.employee where id=@id", new {id});
        return employeeList;
    }

    public async Task<Employee> UpdateEmployee(Employee employee)
    {
        var updateEmployee =
            await _dbService.EditData(
                "Update public.employee SET name=@Name, age=@Age, address=@Address, mobile_number=@MobileNumber WHERE id=@Id",
                employee);
        return employee;
    }

    public async Task<bool> DeleteEmployee(int id)
    {
        var deleteEmployee = await _dbService.EditData("DELETE FROM public.employee WHERE id=@Id", new {id});
        return true;
    }
}
In this code, we used the queries to perform CRUD operations with the required parameters.
7. Register the services
Register all the services implemented using the Program.cs file. Refer to the following code.
builder.Services.AddScoped<IDbService, DbService>();
builder.Services.AddScoped<IEmployeeService, EmployeeService>();
8. Create Employee controller
Now, create an Employee controller to implement CRUD web APIs for this project. To do that, add a controller named EmployeeController inside the Controllers folder. Refer to the following code.
[ApiController]
[Route("[controller]")]
public class EmployeesController : Controller
{
    private readonly IEmployeeService _employeeService;

    public EmployeesController(IEmployeeService employeeService)
    {
        _employeeService = employeeService;
    }

    [HttpGet]
    public async Task<IActionResult> Get()
    {
        var result =  await _employeeService.GetEmployeeList();

        return Ok(result);
    }

    [HttpGet("{id:int}")]
    public async Task<IActionResult> GetEmployee(int id)
    {
        var result =  await _employeeService.GetEmployee(id);

        return Ok(result);
    }

    [HttpPost]
    public async Task<IActionResult> AddEmployee([FromBody]Employee employee)
    {
        var result =  await _employeeService.CreateEmployee(employee);

        return Ok(result);
    }

    [HttpPut]
    public async Task<IActionResult> UpdateEmployee([FromBody]Employee employee)
    {
        var result =  await _employeeService.UpdateEmployee(employee);

        return Ok(result);
    }

    [HttpDelete("{id:int}")]
    public async Task<IActionResult> DeleteEmployee(int id)
    {
        var result =  await _employeeService.DeleteEmployee(id);

        return Ok(result);
    }
}
Here, EmployeeController uses the ApiController attribute to implement the web API controller. Also, we use the Route attribute to maintain the route with the controller name, and we inject IEmployeeService to use Employee CRUD operations in this controller.
9. Run and test the ASP.NET Core web API application
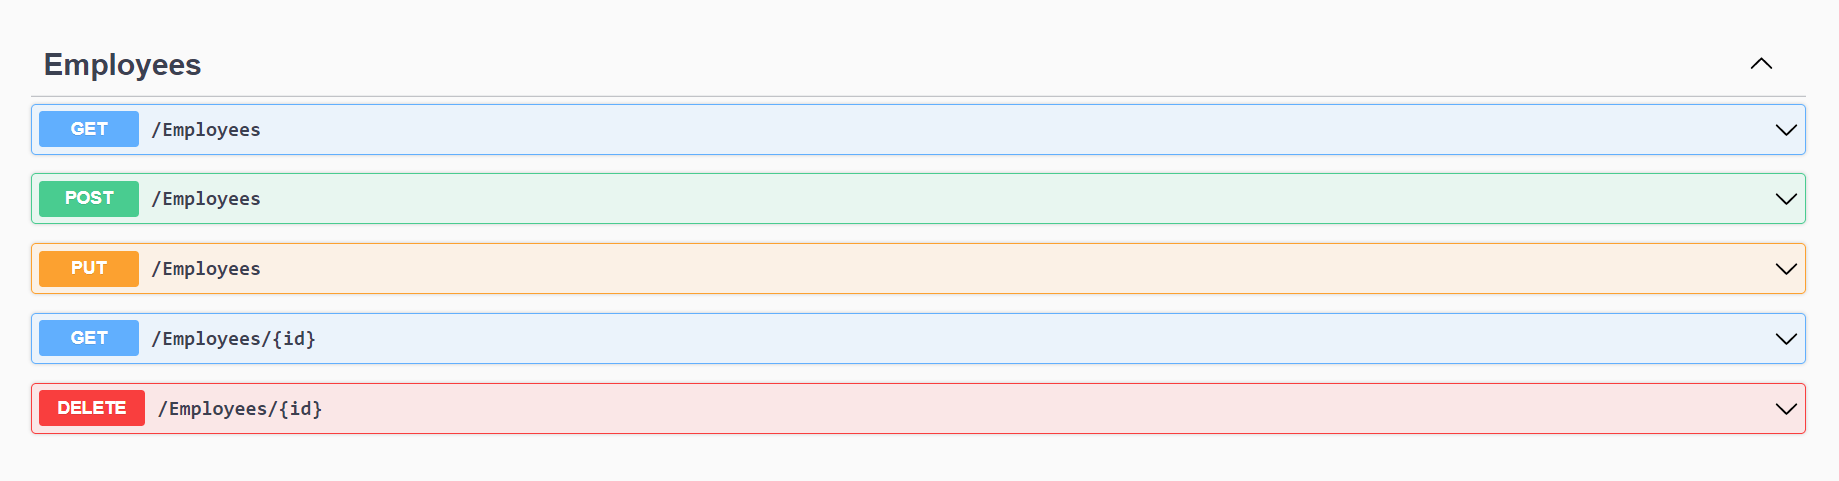
Now, run this application. You should see the Swagger documentation with REST APIs, which are implemented as CRUD operations in this app.
 First, test the POST request, which is used to create an employee record.
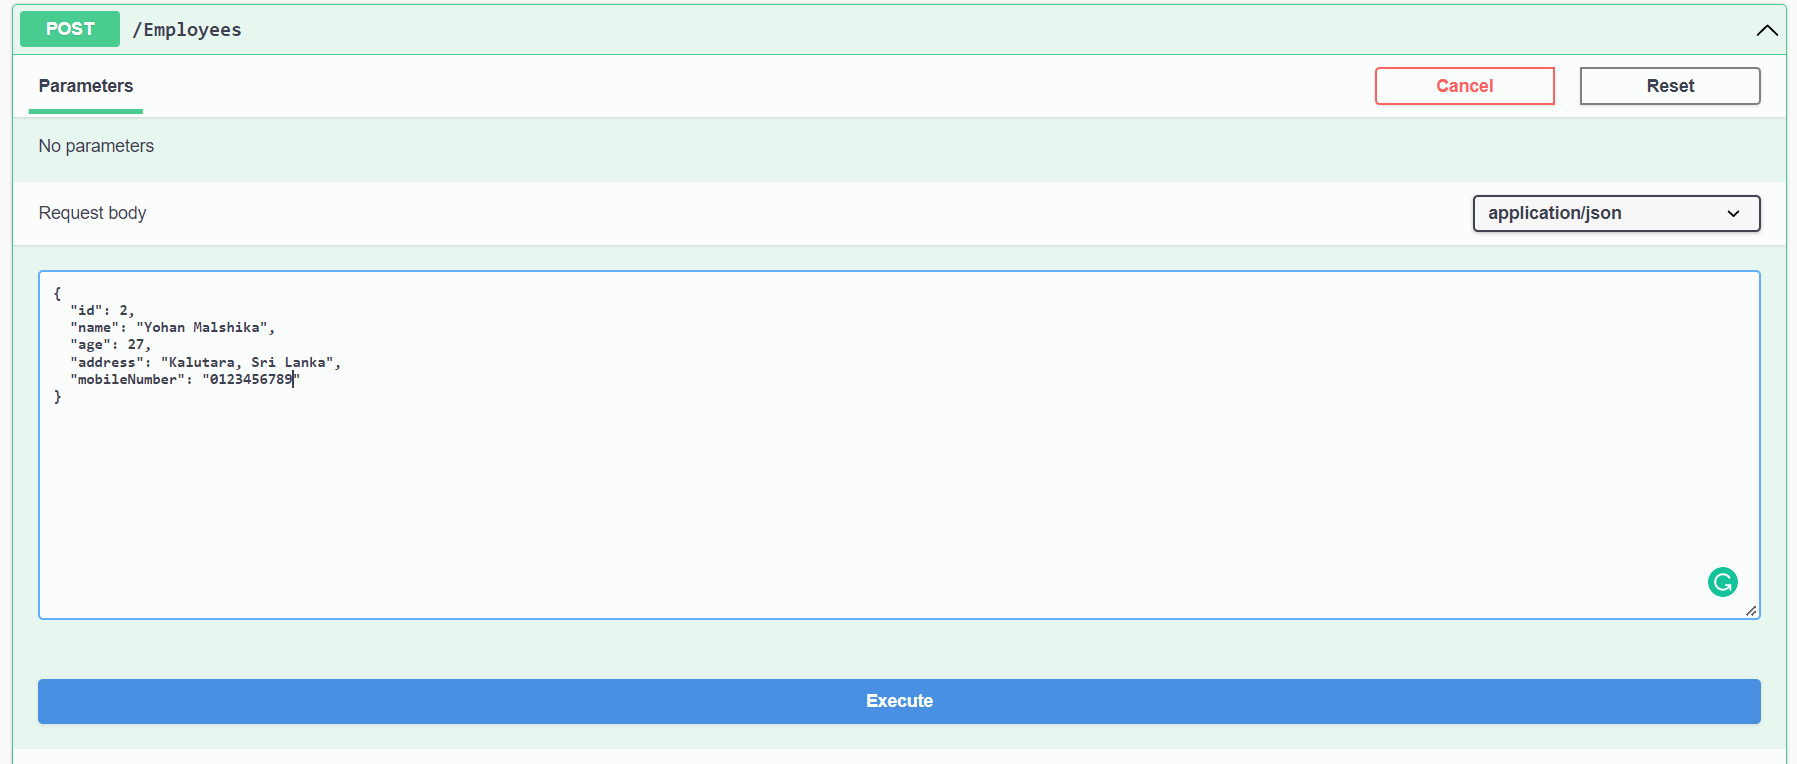 Now you can see the request and the body that we use to create employees.
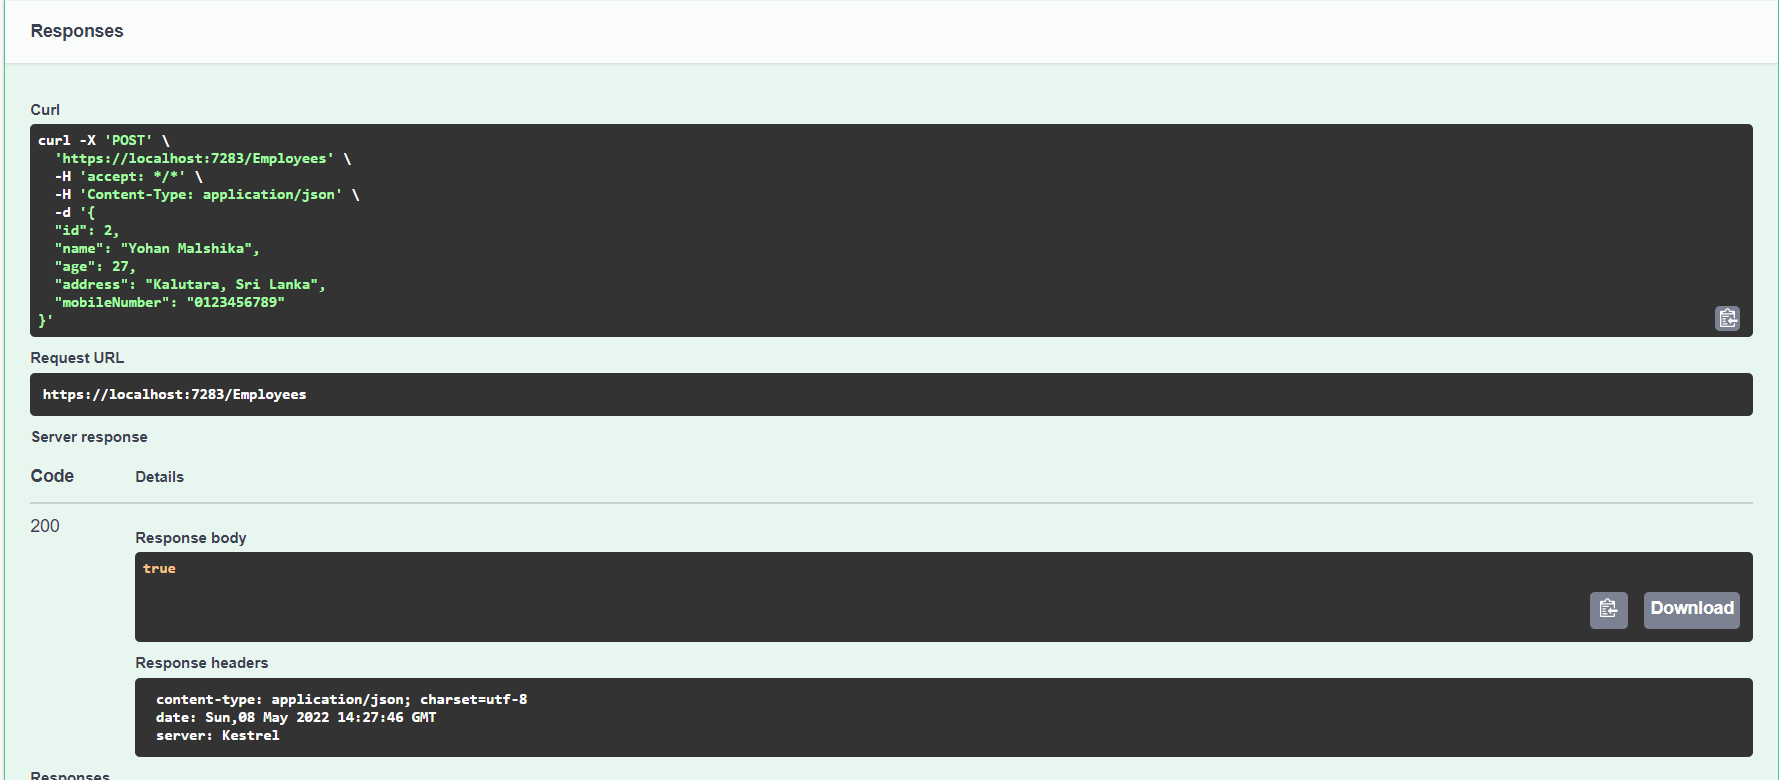 And there is the result of the POST request, which is used to create employees. We received a success response.
Now, test the GET request, which is used to get all employees’ details.

 Now we can see the GET request and its result. It receives a success response as well.
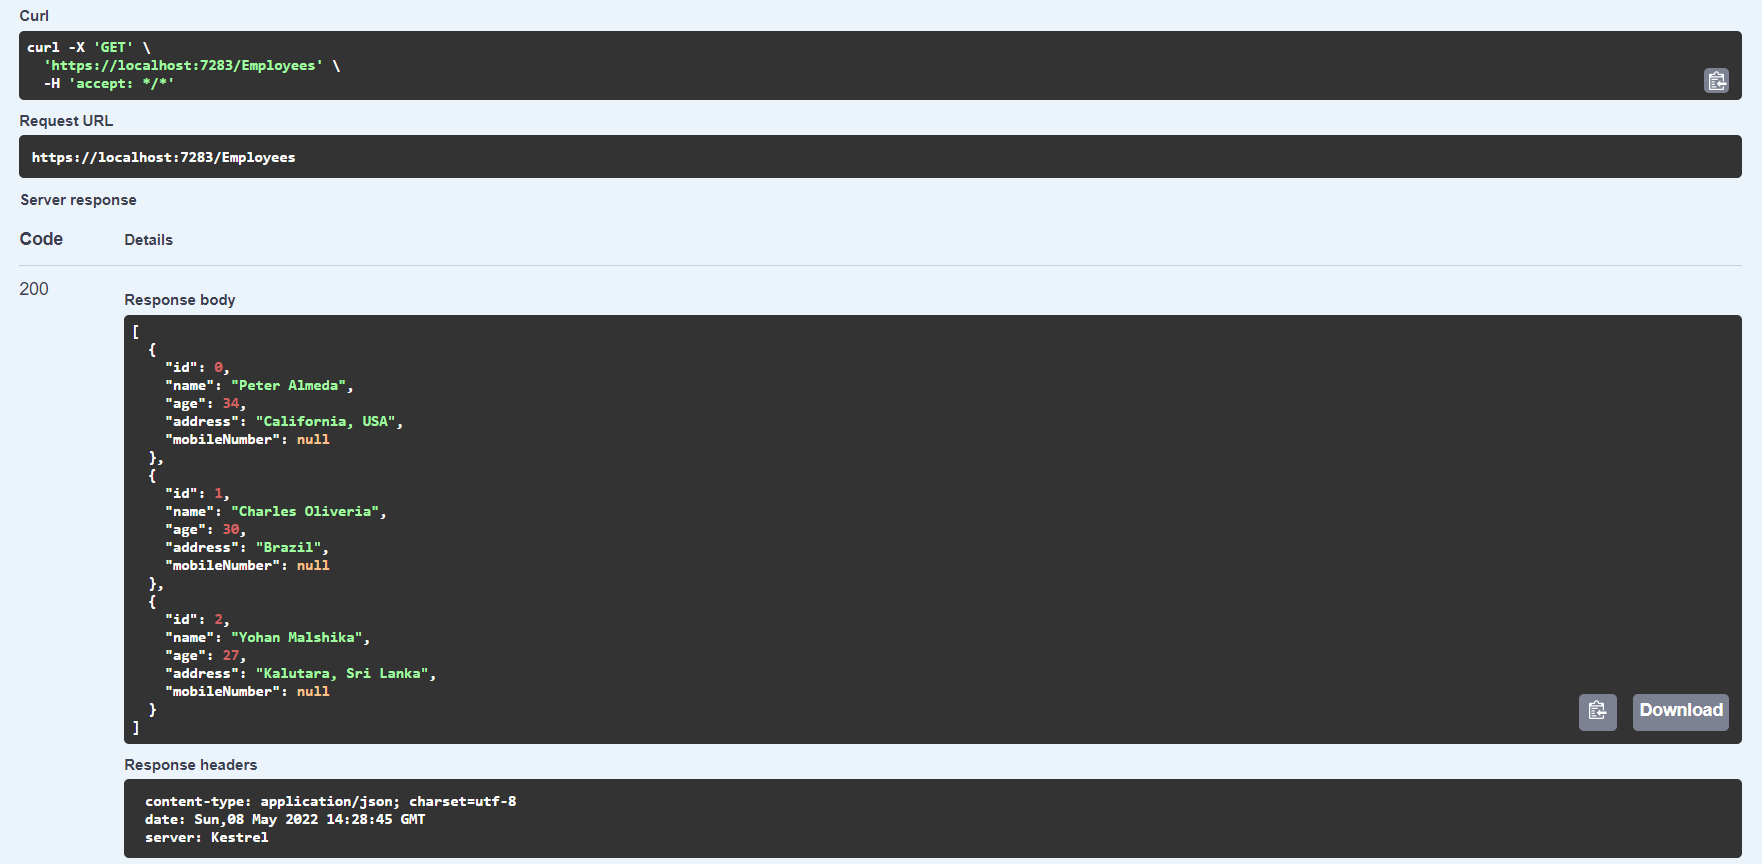
Now test the PUT request, which is used to update the employee details.
 We are updating the age and address details.
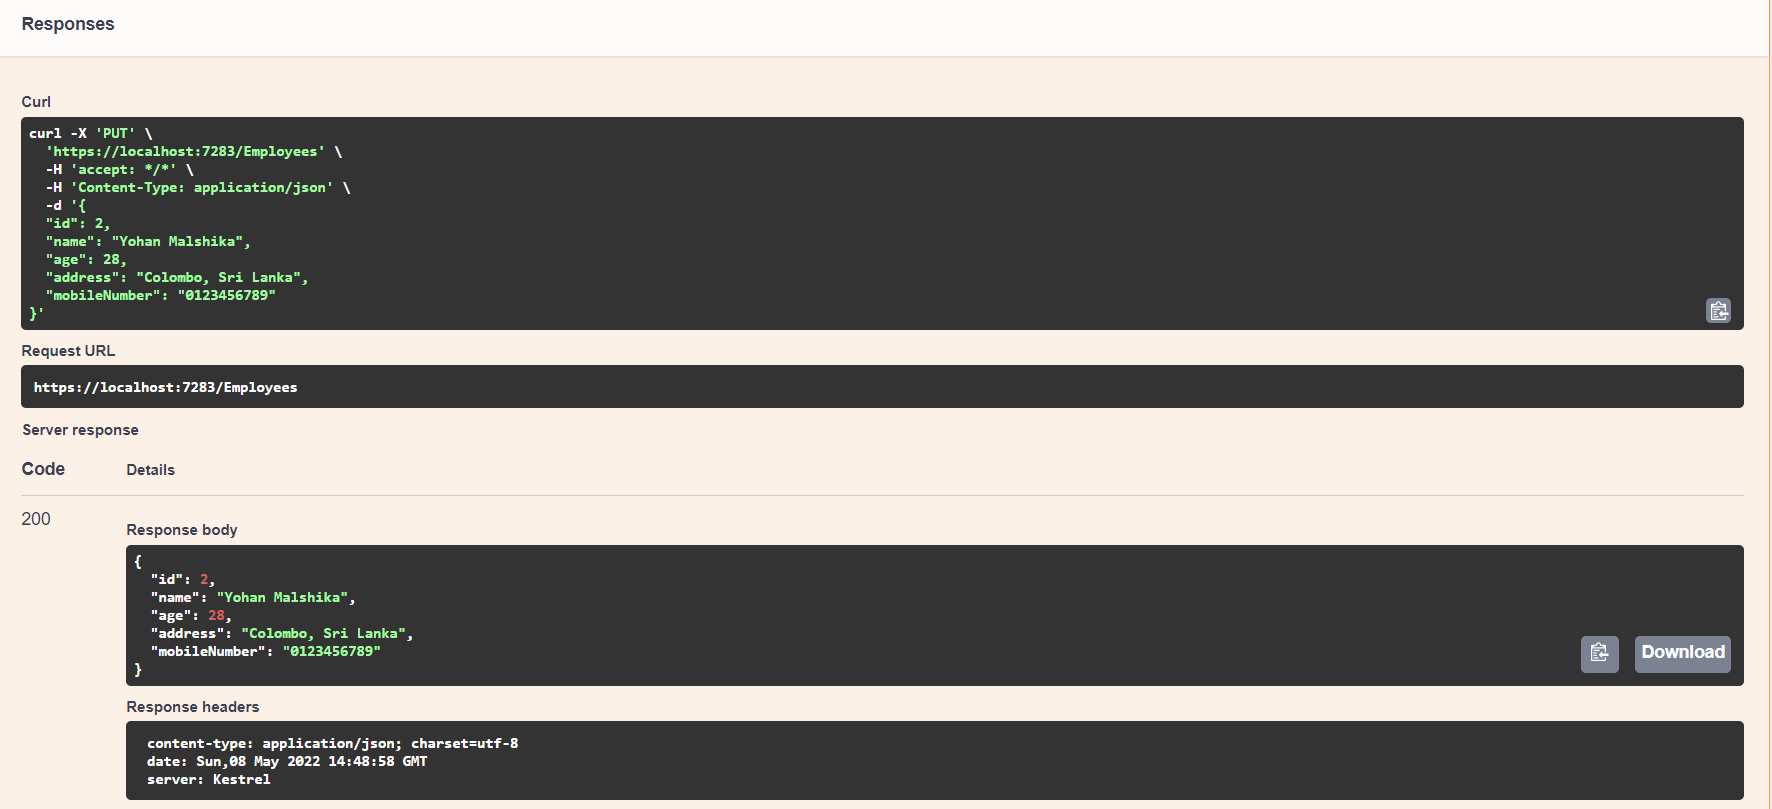 Now you can see the response with updated details of the employee.
Next, test the DELETE request, which is used to delete the employee record. To test it, pass the employee ID as a path parameter with the API URL.
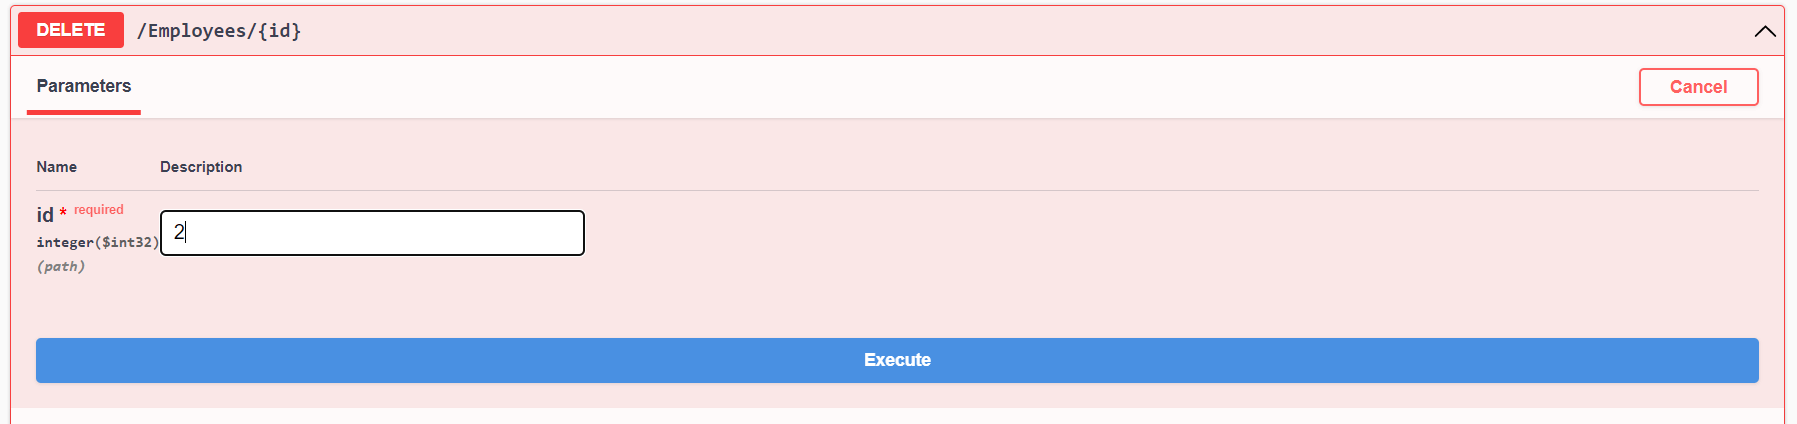 We pass the ID value 2 for the path parameter to delete the employee details.
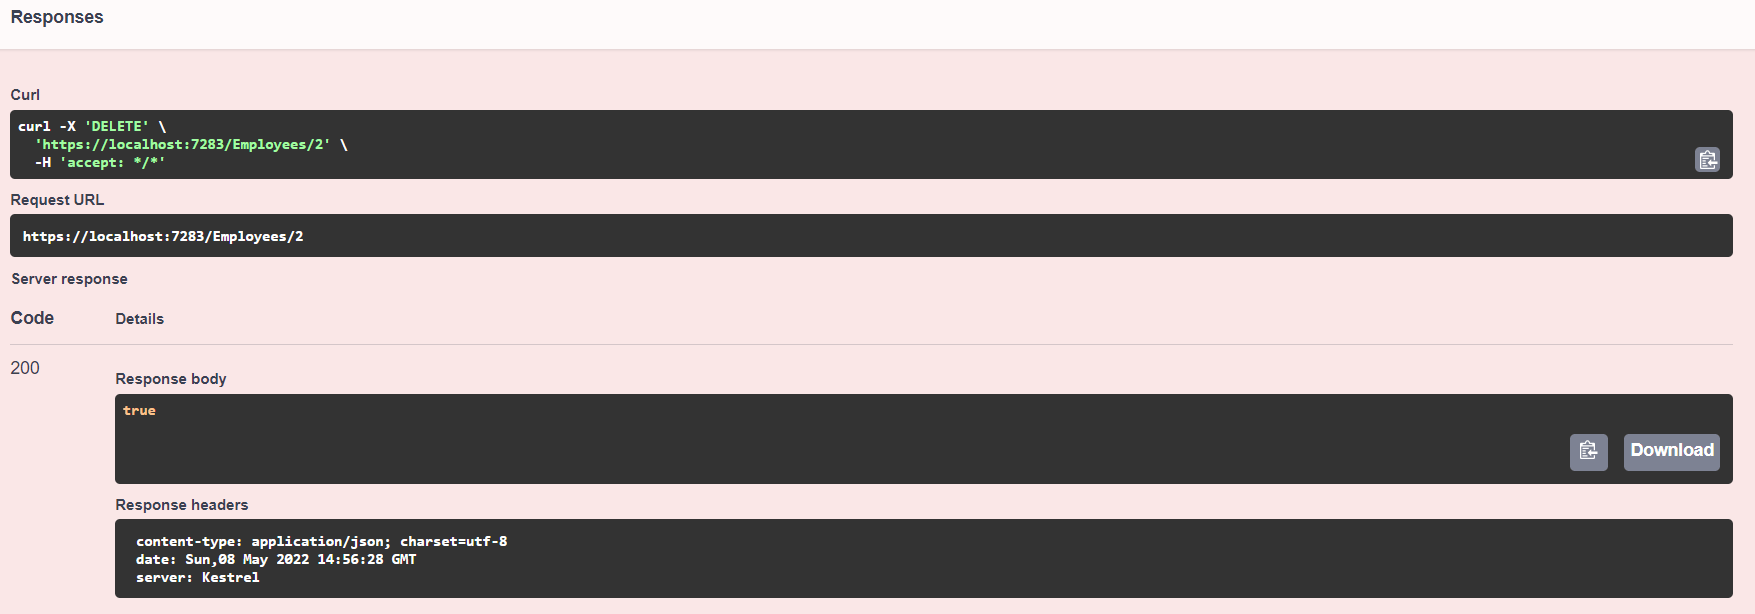 It receives a successful response, too.
Resource
For more information, refer to the ASP.NET Core Web API with Dapper and PostgreSQL project on GitHub.
Conclusion
In this article, we learned how to create an ASP.NET Core CRUD web API in .NET 6 using PostgreSQL and Dapper. To better understand it, we implemented a database service as a generic service to perform the CRUD operations.
I hope this article helped you understand the construction of an ASP.NET Core web API. Please share your thoughts in the comment section below. Thank you for reading.
The Syncfusion ASP.NET Core UI control library, powered by Essential JS 2, is the only suite you will ever need to build an app. It contains over 70 high-performance, lightweight, modular, and responsive UI controls in a single package. Use them to build stunning web apps!
If you’re already a Syncfusion user, you can download the product setup. If not, you can download a free 30-day trial to evaluate our products.
You can contact us through our support forum, support portal, or feedback portal. As always, we are happy to assist you!
 No spam, just valuable updates.
Comments (1)
Thanks for creating this tutorial. I have followed along with it and I’m having an issue with the controller routing. Swagger is not seeing the services, I’m getting a “No operations defined in spec” message from the UI. I have tried a few different things to overcome this based on my internet searches, but no luck. Any suggestions at this point would be appreciated.