
In this blog, we will create a Blazor CRUD application with Dapper and the PostgreSQL database for Blazor server-side apps. We will use the Syncfusion Blazor DataGrid component to perform CRUD operations in this app.
What is Dapper?
Dapper is an open-source and micro ORM (object-relational mapping) product developed by the StackOverflow team. It is very lightweight and straightforward to use with a project. It supports PostgreSQL, MySQL, SQL Server, and other databases.
Dapper extends the IDbConnection interface, which provides an open data source connection supported by the .NET Framework. We also have to write queries when using Dapper. It’s simple to execute a SQL query on a database and have the results mapped to a C# domain class.
Dapper can be configured and is available as a NuGet package.
What is PostgreSQL?
PostgreSQL is an open-source database management system for enterprises. It supports both SQL and JSON for relational and nonrelational queries for flexibility and SQL compliance. In addition, advanced data types and performance optimization capabilities, which are only accessible in expensive production databases such as Oracle and SQL Server, are supported by PostgreSQL.
Prerequisites
- Visual Studio 2022
- PostgreSQL 13.0 with PgAdmin
- .NET SDK 5.0 or later (I used .NET 6.0)
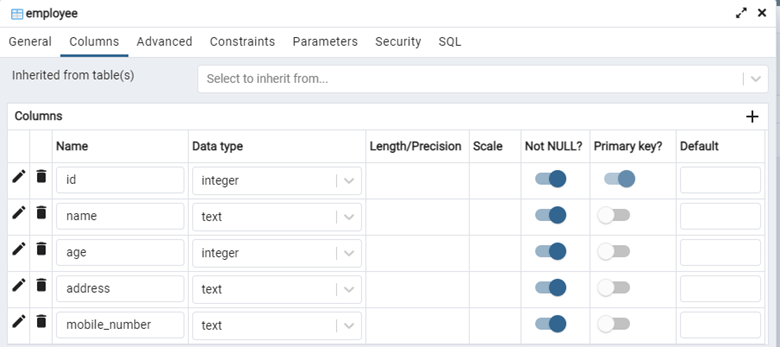
Step 1: Create the database.
Use the PgAdmin to create the database using PostgreSQL. In the database, create a table named Employee to manage employee details like in the following figure.
 Step 2: Create the Blazor server-side application.
Open Visual Studio 2022 and create a new Blazor server-side project.
Make sure to select .NET 6.0 as the framework for this project and set the authenticate type to none.

Step 3: Install and configure PostgreSQL package.
Now, open the NuGet package manager of the project solution, search for the package Npsql 6.0.3 and install it.
This package connects and interacts with the PostgreSQL server in the .NET environment.
Now, add the connection string in the project to connect it with the PostgreSQL server. Use the appsettings.json file to add the connection string like in the following code example.
{
	"Logging": {
		"LogLevel": {
			"Default": "Information"
			"Microsoft.AspNetCore": "Warning"
		}
	}
	"AllowedHosts": "*",
	"ConnectionStrings": {
		"Employeedb": Host=localhost;Port=5432;Database=testdb;User Id=*******;Password=*******;"
	}
}
Step 4: Install Dapper package in the project.
Open the NuGet package manager, search for Dapper, and install the dapper package.
Then, add the following configuration in the Program.cs to map the column name with underscores to the model class.
Using Dapper

DefaultTypeMap.MatchNamesWithUnderscores = true;
Step 5: Create a database service.
Next, create a model class to interact with the database using Dapper.
Then, create a directory named Models in the root directory. Create an Employee model class inside the Model directory with the following code.
public class Employee

{
  public int Id { get; set; }
  public string Name { get; set; }
  public int Age { get; set; }
  public string Address { get; set; }
  public string MobileNumber { get; set; }
}
Create a directory named Services in the root directory and then create an interface named IDbService inside the Services folder, with the following code.
public interface IDbService
{
  Task<T> GetAsync<T>(string command, object parms);
  Task<List<T>> GetAll<T>(string command, object parms);
  Task<T> Insert<T>(string command, object parms);
  Task<T> Update<T>(string command, object parms);
  Task<T> Delete<T>(string command, object parms);
}
Here, T refers to the type of parameter. We have used the T type parameter for the return type of the methods. Also, the methods accept two parameters. The command parameter is the query command, and params parameter refers to the object used for operation with PostgreSQL query.
Now, create the DbService class inherited from the IDbservice inside the Services folder, like in the following code example.
using Dapper;
using Npgsql;

public class DbService : IDbService
{
  private readonly IDbConnection _db;

  public DbService(IConfiguration config)
  {
    _db = new NpgsqlConnection(config.GetConnectionString("Employeedb"));
  }

  public async Task<T> GetAsync<T>(string command, object parms)
  {
    T result;
    result = (await _db.QueryAsync<T>(command, parms).ConfigureAwait(false)).FirstOrDefault();
    return result;
  }

  public async Task<List<T>> GetAll<T>(string command, object parms)
  {
    List<T> result = new List<T>();
    result = (await _db.QueryAsync<T>(command, parms)).ToList();
    return result;
  }

  public async Task<T> Insert<T>(string command, object parms)
  {
    T result;
    result = _db.Query<T>(command, parms).FirstOrDefault();
    return result;
  }

  public async Task<T> Update<T>(string command, object parms)
  {
    T result;
    result = _db.Query<T>(command, parms).FirstOrDefault();
    return result;
  }

  public async Task<T> Delete<T>(string command, object parms)
  {
    T result;
    result = _db.Query<T>(command, parms).FirstOrDefault();
    return result;
  }
}
We have used IConfiguration to access the appsettings.json file and get the connection string. We then used the connection string to establish the connection with the database through the NpgsqlConnection method.
We implemented the IDbService interface in the DbService class, and it includes the implementation for the CRUD operations.
Step 6: Creating the Employee Service.
Now, create an IEmployeeService interface inside the Services directory in the project with the following code.
public interface IEmployeeService
{
  Task<bool> CreateEmployee(Employee employee);
  Task<List<Employee>> GetEmployeeList();
  Task<Employee> UpdateEmployee(Employee employee);
  Task<bool> DeleteEmployee(int key);
}
Now, create the EmployeeService class inherited from IEmployeeService inside the Service directory.
public class EmployeeService : IEmployeeService
{
  private readonly IDbService _dbService;

  public EmployeeService(IDbService dbService)
  {
    _dbService = dbService;
  }

  public async Task<bool> CreateEmployee(Employee employee)
  {
    var result = await _dbService.Insert<int>("INSERT INTO public.employee (id,name, age, address, mobile_number) VALUES (@Id, @Name, @Age, @Address, @MobileNumber)", employee);
    return true;
  }

  public async Task<List<Employee>> GetEmployeeList()
  {
    var employeeList = await _dbService.GetAll<Employee>("SELECT * FROM public.employee", new { });
    return employeeList;
  }

  public async Task<Employee> UpdateEmployee(Employee employee)
  {
    var updateEmployee = await _dbService.Update<int>("Update public.employee SET name=@Name, age=@Age, address=@Address, mobile_number=@MobileNumber WHERE id=@Id", employee);
    return employee;
  }

  public async Task<bool> DeleteEmployee(int key)
  {
    var deleteEmployee = await _dbService.Delete<int>("DELETE FROM public.employee WHERE id=@Id", new { id = key });
    return true;
  }
}
Here is an implementation of the IEmployeeService interface. In this case, we create the CRUD operations for employees. Also, we use queries for each operation with database services.
Step 7: Installing and configuring the Syncfusion Blazor DataGrid component.
First, you add two NuGet packages to your app for the Syncfusion Blazor DataGrid component. To do so, open the NuGet package manager and install:
- Syncfusion.Blazor.Grid: This package adds the Syncfusion Blazor DataGrid component and works with the Blazor application.
- Syncfusion.Blazor.Themes: This package adds and configures Blazor component themes as static web assets in the application.
Note: If you are new to using the Syncfusion Blazor DataGrid control, we highly recommend you go through the getting started documentation.
After adding the packages, add the following namespaces in the _Import.razor file.
@using Syncfusion.Blazor
@using Syncfusion.Blazor.Grids
@using Syncfusion.Blazor.Data
Then, configure and register the Blazor components in your application. To do so, open the program.cs file and add the following services.
var builder = WebApplication.CreateBuilder(args);

 // Add services to the container.
 builder.Services.AddRazorPages();
 builder.Services.AddServerSideBlazor();
 builder.Services.AddSyncfusionBlazor();

var app = builder.Build();
// Configure the HTTP request pipeline.
Next, open the _Layout.cshtml file inside the pages folder and add the Syncfusion Bootstrap 5 theme inside the <head> tag as follows.
<head>
  <link href="_content/Syncfusion.Blazor.Themes/bootstrap5.css" rel="stylesheet" />
</head>
Open _Layout.cshtml file inside the pages directory and then add the script reference inside the <head> tag.
<head>
  <link href="_content/Syncfusion.Blazor.Themes/bootstrap5.css" rel="stylesheet" /><script src="_content/Syncfusion.Blazor/scripts/syncfusion-blazor.min.js" type="text/javascript"></script>
</head>
Step 8: Create the custom data adapter.
The DataGrid component’s comprehensive data-binding capability using the SfDataManager component is one of its most significant features. The SfDataManager handles data requests and responses, and it serves as an interface between the data source and the DataGrid. The SfDataManager has a few types of built-in adapters, and you are free to create your own custom adapters.
For our requirement, we’ll create a custom adapter for the Employee table to operate with the DataGrid. First, create a directory named Adapters in the root directory and then create a class named EmployeeAdapater, which inherits DataAdapter. Refer to the following code example.
public class EmployeeAdapter : DataAdapter
{
  private readonly IEmployeeService _employeeService;

  public EmployeeAdapter(IEmployeeService employeeService)
  {
    _employeeService = employeeService;
  }

  public override async Task<object> ReadAsync(DataManagerRequest dataManagerRequest, string key = null)
  {
    List<Employee> employees = await _employeeService.GetEmployeeList();
    int count = employees.Count;
    return dataManagerRequest.RequiresCounts ? new DataResult() { Result = employees, Count = count } : count;
  }

  public override async Task<object> InsertAsync(DataManager dataManager, object data, string key)
  {
    await _employeeService.CreateEmployee(data as Employee);
    return data;
  }

  public override async Task<object> RemoveAsync(DataManager dataManager, object data, string keyField, string key)
  {
    await _employeeService.DeleteEmployee(Convert.ToInt32(data));
    return keyField;
  }

  public override async Task<object> UpdateAsync(DataManager dataManager, object data, string keyField, string key)
  {
    await _employeeService.UpdateEmployee(data as Employee);
    return data;
  }
}
We also injected an employee service using the IEmployeeService interface in order to use employee CRUD operations.
Step 9: Add the Syncfusion Blazor DataGrid component.
Add the Syncfusion Blazor DataGrid to the Index.razor page inside the page folder. Refer to the following code example.
@page "/"
@using BlazorCRUD.Adapters
@using BlazorCRUD.Models

<SfGrid TValue="Employee" ID="Grid" Toolbar="@(new List<string>() {"Add", "Delete", "Update", "Cancel"})">
 <SfDataManager AdapterInstance="typeof(EmployeeAdapter)" Adapter="Adapters.CustomAdapter"></SfDataManager>
 <GridEditSettings AllowEditing="true" AllowDeleting="true" AllowAdding="true" Mode="@EditMode.Normal"></GridEditSettings>
 <GridColumns>
   <GridColumn Field="@nameof(Employee.Id)" Width="50" IsPrimaryKey="true"></GridColumn>
   <GridColumn Field="@nameof(Employee.Name)" Width="100"></GridColumn>
   <GridColumn Field="@nameof(Employee.Age)"  Width="100"></GridColumn>
   <GridColumn Field="@nameof(Employee.Address)" Width="100"></GridColumn>
   <GridColumn Field="@nameof(Employee.MobileNumber)"  Width="100" HeaderText="Mobile Number"></GridColumn>
 </GridColumns>
</SfGrid>
Step 10: Register the services and adapters.
Now, register the services and adapters in the program.cs file as follows.
builder.Services.AddScoped<IDbService, DbService>();
builder.Services.AddScoped<IEmployeeService, EmployeeService>();
builder.Services.AddScoped<EmployeeAdapter>();
Step 11: Run the Blazor CRUD application.
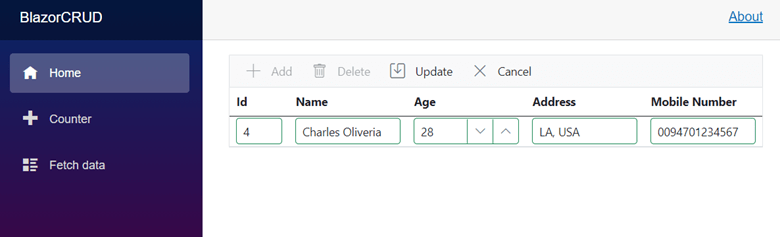
Run the application. You will see a screen similar to the following screenshot. Click Add and type in the values of the fields. Then, click Update to add the data into the Employee table of the database.
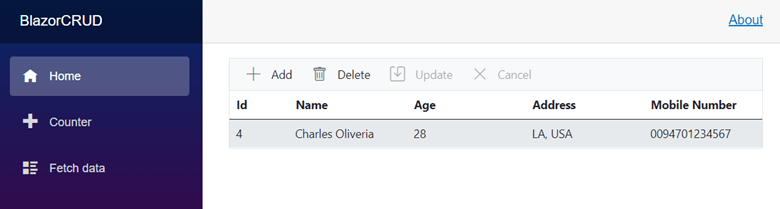
After successfully adding a new record, the app will invoke the ReadAsync method in the EmployeeAdapter to fetch the records and display them in the app. Refer to the following screenshot.
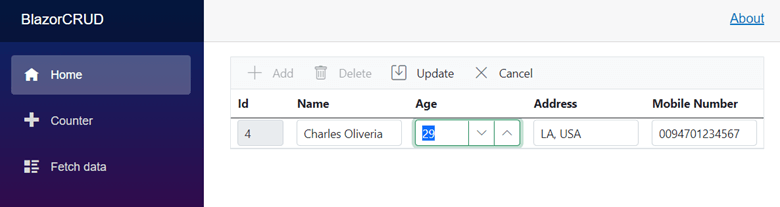
 Double-clicking the table row will enable the edit mode of that particular row. Make the necessary changes and click Update to update the data in the database table.
To delete a row from the table, click the row to select it, and then click Delete. This action will call the RemoveAsync method of the EmployeeAdapter to remove the record from the table.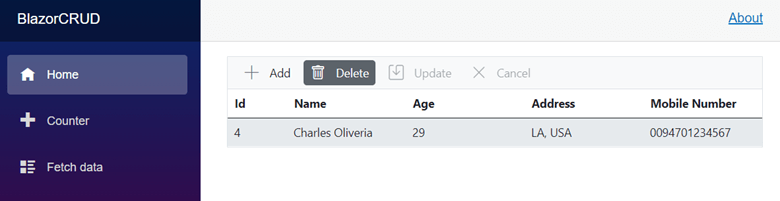
Resource
For more information, refer to the project Blazor CRUD application with PostgreSQL and Dapper demo on GitHub.
Conclusion
In this blog, we learned how to create a Blazor CRUD application with the Dapper ORM tool and PostgreSQL. We demonstrated how to create a custom adapter for the Syncfusion Blazor DataGrid component using the Syncfusion DataManager and perform CRUD operations.
I hope this article will assist you in your next Blazor project. Please share if you have any concerns in the comments section below. Thank you for reading!
Syncfusion’s Blazor component suite offers over 70 UI components. They work with both server-side and client-side (WebAssembly) hosting models seamlessly. Use them to build marvelous applications!
If you have any questions or comments, you can contact us through our support forums, support portal, or feedback portal. We are always happy to assist you!


 No spam, just valuable updates.
Comments (2)
Well done!
Would it be easy to use Sql Server, or other RDBMS, instead of PostgreSQL? Maybe using the repository pattern? What’s your opinion?
Regards
Hi! There are errors in code – all words “adapter” should be in in fact “adaptOr”. At least in .NET 8.