

In 2022, React introduced version 18, completely changing how React applications were developed and maintained. It introduced various new features, such as an advanced transition API, automatic batching, React suspense, and new server components.
Version 18 brought about a more high-performing framework, thus enabling developers to build single-page applications that perform better and faster. However, there are other places it has benefits. Opinionated frameworks such as Remix, Relay, and NextJS widely embraced the release of React 18 and introduced support for it in no time.
So, this article will address how a developer can utilize the features of React 18 on a NextJS project.
Getting Started
It’s important to understand that React 18 will only work on the latest NextJS version, NextJS 13. Therefore, before proceeding, create a new NextJS project or upgrade your current NextJS project using the following commands.
# create new NextJS project on V13 with React 18
npx create-next-app@latest --typescript

# upgrade existing NextJS project to React 18
npm i next@latest react@latest react-dom@latest eslint-config-next@latest
After, you can start using all the React 18 features in your NextJS application. In this demonstration, we will look at two of the top React 18 features for NextJS.

Streaming SSR
Streaming server-side rendering (SSR) enables developers to render UI parts in a client incrementally. This means that developers can now add HTML from the server to the client progressively rather than at once. This results in faster initial load times, as the server does not wait to gather all the data but instead sends data progressively to the client.
Consider the next scenario.
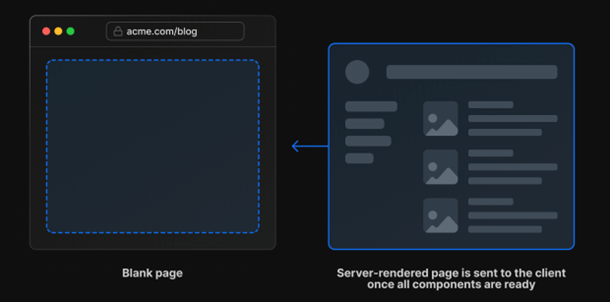
The preceding figure depicts a nonstreaming SSR component. Previously, NextJS returned a fully rendered page to the client, resulting in higher load times. In slow network connections, your requests may time out or take a longer time to load. This is where streaming SSR comes in handy.
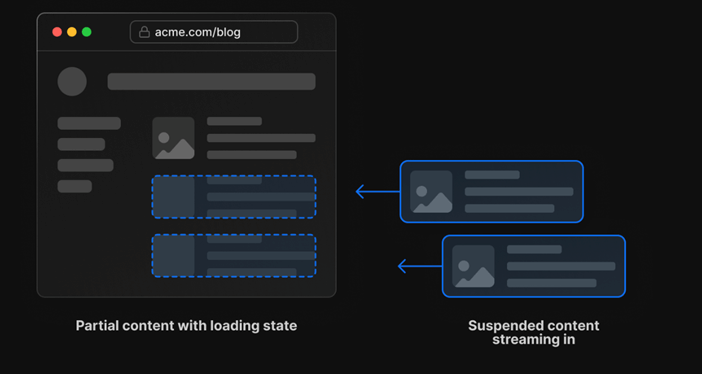
The preceding figure depicts streaming SSR. NextJS will return parts of the UI as data becomes available, thus creating faster loads and less bulky data payloads. NextJS achieves this using React Suspense, where slow-loading components can be wrapped using the <Suspense/> component boundary until they’ve been rendered on the server.
NextJS introduced an app directory that supports streaming SSR. So, to utilize streaming SSR, all pages and components must be declared within this directory. You can use a loading.js file (less control) or the Suspense component for finer control.
First, add the following config to your next.config.ts.
const nextConfig = {
  reactStrictMode: true,
  swcMinify: true,
  experimental: {
    appDir: true // enable app directory
  }
}
The next snippet shows how developers can implement streaming SSR using React Suspense.
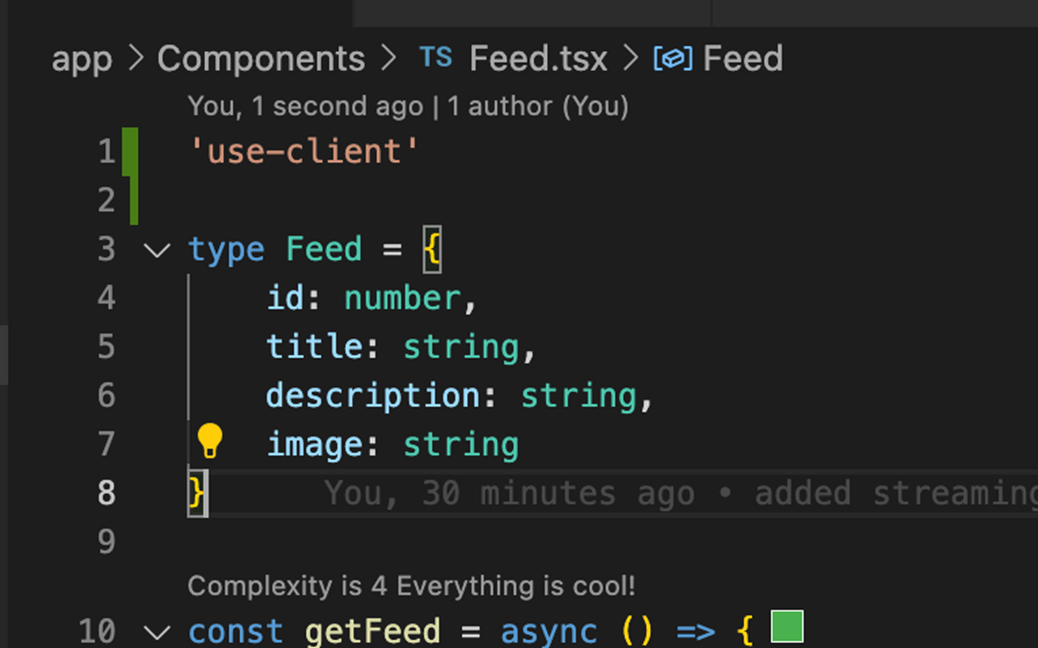
I’ve created a directory titled app in the root and created the file page.tsx. In NextJS 13, the page.tsx is the route and can be accessed via http://localhost:3000/. After that, two components are created, Feed and Weather, with implementations shown in the following.
type Feed = {
    id: number,
    title: string,
    description: string,
    image: string
}

const getFeed = async () => {
    const feed: Feed[] = [
        {
            id: 1,
            title: 'Title 1',
            description: 'Description 1',
            image: 'https://picsum.photos/200/300',
        },
        {
            id: 2,
            title: 'Title 2',
            description: 'Description 2',
            image: 'https://picsum.photos/200/300',
        },
        {
            id: 3,
            title: 'Title 3',
            description: 'Description 3',
            image: 'https://picsum.photos/200/300',
        },
    ]

    const promise: Promise<Feed[]> = new Promise((resolve, reject) => {
        setTimeout(() => {
            resolve(feed)
        }, 5000)
    });

    return promise;
};

export default async function FeedComponent() {
    const feed = await getFeed();
    return (
        <><p>This is the feed</p>
            {feed.map((item) => (
                <div key={item.id}><h2>{item.title}</h2><p>{item.description}</p><img src={item.image} /></div>
            ))}
        </>
    )

}
The previous snippet depicts the implementation of the Feed component. The next snippet shows the implementation of the Weather component.
type Weather = {
    temperature: number,
    humidity: number
}

const getWeather = () => {
    const weather: Weather = {
        temperature: 20,
        humidity: 50,
    }

    const promise: Promise<Weather> = new Promise((resolve, reject) => {
        setTimeout(() => {
            resolve(weather)
        }, 2000)
    });

    return promise;
}

export default async function WeatherComponent() {
    const weather = await getWeather();
    return (
        <><p>This is the weather</p><p>Temperature: {weather.temperature}</p><p>Humidity: {weather.humidity}</p></>
    )
}
As the snippets illustrate, all API calls can be carried out using a plain old async/await. There is no need for conditional rendering or effects. Next, the following code is added to the page.tsx.
import { Suspense } from "react";
import FeedComponent from "./Components/Feed";
import WeatherComponent from "./Components/Weather";

export default async function IndexPage() {
    return (
        <><h1>
            Hello from Index Page!
          </h1><div style={{ display: 'flex', gap: 5 }}><div><Suspense fallback={<>
                        Loading Weather
                    </>}>
                        <WeatherComponent /></Suspense></div><div><Suspense fallback={<>
                        Loading Feed
                    </>}>
                        <FeedComponent /></Suspense></div></div></>
    )

}This snippet depicts the implementation of the page.tsx component. The page.tsx component uses the Suspense component to render the page incrementally as the components receive data. Thus, the initial load time is reduced, and we can see faster responses to create a more interactive UI right from the start. Its output is shown in the following.

React Server Components
React 18 introduced two ways to render components in a NextJS application:
- Client: The device the user is accessing your application on.
- Server: The computing device that stores your application’s code. It receives client requests, processes them, and returns an HTML response.
Before React 18, NextJS allowed prerendering of HTML on the server via pages. However, this required additional JavaScript code to be bundled into the client to make the HTML interactive. This resulted in a heavy, more extensive application that sometimes created longer load times (on jittery networks).
However, React 18 introduced server components, allowing the user to determine where the component is rendered. By default, any component rendered in the app directory is a server component. These components are far less heavy. However, they come with a significant tradeoff. These components do not allow using traditional React client-side hooks, such as useState, and useEffect.
An implementation of a server component is shown in the following.
type Feed = {
    id: number,
    title: string,
    description: string,
    image: string
}

const getFeed = async () => {
    const feed: Feed[] = [
        {
            id: 1,
            title: 'Title 1',
            description: 'Description 1',
            image: 'https://picsum.photos/200/300',
        },
        {
            id: 2,
            title: 'Title 2',
            description: 'Description 2',
            image: 'https://picsum.photos/200/300',
        },
        {
            id: 3,
            title: 'Title 3',
            description: 'Description 3',
            image: 'https://picsum.photos/200/300',
        },
    ]

    const promise: Promise<Feed[]> = new Promise((resolve, reject) => {
        setTimeout(() => {
            resolve(feed)
        }, 5000)
    });
    return promise;
};

export default async function FeedComponent() {
    const feed = await getFeed();
    return (
        <><p>This is the feed</p>
            {feed.map((item) => (
                <div key={item.id}><h2>{item.title}</h2><p>{item.description}</p><img src={item.image} /></div>
            ))}
        </>
    )

}
Note: These components do not rely on any React Hooks. However, developers can opt into these functionalities by placing the tag use-client on top of the component, as shown.
Other Features
Additionally, more features are baked into React 18 and do not need any additional configuration, such as automatic batching. This helps implement a batched state update for events outside the browser context to help improve the performance of the React rendering tree and ultimately deliver a smoother experience to the user.
GitHub reference
The code implemented in this article is available in the GitHub repository.
Conclusion
Thank you for reading. This article provided an in-depth analysis and tutorial on several ways in which developers can utilize the new features of React 18 in their NextJS projects to build faster and high-performing server-side React applications with little to no effort!
I hope that you found this article helpful.
The Syncfusion Essential Studio® for React suite offers over 70 high-performance, lightweight, modular, and responsive UI components in a single package. It’s the only suite you’ll ever need to construct a complete app.
If you have questions, contact us through our support forum, support portal, or feedback portal. We are always happy to assist you!
 No spam, just valuable updates.
Comments (2)
I’m wondering how do you use Syncfusion with nextjs 13. This is a syncfusion blog with no mention of its integration. Just would like to know
Hi Wade,
To use Syncfusion components in Next.js, you can refer to the Getting Started with Next.js documentation.
https://ej2.syncfusion.com/react/documentation/getting-started/nextjs
This documentation provides comprehensive information and guidance on integrating Syncfusion components into your Next.js 13 project.
Regards,
Christo